
User Manual


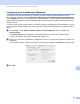
Table Of Contents
- SOFTWARE USER’S GUIDE
- Table of Contents
- Windows®
- Printing
- Using the Brother printer driver
- Features
- Choosing the right type of paper
- Simultaneous printing, scanning and faxing
- Clearing data from the memory
- Status Monitor
- Printer driver settings
- Accessing the printer driver settings
- Basic tab
- Advanced tab
- Support
- Using FaceFilter Studio for photo printing by REALLUSION
- Scanning
- ControlCenter3
- Remote Setup (Not available for MFC-J220, MFC-J265W and MFC-J410)
- Brother PC-FAX Software
- PhotoCapture Center™
- Firewall settings (For Network users)
- Printing
- Apple Macintosh
- Printing and Faxing
- Scanning
- ControlCenter2
- Remote Setup & PhotoCapture Center™
- Using the Scan key
- Index
- brother CHN-ENG

Network Scanning (For models with built-in network support)
184
13
Configuring network scanning for Macintosh 13
If you want to scan from the machine on a network, you must choose the networked machine in the
Device Selector application located in Macintosh HD/Library/Printers/Brother/Utilities/DeviceSelector or
from the Model pop-up menu in the main screen of ControlCenter2. If you have already installed the MFL-Pro
Suite Software following the network installation steps in the Quick Setup Guide then this selection should
already be made.
To use the machine as a network scanner, the machine must be configured with a TCP/IP address. You can
set or change the address settings from the control panel. (See Control Panel Setup in the Network User’s
Guide.)
a From Library, choose Printers, Brother, Utilities and DeviceSelector, and then double-click
Device Selector.
The Device Selector window appears. This window can also be opened from ControlCenter2.
For more information, see Using ControlCenter2 on page 147.
b Specify your machine by IP address or mDNS service name. To change the IP address, enter the new
IP address.
You can also choose a machine from the list of the machines available. Click Browse to show the list.
c Click OK.