
Network User's Guide

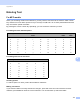
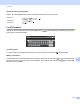
Table Of Contents
- NETWORK USER’S GUIDE
- Definitions of warnings, cautions, and notes
- Compilation and publication notice
- IMPORTANT NOTE
- Brother numbers
- Table of Contents
- 1 Introduction
- 2 Configuring your machine for a network with an Ethernet cable connection (DCP-J715W, MFC-J615W and MFC-J630W only)
- Overview
- IP addresses, subnet masks and gateways
- Step by step chart
- Setting up the IP address and subnet mask
- Changing the print server settings
- Using the BRAdmin Light utility to change the print server settings
- Using the BRAdmin Professional 3 utility to change the wireless settings (Windows®)
- Using the Remote Setup to change the print server settings (MFC-J615W and MFC-J630W only) (Not available for Windows Server® 2003/2008)
- Using the control panel to change the print server settings
- 3 Configuring your machine for a wireless network
- Overview
- Wireless network terms and concepts
- Step by step chart for wireless network configuration
- Confirm your network environment
- Confirm your wireless network setup method
- Configuration using the machine’s control panel Setup Wizard to configure your wireless network machine
- Configuration using the WPS/AOSS™ control panel menu (Infrastructure mode only)
- Configuration using the PIN Method of Wi-Fi Protected Setup (Infrastructure mode only)
- Configuration using the Brother installer application on the installation CD-ROM to configure your wireless network machine
- Configuring your machine for a wireless network
- Using the Setup Wizard from the control panel
- Using WPS or AOSS™ from the control panel menu to configure your machine for a wireless network
- Using the PIN Method of Wi-Fi Protected Setup
- Using the Brother automatic installer application on the installation CD-ROM to configure your machine for a wireless network
- 4 Wireless configuration using the Brother installer application
- 5 Control panel setup
- Network menu
- Restoring the network settings to factory default
- Printing the Network Configuration List
- Printing the WLAN Report
- 6 Driver Deployment Wizard (Windows® only)
- 7 Network printing from Windows® basic TCP/IP Peer-to-Peer printing
- 8 Network printing from a Macintosh
- 9 Troubleshooting
- Appendix A
- Appendix B
- Index

Appendix B
113
B
Special characters and symbols B
Press l, # or 0 repeatedly until you see the special character or symbol you want.
For DCP models B
Press a, b, d or c to select a letter, and press OK. Select and press OK to cycle between upper case,
lower case or special characters.
Inserting spaces B
To enter a space, choose special characters. Then press a , b, d or c to select , and press OK.
Making corrections B
If you entered an incorrect letter and want to change it, press a, b, d or c to select or . Press OK several
times to move the cursor under the incorrect character. Then press a, b, d or c to select , and press OK.
Re-enter the correct letter.
Press l for
Press # for
Press 0 for
0
A
K
U
1
B
L
V
2
C
M
W
3
D
N
X
4
E
O
Y
5
F
P
Z
6
G
Q
7
H
R
8
I
S
9
J
T
SSID
SSID
OK
OK
Complete OK