
Network User's Guide

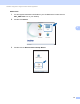
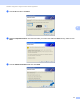
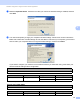
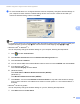
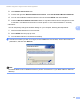
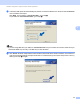
Table Of Contents
- NETWORK USER’S GUIDE
- Definitions of warnings, cautions, and notes
- Compilation and publication notice
- IMPORTANT NOTE
- Brother numbers
- Table of Contents
- 1 Introduction
- 2 Configuring your machine for a network with an Ethernet cable connection (DCP-J715W, MFC-J615W and MFC-J630W only)
- Overview
- IP addresses, subnet masks and gateways
- Step by step chart
- Setting up the IP address and subnet mask
- Changing the print server settings
- Using the BRAdmin Light utility to change the print server settings
- Using the BRAdmin Professional 3 utility to change the wireless settings (Windows®)
- Using the Remote Setup to change the print server settings (MFC-J615W and MFC-J630W only) (Not available for Windows Server® 2003/2008)
- Using the control panel to change the print server settings
- 3 Configuring your machine for a wireless network
- Overview
- Wireless network terms and concepts
- Step by step chart for wireless network configuration
- Confirm your network environment
- Confirm your wireless network setup method
- Configuration using the machine’s control panel Setup Wizard to configure your wireless network machine
- Configuration using the WPS/AOSS™ control panel menu (Infrastructure mode only)
- Configuration using the PIN Method of Wi-Fi Protected Setup (Infrastructure mode only)
- Configuration using the Brother installer application on the installation CD-ROM to configure your wireless network machine
- Configuring your machine for a wireless network
- Using the Setup Wizard from the control panel
- Using WPS or AOSS™ from the control panel menu to configure your machine for a wireless network
- Using the PIN Method of Wi-Fi Protected Setup
- Using the Brother automatic installer application on the installation CD-ROM to configure your machine for a wireless network
- 4 Wireless configuration using the Brother installer application
- 5 Control panel setup
- Network menu
- Restoring the network settings to factory default
- Printing the Network Configuration List
- Printing the WLAN Report
- 6 Driver Deployment Wizard (Windows® only)
- 7 Network printing from Windows® basic TCP/IP Peer-to-Peer printing
- 8 Network printing from a Macintosh
- 9 Troubleshooting
- Appendix A
- Appendix B
- Index

Wireless configuration using the Brother installer application
59
4
i To communicate with the un-configured wireless machine, temporarily change the wireless settings on
your computer to match machine’s default settings shown on this screen. Check the box after you
confirm the wireless setting, and then click Next.
Note
• If a message to restart your computer appears after the wireless settings have been changed, restart your
computer and then go back to step c and continue with the install skipping steps g, h and i.
•Windows Vista
®
or Windows
®
7:
You can temporarily change the wireless settings on your computer, following the steps below:
1 Click and then Control Panel.
2 Click Network and Internet and then Network and Sharing Center icon.
3 Click Connect to a network.
4 You can see the SSID of the wireless Brother machine in the list. Choose SETUP and click Connect.
5 (For Windows Vista
®
only)
Click Connect Anyway and then Close.
6 (Windows Vista
®
)
Click View status of Wireless Network Connection (SETUP).
(Windows
®
7)
Click Wireless Network Connection (SETUP).
7 Click Details... and check the Network Connection Details. It may take a few minutes to change
from 0.0.0.0 to 169.254.x.x IP address to be shown on screen (where x.x. are numbers between 1
and 254).
•Windows
®
XP SP2 or greater:
You can temporarily change the wireless settings on your PC, following the steps below:
1 Click Start and then Control Panel.