
Software User's Guide

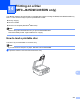
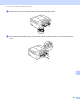
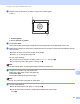
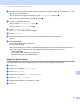
Table Of Contents
- SOFTWARE USER’S GUIDE
- Applicable models
- Definitions of notes
- Compilation and publication notice
- IMPORTANT NOTE
- Table of Contents
- Windows®
- 1 Printing
- Using the Brother printer driver
- Features
- Choosing the right type of paper
- Simultaneous printing, scanning and faxing
- Clearing data from the memory
- Status Monitor
- Printer driver settings
- Accessing the printer driver settings
- Basic tab
- Advanced tab
- Print Profiles tab
- Support
- Trial Photo Print (Not available for MFC-J280W/J425W/J430W/J435W/J5910DW)
- Using FaceFilter Studio for photo printing by REALLUSION
- Using Homepage Print 2 by Corpus (Not available for MFC-J5910DW)
- 2 Scanning
- Scanning a document using the TWAIN driver
- Scanning a document using the WIA driver
- Scanning a document using the WIA driver (Windows® Photo Gallery and Windows® Fax and Scan users)
- Using ScanSoft™ PaperPort™12SE with OCR by NUANCE™
- Using BookScan Enhancer and Whiteboard Enhancer by REALLUSION
- 3 ControlCenter4
- 4 Remote Setup (For MFC-J625DW/J825DW/J835DW/J5910DW)
- 5 Brother PC-FAX Software (MFC models only)
- 6 PhotoCapture Center™ (For MFC-J625DW/J825DW/J835DW/J5910DW)
- 7 Firewall settings (For Network users)
- 1 Printing
- Apple Macintosh
- 8 Printing and Faxing
- 9 Scanning
- 10 ControlCenter2
- 11 Remote Setup & PhotoCapture Center™ (For MFC-J625DW/J825DW/J835DW/J5910DW)
- Using the Scan key
- 12 USB cable scanning
- 13 Network Scanning
- Before using Network Scanning
- Using the Scan key on your network
- Using Web Services for scanning on your network (Windows Vista® SP2 or later and Windows® 7)
- Printing on a Disc
- Index
- brother USA

Network Scanning
224
13
e Press a or b to display the destination computer you want to send to.
Press the destination computer.
f Press Start.
The machine starts the scanning process.
For MFC-J425W/J430W/J435W 13
a Load your document.
b Press (SCAN).
c Press a or b to choose Web Service.
Press OK.
d Press a or b to choose the type of scan you want to do.
Press OK.
e Press a or b to display the destination computer you want to send to.
Press OK.
f Press Black Start or Color Start.
The machine starts the scanning process.
Configuring settings for scanning 13
If the LCD shows OutofMemory, decrease the Paper size setting or the Resolution setting.
a (Windows Vista
®
)
Click the button, Control Panel, Hardware and Sound, then Scanners and Cameras.
(Windows
®
7)
Click the button, All Programs, Brother, MFC-XXXX, Scanner Settings, then
Scanners and Cameras.
b Click your machine, and then click the Scan Profiles button.
The Scan Profiles dialog will appear.
c Choose the scan profile you want to use. Make sure the scanner selected in Scanner is a Brother
machine that supports Web Services for scanning.
Click Set as Default.
d Click Edit. The Edit Profile dialog will appear.
e Choose the Source, Paper size, Color format, File type, Resolution, Brightness and Contrast
settings.
f Click Save Profile. The settings will be applied when scanning using the Web Services protocol.
Note
If you are requested to choose a software application to scan, choose Windows
®
Fax and Scan or
Windows
®
Photo Gallery from the list.