
Software User's Guide
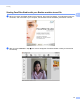
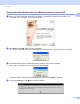
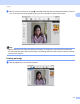
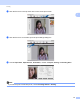
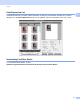
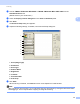

Table Of Contents
- SOFTWARE USER’S GUIDE
- Applicable models
- Definitions of notes
- Compilation and publication notice
- IMPORTANT NOTE
- Table of Contents
- Windows®
- 1 Printing
- Using the Brother printer driver
- Features
- Choosing the right type of paper
- Simultaneous printing, scanning and faxing
- Clearing data from the memory
- Status Monitor
- Printer driver settings
- Accessing the printer driver settings
- Basic tab
- Advanced tab
- Print Profiles tab
- Support
- Trial Photo Print (Not available for MFC-J280W/J425W/J430W/J435W/J5910DW)
- Using FaceFilter Studio for photo printing by REALLUSION
- Using Homepage Print 2 by Corpus (Not available for MFC-J5910DW)
- 2 Scanning
- Scanning a document using the TWAIN driver
- Scanning a document using the WIA driver
- Scanning a document using the WIA driver (Windows® Photo Gallery and Windows® Fax and Scan users)
- Using ScanSoft™ PaperPort™12SE with OCR by NUANCE™
- Using BookScan Enhancer and Whiteboard Enhancer by REALLUSION
- 3 ControlCenter4
- 4 Remote Setup (For MFC-J625DW/J825DW/J835DW/J5910DW)
- 5 Brother PC-FAX Software (MFC models only)
- 6 PhotoCapture Center™ (For MFC-J625DW/J825DW/J835DW/J5910DW)
- 7 Firewall settings (For Network users)
- 1 Printing
- Apple Macintosh
- 8 Printing and Faxing
- 9 Scanning
- 10 ControlCenter2
- 11 Remote Setup & PhotoCapture Center™ (For MFC-J625DW/J825DW/J835DW/J5910DW)
- Using the Scan key
- 12 USB cable scanning
- 13 Network Scanning
- Before using Network Scanning
- Using the Scan key on your network
- Using Web Services for scanning on your network (Windows Vista® SP2 or later and Windows® 7)
- Printing on a Disc
- Index
- brother USA

Scanning
41
2
Pre-Scanning to crop a portion you want to scan 2
You can preview your image and crop unwanted portions before scanning by using the PreScan button.
When you are satisfied with the preview, click Start on the Scanner Setup dialog box to scan the image.
a Follow the steps from a to g of Scanning a document into the computer uu page 39.
b Choose the settings for Scan (Image Type), Resolution, Scan Type, Brightness, Contrast and
Document Size as needed.
Note
Pre-Scanning is not available when choosing Auto Crop.
c Click PreScan.
The whole image is scanned into the computer and appears in the scanning area of the Scanner Setup
dialog box.
d Press and hold down the left mouse button and drag it over the portion you want to scan.
1 Scanning area
Note
You can enlarge the image using the icon, and then use the icon to restore the image to its
original size.
e Load your document again.
Note
Skip this step if you loaded the document on the scanner glass in step a.
f Click Start.
This time only the chosen area of the document appears in the PaperPort™12SE window (or your
application window).
g In the PaperPort™12SE window, use the options available to refine the image.
1