
Software User's Guide

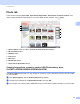
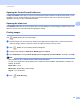

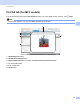
Table Of Contents
- SOFTWARE USER’S GUIDE
- Applicable models
- Definitions of notes
- Compilation and publication notice
- IMPORTANT NOTE
- Table of Contents
- Windows®
- 1 Printing
- Using the Brother printer driver
- Features
- Choosing the right type of paper
- Simultaneous printing, scanning and faxing
- Clearing data from the memory
- Status Monitor
- Printer driver settings
- Accessing the printer driver settings
- Basic tab
- Advanced tab
- Print Profiles tab
- Support
- Trial Photo Print (Not available for MFC-J280W/J425W/J430W/J435W/J5910DW)
- Using FaceFilter Studio for photo printing by REALLUSION
- Using Homepage Print 2 by Corpus (Not available for MFC-J5910DW)
- 2 Scanning
- Scanning a document using the TWAIN driver
- Scanning a document using the WIA driver
- Scanning a document using the WIA driver (Windows® Photo Gallery and Windows® Fax and Scan users)
- Using ScanSoft™ PaperPort™12SE with OCR by NUANCE™
- Using BookScan Enhancer and Whiteboard Enhancer by REALLUSION
- 3 ControlCenter4
- 4 Remote Setup (For MFC-J625DW/J825DW/J835DW/J5910DW)
- 5 Brother PC-FAX Software (MFC models only)
- 6 PhotoCapture Center™ (For MFC-J625DW/J825DW/J835DW/J5910DW)
- 7 Firewall settings (For Network users)
- 1 Printing
- Apple Macintosh
- 8 Printing and Faxing
- 9 Scanning
- 10 ControlCenter2
- 11 Remote Setup & PhotoCapture Center™ (For MFC-J625DW/J825DW/J835DW/J5910DW)
- Using the Scan key
- 12 USB cable scanning
- 13 Network Scanning
- Before using Network Scanning
- Using the Scan key on your network
- Using Web Services for scanning on your network (Windows Vista® SP2 or later and Windows® 7)
- Printing on a Disc
- Index
- brother USA

ControlCenter4
69
3
Attaching the scanned data to E-mail 3
The (Send E-mail) button lets you scan a document to your default E-mail application, so you can send
the scanned job as an attachment.
a Select the Scan tab.
b Configure the settings in the PC Scan setting area.
c Click (Scan).
d Confirm and edit (if necessary) the scanned image in the image viewer.
e Click (Send E-mail).
f Configure the attached file settings and click OK.
g Your default E-mail application will open and the image will be attached to a new, blank E-mail.
Using the OCR feature 3
The (OCR) button lets you scan a document and converts it into text. This text can be edited using your
favorite word processing software.
a Select the Scan tab.
b Configure the settings in the PC Scan setting area.
c Click (Scan).
d Confirm and edit (if necessary) the scanned image in the image viewer.
e Click (OCR).
f Configure the OCR settings and click OK.
g The application you have chosen will open with the converted text data.