
Operation Manual
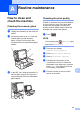


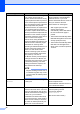
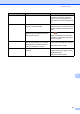

Table Of Contents
- Basic User’s Guide MFC-J4420DW
- You can use the following features!
- User's Guides and where to find them
- The Online User’s Guide helps you get the most out of your machine.
- If you have questions or problems, please take a look at your model’s FAQs.
- Table of Contents
- 1 General information
- 2 Loading paper
- 3 Loading documents
- 4 Printing from a computer
- 5 Copying
- 6 Scanning to a computer
- 7 Printing photos from a USB flash drive
- 8 Telephone services and external devices
- 9 Sending a fax
- 10 Receiving a fax
- A Routine maintenance
- B Troubleshooting
- Index
- Supplies
- brother UK

Routine maintenance
35
A
Checking the print alignment A
If your printed text becomes blurred or
images become faded, you may need to
adjust the print alignment after transporting
the machine.
a Press .
NOTE
You can also press (Settings) and
then Maintenance.
b Press a or b to display
Improve Print Quality.
c Press Improve Print Quality.
d Press Alignment.
e Press Next.
f Press a or b to display the paper size
that needs a print alignment adjustment,
and then press it.
g Press Basic alignment or
Advanced alignment.
h Following the instructions on the
Touchscreen, load plain paper of the
selected size in the paper tray or manual
feed slot, and then press Start.
The machine prints the Alignment
Check Sheet.
i For the “A” pattern, press a or b to
display the number of the test print that
has the least visible vertical stripes
(1-9), and press it. Then press OK.
In the example, number 6 is the best
choice.
j Do one of the following:
If you selected Basic alignment,
repeat step i for patterns B to H.
If you selected
Advanced alignment, repeat
step i for patterns B to Z.
NOTE
k Press .
NOTE
For more information about cleaning and
checking the machine, see Online User’s
Guide.
i
When the print
alignment is not
adjusted correctly,
text looks blurry.
After the print
alignment is
adjusted correctly,
text looks sharp.