Web Connect Guide Version A USA
Applicable models This User’s Guide applies to the following models: DCP-J152W, MFC-J285DW/J450DW/J470DW/J475DW/J650DW/J870DW/J875DW Definitions of notes We use the following note style throughout this user’s guide: NOTE Notes tell you how you should respond to a situation that may arise or give tips about how the operation works with other features. Trademarks The Brother logo is a registered trademark of Brother Industries, Ltd. Brother is a trademark of Brother Industries, Ltd.
Table of Contents 1 Introduction 1 Brother Web Connect ................................................................................................................................1 Accessible services ...................................................................................................................................2 Conditions for using Brother Web Connect ...............................................................................................4 Service account .................
6 Shortcut Settings (For MFC-J650DW/J870DW/J875DW) 48 Adding Web Connect Shortcuts...............................................................................................................48 How to change Shortcuts ..................................................................................................................49 How to edit Shortcut names ..............................................................................................................49 How to delete Shortcuts ........
1 Introduction 1 1 Brother Web Connect 1 Certain websites provide services that allow users to upload and view images and files on the website. Your Brother machine can scan images and upload them to these services, and also download from and print images that are already uploaded to these services.
Introduction Accessible services 1 1 The following services can be accessed from your Brother machine: PICASA WEB ALBUMS™ PICASA WEB ALBUMS™ is an online photo sharing service. Images can be uploaded, organized into albums, and shared with other users. URL: http://picasaweb.google.com/ GOOGLE DRIVE™ GOOGLE DRIVE™ is an online document editing and sharing service. URL: http://drive.google.com/ FLICKR® FLICKR® is an online photo sharing service.
Introduction For more information about any of these services, refer to the respective service’s website.
Introduction Conditions for using Brother Web Connect 1 1 Service account 1 In order to use Brother Web Connect, you must have an account with the desired service. If you do not already have an account, use a computer to access the service's website and create an account. You do not need to create an account if you use Brother CreativeCenter.
Introduction c Press a or b to display Network. Press Network. d Press a or b to display Web Connect Settings. Press Web Connect Settings. e f Press Proxy Settings. g h Press On. i Press 1 Press a or b to display Proxy Connection. Press Proxy Connection. Press the option that you want to set, and then enter the proxy server information. Press OK. . For MFC-J285DW a b Press Settings. c Press s or t to display Web Connect Settings. Press Web Connect Settings. d e Press Proxy Settings.
Introduction e Press a or b to choose Proxy Connection. Press OK. f Press a or b to choose On. Press OK. g Press Stop/Exit.
Introduction Setting up Brother Web Connect 1 1 (For PICASA WEB ALBUMS™, FLICKR®, FACEBOOK, GOOGLE DRIVE™, EVERNOTE®, DROPBOX, SKYDRIVE® and BOX) Step-by-step overview 1 Configure the settings using the following procedure: Step 1: Create an account with the desired service (see page 8). Access the service’s website using a computer and create an account. (If you already have an account, there is no need to create an additional account.
Introduction How to create an account for each of the desired services 1 1 In order to use Brother Web Connect to access an online service, you must have an account with that online service. If you do not already have an account, use a computer to access the website of the service and create an account. After creating an account, log on and use the account once with a computer before using the Brother Web Connect feature. Otherwise, you may not be able to access the service using Brother Web Connect.
Introduction NOTE 1 You can also access the page directly in the following ways: • From the supplied CD-ROM 1 Put the CD-ROM into your CD-ROM drive. When it launches, double-click the Brother Support icon. 2 Click the Brother Web Connect icon. • From your web browser Type “http://bwc.brother.com” into your web browser’s address bar. c Choose the service you want to use. d Follow the on-screen instructions and apply for access. When finished, your temporary ID will be displayed.
Introduction e Close the web browser. Continue with the next procedure, How to register and delete accounts on the machine on page 10. 1 How to register and delete accounts on the machine 1 Enter the account information and configure your machine so that it can access the service. You can register up to 10 accounts on your machine. Register an account 1 For MFC-J650DW/J870DW/J875DW 1 a Before you register an account, confirm that the correct date and time are set on the machine’s control panel.
Introduction k The machine will prompt you to enter the account name that you want to be displayed on the LCD. Press OK. l Enter the name using the LCD. Press OK. m Do one of the following: 1 To set a PIN for the account, press Yes. (A PIN prevents unauthorized access to the account.) Enter a four-digit number and press OK. If you do not want to set a PIN, press No. n When the account information you entered is displayed, confirm that it is correct.
Introduction i j The machine will prompt you to enter the temporary ID you received when you applied for Brother Web Connect access. Press OK. 1 Enter the temporary ID using the LCD. Press OK. NOTE An error message will appear on the LCD if the information you entered does not match the temporary ID you received when you applied for access, or if the temporary ID has expired.
Introduction NOTE 1 Occasionally, updates or announcements about your machine's feature will be displayed on the LCD. Read the information, and then press OK. e Press a or b to choose the service with which you want to register. Press OK. f g If information regarding Brother Web Connect is displayed, press OK. h Press a or b to choose Register Account. Press OK. i The machine will prompt you to enter the temporary ID you received when you applied for Brother Web Connect access. Press OK.
Introduction Delete an account 1 1 For MFC-J650DW/J870DW/J875DW 1 a Press d or c to display Web. Press Web. b If information regarding the Internet connection is displayed on the machine’s LCD, read the information and press OK. c You will be asked if you want to display this information again in the future. Press Yes or No. NOTE Occasionally, updates or announcements about your machine's feature will be displayed on the LCD. Read the information, and then press OK.
Introduction d Press s or t to display the service that hosts the account you want to delete. Press the service. e f g h i Press Register/Delete. j Account deletion is complete. Press OK. k Press 1 Press Delete Account. Press the accounts that you want to delete. The selected accounts will be indicated by check marks. Press OK. You will be asked to confirm your selections. Press Yes to delete. .
2 Scan and Upload 2 Scanning and uploading documents 2 Your scanned photos and documents can be uploaded directly to a service without using a computer. When scanning and uploading JPEG or Microsoft® Office files, black and white scanning is not available. When scanning and uploading JPEG files, each page is uploaded as a separate file. Uploaded documents are saved in an album named “From_BrotherDevice”.
Scan and Upload k l m If the LCD prompts you to Select a Tag, press the tag you want. Press OK. If you placed the document in the automatic document feeder (ADF), the machine scans the document and starts uploading. If you are using the scanner glass, go to step m. 2 When Next Page? is displayed, do one of the following: If there are no more pages to scan, press No. Go to step o. To scan more pages, press Yes and go to step n. n Place the next page on the scanner glass. Press OK.
Scan and Upload k l m If the LCD prompts you to Select a Tag, press the tag you want. Press OK. When Next Page? is displayed, do one of the following: 2 If there are no more pages to scan, press No. Go to step o. To scan more pages, press Yes and go to step n. n Place the next page on the scanner glass. Press OK. The machine starts scanning the page. Repeat steps m and n for each additional page. o The machine uploads the documents. Press .
Scan and Upload k Press OK. If you placed the document in the automatic document feeder (ADF), the machine scans the document and starts uploading. If you are using the scanner glass, go to step l. l When Next Page? is displayed, do one of the following: 2 If there are no more pages to scan, press 2 (No). Go to step n. To scan more pages, press 1 (Yes) and go to step m. m Place the next page on the scanner glass. Press OK. The machine starts scanning the page.
Scan and Upload Scan Size a b c Press Scan Size. Choose the size you want. 2 If you do not want to change any other settings, press OK. For MFC-J285DW Scan Type a b c 2 2 2 Press Scan Type. Choose Color or B&W. If you do not want to change any other settings, press OK. NOTE • When scanning and uploading JPEG or Microsoft® Office files, black and white scanning is not available. • When scanning and uploading JPEG files, each page is uploaded as a separate file.
Scan and Upload b Choose Color or B&W. Press OK. c If you do not want to change any other settings, press a or b to choose Complete, and then press OK. 2 NOTE • When scanning and uploading JPEG or Microsoft® Office files, black and white scanning is not available. • When scanning and uploading JPEG files, each page is uploaded as a separate file. Resolution 2 a Press a or b to choose Resolution. Press OK. b Choose 100 dpi, 200 dpi, 300 dpi or 600 dpi. Press OK.
Scan and Upload Uploading a document from an external memory device (For MFC-J650DW/J870DW/J875DW) 2 Documents saved on media such as a memory card or a USB flash drive connected to the machine can be uploaded directly to a service. For more information about services and supported features, see Accessible services on page 2. NOTE (For Hong Kong, Taiwan and Korea) Brother Web Connect supports only file names written in English. Files named in the local language will not be uploaded.
Scan and Upload NOTE • Uploaded documents are saved in an album named “From_BrotherDevice”. • For information regarding restrictions, such as the size or number of documents that can be uploaded, refer to the respective service’s website.
3 Download, Print, and Save 3 Downloading and printing documents (For MFC-J285DW/J650DW/J870DW/J875DW) 3 Documents that have been uploaded to your account on a service can be downloaded directly to your machine and printed. Documents that other users have uploaded to their own accounts for sharing can also be downloaded to your machine and printed, as long as you have viewing privileges for those documents. Certain services allow guest users to view documents that are public.
Download, Print, and Save For PICASA WEB ALBUMS™, FLICKR®, FACEBOOK, GOOGLE DRIVE™, EVERNOTE®, DROPBOX, SKYDRIVE® and BOX 3 For MFC-J650DW/J870DW/J875DW 3 a Press d or c to display Web. Press Web. b If information regarding the Internet connection is displayed on the machine’s LCD, read the information and press OK. c You will be asked if you want to display this information again in the future. Press Yes or No.
Download, Print, and Save j Press a or b to display the desired album 1, and press it. Some services do not require documents to be saved in albums. For documents not saved in albums, select See UnsortedPhotos to select documents. Other users’ documents cannot be downloaded if they are not saved in an album. 1 An album is a collection of documents. However, the actual term may differ depending on the service you use. When using EVERNOTE®, you must select the notebook, and then select the note.
Download, Print, and Save h Do one of the following: (For PICASA WEB ALBUMS™, FLICKR® and FACEBOOK) To download your own documents from the service, press Your album. Go to step j. To download other users’ documents from the service, press Other user’s album. Go to step i. (For GOOGLE DRIVE™, DROPBOX, EVERNOTE®, SKYDRIVE® and BOX) 3 Go to step j. i Using the LCD, type the account name of the user whose documents you want to download. Press OK.
Download, Print, and Save For Brother CreativeCenter (USA and Oceania only) 3 For MFC-J650DW/J870DW/J875DW 3 a Press d or c to display Web. Press Web. b If information regarding the Internet connection is displayed on the machine’s LCD, read the information and press OK. c You will be asked if you want to display this information again in the future. Press Yes or No. NOTE Occasionally, updates or announcements about your machine's feature will be displayed on the LCD.
Download, Print, and Save For MFC-J285DW 3 a Press s or t to display Web. Press Web. b If information regarding the Internet connection is displayed on the machine’s LCD, read the information and press OK. c You will be asked if you want to display this information again in the future. Press Yes or No. NOTE Occasionally, updates or announcements about your machine's feature will be displayed on the LCD. Read the information, and then press OK. d Press s or t to display Apps. Press Apps.
Download, Print, and Save How to change print settings 3 The Print Settings screen is displayed after you have selected the documents that you want to print. Use the a or b buttons to scroll through the settings list. For MFC-J650DW/J870DW/J875DW Print Quality a b c c 3 3 Press Print Quality. Press Fine or Normal. If you do not want to change any other settings, press OK. Paper Size a b 3 3 Press Paper Size.
Download, Print, and Save For MFC-J285DW Print Quality a b c c 3 Press Print Quality. Press Fine or Normal. 3 If you do not want to change any other settings, press OK. Paper Size a b 3 3 Press Paper Size. Press the paper size you are using, Letter, Legal 1, A4, 4"x6" (10x15cm), or 5"x7" (13x18cm) 2. 1 PDF or Microsoft® Office files only 2 JPEG files only If you do not want to change any other settings, press OK. Paper Type a b Press Paper Type.
Download, Print, and Save Downloading and saving a document to an external memory device (For MFC-J650DW/J870DW/J875DW) 3 JPEG, PDF and Microsoft® Office files can be downloaded from a service and saved directly on media connected to the machine. Documents that other users have uploaded for to their own accounts sharing can also be downloaded, to your machine and printed, as long as you have viewing privileges for those documents. Certain services allow guest users to view documents that are public.
Download, Print, and Save i j If the PIN entry screen is displayed, enter the four-digit PIN and press OK. Press Download: Media. Do one of the following: If you logged on to the service with your account, go to step k. If you accessed the service as a guest user, go to step l. k 3 Do one of the following: (For PICASA WEB ALBUMS™, FLICKR® and FACEBOOK) To download your own documents from the service, press Your album. Go to step m.
4 Outline, Scan, and Copy or Cut 4 Scanning, copying, and cutting parts of your documents 4 When you outline specific areas of a document using a red pen and then scan the document, the outlined areas will be captured and can be processed as images in various ways. Outline and Scan 4 When you use a red pen to outline sections of a document and then scan the document, the outlined areas are extracted and saved to media or a cloud service as separate JPEG files.
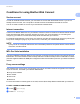
Outline, Scan, and Copy or Cut Outlining 4 4 Good examples Bad examples Use a red pen or marker with a tip width of 0.04-0.39 in. (1.0-10.0 mm), that is, from an extra-fine tip up to an extra-thick marker tip. Outlined areas with thick red lines are easier to recognize. However, do not use a pen or marker with a tip wider than indicated above. The red outline must not be broken and the line must not cross more than once. The outlined area must have a length and width of at least 0.4 in. (1 cm).
Outline, Scan, and Copy or Cut f Press a or b to display Apps. Press Apps. g h i Press Outline&Scan. j Do one of the following: If information regarding Outline&Scan is displayed, read the information and press OK. You will be asked if you want to display this information again in the future. Press Yes or No. 4 To save images to a cloud, press Save to Cloud and go to step k. To save images to media, press Save to Media Card and go to step n. k Press a or b to display the service you want.
Outline, Scan, and Copy or Cut e You will be asked if you want to display this information again in the future. Press Yes or No. NOTE Occasionally, updates or announcements about your machine's feature will be displayed on the LCD. Read the information, and then press OK. f Press s or t to display Apps. Press Apps. g h i Press Outline&Scan. j Press s or t to display the service you want. Press the service. k l m n o Press s or t to display your account name, and then press it.
Outline, Scan, and Copy or Cut e You will be asked if you want to display this information again in the future. Press 1 (Yes) or 2 (No). NOTE Occasionally, updates or announcements about your machine's feature will be displayed on the LCD. Read the information, and then press OK. f Press a or b to display Apps. Press OK. g h i Choose Outline&Scan and press OK. j Press a or b to choose the desired service. Press OK. k Press a or b to choose your account name. Press OK.
Outline, Scan, and Copy or Cut How to copy or cut an outlined section 4 For MFC-J650DW/J870DW/J875DW 4 a b c Using a red pen, outline the areas of the document that you want to scan. d If information regarding the Internet connection is displayed on the machine’s LCD, read the information and press OK. e You will be asked if you want to display this information again in the future. Press Yes or No. Load your document. Press d or c to display Web. Press Web.
Outline, Scan, and Copy or Cut o p The machine starts printing. When it is finished, press OK Press . For MFC-J285DW 4 a b c Using a red pen, outline the areas of the document that you want to scan. d If information regarding the Internet connection is displayed on the machine’s LCD, read the information and press OK. e You will be asked if you want to display this information again in the future. Press Yes or No. Load your document. Press s or t to display Web. Press Web.
5 NotePrint and NoteScan (For MFC-J285DW/J650DW/J870DW/J875DW) Printing and Scanning notes 5 5 Use this function to print note sheets and folders designed to hold them, and to scan note sheets so that each page of notes is saved as a JPEG file. The printed note sheets can be folded in half or quarters, used, and stored in the folders. After writing on the note sheets pre-printed with lines or a grid, scan the sheets and save your notes to media or to a cloud service.
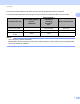
NotePrint and NoteScan (For MFC-J285DW/J650DW/J870DW/J875DW) Note Sheet template examples: 1 in 1, Note style 2 in 1, Dot graph style 5 4 in 1, Note style 8 in 1, Grid style 5 Note Folder template examples: How to use note sheets and note folder 5 5 42
NotePrint and NoteScan (For MFC-J285DW/J650DW/J870DW/J875DW) Print Note and Folder Template 5 For MFC-J650DW/J870DW/J875DW 5 a Press d or c to display Web. Press Web. b If information regarding the Internet connection is displayed on the machine’s LCD, read the information and press OK. c You will be asked if you want to display this information again in the future. Press Yes or No. NOTE 5 Occasionally, updates or announcements about your machine's feature will be displayed on the LCD.
NotePrint and NoteScan (For MFC-J285DW/J650DW/J870DW/J875DW) For MFC-J285DW 5 a Press s or t to display Web. Press Web. b If information regarding the Internet connection is displayed on the machine’s LCD, read the information and press OK. c You will be asked if you want to display this information again in the future. Press Yes or No. NOTE Occasionally, updates or announcements about your machine's feature will be displayed on the LCD. Read the information, and then press OK.
NotePrint and NoteScan (For MFC-J285DW/J650DW/J870DW/J875DW) How to Scan a note 5 Each page of your notes template page will be saved as a separate JPEG file. For MFC-J650DW/J870DW/J875DW 5 When saving scanned Notes to an external media source, insert the media before scanning. a b Load your notes. c If information regarding the Internet connection is displayed on the machine’s LCD, read the information and press OK. d You will be asked if you want to display this information again in the future.
NotePrint and NoteScan (For MFC-J285DW/J650DW/J870DW/J875DW) o When Next page? is displayed, do one of the following: If there are no more pages to scan, press No. Go to step q. To scan more pages, press Yes and go to step p. p Place the next page on the scanner glass. Press OK. The machine starts scanning the page. Repeat steps o and p for each additional page. q r The machine uploads the image. When it is finished, press OK. Press . For MFC-J285DW 5 a b Load your notes.
NotePrint and NoteScan (For MFC-J285DW/J650DW/J870DW/J875DW) n When Next page? is displayed, do one of the following: If there are no more pages to scan, press No. Go to step p. To scan more pages, press Yes and go to step o. o Place the next page on the scanner glass. Press OK. The machine starts scanning the page. Repeat steps n and o for each additional page. p q The machine uploads the image. When it is finished, press OK. Press .
6 Shortcut Settings (For MFC-J650DW/J870DW/J875DW) 6 Adding Web Connect Shortcuts 6 Your customized settings for uploading to or downloading and printing from the following services can be saved as a Web Connect Shortcut on your machine. PICASA WEB ALBUMS™ GOOGLE DRIVE™ FLICKR® FACEBOOK EVERNOTE® 6 DROPBOX SKYDRIVE® BOX a b c d e Press Press (Shortcuts). where there is room to add a Shortcut. Press a or b to display Web. Press Web.
Shortcut Settings (For MFC-J650DW/J870DW/J875DW) How to change Shortcuts 6 Web Connect Shortcut settings cannot be changed. Instead, you must delete the Shortcut (see How to delete Shortcuts on page 49) and create a new Shortcut with the settings you need (see Adding Web Connect Shortcuts on page 48). How to edit Shortcut names a b c Press 6 (Shortcuts). Press d or c to display the Shortcut name you want to edit. Do one of the following: Press and hold the Shortcut until the options appear.
A Troubleshooting A Error messages A As with any sophisticated office product, errors may occur. If an error occurs, your machine will display an error message. The most common error messages are shown below. You can correct most errors yourself. If, after reading this table, you still need help, the Brother Solutions Center offers the latest FAQs and troubleshooting tips. Visit us at http://solutions.brother.com/.
Troubleshooting Error Message Cause Action Server Error 03 The file you are trying to upload may have one of the following problems: The file cannot be used: Failed to upload. Unsupported file or corrupt data. Confirm data of file. The file exceeds the service’s limit on number of pixels, file size, etc. The file type is not supported. Check the service's size or format restrictions. Save the file as a different type. If possible, get a new, uncorrupted version of the file.
Visit us on the World Wide Web http://www.brother.com/ www.brotherearth.