
User guide
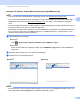
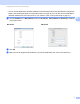

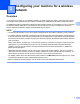

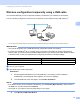
Table Of Contents
- Network User’s Guide
- Applicable models
- Definitions of notes
- Compilation and publication notice
- IMPORTANT NOTE
- Table of Contents
- Network Operation
- 1 Introduction
- 2 Changing your machine’s network settings
- 3 Configuring your machine for a wireless network
- 4 Control panel setup
- Network settings
- Restoring the network settings to factory default
- Printing the Network Configuration Report
- Printing the WLAN Report
- Function table and default factory settings
- 5 Web Based Management
- Overview
- How to configure the machine settings using Web Based Management (web browser)
- Secure Function Lock 2.0
- Synchronize with SNTP server
- Changing the Scan to FTP configuration using a web browser
- Changing the Scan to Network configuration using a web browser
- Changing the LDAP configuration using a web browser (For MFC-J2510/J4510DW/J4710DW) (Available as a download)
- 6 LDAP operation (For MFC-J2510/J4510DW/J4710DW)
- 7 Internet fax (For MFC models) (Available as a download)
- 8 Security features
- 9 Troubleshooting
- Network Glossary
- 10 Types of network connections and protocols
- 11 Configuring your machine for a network
- 12 Wireless network terms and concepts
- 13 Additional network settings from Windows®
- Types of additional network settings
- Installing drivers used for printing and scanning via Web Services (Windows Vista® and Windows® 7)
- Uninstalling drivers used for printing and scanning via Web Services (Windows Vista® and Windows® 7)
- Network printing and scanning installation for Infrastructure mode when using Vertical Pairing (Windows® 7)
- Appendixes
- Index
- brother ENG

Configuring your machine for a wireless network
12
3
Wireless configuration temporarily using a USB cable 3
It is recommended that you use a computer wirelessly connected to your network for this method.
You can remotely configure the machine from a computer on the network using a USB cable (A)
1
.
1
You can configure the wireless settings of the machine using a USB cable temporarily connected to a wired or wireless computer.
IMPORTANT
• You need to temporarily use a USB cable during configuration (cable not included).
• If you are using Windows
®
XP, or currently using a computer connected to an access point/router by
network cable, you need to know the SSID and Network Key of your access point/router. Write them down
in the area below, as they are required when configuring the machine’s wireless settings.
a Turn on your computer.
b Start the Brother installer application.
Windows
®
1 Put the supplied CD-ROM into your CD-ROM drive. The opening screen will appear
automatically. If the language screen appears, choose your language.
2 The CD-ROM main menu will appear. Click Custom Installation.
NOTE
• If the Brother screen does not appear automatically, go to Computer (My Computer), double-click the
CD-ROM icon, and then double-click start.exe.
• The screen on your machine may vary depending on your region.
3 Click Wireless LAN Setup Wizard.
Item Record the current wireless network settings
SSID (Network Name):
Network Key
A