
User guide
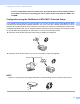
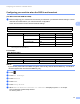
Table Of Contents
- Network User’s Guide
- Applicable models
- Definitions of notes
- Compilation and publication notice
- IMPORTANT NOTE
- Table of Contents
- Network Operation
- 1 Introduction
- 2 Changing your machine’s network settings
- 3 Configuring your machine for a wireless network
- 4 Control panel setup
- Network settings
- Restoring the network settings to factory default
- Printing the Network Configuration Report
- Printing the WLAN Report
- Function table and default factory settings
- 5 Web Based Management
- Overview
- How to configure the machine settings using Web Based Management (web browser)
- Secure Function Lock 2.0
- Synchronize with SNTP server
- Changing the Scan to FTP configuration using a web browser
- Changing the Scan to Network configuration using a web browser
- Changing the LDAP configuration using a web browser (For MFC-J2510/J4510DW/J4710DW) (Available as a download)
- 6 LDAP operation (For MFC-J2510/J4510DW/J4710DW)
- 7 Internet fax (For MFC models) (Available as a download)
- 8 Security features
- 9 Troubleshooting
- Network Glossary
- 10 Types of network connections and protocols
- 11 Configuring your machine for a network
- 12 Wireless network terms and concepts
- 13 Additional network settings from Windows®
- Types of additional network settings
- Installing drivers used for printing and scanning via Web Services (Windows Vista® and Windows® 7)
- Uninstalling drivers used for printing and scanning via Web Services (Windows Vista® and Windows® 7)
- Network printing and scanning installation for Infrastructure mode when using Vertical Pairing (Windows® 7)
- Appendixes
- Index
- brother ENG

Configuring your machine for a wireless network
21
3
g Press Yes to connect to your machine using WPS. (If you press No to continue manual setting, go to
step h to enter a Network Key.)
When the LCD shows Start WPS; press the WPS button on your wireless access point/router and then
press Next to proceed. Go to step i.
h Enter the Network Key you wrote down in step a. (For information on how to enter text, see the Quick
Setup Guide.)
Press OK when you have entered all the characters, then press Yes to apply your settings.
i The machine starts to connect to the wireless device you have chosen.
j A connection result message appears for 60 seconds on the LCD and a wireless LAN report will
automatically be printed. If the connection failed, check the error code on the printed report.
See Quick Setup Guide: Troubleshooting
(Windows
®
)
You have completed the wireless network setup. If you would like to continue installing drivers
and software necessary for operating your device, please choose Install MFL-Pro Suite from
the CD-ROM menu.
(Macintosh)
You have completed the wireless network setup. If you would like to continue installing drivers
and software necessary for operating your device, please double-click Start Here OSX in the
CD-ROM.
(For DCP-J4110DW, MFC-J2310/J4310DW/J4410DW/J4610DW)
3
a Before configuring your machine we recommend you write down your wireless network settings. You will
need this information before you continue with the configuration.
b Press Settings.
c Press s or t to display Network and then press Network.
d Press WLAN.
e Press Setup Wizard.
f When Network I/F switched to Wireless is displayed, press Yes to accept.
This will start the wireless setup wizard.
To cancel, press No.
g The machine will search for your network and display a list of available SSIDs.
If a list of SSIDs is displayed, press s or t to choose the SSID you wrote down in step a. Select the
SSID you want to connect with.
Item Record the current wireless network settings
SSID (Network Name):
Network Key