
User Manual

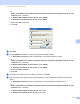
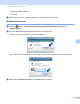
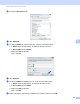
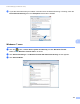
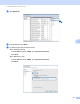
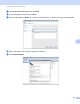
Table Of Contents
- Software User’s Guide
- Applicable models
- Definitions of notes
- Compilation and publication notice
- IMPORTANT NOTE
- Table of Contents
- Windows®
- 1 Printing
- Using the Brother printer driver
- Features
- Choosing the right type of paper
- Simultaneous printing, scanning and faxing
- Clearing data from the memory
- Status Monitor
- Printer driver settings
- Accessing the printer driver settings
- Basic tab
- Advanced tab
- Print Profiles tab
- Maintenance tab
- Support
- Using FaceFilter Studio for photo printing by REALLUSION
- 2 Scanning
- Scanning a document using the TWAIN driver
- Scanning a document using the WIA driver
- Scanning a document using the WIA driver (Windows® Photo Gallery and Windows® Fax and Scan users)
- Using Nuance™ PaperPort™ 12SE
- Using BookScan Enhancer and Whiteboard Enhancer by REALLUSION
- 3 ControlCenter4
- 4 Remote Setup (For MFC models)
- 5 Brother PC-FAX Software (For MFC models)
- 6 PhotoCapture Center™
- 7 Firewall settings (For Network users)
- 1 Printing
- Apple Macintosh
- 8 Printing and Faxing
- 9 Scanning
- 10 ControlCenter2
- 11 Remote Setup & PhotoCapture Center™
- Using the Scan button
- 12 USB cable scanning
- 13 Network Scanning
- Before using Network Scanning
- Using the Scan button on your network
- Using Web Services for scanning on your network (Windows Vista® SP2 or later and Windows® 7)
- Index
- brother USA

116
7
7
Before using the Brother software 7
Firewall settings on your computer may reject the necessary network connection for network printing, network
scanning and PC-Fax. If you are using Windows
®
Firewall and you installed MFL-Pro Suite from the
CD-ROM, the necessary Firewall settings have already been made. If you did not install from the CD-ROM
follow the instructions below to configure Windows
®
Firewall. If you are using any other personal firewall
software, see the user’s guide for your software or contact the software manufacturer.
UDP Port number information for Firewall configuration
1
Add Port number 137 if you still have trouble with your network connection after you added port 54925 and 54926. Port number 137 also supports
printing, PhotoCapture Center™ and Remote Setup over the network.
Windows
®
XP SP2 or higher users 7
a Click Start, Control Panel, Network and Internet Connections and then Windows Firewall.
Make sure that Windows Firewall on the General tab is set to On.
b Choose the Advanced tab and click Settings.
c Click Add.
d Add port 54925 for network scanning by entering the information below:
1In Description of service: Enter any description, for example “Brother Scanner”.
Firewall settings (For Network users) 7
UDP Port Network Scanning Network PC-Fax Network Scanning and
Network PC-Fax
1
External Port number 54925 54926 137
Internal Port number 54925 54926 137