
Operation Manual
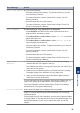
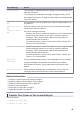

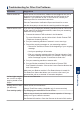

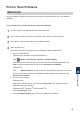
Table Of Contents
- Basic User's Guide MFC-J480DW
- You Can Use the Following Features
- User's Guides and Where to Find Them
- Basic Operations and Where to Find Instructions
- The Online User's Guide Helps You Get the Most Out of Your Machine
- Questions or Problems? Please take a look at our FAQs, solutions, and videos online.
- Definitions of Notes
- For the Latest Driver Updates
- Compilation and Publication Notice
- Table of Contents
- 1 General Information
- 2 Paper Handling
- 3 Print
- 4 Copy
- 5 Scan
- 6 Fax
- A Routine Maintenance
- B Troubleshooting
- C Appendix
- D Index

Troubleshooting for Other Fax Problems
Difficulties Suggestions
Cannot send a fax. Check all line cord connections. Make sure the telephone line cord is
plugged into the telephone wall socket and the LINE socket of the
machine. If you subscribe to DSL or VoIP services, contact your
service provider for connection instructions.
Print the Transmission Verification Report and check for an error.
Ask the other party to check that the receiving machine has paper.
Cannot receive a fax. If you are using a telephone answering machine (External TAD mode)
on the same line as the Brother machine, make sure your answering
machine is set up correctly.
1. Connect the external TAD as shown in the illustration.
For more information, see the Online User's Guide: External TAD
(Telephone Answering Device).
2. Set your answering machine to answer in one or two rings.
3. Record the outgoing message on your answering machine.
• Record five seconds of silence at the beginning of your outgoing
message.
• Limit your speaking to 20 seconds.
• End your outgoing message with your Remote Activation Code
for people sending manual faxes. For example: “After the beep,
leave a message or press *51 and Start to send a fax.”
4. Set your answering machine to answer calls.
5. Set your Brother machine’s Receive Mode to External TAD.
See Related Information: Choose the Correct Receive Mode at the
end of this section.
Make sure your Brother machine’s Fax Detect feature is turned On.
Fax Detect is a feature that allows you to receive a fax even if you
answered the call on an external or extension telephone.
Left and right margins
are cut off or a single
page is printed on two
pages.
Turn on Auto Reduction.
Dialling does not work.
(No dial tone)
Check all line cord connections.
Change Tone/Pulse setting. (Available only for some countries)
Poor sending quality. Try changing your resolution to Fine or S.Fine.
Make a copy to check your machine’s scanner operation. If the copy
quality is not good, clean the scanner.
See Related Information: Clean the Scanner at the end of this section.
B
Troubleshooting
45