Online User's Guide DCP-J562DW MFC-J480DW MFC-J680DW MFC-J880DW © 2015 Brother Industries, Ltd. All rights reserved.
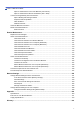
Home > Table of Contents Table of Contents Before You Use Your Brother Machine ............................................................................................... 1 Applicable Models .......................................................................................................................................... 2 Definitions of Notes ........................................................................................................................................ 3 Trademarks ....
Home > Table of Contents Print a Document (Macintosh)............................................................................................................ 92 Print on Both Sides of the Paper Automatically (Automatic 2-sided Printing) (Macintosh) ................ 93 Print More Than One Page on a Single Sheet of Paper (N in 1) (Macintosh).................................... 94 Print a Colour Document in Greyscale (Macintosh) ...........................................................................
Home > Table of Contents Send a Fax at a Specified Time (Delayed Fax)................................................................................ 228 Cancel a Fax in Progress ................................................................................................................. 229 Check and Cancel a Pending Fax.................................................................................................... 230 Fax Polling.....................................................................
Home > Table of Contents Additional Methods of Configuring Your Brother Machine for a Wireless Network .................................... 373 Before Configuring Your Brother Machine for a Wireless Network................................................... 374 Configure Your Machine for a Wireless Network Using the One Push Method of Wi-Fi Protected Setup™ (WPS) or AOSS™................................................................................................................
Home > Table of Contents Paper is Jammed in the Front of the Machine (Jam B Front)........................................................... 469 Paper is Jammed in the Back of the Machine (Jam C Rear) ........................................................... 472 If You Are Having Difficulty with Your Machine .......................................................................................... 474 Paper Handling and Printing Problems ...................................................................
Home > Before You Use Your Brother Machine Before You Use Your Brother Machine • Applicable Models • Definitions of Notes • Trademarks • Important Note 1
Home > Before You Use Your Brother Machine > Applicable Models Applicable Models This User's Guide applies to the following models: 1.8 inch LCD models: MFC-J480DW 2.
Home > Before You Use Your Brother Machine > Definitions of Notes Definitions of Notes We use the following symbols and conventions throughout this User's Guide: WARNING WARNING indicates a potentially hazardous situation which, if not avoided, could result in death or serious injuries. CAUTION CAUTION indicates a potentially hazardous situation which, if not avoided, may result in minor or moderate injuries.
Home > Before You Use Your Brother Machine > Trademarks Trademarks Microsoft, Windows, Windows Vista, Windows Server, SharePoint, Internet Explorer, Word, Excel, PowerPoint, OneNote and Windows Phone are either registered trademarks or trademarks of Microsoft Corporation in the United States and/or other countries. Apple, Macintosh, Safari, iPad, iPhone, iPod touch and OS X are trademarks of Apple Inc., registered in the United States and other countries. AirPrint is a trademark of Apple Inc.
Home > Before You Use Your Brother Machine > Important Note Important Note • Do not use this product outside the country of purchase as it may violate the wireless telecommunication and power regulations of that country. • Not all models are available in all countries. • Windows® XP in this document represents Windows® XP Professional, Windows® XP Professional x64 Edition and Windows® XP Home Edition.
Home > Introduction to Your Brother Machine Introduction to Your Brother Machine • Before Using Your Machine • Control Panel Overview • LCD Overview • Settings Screen Overview • Navigate the Touchscreen • Access Brother Utilities (Windows®) Brother Utilities is an application launcher that offers convenient access to all Brother applications installed on your computer.
Home > Introduction to Your Brother Machine > Before Using Your Machine Before Using Your Machine Before attempting any printing operation, confirm the following: • Make sure you have installed the Brother software and drivers. • For USB or network cable users: Make sure the interface cable is physically secure. Selecting the correct type of paper For high quality printing, it is important to select the correct type of paper.
Home > Introduction to Your Brother Machine > Control Panel Overview Control Panel Overview MFC-J480DW 1 2 3 01. 01. 2016 Fax 01 1. 1.8"(44.9 mm) Liquid Crystal Display (LCD) Displays messages to help you set up and use the machine. Adjust the angle of the control panel by lifting it. 2. Mode buttons FAX Press to switch the machine to FAX Mode. SCAN Press to switch the machine to SCAN Mode. COPY Press to switch the machine to COPY Mode. WEB Press to switch the machine to WEB Mode. 3.
Settings Press to access the main menu. OK Press to choose a setting. d or c Press to adjust the ring volume while the machine is idle. • Press to store Speed Dial and Group numbers in the machine's memory. • Press to look up and dial numbers that are stored in the machine's memory. Press to configure the wireless settings while the machine is idle. a or b Press to scroll through the menus and options. d or c Press to move the cursor left or right on the LCD. 4 5 6 7 8 4.
5. Dial Pad • Use to dial fax and telephone numbers. • Use as a keyboard to enter text or characters. 6. Stop/Exit • Press to stop an operation. • Press to exit from a menu. Power On/Off 7. to turn on the machine. Press Press and hold down to turn off the machine. The LCD will display [Shutting Down] and will stay on for a few seconds before turning itself off. If you have connected an external telephone or TAD, it is always available.
• If your Android™ device supports the NFC feature, you can print from your device or scan documents to your device by touching it to the NFC logo on the control panel. You must download and install Brother iPrint&Scan to your Android™ device to use this feature. • Make sure the NFC settings of both your Brother machine and your Android™ device are set to On. 2. 2.7"(67.5 mm) Touchscreen Liquid Crystal Display (LCD) Access menus and options by pressing them on this Touchscreen.
Home > Introduction to Your Brother Machine > LCD Overview LCD Overview MFC-J480DW This screen shows the machine’s status when the machine is idle. This Home screen is also called the Ready Mode screen. When displayed, this indicates that your machine is Ready for the next command. 1 2 01. 01. 2016 01 Fax 5 6 4 3 1. Quiet Mode The (Quiet Mode) icon appears when the [Quiet Mode] setting is set to [On]. The Quiet Mode setting can reduce printing noise.
(For some countries) When the Distinctive Ring feature is turned on, the LCD displays [D/R]. (For New Zealand) When the FaxAbility feature is turned on, the LCD displays [D/R]. MFC-J680DW/MFC-J880DW There are two Home screens that you can access by pressing d or c. From the Home screens, you can access Wi-Fi setup, Shortcuts, Ink levels and Setup screens. Home Screen 1 1 2 5 4 3 7 6 This screen shows the machine’s status when the machine is idle.
The wireless access point cannot be detected. The wireless setting is disabled. You can configure wireless settings by pressing the Wireless Status button. 4. [Shortcuts] Create Shortcuts for frequently-used operations such as sending a fax, copying, scanning and using Web Connect. 5. • There are three Shortcuts screens. You can program four shortcuts on each screen. • To display the other Shortcuts screens, press d or c. [Ink] Displays the available ink volume. Press to access the [Ink] menu.
For more information, see the Web Connect Guide: solutions.brother.com/manuals 8. [Stored Fax(es):] 8 When [Fax Preview] 1 is set to [Off], [Stored Fax(es)] displays how many received faxes are in the machine's memory. Press [Print] to print the faxes. 9. [New Fax(es):] (MFC-J880DW) 9 When [Fax Preview] is set to [On], [New Fax(es)] displays how many new faxes you have received and stored in the memory. Press [View] to view the faxes on the Touchscreen. 10.
Home Screen 1 1 4 3 2 6 5 This screen shows the machine’s status when the machine is idle. This Home screen is also called the Ready Mode screen. When displayed, this indicates that your machine is Ready for the next command. Home Screen 1 provides access to [Copy], [Scan] and [Photo] operations. Home Screen 2 1 3 4 5 2 6 Home Screen 2 provides access to additional features, such as [Web] and [Apps] operations. 1. Quiet Mode This icon appears when the [Quiet Mode] setting is set to [On].
4. • There are three Shortcuts screens. You can program four shortcuts on each screen. • To display the other Shortcuts screens, press d or c. [Ink] Displays the available ink volume. Press to access the [Ink] menu. When an ink cartridge is near the end of its life or having a problem, an error icon is displayed on the ink colour. 5. [Settings] Press to access the [Settings] menu. 6. Modes: • [Copy] Press to access Copy mode. • [Scan] Press to access Scan mode.
The warning icon and then press • appears when there is an error or maintenance message; press [Detail] to view it, to return to Ready mode. This product adopts the font of ARPHIC TECHNOLOGY CO.,LTD.
Home > Introduction to Your Brother Machine > LCD Overview > Cloud Service Notifications Cloud Service Notifications Related Models: DCP-J562DW/MFC-J680DW/MFC-J880DW If you use Brother Web Connect and [New Function Notice] is set to [On], notifications about cloud services will appear on the Home screen. Check for new notifications by pressing [Detail].
Home > Introduction to Your Brother Machine > Settings Screen Overview Settings Screen Overview Related Models: DCP-J562DW/MFC-J680DW/MFC-J880DW MFC-J680DW The Touchscreen shows the machine's status when you press [Settings]. Use the Settings menu to access all of your Brother machine's settings. 4 5 1 6 2 7 3 8 1. [Maintenance] Press to access the [Maintenance] menu. Use options in the Maintenance menu to check and improve print quality, clean the print head and check the ink volume. 2.
If you are using a wireless connection, a three-level indicator on the screen displays the current wireless signal strength. 7. [Paper Size] Press to access the [Paper Size] menu. 8. [All Settings] Press to access a menu of all of your machine's settings. DCP-J562DW The Touchscreen shows the machine's status when you press [Settings]. Use the Settings menu to access all of your Brother machine's settings. 4 1 5 2 6 3 7 1. [Maintenance] Press to access the [Maintenance] menu.
4 5 1 6 2 7 3 8 1. [Maintenance] Press to access the [Maintenance] menu. Use options in the Maintenance menu to check and improve print quality, clean the print head and check the ink volume. 2. [Quiet Mode] Displays the Quiet Mode setting. Press to access the [Quiet Mode] menu. When this menu is set to [On], is displayed on the Home screen. 3. [Fax Preview] Displays the Fax Preview setting. Press to access the [Fax Preview] menu. 4. Receive Mode Displays the current Receive Mode.
Related Information • Introduction to Your Brother Machine • LCD Overview • Check the Ink Volume • Distinctive Ring 23
Home > Introduction to Your Brother Machine > Navigate the Touchscreen Navigate the Touchscreen Related Models: DCP-J562DW/MFC-J680DW/MFC-J880DW • Press your finger on the Touchscreen to display and access all the settings and features and their available options. Press d c or a b to scroll through them. IMPORTANT DO NOT press the Touchscreen with a sharp object such as a pen or stylus. It may damage the machine.
Home > Introduction to Your Brother Machine > Access Brother Utilities (Windows®) Access Brother Utilities (Windows®) Brother Utilities is an application launcher that offers convenient access to all Brother applications installed on your computer. 1. Do one of the following: • (Windows® XP, Windows Vista® and Windows® 7) Click • (Start) > All Programs > Brother > Brother Utilities. (Windows® 8) Tap or click • (Brother Utilities) either on the Start screen or the desktop. (Windows® 8.
Home > Introduction to Your Brother Machine > Access Brother Utilities (Windows®) > Uninstall the Brother Software and Drivers (Windows®) Uninstall the Brother Software and Drivers (Windows®) 1. Do one of the following: • (Windows® XP, Windows Vista® and Windows® 7) Click • (Start) > All Programs > Brother > Brother Utilities. (Windows® 8) Tap or click • (Brother Utilities) either on the Start screen or the desktop. (Windows® 8.
Home > Paper Handling Paper Handling • Load Paper • Load Documents 27
Home > Paper Handling > Load Paper Load Paper • Load Paper in the Paper Tray • Load Photo or Photo L Paper in Photo Paper Tray Use the photo paper tray, which is located on the top of the output paper tray cover, to print on Photo (10 x 15 cm) or Photo L (89 x 127 mm) size paper. • Load Paper in the Manual Feed Slot Load special print media in this slot one sheet at a time.
Home > Paper Handling > Load Paper > Load Paper in the Paper Tray Load Paper in the Paper Tray • Load Cut-Sheet Paper or Photo 2L Paper in the Paper Tray • Load Photo Paper in the Paper Tray • Load Envelopes in the Paper Tray 29
Home > Paper Handling > Load Paper > Load Paper in the Paper Tray > Load Cut-Sheet Paper or Photo 2L Paper in the Paper Tray Load Cut-Sheet Paper or Photo 2L Paper in the Paper Tray • If the [Check Paper] setting is set to [On] and you pull the paper tray out of the machine, a message appears on the LCD asking if you want to change the paper type and paper size. Change the Paper Size and Paper Type settings if needed, following the on-screen instructions.
1 2 5. Fan the stack of paper well to avoid paper jams and misfeeds. Always make sure the paper is not curled or wrinkled. 6. Gently load paper in the paper tray with the printing surface face down. Make sure the paper is flat in the tray and the paper length guide (1) touches the edges of the paper.
IMPORTANT • Be careful not to push the paper in too far; it may lift at the back of the tray and cause paper feed problems. • Loading more than 20 sheets of Photo 2L (13 x 18 cm) paper may cause paper jams. To add paper before the tray is empty, remove the paper from the tray and combine it with the paper you are adding. Always fan the stack of paper well to prevent the machine from feeding multiple pages. 7. Gently adjust the paper width guides (1) to fit the paper.
Related Information • Load Paper in the Paper Tray • Change the Check Paper Size Setting • Choose the Right Print Media • Change the Paper Size and Paper Type 33
Home > Paper Handling > Load Paper > Load Paper in the Paper Tray > Load Photo Paper in the Paper Tray Load Photo Paper in the Paper Tray • If the [Check Paper] setting is set to [On] and you pull the paper tray out of the machine, a message appears on the LCD asking if you want to change the paper type and paper size. Change the Paper Size and Paper Type settings if needed, following the on-screen instructions. • Load only one size and type of paper in the paper tray at a time.
1 2 5. Close the output paper tray cover. 6. Load up to 20 sheets of Photo paper with the printing surface face down. Loading more than 20 sheets of photo paper may cause paper jams. 7. Gently adjust the paper guides (1) to fit the paper. Make sure the paper width guides touch the edges of the paper and the paper is flat in the tray. 1 8. Slowly push the paper tray completely into the machine.
9. While holding the paper tray in the machine, pull out the paper support (1) until it locks into place, and then unfold the paper support flap (2).
Home > Paper Handling > Load Paper > Load Paper in the Paper Tray > Load Envelopes in the Paper Tray Load Envelopes in the Paper Tray • If the [Check Paper] setting is set to [On] and you pull the paper tray out of the machine, a message appears on the LCD asking if you want to change the paper type and paper size. Change the Paper Size and Paper Type settings if needed, following the on-screen instructions. • Load only one size and type of paper in the paper tray at a time.
1 2 IMPORTANT If envelopes are "double-feeding," load one envelope in the paper tray at a time. 5. Close the output paper tray cover. 6. Slowly push the paper tray completely into the machine. 7. While holding the paper tray in the machine, pull out the paper support (1) until it locks into place, and then unfold the paper support flap (2).
• Change the Check Paper Size Setting • Choose the Right Print Media • Change the Paper Size and Paper Type 39
Home > Paper Handling > Load Paper > Load Photo or Photo L Paper in Photo Paper Tray Load Photo or Photo L Paper in Photo Paper Tray Related Models: DCP-J562DW/MFC-J680DW/MFC-J880DW Use the photo paper tray, which is located on the top of the output paper tray cover, to print on Photo (10 x 15 cm) or Photo L (89 x 127 mm) size paper. • When you use the photo paper tray, you do not have to remove the paper from the tray beneath it.
5. Gently adjust the paper width guides (1) to fit the paper. Make sure the paper width guides touch the edges of the paper and the paper is flat in the tray. 1 6. Slowly push the paper tray completely into the machine. Do not open the paper support and the paper support flap when using the photo paper tray. Otherwise it is difficult to take out the printouts. IMPORTANT When you have finished printing photos, return the photo paper tray to the Normal printing position.
• Paper Handling and Printing Problems 42
Home > Paper Handling > Load Paper > Load Paper in the Manual Feed Slot Load Paper in the Manual Feed Slot Related Models: DCP-J562DW/MFC-J680DW/MFC-J880DW Load special print media in this slot one sheet at a time. The machine automatically turns on Manual Feed mode when you put paper in the manual feed slot. 1. Open the manual feed slot cover. 2. Lift up the paper support. 3. Slide the manual feed slot paper guides to fit the width of the paper you are using. 4.
When you are using envelopes, load the envelopes with the printing surface face up and the flap on the left as shown in the illustration. See Related Information. IMPORTANT • DO NOT load more than one sheet of paper in the manual feed slot at any one time. Doing this may cause a paper jam. When printing multiple pages, do not feed the next sheet of paper until the Touchscreen displays a message instructing you to feed the next sheet.
• DO NOT load paper in the manual feed slot when you are printing from the paper tray. Doing this may cause a paper jam. 5. Using both hands, gently adjust the manual feed slot paper guides to fit the paper. • DO NOT press the paper guides too tightly against the paper. Doing this may cause the paper to fold and jam. • Place the paper in the centre of the manual feed slot between the paper guides. If the paper is not centred, pull it out and insert it again in the centre position. 6.
• If the document does not fit on one sheet, the machine will prompt you to load another sheet of paper. Place another sheet of paper in the manual feed slot, and then press [OK] on the Touchscreen. • Make sure printing has finished before you close the manual feed slot cover. • When paper is placed in the manual feed slot, the machine always prints from the manual feed slot. • The machine will eject paper loaded in the manual feed slot while a test page, fax, or report is being printed.
Home > Paper Handling > Load Paper > Unprintable Area Unprintable Area The unprintable area depends on the settings in the application you are using. The figures below show the unprintable areas on cut-sheet paper and envelopes. The machine can print in the shaded areas of cut-sheet paper only when the Borderless print feature is available and turned on.
Home > Paper Handling > Load Paper > Paper Settings Paper Settings • Change the Paper Size and Paper Type Set the Paper Size and Paper Type settings for the paper tray. • Change the Check Paper Size Setting If the Check Paper setting is set to [On] and you pull the paper tray out of the machine, the LCD displays a message asking if you want to change the Paper Size and Paper Type settings.
Home > Paper Handling > Load Paper > Paper Settings > Change the Paper Size and Paper Type Change the Paper Size and Paper Type Set the Paper Size and Paper Type settings for the paper tray. • To get the best print quality, set the machine for the type of paper you are using. • When you change the size of the paper you load in the tray, you must change the Paper Size setting on the LCD at the same time. >> MFC-J480DW >> DCP-J562DW/MFC-J680DW/MFC-J880DW MFC-J480DW 1. Press Settings. 2.
• Paper Handling and Printing Problems 50
Home > Paper Handling > Load Paper > Paper Settings > Change the Check Paper Size Setting Change the Check Paper Size Setting If the Check Paper setting is set to [On] and you pull the paper tray out of the machine, the LCD displays a message asking if you want to change the Paper Size and Paper Type settings. The default setting is [On]. >> MFC-J480DW >> DCP-J562DW/MFC-J680DW/MFC-J880DW MFC-J480DW 1. Press Settings. 2. Press a or b to select the following: a. Select [General Setup]. Press OK. b.
Home > Paper Handling > Load Paper > Acceptable Paper and Other Print Media Acceptable Paper and Other Print Media The print quality can be affected by the type of paper you use in the machine. To get the best print quality for the settings you have chosen, always set the Paper Type to match the type of paper you load. You can use plain paper, inkjet paper (coated paper), glossy paper, recycled paper and envelopes. We recommend testing various paper types before buying large quantities.
Home > Paper Handling > Load Paper > Acceptable Paper and Other Print Media > Recommended Print Media Recommended Print Media For the best print quality, we recommend using the Brother paper listed in the table. If Brother paper is not available in your country, we recommend testing various paper types before purchasing large quantities.
Home > Paper Handling > Load Paper > Acceptable Paper and Other Print Media > Handle and Use Print Media Handle and Use Print Media • Store paper in its original packaging and keep it sealed. Keep the paper flat and away from moisture, direct sunlight and heat. • Avoid touching the shiny (coated) side of photo paper. IMPORTANT DO NOT use the following kinds of paper: • Damaged, curled, wrinkled, or irregularly shaped 1 1 1. 2 mm or greater curl may cause jams to occur.
Home > Paper Handling > Load Paper > Acceptable Paper and Other Print Media > About Envelopes About Envelopes • Use envelopes that weigh from 80 to 95 gsm. • Some envelope sizes require that you set margins in the application. Make sure you do a test print first before printing many envelopes.
Related Information • Acceptable Paper and Other Print Media • Load Envelopes in the Paper Tray • Load Paper in the Manual Feed Slot 56
Home > Paper Handling > Load Paper > Acceptable Paper and Other Print Media > Choose the Right Print Media Choose the Right Print Media • Paper Type and Paper Size for Each Operation • Paper Capacity of the Paper Trays • Paper Weight and Thickness • Load Cut-Sheet Paper or Photo 2L Paper in the Paper Tray • Load Photo Paper in the Paper Tray • Load Envelopes in the Paper Tray • Load Paper in the Manual Feed Slot Load special print media in this slot one sheet at a time.
Home > Paper Handling > Load Paper > Acceptable Paper and Other Print Media > Choose the Right Print Media > Paper Type and Paper Size for Each Operation Paper Type and Paper Size for Each Operation Paper Type Cut-Sheet Cards Envelopes Paper Size Usage Fax 1 Copy Photo Capture 2 Printer A4 210 x 297 mm (8.3 x 11.7 in.) Yes Yes Yes Yes Letter 215.9 x 279.4 mm (8 1/2 x 11 in.) Yes Yes Yes Yes Legal 3 215.9 x 355.6 mm (8 1/2 x 14 in.) - Yes - Yes Executive 184.1 x 266.
Home > Paper Handling > Load Paper > Acceptable Paper and Other Print Media > Choose the Right Print Media > Paper Capacity of the Paper Trays Paper Capacity of the Paper Trays Paper Tray Paper Size 1 Paper Types No.
Home > Paper Handling > Load Paper > Acceptable Paper and Other Print Media > Choose the Right Print Media > Paper Weight and Thickness Paper Weight and Thickness Paper Type Cut-Sheet Cards Weight Thickness Plain Paper, Recycled Paper 64 to 120 gsm 0.08 to 0.15 mm Inkjet Paper 64 to 200 gsm 0.08 to 0.25 mm Glossy Paper 1 Up to 220 gsm Up to 0.25 mm Photo Card 1 Up to 220 gsm Up to 0.25 mm Index Card Up to 120 gsm Up to 0.15 mm 80 to 95 gsm Up to 0.
Home > Paper Handling > Load Documents Load Documents • Load Documents in the Automatic Document Feeder (ADF) The ADF can hold up 20 pages and feeds each sheet individually. • Load Documents on the Scanner Glass • Unscannable Area The unscannable area of a page depends on the settings in the application you are using. The figures below show the typical unscannable measurements.
Home > Paper Handling > Load Documents > Load Documents in the Automatic Document Feeder (ADF) Load Documents in the Automatic Document Feeder (ADF) Related Models: MFC-J480DW/MFC-J680DW/MFC-J880DW The ADF can hold up 20 pages and feeds each sheet individually. (Documents that are longer than 297 mm must be fed one page at a time.) Use paper that is within the sizes and weights shown in the table. Always fan the pages before placing them in the ADF. Document Sizes and Weights Length: 148 to 355.
Related Information • Load Documents • Copy a Document • Error and Maintenance Messages • Telephone and Fax problems • Other Problems 63
Home > Paper Handling > Load Documents > Load Documents on the Scanner Glass Load Documents on the Scanner Glass Use the scanner glass to fax, copy, or scan one page at a time. Document Sizes Supported Length: Up to 297 mm Width: Up to 215.9 mm Weight: Up to 2 kg (ADF models) To use the scanner glass, the ADF must be empty and the ADF document support must be closed. 1. Lift the document cover. 2. Place the document face down in the upper left corner of the scanner glass, aligned with the arrow. 3.
• Other Problems 65
Home > Paper Handling > Load Documents > Unscannable Area Unscannable Area The unscannable area of a page depends on the settings in the application you are using. The figures below show the typical unscannable measurements. Usage Fax Document Size A4 Top (1) Left (2) Bottom (3) Right (4) 3 mm 3 mm 1 Letter 4 mm Legal Copy All paper sizes Scan 1 3 mm 1 mm 1 mm The unscannable area is 1 mm when using the ADF.
Home > Print Print • Print from Your Computer (Windows®) • Print from Your Computer (Macintosh) 67
Home > Print > Print from Your Computer (Windows®) Print from Your Computer (Windows®) • Print a Photo (Windows®) • Print a Document (Windows®) • Cancel a Print Job (Windows®) If a print job was sent to the print queue and did not print, or was sent to the print queue in error, you may have to delete it to allow subsequent jobs to print.
Home > Print > Print from Your Computer (Windows®) > Print a Photo (Windows®) Print a Photo (Windows®) 1. Select the print command in your application. 2. Select Brother MFC-XXXX Printer (where XXXX is the name of your model), and then click the printing properties or preferences button. The printer driver window appears. 3. Make sure you have loaded the correct media in the paper tray.
Home > Print > Print from Your Computer (Windows®) > Print a Document (Windows®) Print a Document (Windows®) 1. Select the print command in your application. 2. Select Brother MFC-XXXX Printer (where XXXX is the name of your model), and then click the printing properties or preferences button. The printer driver window appears. 3. Make sure you have loaded the correct size paper in the paper tray. 4. Click the Media Type drop-down list, and then select the type of paper you are using.
Home > Print > Print from Your Computer (Windows®) > Cancel a Print Job (Windows®) Cancel a Print Job (Windows®) If a print job was sent to the print queue and did not print, or was sent to the print queue in error, you may have to delete it to allow subsequent jobs to print. 1. Double-click the printer icon in the task tray. 2. Select the print job you want to cancel. 3. Click the Document menu. 4. Select Cancel. 5. Click Yes.
Home > Print > Print from Your Computer (Windows®) > Print More Than One Page on a Single Sheet of Paper (N in 1) (Windows®) Print More Than One Page on a Single Sheet of Paper (N in 1) (Windows®) 1. Select the print command in your application. 2. Select Brother MFC-XXXX Printer (where XXXX is the name of your model), and then click the printing properties or preferences button. The printer driver window appears. 3.
Home > Print > Print from Your Computer (Windows®) > Print as a Poster (Windows®) Print as a Poster (Windows®) Enlarge your print size and print the document in poster mode. 1. Select the print command in your application. 2. Select Brother MFC-XXXX Printer (where XXXX is the name of your model), and then click the printing properties or preferences button. The printer driver window appears. 3. Click the Multiple Page drop-down list, and then select the 1 in 2x2 Pages or 1 in 3x3 Pages option. 4.
Home > Print > Print from Your Computer (Windows®) > Print on Both Sides of the Paper Automatically (Automatic 2-sided Printing) (Windows®) Print on Both Sides of the Paper Automatically (Automatic 2-sided Printing) (Windows®) • Make sure the back cover is closed. • If paper is curled, straighten it and put it back in the paper tray. • Use regular paper or thin paper. DO NOT use bond paper. • If the paper is thin, it may wrinkle. 1. Select the print command in your application. 2.
Option for Portrait Description Short Edge (Top) Short Edge (Bottom) Option for Landscape Description Long Edge (Top) Long Edge (Bottom) Short Edge (Right) Short Edge (Left) 7. Select the Binding Offset check box if you want to specify the offset for binding in inches or millimetres. 8. Click OK to return to the printer driver window. 9. Change other printer settings if needed. The Borderless feature is not available when using this option. 10. Click OK again, and then complete your print operation.
Related Information • Print from Your Computer (Windows®) • Print Settings (Windows®) • Print as a Booklet Automatically (Windows®) 76
Home > Print > Print from Your Computer (Windows®) > Print as a Booklet Automatically (Windows®) Print as a Booklet Automatically (Windows®) Use this option to print a document in booklet format using 2-sided printing. The document's pages will be arranged according to the correct page number and will allow you to fold at the centre of the print output without having to change the order of the printed pages. • Make sure the back cover is closed.
Option for Landscape Description Top Binding Bottom Binding 7. Select one of the options from the Booklet Printing Method menu. Option Description All Pages at Once Every page will be printed in booklet format (four pages to every piece of paper, two pages per side). Fold your printout in the middle to create the booklet.
Home > Print > Print from Your Computer (Windows®) > Print a Colour Document in Greyscale (Windows®) Print a Colour Document in Greyscale (Windows®) Greyscale mode makes the print processing speed faster than colour mode. If your document contains colour, selecting Greyscale mode prints your document in 256 levels of greyscale. 1. Select the print command in your application. 2.
Home > Print > Print from Your Computer (Windows®) > Prevent Smudged Printouts and Paper Jams When Printing on Both Sides of the Paper (Windows®) Prevent Smudged Printouts and Paper Jams When Printing on Both Sides of the Paper (Windows®) Some types of print media may need more drying time when using the 2-sided feature. Change the Advanced 2sided Settings option if you have problems with smudged 2-sided printouts or paper jams. 1. Select the print command in your application. 2.
Home > Print > Print from Your Computer (Windows®) > Use a Preset Print Profile (Windows®) Use a Preset Print Profile (Windows®) Print Profiles are presets designed to give you quick access to frequently-used printing configurations. 1. Select the print command in your application. 2. Select Brother MFC-XXXX Printer (where XXXX is the name of your model), and then click the printing properties or preferences button. The printer driver window appears. 3. Click the Print Profiles tab. 4.
Related Information • Print from Your Computer (Windows®) • Create or Delete Your Print Profile (Windows®) • Print Settings (Windows®) 82
Home > Print > Print from Your Computer (Windows®) > Use a Preset Print Profile (Windows®) > Create or Delete Your Print Profile (Windows®) Create or Delete Your Print Profile (Windows®) Add up to 20 new print profiles with customised settings. 1. Select the print command in your application. 2. Select Brother MFC-XXXX Printer (where XXXX is the name of your model), and then click the printing properties or preferences button. The printer driver window appears. 3.
Home > Print > Print from Your Computer (Windows®) > Change the Default Print Settings (Windows®) Change the Default Print Settings (Windows®) When you change print settings from within a program, the changes apply only to the items you are printing in that program, at that time. To select print settings to use for all of your Windows® programs, all the time, use these steps to change the default print settings. 1.
Home > Print > Print from Your Computer (Windows®) > Print Settings (Windows®) Print Settings (Windows®) Basic Tab 1. Media Type Select the type of media you want to use. To achieve the best print results, the machine automatically adjusts its print settings according to the selected media type. Slow Drying Paper Select this option if you use a type of plain paper on which ink dries slowly. This option may cause slight blurring of the text. 2. Print Quality Select the print resolution you want.
Borderless Select this option to print photos without borders. Because the image data is created slightly larger than the paper size you are using, this will cause some cropping of the photo edges. You may not be able to select the Borderless option for some combinations of media type and quality, or from some applications. 4. Colour Mode Select the colour mode to suit your preference. 5. Orientation Select the orientation (portrait or landscape) of your printout.
Advanced Tab 1. Colour / Greyscale Select colour or greyscale printing. The print speed is faster in greyscale mode than it is in colour mode. If your document contains colour and you select greyscale mode, your document will be printed using 256 levels of greyscale. Settings button Click this button to select the Colour Enhancement feature. This feature analyses your image to improve its sharpness, white balance and colour density.
Fit to Paper Size Select this option to enlarge or reduce the document pages to fit a specified paper size. When you select this option, select the paper size you want from the drop-down list. Free Select this option to enlarge or reduce the document pages manually. When you select this option, type a value into the field. 4. Mirror Print Select this option to reverse the printed image on the page horizontally from left to right. 5. Reverse Print Select this option to rotate the printed image 180 degrees.
• Change the Default Print Settings (Windows®) 89
Home > Print > Print from Your Computer (Macintosh) Print from Your Computer (Macintosh) • Print a Photo (Macintosh) • Print a Document (Macintosh) • Print on Both Sides of the Paper Automatically (Automatic 2-sided Printing) (Macintosh) • Print More Than One Page on a Single Sheet of Paper (N in 1) (Macintosh) • Print a Colour Document in Greyscale (Macintosh) Greyscale mode makes the print processing speed faster than colour mode.
Home > Print > Print from Your Computer (Macintosh) > Print a Photo (Macintosh) Print a Photo (Macintosh) 1. Make sure you have loaded the correct media in the paper tray. IMPORTANT • We recommend using the photo paper tray located on the top of the output tray cover to print on Photo (10 x 15 cm) and Photo L (9 x 13 cm) paper. (available only for certain models) • For best results, use Brother paper.
Home > Print > Print from Your Computer (Macintosh) > Print a Document (Macintosh) Print a Document (Macintosh) 1. Make sure you have loaded the correct size paper in the paper tray. 2. From an application, such as Apple TextEdit, click the File menu, and then select Print. 3. Select Brother MFC-XXXX (where XXXX is your model name). For more page setup options, click the Show Details button. 4. Click the Paper Size pop-up menu, and then select your paper size. 5.
Home > Print > Print from Your Computer (Macintosh) > Print on Both Sides of the Paper Automatically (Automatic 2-sided Printing) (Macintosh) Print on Both Sides of the Paper Automatically (Automatic 2-sided Printing) (Macintosh) 1. From an application, such as Apple TextEdit, click the File menu, and then select Print. 2. Select Brother MFC-XXXX (where XXXX is your model name). For more page setup options, click the Show Details button. 3.
Home > Print > Print from Your Computer (Macintosh) > Print More Than One Page on a Single Sheet of Paper (N in 1) (Macintosh) Print More Than One Page on a Single Sheet of Paper (N in 1) (Macintosh) 1. From an application, such as Apple TextEdit, click the File menu, and then select Print. 2. Select Brother MFC-XXXX (where XXXX is your model name). For more page setup options, click the Show Details button. 3. Click the application pop-up menu, and then select Layout. The Layout setting options appear.
Home > Print > Print from Your Computer (Macintosh) > Print a Colour Document in Greyscale (Macintosh) Print a Colour Document in Greyscale (Macintosh) Greyscale mode makes the print processing speed faster than colour mode. If your document contains colour, selecting Greyscale mode prints your document in 256 levels of greyscale. 1. From an application, such as Apple TextEdit, click the File menu, and then select Print. 2. Select Brother MFC-XXXX (where XXXX is your model name).
Home > Print > Print from Your Computer (Macintosh) > Prevent Smudged Printouts and Paper Jams When Printing on Both Sides of the Paper (Macintosh) Prevent Smudged Printouts and Paper Jams When Printing on Both Sides of the Paper (Macintosh) Some types of print media may need more drying time when using the 2-sided feature. Change the Advanced 2sided Settings option if you have problems with smudged 2-sided printouts or paper jams. 1.
Home > Print > Print from Your Computer (Macintosh) > Print Options (Macintosh) Print Options (Macintosh) Page Setup 1. Paper Size Select the size of the paper you want to use. You can either choose from standard paper sizes or create a custom paper size. 2. Orientation Select the orientation (portrait or landscape) of your printout. If your application contains a similar setting, we recommend that you set the orientation using the application. 3.
Layout 1. Pages per Sheet Select the number of pages to print on a single sheet of paper. 2. Layout Direction Select the page order when printing multiple pages on a single sheet of paper. 3. Border Select the type of border to use when printing multiple pages on a single sheet of paper. 4. Two-Sided (available only for certain models) Select whether to print on both sides of the paper. 5. Reverse page orientation Select this option to rotate the printed image 180 degrees. 6.
Paper Handling 1. Collate pages Select this option to print sets of multi-page documents in the original page order. When this option is selected, one complete copy of your document will print, and then reprint according to the number of copies you choose. If this option is not selected, then each page will print according to the number of copies chosen before the next page of the document is printed. 2. Page Order Select the page order. 3.
Print Settings 1. Media Type Select the type of media you want to use. To achieve the best print results, the machine automatically adjusts its print settings according to the selected media type. 2. Slow Drying Paper Select this option if you use a type of plain paper on which ink dries slowly. This option may cause slight blurring of the text. 3. Print Quality Select the print resolution you want.
4. Color/Grayscale Select colour or greyscale printing. The print speed is faster in greyscale mode than it is in colour mode. If your document contains colour and you select greyscale mode, your document will be printed using 256 levels of greyscale. 5. Advanced Change Data Transfer Mode Select the print data transfer mode to improve print quality or print speed. Advanced 2-sided Settings Select the print speed for 2-sided printing.
1. Color Mode Select the colour mode to suit your preference. 2. Advanced Color Settings Click the disclosure triangle to select the Colour Enhancement feature. This feature analyses your image to improve its sharpness, white balance and colour density. This process may take several minutes depending on the size of the image and the specifications of your computer.
Home > Scan Scan • Scan Using the Scan Button on Your Brother Machine • Scan from Your Computer (Windows®) There are several ways you can use your computer to scan photos and documents on your Brother machine. Use the software applications provided by Brother, or use your favourite scanning application. • Scan from Your Computer (Macintosh) There are several ways you can use your Macintosh to scan photos and documents on your Brother machine.
Home > Scan > Scan Using the Scan Button on Your Brother Machine Scan Using the Scan Button on Your Brother Machine • Scan Photos and Graphics Send scanned photos or graphics directly to your computer. • Save Scanned Data to a Folder as a PDF File Scan documents and save them to a folder on your computer as PDF files. • Save Scanned Data to a Memory Card or USB Flash Drive Scan documents and save them directly to a memory card or USB flash drive without using a computer.
Home > Scan > Scan Using the Scan Button on Your Brother Machine > Scan Photos and Graphics Scan Photos and Graphics Send scanned photos or graphics directly to your computer. Use the Scan button on the machine to make temporary changes to the scan settings. To make permanent changes, use Brother's ControlCenter software. >> MFC-J480DW >> DCP-J562DW/MFC-J680DW/MFC-J880DW MFC-J480DW 1. Load your document. 2. Press (SCAN). 3. Press a or b to select the [Scan to Image] option, and then press OK. 4.
Option Description Scan Size Select the scan size for your document. Remove Background Change the amount of background colour that is removed. 9. Press Mono Start or Colour Start. [Scan Type] depends on the settings you have selected. Pressing Mono Start or Colour Start does not allow you to change the settings. DCP-J562DW/MFC-J680DW/MFC-J880DW 1. Load your document. 2. Press [Scan] > [to Image]. 3.
Home > Scan > Scan Using the Scan Button on Your Brother Machine > Save Scanned Data to a Folder as a PDF File Save Scanned Data to a Folder as a PDF File Scan documents and save them to a folder on your computer as PDF files. Use the Scan button on the machine to make temporary changes to the scan settings. To make permanent changes, use Brother's ControlCenter software. >> MFC-J480DW >> DCP-J562DW/MFC-J680DW/MFC-J880DW MFC-J480DW 1. Load your document. 2. Press (SCAN). 3.
Option Description File Type Select the file format for your document. Scan Size Select the scan size for your document. Remove Background Change the amount of background colour that is removed. 9. Press Mono Start or Colour Start. [Scan Type] depends on the settings you have selected. Pressing Mono Start or Colour Start does not allow you to change the settings. DCP-J562DW/MFC-J680DW/MFC-J880DW 1. Load your document. 2. Press [Scan] > [to File]. 3.
Home > Scan > Scan Using the Scan Button on Your Brother Machine > Save Scanned Data to a Memory Card or USB Flash Drive Save Scanned Data to a Memory Card or USB Flash Drive Related Models: DCP-J562DW/MFC-J680DW/MFC-J880DW Scan documents and save them directly to a memory card or USB flash drive without using a computer. 1. Load your document. 2. Open the machine's media slot cover. 3. Insert a memory card or USB flash drive into your machine. The LCD screen automatically changes. 4.
IMPORTANT The LCD displays a message while reading the data. DO NOT unplug the power cord or remove the memory card or USB flash drive from the machine while it is reading the data. You could lose your data or damage the memory card or USB flash drive.
Home > Scan > Scan Using the Scan Button on Your Brother Machine > Save Scanned Data to a Memory Card or USB Flash Drive > Memory Card or USB Flash Drive Information Memory Card or USB Flash Drive Information Related Models: DCP-J562DW/MFC-J680DW/MFC-J880DW Your Brother machine has media drives (slots) for use with common data storage and digital camera media.
Home > Scan > Scan Using the Scan Button on Your Brother Machine > Save Scanned Data to a Memory Card or USB Flash Drive > Scan-to Media Settings Scan-to Media Settings Related Models: DCP-J562DW/MFC-J680DW/MFC-J880DW [Scan Type] / [Resolution] / [File Type] Selecting a higher dots per inch (dpi) setting increases the details captured during the scan; however, file size and transfer time also increase. The table below shows the available quality settings and file types.
[Factory Reset] Restore all settings back to the factory settings.
Home > Scan > Scan Using the Scan Button on Your Brother Machine > Scan Multiple Business Cards and Photos (Auto Crop) Scan Multiple Business Cards and Photos (Auto Crop) Related Models: MFC-J880DW You can scan multiple documents placed on the scanner glass. The machine will scan each document and use the Auto Crop feature to create separate files or a single multi-page file. Guidelines for Auto Crop 1. 10 mm or greater 2.
Related Information • Scan Using the Scan Button on Your Brother Machine 115
Home > Scan > Scan Using the Scan Button on Your Brother Machine > Scan to an Editable Text File Using OCR Scan to an Editable Text File Using OCR Related Models: MFC-J480DW/MFC-J680DW/MFC-J880DW Your machine can convert characters in a scanned document to text data using optical character recognition (OCR) technology. You can edit this text using your preferred text-editing application. • (Macintosh) Presto! PageManager must be installed on your computer. Download Presto! PageManager from http://nj.
7. Press a or b to select the [Set at Device] option, and then press OK. 8. Select the scan settings you want to change, and then press OK. Option Description Scan Type Select the scan type for your document. Resolution Select the scan resolution for your document. File Type Select the file format for your document. Scan Size Select the scan size for your document. 9. Press Mono Start or Colour Start. [Scan Type] depends on the settings you have selected.
Home > Scan > Scan Using the Scan Button on Your Brother Machine > Scan to E-mail Attachment Scan to E-mail Attachment Send a scanned document as an email attachment. • Use the Scan button on the machine to make temporary changes to the scan settings. To make permanent changes, use Brother's ControlCenter software. • The Scan to E-mail feature does not support Webmail services.
Option Description Scan Type Select the scan type for your document. Resolution Select the scan resolution for your document. File Type Select the file format for your document. Scan Size Select the scan size for your document. Remove Background Change the amount of background colour that is removed. 9. Press Mono Start or Colour Start. [Scan Type] depends on the settings you have selected. Pressing Mono Start or Colour Start does not allow you to change the settings.
Home > Scan > Scan Using the Scan Button on Your Brother Machine > Web Services for Scanning on Your Network (Windows Vista® SP2 or greater, Windows® 7 and Windows® 8) Web Services for Scanning on Your Network (Windows Vista® SP2 or greater, Windows® 7 and Windows® 8) The Web Services protocol enables Windows Vista® (SP2 or greater), Windows® 7 and Windows® 8 users to scan using a Brother machine on the network. You must install the driver via Web Services.
Home > Scan > Scan Using the Scan Button on Your Brother Machine > Web Services for Scanning on Your Network (Windows Vista® SP2 or greater, Windows® 7 and Windows® 8) > Use Web Services to Install Drivers Used for Scanning (Windows Vista®, Windows® 7 and Windows® 8) Use Web Services to Install Drivers Used for Scanning (Windows Vista®, Windows® 7 and Windows® 8) Use Web Services to monitor printers on the network. • Make sure you have installed the Brother software and drivers.
Related Information • Web Services for Scanning on Your Network (Windows Vista® SP2 or greater, Windows® 7 and Windows® 8) 122
Home > Scan > Scan Using the Scan Button on Your Brother Machine > Web Services for Scanning on Your Network (Windows Vista® SP2 or greater, Windows® 7 and Windows® 8) > Scan Using Web Services from the Brother Machine (Windows Vista® SP2 or greater, Windows® 7 and Windows® 8) Scan Using Web Services from the Brother Machine (Windows Vista® SP2 or greater, Windows® 7 and Windows® 8) If you have installed the driver for scanning via Web Services, you can access the Web Services scanning menu on your Brother
Home > Scan > Scan Using the Scan Button on Your Brother Machine > Web Services for Scanning on Your Network (Windows Vista® SP2 or greater, Windows® 7 and Windows® 8) > Configure Scan Settings for Web Services Configure Scan Settings for Web Services 1. Do one of the following: • (Windows Vista®) Click • (Windows® 7) Click • (Start) > Control Panel > Hardware and Sound > Scanners and Cameras. (Start) > Devices and Printers. (Windows® 8) Move your mouse to the lower right corner of your desktop.
Home > Scan > Scan Using the Scan Button on Your Brother Machine > Change Scan Button Settings from ControlCenter4 (Windows®) Change Scan Button Settings from ControlCenter4 (Windows®) 1. Click the (ControlCenter4) icon in the task tray, and then click Open. 2. Click the Device Settings tab. 3. Click the Device Scan Settings button. The Device Scan Settings dialog box appears. 4. Click the tab for the Scan to action you want to change (Image, OCR, E-mail, or File). 5. Change the settings as needed. 6.
Each tab corresponds to a scan feature, as described below. These settings can be changed. Click the tabs, and then change the settings.
Destination Folder To change the folder for the Image, OCR and E-mail features, click Change. Click the folder icon, and then browse to the folder where you want to save your scanned document. Select the Show Folder option to automatically display the destination folder after scanning to a File. File size Adjust the data compression ratio of the scanned image. Change the file size by moving the File size slider to the right or left. Resolution Select a scanning resolution from the Resolution drop-down list.
• Remove Background Colour Remove the base colour of documents to make the scanned data more recognisable. When you use this feature, choose from three settings: High, Medium and Low. Default Select this option to restore all settings to their factory setting values.
Home > Scan > Scan Using the Scan Button on Your Brother Machine > Change Scan Button Settings from ControlCenter2 (Macintosh) Change Scan Button Settings from ControlCenter2 (Macintosh) 1. In the Finder menu bar, click Go > Applications > Brother, and then double-click the (ControlCenter) icon. The ControlCenter2 screen appears. 2. Hold the control key on your keyboard and click the scan destination (Image, OCR, E-mail, or File) whose settings you want to change. 3. Click the Device Button tab.
OCR Software - Yes - - - Yes - - Destination File Path Yes Yes Yes - File Name Yes Yes Yes Yes Insert Date in File Name Yes Yes Yes Yes Destination Folder Yes Yes Yes Yes Resolution Yes Yes Yes Yes Scan Type Yes Yes Yes Yes Document Size Yes Yes Yes Yes ID Card Scan Yes Yes Yes Yes Advanced Settings Yes Yes Yes Yes Restore Defaults Yes Yes Yes Yes (only available for certain models) OCR Language (only available for certain models) Target Applicatio
Resolution Select a scanning resolution from the Resolution pop-up menu. Higher resolutions take more memory and transfer time, but produce a finer scanned image. Scan Type Select from a range of scan colour depths. • Black & White Use for text or line art images. • Gray (Error Diffusion) Use for photographic images or graphics. (Error Diffusion is a method for creating simulated grey images without using true grey dots. Black dots are put in a specific pattern to give a grey appearance.
Home > Scan > Scan from Your Computer (Windows®) Scan from Your Computer (Windows®) There are several ways you can use your computer to scan photos and documents on your Brother machine. Use the software applications provided by Brother, or use your favourite scanning application. • Scan Using ControlCenter4 Home Mode (Windows®) Use ControlCenter4 Home Mode to access your machine's main features.
Home > Scan > Scan from Your Computer (Windows®) > Scan Using ControlCenter4 Home Mode (Windows®) Scan Using ControlCenter4 Home Mode (Windows®) Use ControlCenter4 Home Mode to access your machine's main features.
Home > Scan > Scan from Your Computer (Windows®) > Scan Using ControlCenter4 Home Mode (Windows®) > Scan Using ControlCenter4 Home Mode (Windows®) Scan Using ControlCenter4 Home Mode (Windows®) Select Home Mode as the mode setting for ControlCenter4. 1. Load your document. 2. Click the (ControlCenter4) icon in the task tray, and then click Open. 3. Click the Scan tab. 4. Select the Document Type. 5. Change the document's Scan Size, if needed. 6. Click (Scan).
Related Information • Scan Using ControlCenter4 Home Mode (Windows®) • Select Document Type Using ControlCenter4 Home Mode (Windows®) • Change Scan Size Using ControlCenter4 Home Mode (Windows®) • Crop a Scanned Image Using ControlCenter4 Home Mode (Windows®) • Print Scanned Data Using ControlCenter4 Home Mode (Windows®) • Open with an Application Using ControlCenter4 Home Mode (Windows®) 135
Home > Scan > Scan from Your Computer (Windows®) > Scan Using ControlCenter4 Home Mode (Windows®) > Scan Using ControlCenter4 Home Mode (Windows®) > Select Document Type Using ControlCenter4 Home Mode (Windows®) Select Document Type Using ControlCenter4 Home Mode (Windows®) • Select the Document Type option that matches the type of original you want to scan.
Home > Scan > Scan from Your Computer (Windows®) > Scan Using ControlCenter4 Home Mode (Windows®) > Scan Using ControlCenter4 Home Mode (Windows®) > Select Document Type Using ControlCenter4 Home Mode (Windows®) > Custom Scan Settings (Windows®) Custom Scan Settings (Windows®) Select Custom in the Document Type list to change advanced scan settings. • Select Custom, and then click the Custom Settings button. The Custom Scan Settings dialog box appears.
Brightness Set the Brightness level by dragging the slider to the right or left to lighten or darken the image. If the scanned image is too light, set a lower brightness level and scan the document again. If the image is too dark, set a higher brightness level and scan the document again. You can also type a value into the field to set the Brightness level. Contrast Increase or decrease the Contrast level by moving the slider to the right or left.
Home > Scan > Scan from Your Computer (Windows®) > Scan Using ControlCenter4 Home Mode (Windows®) > Scan Using ControlCenter4 Home Mode (Windows®) > Change Scan Size Using ControlCenter4 Home Mode (Windows®) Change Scan Size Using ControlCenter4 Home Mode (Windows®) For faster scan speeds, select the exact size of your document from the Scan Size drop-down menu. Auto means that the machine will automatically detect the document size.
Home > Scan > Scan from Your Computer (Windows®) > Scan Using ControlCenter4 Home Mode (Windows®) > Scan Using ControlCenter4 Home Mode (Windows®) > Crop a Scanned Image Using ControlCenter4 Home Mode (Windows®) Crop a Scanned Image Using ControlCenter4 Home Mode (Windows®) The crop tool on the Image Editing Toolbar lets you trim unwanted areas from your scanned image. Use the Zoom In and Zoom Out tools to help view the image to be cropped. Image Editing Toolbar 1.
a. Expands the scanned image so that the entire image fits in the window. b. Zooms in on the image. c. Zooms out of the image. d. Rotates the image counter-clockwise 90 degrees. e. Rotates the image clockwise 90 degrees. f. Click and drag the frame to adjust the area to be cropped. 3. Click OK. The edited image is displayed in the image viewer.
Home > Scan > Scan from Your Computer (Windows®) > Scan Using ControlCenter4 Home Mode (Windows®) > Scan Using ControlCenter4 Home Mode (Windows®) > Print Scanned Data Using ControlCenter4 Home Mode (Windows®) Print Scanned Data Using ControlCenter4 Home Mode (Windows®) Scan a document on your Brother machine, and then print copies using the printer driver features that are available in ControlCenter4. 1. Scan a document. 2. Click Print. a.
Home > Scan > Scan from Your Computer (Windows®) > Scan Using ControlCenter4 Home Mode (Windows®) > Scan Using ControlCenter4 Home Mode (Windows®) > Open with an Application Using ControlCenter4 Home Mode (Windows®) Open with an Application Using ControlCenter4 Home Mode (Windows®) The Open with an Application button lets you scan an image directly into your graphics application for editing. 1. Click the Open with an Application button. 2. Select the application from the drop-down list, and then click OK.
Home > Scan > Scan from Your Computer (Windows®) > Scan Using ControlCenter4 Home Mode (Windows®) > Save Scanned Data to a Folder as a PDF File Using ControlCenter4 Home Mode (Windows®) Save Scanned Data to a Folder as a PDF File Using ControlCenter4 Home Mode (Windows®) Select Home Mode as the mode setting for ControlCenter4. 1. Load your document. 2. Click the (ControlCenter4) icon in the task tray, and then click Open. 3. Click the Scan tab. 4. Select the Document Type. 5.
To save the document as a password-protected PDF, select Secure PDF (*.pdf) from the File Type dropdown list, click , and then type the password. 10. In the File Name field, type a prefix for your file name, if needed. 11. Click the folder icon to browse and select the folder where you want to save your scanned documents. 12. Click OK. The scanned document is saved to the destination folder as a PDF.
Home > Scan > Scan from Your Computer (Windows®) > Scan Using ControlCenter4 Home Mode (Windows®) > Scan Settings for ControlCenter4 Home Mode (Windows®) Scan Settings for ControlCenter4 Home Mode (Windows®) Settings Applicable Features Open OCR with an Applicati on Send Email Save File Type - Yes Yes Yes Target Application Yes Yes - - OCR Language (available only for certain models) - Yes - - File Name - - - Yes Insert Date in File Name - - - Yes Scan Location - - - Yes S
OCR Language Set the optical character recognition (OCR) language to match the language of the scanned document's text (available only for certain models) . File Name Type a prefix for your file name, if needed. Insert Date in File Name Select to automatically insert the date in the scanned image's file name. Scan Location Select the Folder or SharePoint radio button to specify the destination where you would like to save your scanned documents.
Home > Scan > Scan from Your Computer (Windows®) > Scan Using ControlCenter4 Advanced Mode (Windows®) Scan Using ControlCenter4 Advanced Mode (Windows®) ControlCenter4 Advanced Mode gives you more control over the details of your machine's features and allows you to customise one-button scan actions. • Scan Photos and Graphics Using ControlCenter4 Advanced Mode (Windows®) Send scanned photos or graphics directly to your computer.
Home > Scan > Scan from Your Computer (Windows®) > Scan Using ControlCenter4 Advanced Mode (Windows®) > Scan Photos and Graphics Using ControlCenter4 Advanced Mode (Windows®) Scan Photos and Graphics Using ControlCenter4 Advanced Mode (Windows®) Send scanned photos or graphics directly to your computer. Select Advanced Mode as the mode setting for ControlCenter4. 1. Load your document. 2. Click the (ControlCenter4) icon in the task tray, and then click Open. 3. Click the Scan tab. 4.
5. Change the scan settings, such as file format, file name, destination file path, resolution, or colour, if needed. • To change the file name or Destination File Path, click Change. • To preview and configure the scanned image, select the PreScan check box. 6. Click Scan. The machine starts scanning. The image opens in the application you have selected.
Home > Scan > Scan from Your Computer (Windows®) > Scan Using ControlCenter4 Advanced Mode (Windows®) > Save Scanned Data to a Folder as a PDF File Using ControlCenter4 Advanced Mode (Windows®) Save Scanned Data to a Folder as a PDF File Using ControlCenter4 Advanced Mode (Windows®) Scan documents and save them to a folder on your computer as PDF files. Select Advanced Mode as the mode setting for ControlCenter4. 1. Load your document. 2.
4. Click the File button. The scan settings dialog box appears. 5. Click the File Type drop-down list, and then select PDF (*.pdf). To save the document as a password-protected PDF, select Secure PDF (*.pdf) from the File Type dropdown list, click , and then type the password. 6. Click the folder icon to browse and select the folder where you want to save your scanned documents. 7. Change the scan settings, such as file format, file name, resolution or colour, if needed.
Home > Scan > Scan from Your Computer (Windows®) > Scan Using ControlCenter4 Advanced Mode (Windows®) > Scan Both Sides of an ID Card Using ControlCenter4 Advanced Mode (Windows®) Scan Both Sides of an ID Card Using ControlCenter4 Advanced Mode (Windows®) Select Advanced Mode as the mode setting for ControlCenter4. 1. Place an ID card on the scanner glass. 2. Click the (ControlCenter4) icon in the task tray, and then click Open. 3. Click the Scan tab.
4. Click the File button. The scan settings dialog box appears. 5. Select the ID Card Scan check box. The instruction dialog box appears. 6. Read the instructions on the screen, and then press OK. 7. Change the scan settings, such as file format, file name, scan location, resolution, or colour, if needed. 8. Click Scan. The machine starts scanning one side of the identification card. 9.
Home > Scan > Scan from Your Computer (Windows®) > Scan Using ControlCenter4 Advanced Mode (Windows®) > Scan to E-mail Attachment Using ControlCenter4 Advanced Mode (Windows®) Scan to E-mail Attachment Using ControlCenter4 Advanced Mode (Windows®) Send a scanned document as an email attachment. • Select Advanced Mode as the mode setting for ControlCenter4. • The Scan to E-mail feature does not support Webmail services.
5. Change the scan settings, such as file format, file name, destination file path, resolution, or colour, if needed. • To change the file name or Destination File Path, click Change. • To preview and configure the scanned image, select the PreScan check box. 6. Click Scan. The machine starts scanning. Your default email application opens and the scanned image is attached to a new, blank email message.
Home > Scan > Scan from Your Computer (Windows®) > Scan Using ControlCenter4 Advanced Mode (Windows®) > Scan to an Editable Text File (OCR) Using ControlCenter4 Advanced Mode (Windows®) Scan to an Editable Text File (OCR) Using ControlCenter4 Advanced Mode (Windows®) Related Models: MFC-J480DW/MFC-J680DW/MFC-J880DW Your machine can convert characters in a scanned document to text data using optical character recognition (OCR) technology. You can edit this text using your preferred text-editing application.
5. Change the scan settings, such as file format, file name, destination file path, resolution, or colour, if needed. • To change the file name or Destination File Path, click Change. • To preview and configure the scanned image, select the PreScan check box. 6. Click Scan. The machine scans the document, converts it to editable text, and then sends it to your default word processing application.
Home > Scan > Scan from Your Computer (Windows®) > Scan Using ControlCenter4 Advanced Mode (Windows®) > Scan to an Office File Using ControlCenter4 Advanced Mode (Windows®) Scan to an Office File Using ControlCenter4 Advanced Mode (Windows®) Your machine can convert scanned data to a Microsoft® Word® file or a Microsoft® PowerPoint® file. • Select Advanced Mode as the mode setting for ControlCenter4.
Home > Scan > Scan from Your Computer (Windows®) > Scan Using ControlCenter4 Advanced Mode (Windows®) > Scan Settings for ControlCenter4 Advanced Mode (Windows®) Scan Settings for ControlCenter4 Advanced Mode (Windows®) Settings Applicable Features Image OCR E-mail File File Type Yes Yes Yes Yes Target Application Yes Yes - - OCR Language (available only for certain models) - Yes - - Destination File Path Yes Yes Yes - File Name Yes Yes Yes Yes Insert Date in File Name Yes Y
• HTML 3.2 (*.htm) • HTML 4.0 (*.htm) • Searchable PDF (*.pdf) • WordPad (*.rtf) • RTF Word 2000 (*.rtf) • WordPerfect 9, 10 (*.wpd) • Microsoft Excel 2003, XP (*.xls) For E-mail and File • Microsoft Office Word (*.docx) (available only for certain models) • Microsoft Office PowerPoint (*.pptx) (available only for certain models) Target Application Select the destination application from the drop-down list.
• Black & White Use for text or line art images. • Grey (Error Diffusion) Use for photographic images or graphics. (Error Diffusion is a method for creating simulated grey images without using true grey dots. Black dots are put in a specific pattern to give a grey appearance.) • True Grey Use for photographic images or graphics. This mode is more accurate because it uses up to 256 shades of grey. • 24bit Colour Use to create an image with the most accurate colour reproduction.
Home > Scan > Scan from Your Computer (Windows®) > Scan Using Nuance™ PaperPort™ 14SE or Other Windows® Applications Scan Using Nuance™ PaperPort™ 14SE or Other Windows® Applications Related Models: MFC-J480DW/MFC-J680DW/MFC-J880DW You can use the Nuance™ PaperPort™ 14SE application for scanning. • To download the Nuance™ PaperPort™ 14SE application, click (Brother Utilities), select Do More in the left navigation bar, and then click PaperPort.
8. Adjust the settings in the Scanner Setup dialog box, if needed. 9. Click the Document Size drop-down list, and then select your document size. • After you select a document size, adjust the scanning area by holding down the left mouse button and dragging your mouse pointer over the portion you want to scan. 10. Click PreScan if you want to preview your image and crop unwanted portions before scanning. 11. Click Start. The machine starts scanning.
Home > Scan > Scan from Your Computer (Windows®) > Scan Using Nuance™ PaperPort™ 14SE or Other Windows® Applications > TWAIN Driver Settings (Windows®) TWAIN Driver Settings (Windows®) 1 2 3 4 5 6 7 8 • Note that the item names and assignable values will vary depending on the machine. • The Brightness option is available only when selecting the Black & White, Grey (Error Diffusion), True Grey, or 24bit Colour option from the Scan Type settings.
• 256 Colour Use for simple colour illustrations that do not need the full colour spectrum. This mode uses up to 256 colours to create images. • 24bit Colour Use to create an image with the most accurate colour reproduction. This mode uses up to 16.8 million colours to scan the image, but it requires the most memory and has the longest transfer time. 4. Reduce Noise Improve and enhance the quality of your scanned images with this selection.
Home > Scan > Scan from Your Computer (Windows®) > Scan Using Windows® Photo Gallery or Windows® Fax and Scan Scan Using Windows® Photo Gallery or Windows® Fax and Scan Windows® Photo Gallery or Windows® Fax and Scan applications are other options that you can use for scanning. • These applications use the WIA scanner driver. • If you want to crop a portion of a page after pre-scanning the document, you must scan using the scanner glass (also called the flatbed). 1. Load your document. 2.
Related Information • Scan from Your Computer (Windows®) • WIA Driver Settings (Windows®) 168
Home > Scan > Scan from Your Computer (Windows®) > Scan Using Windows® Photo Gallery or Windows® Fax and Scan > WIA Driver Settings (Windows®) WIA Driver Settings (Windows®) Paper source Select the Document Feeder or Flatbed option from the drop-down list. Picture Type (Image Type) Select Color picture, Grayscale picture, Black and white picture or text , or Custom Settings for the type of document you want to scan. To change advanced settings, click the Adjust the quality of the scanned picture link.
Brightness Set the Brightness level by dragging the slider to the right or left to lighten or darken the image. If the scanned image is too light, set a lower brightness level and scan the document again. If the image is too dark, set a higher brightness level and scan the document again. Contrast Increase or decrease the Contrast level by moving the slider to the right or left. An increase emphasises dark and light areas of the image, while a decrease reveals more details in grey areas.
Home > Scan > Scan from Your Computer (Windows®) > Install BookScan Enhancer and Whiteboard Enhancer (Windows®) Install BookScan Enhancer and Whiteboard Enhancer (Windows®) BookScan Enhancer and Whiteboard Enhancer are image processing applications. BookScan Enhancer can automatically correct images scanned from books. Whiteboard Enhancer can clean up and enhance text and images in photos taken of a whiteboard. These applications are not available for Windows Server® 2003/2008/2012 series.
Home > Scan > Scan from Your Computer (Macintosh) Scan from Your Computer (Macintosh) There are several ways you can use your Macintosh to scan photos and documents on your Brother machine. Use the software applications provided by Brother or your favourite scanning application. • Scan Using ControlCenter2 (Macintosh) Use Brother's ControlCenter software to scan photos and save them as JPEGs, PDFs, or other file formats.
Home > Scan > Scan from Your Computer (Macintosh) > Scan Using ControlCenter2 (Macintosh) Scan Using ControlCenter2 (Macintosh) Use Brother's ControlCenter software to scan photos and save them as JPEGs, PDFs, or other file formats. • Scan Using ControlCenter2 (Macintosh) Send scanned photos or graphics directly to your computer.
Home > Scan > Scan from Your Computer (Macintosh) > Scan Using ControlCenter2 (Macintosh) > Scan Using ControlCenter2 (Macintosh) Scan Using ControlCenter2 (Macintosh) Send scanned photos or graphics directly to your computer. 1. Load your document. 2. In the Finder menu bar, click Go > Applications > Brother, and then double-click the (ControlCenter) icon. The ControlCenter2 screen appears. 3. Click the SCAN tab. 4. Click the Image button. The scan settings dialog box appears.
5. Change the scan settings, such as file format, file name, destination file path, resolution, or colour, if needed. To change the file name or destination file path, click Change. 6. Click the Start Scanning button. The machine starts scanning. The scanned image will open in the application you have selected.
Home > Scan > Scan from Your Computer (Macintosh) > Scan Using ControlCenter2 (Macintosh) > Save Scanned Data to a Folder as a PDF File Using ControlCenter2 (Macintosh) Save Scanned Data to a Folder as a PDF File Using ControlCenter2 (Macintosh) 1. Load your document. 2. In the Finder menu bar, click Go > Applications > Brother, and then double-click the (ControlCenter) icon. The ControlCenter2 screen appears. 3. Click the SCAN tab. 4. Click the File button. The scan settings dialog box appears.
5. Click the File Type pop-up menu, and then select PDF (*.pdf). To save the document as a password-protected PDF, select Secure PDF (*.pdf) from the File Type pop-up menu, type your password in the Password and Re-type Password fields, and then click OK. 6. Change the scan settings, such as file format, file name, destination folder, resolution, or colour, if needed. 7. Click the Start Scanning button. The machine starts scanning. The file will be saved in the folder you selected.
Home > Scan > Scan from Your Computer (Macintosh) > Scan Using ControlCenter2 (Macintosh) > Scan Both Sides of an ID Card Using ControlCenter2 (Macintosh) Scan Both Sides of an ID Card Using ControlCenter2 (Macintosh) 1. Place an ID card on the scanner glass. 2. In the Finder menu bar, click Go > Applications > Brother, and then double-click the (ControlCenter) icon. The ControlCenter2 screen appears. 3. Click the SCAN tab. 4. Click the File button. The scan settings dialog box appears.
5. Select the ID Card Scan check box. The instruction dialog box appears. 6. Read the instructions on the screen, and then press OK. 7. Configure other settings, if needed. 8. Click the Start Scanning button. The machine starts scanning one side of the identification card. 9. After the machine has scanned one side, turn over the identification card, and then click Continue to scan the other side. 10. Click Finish.
Home > Scan > Scan from Your Computer (Macintosh) > Scan Using ControlCenter2 (Macintosh) > Scan to E-mail Attachment Using ControlCenter2 (Macintosh) Scan to E-mail Attachment Using ControlCenter2 (Macintosh) Send a scanned document as an email attachment. • The Scan to E-mail feature does not support Webmail services. Use the Scan to Image or Scan to File feature to scan a document or a picture, and then attach the scanned file to an email message. The machine scans to your default email client. 1.
5. Change the scan settings, such as file format, file name, destination file path, resolution, or colour, if needed. To change the file name or destination file path, click Change. 6. Click the Start Scanning button. The machine starts scanning. Your default email application will open and the scanned image is attached to a new, blank email.
Home > Scan > Scan from Your Computer (Macintosh) > Scan Using ControlCenter2 (Macintosh) > Scan to an Editable Text File (OCR) Using ControlCenter2 (Macintosh) Scan to an Editable Text File (OCR) Using ControlCenter2 (Macintosh) Related Models: MFC-J480DW/MFC-J680DW/MFC-J880DW Your machine can convert characters in a scanned document to text data using optical character recognition (OCR) technology. You can edit this text using your preferred text-editing application.
5. Change the scan settings, such as file format, file name, destination file path, resolution, or colour, if needed. To change the file name or destination file path, click Change. 6. Click the Start Scanning button. The machine scans the document, converts it to editable text, and then sends it to your default word processing application.
Home > Scan > Scan from Your Computer (Macintosh) > Scan Using ControlCenter2 (Macintosh) > Scan to an Office File Using ControlCenter2 (Macintosh) Scan to an Office File Using ControlCenter2 (Macintosh) Your machine can convert scanned data to a Microsoft® Word® file or a Microsoft® PowerPoint® file. In order to use this feature, your Brother machine must be connected to a network that has access to the Internet through either a wired or wireless connection. 1. Load your document. 2.
Home > Scan > Scan from Your Computer (Macintosh) > Scan Using ControlCenter2 (Macintosh) > Scan Settings for ControlCenter2 (Macintosh) Scan Settings for ControlCenter2 (Macintosh) Settings Applicable Features Image OCR E-mail File Target Application/E-mail Application Yes Yes Yes - File Type Yes Yes Yes Yes File size Yes - Yes Yes OCR Software - Yes - - - Yes - - Destination File Path Yes Yes Yes - File Name Yes Yes Yes Yes Insert Date in File Name Yes Yes Yes Y
Destination File Path Click the Change button to change the prefix of the file name and the path of the destination folder. File Name Type a prefix for your file name, if needed. To change the prefix for the Image, OCR, and E-mail features, click Change. Insert Date in File Name Automatically inserts the date in the file name of the scanned image. To insert the date in the file name for the Image, OCR and E-mail features, click Change.
• Brightness Set the Brightness level by dragging the slider to the right or left to lighten or darken the image. If the scanned image is too light, set a lower brightness level and scan the document again. If the image is too dark, set a higher brightness level and scan the document again. • Contrast Increase or decrease the Contrast level by moving the slider to the right or left. An increase emphasises dark and light areas of the image, while a decrease reveals more details in grey areas.
Home > Scan > Scan from Your Computer (Macintosh) > Scan Using Presto! PageManager or other TWAIN-Compliant Applications (Macintosh) Scan Using Presto! PageManager or other TWAIN-Compliant Applications (Macintosh) Related Models: MFC-J480DW/MFC-J680DW/MFC-J880DW • Download Presto! PageManager from http://nj.newsoft.com.tw/download/brother/ PM9SEInstaller_BR_multilang2.dmg. • Your hard disk drive must have at least 400 MB of free disk space for installation. • Presto! PageManager supports OS X v10.8.
5. Click the PreScan option to preview your image and crop unwanted portions before scanning. • After you select a document size, adjust the scanning area by holding down the mouse button and dragging your mouse pointer over the portion you want to scan. 6. Click Start. The machine starts scanning.
Home > Scan > Scan from Your Computer (Macintosh) > Scan Using Presto! PageManager or other TWAIN-Compliant Applications (Macintosh) > TWAIN Driver Settings (Macintosh) TWAIN Driver Settings (Macintosh) 1 2 3 4 • Item names and assignable values will vary depending on the machine. • The Brightness setting is available only when selecting Black & White, Gray (Error Diffusion), True Gray, or 24bit Color from the Scan Type options.
3. Document Size Select the exact size of your document from a selection of preset scan sizes. Auto means that the machine will automatically detect the Document Size. • If you select Custom, you can specify the document size. 4. Adjust Image Click the Adjust Image button to adjust other image qualities. Brightness Set the Brightness level by dragging the slider to the right or left to lighten or darken the image.
Related Information • Scan Using Presto! PageManager or other TWAIN-Compliant Applications (Macintosh) 192
Home > Scan > Scan from Your Computer (Macintosh) > Scan Using Presto! PageManager or other TWAIN-Compliant Applications (Macintosh) > NewSoft Technical Support NewSoft Technical Support Related Models: MFC-J480DW/MFC-J680DW/MFC-J880DW For USA Postal Address 47102 Mission Falls Court, Suite 202 Fremont CA 94539 Telephone +1-510-770-8900 Fax +1-510-770-8980 URL http://www.newsoftinc.com Germany Telephone +4940306988851 URL http://de.newsoft.eu.
Home > Copy Copy • • Copy a Document Enlarge or Reduce Copied Images Select an enlargement or reduction ratio to resize your copied data. • Sort Copies Sort multiple copies. Pages will be stacked in the order they are fed, that is: 1, 2, 3, and so on. • Make Page Layout Copies ( N in 1 or Poster) The N in 1 copy feature saves paper by copying two or four pages of your document onto one page of the copy.
Home > Copy > Copy a Document Copy a Document >> MFC-J480DW >> DCP-J562DW/MFC-J680DW/MFC-J880DW MFC-J480DW 1. Make sure you have loaded the correct size paper in the paper tray. 2. Do one of the following: • Place the document face down on the scanner glass. • Place the document face down in the ADF. (If you are copying multiple pages, we recommend using the ADF.) 3. Press (COPY). The LCD displays: Press Start 01 Quality Normal Paper Type Paper Size 4.
To stop copying, press Stop/Exit. DCP-J562DW/MFC-J680DW/MFC-J880DW 1. Make sure you have loaded the correct size paper in the paper tray. 2. Do one of the following: • Place the document face down on the scanner glass. • Place the document face down in the ADF. (ADF models only) (If you are copying multiple pages, we recommend using the ADF.) 3. Press [Copy]. The Touchscreen displays: 4. Change the copy settings, if needed.
Option Description (No. of Copies ) Enter the number of copies in one of the following ways: • Press - or + on the Touchscreen. • Press to display the keyboard on the Touchscreen, and then enter the number of copies using the Touchscreen keyboard. Press OK. Options Press to change the copy settings for the next copy only. • When you have finished changing settings, press OK. • After you have finished choosing new options, you can save them by pressing the Save as Shortcut button. 5.
Home > Copy > Enlarge or Reduce Copied Images Enlarge or Reduce Copied Images Select an enlargement or reduction ratio to resize your copied data. >> MFC-J480DW >> DCP-J562DW/MFC-J680DW/MFC-J880DW MFC-J480DW 1. Load your document. 2. Press (COPY). 3. Enter the number of copies using the dial pad. 4. Press a or b to select [Enlarge/Reduce]. Press OK. 5. Press a or b to select the available options. Press OK. 6.
4. Press [Options] > [Enlarge/Reduce]. 5. Press a or b to display the available options, and then press the option you want to change. 6. Do one of the following: • If you selected the [Enlarge] or [Reduce] option, press the enlargement or reduction ratio you want to use. • If you selected the [Custom(25-400%)] option, press (backspace) to erase the displayed percentage, or press d to move the cursor, and then enter an enlargement or reduction ratio from [25%] to [400%]. Press [OK].
Home > Copy > Sort Copies Sort Copies Sort multiple copies. Pages will be stacked in the order they are fed, that is: 1, 2, 3, and so on. >> MFC-J480DW >> DCP-J562DW/MFC-J680DW/MFC-J880DW MFC-J480DW 1. Load your document. 2. Press (COPY). 3. Enter the number of copies using the dial pad. 4. Press a or b to select the following: a. Select [Stack/Sort]. Press OK. b. Select [Sort]. Press OK. 5. Press Mono Start or Colour Start.
Home > Copy > Make Page Layout Copies ( N in 1 or Poster) Make Page Layout Copies ( N in 1 or Poster) The N in 1 copy feature saves paper by copying two or four pages of your document onto one page of the copy. The poster feature divides your document into sections, then enlarges the sections so you can assemble them into a poster. To print a poster, use the scanner glass. • Make sure the paper size is set to A4, or Letter. • You can make only one Poster copy at a time.
2. Press [Copy]. 3. Enter the number of copies in one of the following ways: • Press [-] or [+] on the Touchscreen. • Press to display the keyboard on the Touchscreen, and then enter the number of copies using the Touchscreen keyboard. Press [OK]. 4. Press [Options] > [Page Layout]. 5. Press a or b to display the options, and then press the option you want. 6. Read and confirm the displayed list of settings you have selected, and then press [OK]. 7.
Home > Copy > Make Page Layout Copies ( N in 1 or Poster) > Page Layout Options for Copies Page Layout Options for Copies MFC-J480DW • If you are copying from the ADF, insert the document face down in the direction shown in the table. • If you are copying from the scanner glass, place the document face down in the direction shown in the table.
Option Description Poster (2x2) (Using the scanner glass) Poster (3x3) (Using the scanner glass) DCP-J562DW/MFC-J680DW/MFC-J880DW • If you are copying from the ADF, insert the document face down in the direction shown in the table. (ADF models only) • If you are copying from the scanner glass, place the document face down in the direction shown in the table.
Option Description Poster(2x1) (Using the scanner glass) Poster(2x2) (Using the scanner glass) Poster(3x3) (Using the scanner glass) Related Information • Make Page Layout Copies ( N in 1 or Poster) 205
Home > Copy > 2-sided Copy 2-sided Copy • Copy on Both Sides of the Paper (1-sided to 2-sided/2-sided to 2-sided) Reduce the amount of paper you use by copying onto both sides of the paper.
Home > Copy > 2-sided Copy > Copy on Both Sides of the Paper (1-sided to 2-sided/2-sided to 2-sided) Copy on Both Sides of the Paper (1-sided to 2-sided/2-sided to 2-sided) Reduce the amount of paper you use by copying onto both sides of the paper. • We recommend loading single-sided documents in the ADF for 2-sided copying. (ADF models only) • For 2-sided documents use the scanner glass. • You can use only A4, A5, or Letter size plain paper.
• If you get a paper jam, press a or b to select [Advanced], and then press OK in the [2-sided Copy] menu. Press a or b to select one of the jam prevention settings: [2-sided1] or [2-sided2], and then press OK. • The [2-sided1] option uses a longer print time for the ink to dry. • The [2-sided2] option uses a longer print time and will also print in lighter colours. DCP-J562DW/MFC-J680DW/MFC-J880DW 1. Load your document. 2. Press [Copy]. 3.
• If you get a paper jam, press the [Advanced] button, and then press one of the jam prevention settings: [2-sided 1] or [2-sided 2]. • The [2-sided 1] option uses a longer print time for the ink to dry. • The [2-sided 2] option uses a longer print time and will also print in lighter colours.
Home > Copy > Copy an ID Card Copy an ID Card Use the [2in1(ID)] feature to copy both sides of an identification card onto one page, keeping the original card size. • Make sure the paper size is set to A4 or Letter. • You may copy an identification card to the extent permitted under applicable laws. For more information, see the Product Safety Guide. >> MFC-J480DW >> DCP-J562DW/MFC-J680DW/MFC-J880DW MFC-J480DW 1.
a. Select [Page Layout]. Press OK. b. Select [2in1(ID)]. Press OK. 5. Press Mono Start or Colour Start. The machine starts scanning one side of the identification card. 6. After the machine has scanned the first side, turn over the identification card and press 1. DCP-J562DW/MFC-J680DW/MFC-J880DW 1. Place your identification card face down near the upper-left corner of the scanner glass. a a c d b a. 3 mm or greater (top, left) b. 207 mm c. 145 mm d. scannable area 2. Press [Copy]. 3.
Home > Copy > Copy in Ink Save Mode Copy in Ink Save Mode Related Models: MFC-J880DW When you select Ink Save Mode, the machine prints the colours lighter and emphasises the outlines of the images. • The amount of ink that is saved varies depending on the type of documents printed. • Ink Save Mode may make your printouts look different from your original document. • The Ink Save Mode feature is supported by technology from Reallusion, Inc. 1. Load your document. 2. Press [Copy]. 3.
Home > Copy > Copy Options Copy Options MFC-J480DW Option Description Quality Select a copy resolution for your type of document. • Paper Type When you select the Normal option, Plain Paper is the only Paper Type option. Select a paper type. If you are copying on special paper, set the machine for the type of paper you are using to get the best print quality. Paper Size Select a paper size. If you are copying on paper other than A4 size, you must change the Paper Size setting.
Option Description Advanced Settings Remove Background Removes the document's background colour in copies. The white background becomes more apparent. This saves some ink and may make certain copies easier to read. Set New Default Saves the copy settings that you use most often by setting them as the default settings. Factory Reset Restores any changed copy settings to the factory settings. DCP-J562DW/MFC-J680DW/MFC-J880DW To change copy settings, press the [Options] button.
Option Description Page Layout Make N in 1, 2 in 1 ID, or Poster copies. 4 in1 2-sided Copy Poster Select to copy on both sides of the paper. 1-sided→2-sided 2-sided→2-sided 1 1 2 Advanced Settings 2 Ink Save Mode (MFC-J880DW) Prints colours lighter and emphasises the outlines of images. Thin Paper Copy (MFC-J880DW) Avoid bleeding through thin paper when copying. Book Copy (MFC-J880DW) Correct dark borders and skew when copying from the scanner glass.
Option Description Watermark Copy (MFC-J880DW) Place text in your document as a watermark. Remove Background Colour Removes the document's background colour in copies. The white background becomes more apparent. This saves some ink and may make certain copies easier to read. Set New Default Saves the copy settings that you use most often by setting them as the default settings. Factory Reset Restores any changed copy settings to the factory settings.
Home > Fax Fax • Send a Fax • Receive a Fax • Voice Operations and Fax Numbers • Telephone Services and External Devices • Fax Reports • PC-FAX 217
Home > Fax > Send a Fax Send a Fax • • Send a Fax from Your Brother Machine Send a Fax Manually Manual fax transmission lets you hear the dialling, ringing and fax-receiving tones while sending a fax. • Send a Fax at the End of a Conversation At the end of a conversation, you can send a fax to the other party before you both hang up. • Send the Same Fax to More than One Recipient (Broadcasting) Use the Broadcasting feature to send the same fax to multiple fax numbers at the same time.
Home > Fax > Send a Fax > Send a Fax from Your Brother Machine Send a Fax from Your Brother Machine Related Models: MFC-J480DW/MFC-J680DW/MFC-J880DW >> MFC-J480DW >> MFC-J680DW/MFC-J880DW MFC-J480DW 1. Load your document in the ADF or on the scanner glass. 2. Press (FAX). The LCD displays: Press Start Enter Number Fax Resolution Standard Contrast 3. Enter the fax number in one of the following ways: • Dial Pad (Enter the fax number manually.) Press all digits of the number using the dial pad.
6. Do one of the following: • If you are using the ADF, the machine starts scanning and sending the document. • If you are using the scanner glass and pressed Mono Start, the machine starts scanning the first page. Go to the next step. • If you are using the scanner glass and pressed Colour Start, the LCD asks if you want to send a colour fax. Press 1 to confirm. The machine starts dialling and sending the document. 7.
Press [Address Book]. Do one of the following: • Choose the number you want, and then press [Apply]. • Press , and then enter the first letter of the name and press [OK]. Press the name you want to dial. If the name has two numbers, press the number you want. Press [Apply]. 4. If you want to change the fax settings, press [Options]. 5. Press a or b to display the setting you want to change, and then press it. 6. Press the option you want. 7. When finished, press [OK]. 8. Press [Fax Start]. 9.
Home > Fax > Send a Fax > Send a Fax Manually Send a Fax Manually Related Models: MFC-J480DW/MFC-J680DW/MFC-J880DW Manual fax transmission lets you hear the dialling, ringing and fax-receiving tones while sending a fax. >> MFC-J480DW >> MFC-J680DW/MFC-J880DW MFC-J480DW 1. Load your document. 2. Press (FAX). 3. Press Hook and listen for a dial tone. 4. Enter the fax number. 5. When you hear fax tones, press Mono Start or Colour Start. • If you are using the scanner glass, press 1 to send a fax.
Home > Fax > Send a Fax > Send a Fax at the End of a Conversation Send a Fax at the End of a Conversation Related Models: MFC-J480DW/MFC-J680DW/MFC-J880DW At the end of a conversation, you can send a fax to the other party before you both hang up. >> MFC-J480DW >> MFC-J680DW/MFC-J880DW MFC-J480DW 1. Ask the other party to wait for fax tones (beeps), and then press the Start or Send key before hanging up. 2. Load your document. 3. Press Mono Start or Colour Start.
Home > Fax > Send a Fax > Send the Same Fax to More than One Recipient (Broadcasting) Send the Same Fax to More than One Recipient (Broadcasting) Related Models: MFC-J480DW/MFC-J680DW/MFC-J880DW Use the Broadcasting feature to send the same fax to multiple fax numbers at the same time. • This feature is available only for monochrome faxes. • Address Book numbers must be stored in the machine’s memory before they can be used in a broadcast.
MFC-J680DW/MFC-J880DW You can include Groups, Address Book numbers and up to 50 manually-dialled numbers in the same broadcast. If you did not use any of the Address Book numbers for Groups, you can broadcast faxes to as many as 250 different numbers. 1. Load your document. 2. Press [Fax]. (MFC-J880DW) If [Fax Preview] is set to [On], press [Fax] > [Sending Faxes]. 3. Press [Options] > [Broadcasting]. 4. Press [Add Number].
Home > Fax > Send a Fax > Send the Same Fax to More than One Recipient (Broadcasting) > Cancel a Broadcast in Progress Cancel a Broadcast in Progress Related Models: MFC-J480DW/MFC-J680DW/MFC-J880DW While broadcasting you can cancel the fax currently being sent or the whole broadcast job. >> MFC-J480DW >> MFC-J680DW/MFC-J880DW MFC-J480DW 1. Press Settings. 2. Press a or b to select the following: a. Select [Fax]. Press OK. b. Select [Remaining Jobs]. Press OK.
Home > Fax > Send a Fax > Send a Fax in Real Time Send a Fax in Real Time Related Models: MFC-J480DW/MFC-J680DW/MFC-J880DW When sending a fax, the machine scans the document into the memory before sending it. As soon as the telephone line is free, the machine starts dialling and sending. If you want to send an important document immediately without waiting for the machine to retrieve the scan from its memory, transmit the fax quickly by turning on [Real Time TX].
Home > Fax > Send a Fax > Send a Fax at a Specified Time (Delayed Fax) Send a Fax at a Specified Time (Delayed Fax) Related Models: MFC-J680DW/MFC-J880DW You can store up to 50 faxes in the machine's memory to be sent within the next twenty-four hour period. This feature is available only for monochrome faxes. 1. Load your document. 2. Press [Fax]. (MFC-J880DW) If [Fax Preview] is set to [On], press [Fax] > [Sending Faxes]. 3. Press [Options] > [Delayed Fax]. 4. Press [Delayed Fax]. 5. Press [On]. 6.
Home > Fax > Send a Fax > Cancel a Fax in Progress Cancel a Fax in Progress Related Models: MFC-J480DW/MFC-J680DW/MFC-J880DW >> MFC-J480DW >> MFC-J680DW/MFC-J880DW MFC-J480DW 1. Press Stop/Exit to cancel a fax that is already in process. 2. When you press Stop/Exit while the machine is dialling or sending, the LCD displays [Job Cancel]. Press 1 to confirm. MFC-J680DW/MFC-J880DW 1. Press to cancel a fax that is already in process. 2.
Home > Fax > Send a Fax > Check and Cancel a Pending Fax Check and Cancel a Pending Fax Related Models: MFC-J480DW/MFC-J680DW/MFC-J880DW Follow these steps to view or to cancel faxes stored in the machine's memory and waiting to be sent. If there are no fax jobs in memory, the LCD displays [No Jobs Waiting]. You can cancel a fax job before it is sent. >> MFC-J480DW >> MFC-J680DW/MFC-J880DW MFC-J480DW 1. Press Settings. 2. Press a or b to select the following: a. Select [Fax]. Press OK. b.
Home > Fax > Send a Fax > Fax Polling Fax Polling Polling lets you set up your machine so the other party pays for the call when receiving a fax from you. It also lets you pay for the call when you call someone's fax machine to retrieve a fax. The polling feature must be set up on both machines to work. Not all fax machines support polling. • • Polled Transmit Polling Receive Polling Receive lets you call another fax machine to receive a fax.
Home > Fax > Send a Fax > Fax Polling > Polled Transmit Polled Transmit Polled transmit lets you set up your machine to wait with a document so another fax machine can call and retrieve it. The document will be stored and can be retrieved by any other fax machine until you delete it from the memory. This feature is available only for monochrome faxes. • • Setup for Polled Transmit Set Up Secure Polling Use the Secure Polling feature to restrict access to the documents you set up to be polled.
Home > Fax > Send a Fax > Fax Polling > Polled Transmit > Setup for Polled Transmit Setup for Polled Transmit Related Models: MFC-J680DW/MFC-J880DW This feature is available only for monochrome faxes. 1. Load your document. 2. Press [Fax]. (MFC-J880DW) If [Fax Preview] is set to [On], press [Fax] > [Sending Faxes]. 3. Press [Options] > [Polled TX]. 4. Press [Standard]. 5. Press [Fax Start]. If you are using the ADF, the machine starts scanning the document. 6.
Home > Fax > Send a Fax > Fax Polling > Polled Transmit > Set Up Secure Polling Set Up Secure Polling Related Models: MFC-J680DW/MFC-J880DW Use the Secure Polling feature to restrict access to the documents you set up to be polled. • This feature is available only for monochrome faxes. • Secure Polling works only with Brother fax machines. To retrieve a fax from your machine, someone must enter the secure code. 1. Load your document. 2. Press [Fax].
Home > Fax > Send a Fax > Fax Options Fax Options Related Models: MFC-J480DW/MFC-J680DW/MFC-J880DW MFC-J480DW Option Description Fax Resolution Set the resolution for outgoing faxes. The fax quality often can be improved by changing the Fax Resolution. Contrast Adjust the contrast. If your document is very light or very dark, changing the contrast may improve the fax quality. Address Book Select a number from the Address Book. Outgoing Call Select a number from the Outgoing Call history.
Option Description Colour Setting Set whether faxes are sent in monochrome or colour. Delayed Fax • Colour faxes cannot be stored in the machine’s memory and the machine sends them immediately. • Use the ADF to send colour faxes with multiple pages. • (MFC-J880DW) You cannot send a colour fax when Preview is set to On. Set the time of day the delayed faxes will be sent.
Home > Fax > Receive a Fax Receive a Fax • Receive Mode Settings • Fax Preview Use the Fax Preview feature to view received faxes on the LCD. • Shrink Page Size of an Oversized Incoming Fax • Set the Fax Receive Stamp Set the machine to print the date and time of receipt at the top of each incoming fax page. Make sure you have set the current date and time on the machine.
Home > Fax > Receive a Fax > Receive Mode Settings Receive Mode Settings • • Receive Modes Choose the Correct Receive Mode You must choose a Receive Mode depending on the external devices and telephone services you have on your line. • Set the Number of Rings Before the Machine Answers (Ring Delay) When somebody calls your machine, you will hear the normal telephone ring sound. The number of rings is set in the Ring Delay option.
Home > Fax > Receive a Fax > Receive Mode Settings > Receive Modes Receive Modes Related Models: MFC-J480DW/MFC-J680DW/MFC-J880DW Some receive modes answer automatically ([Fax Only] and [Fax/Tel]). You may want to change the Ring Delay before using these modes. Fax Only [Fax Only] mode automatically will answer every call as a fax.
Home > Fax > Receive a Fax > Receive Mode Settings > Choose the Correct Receive Mode Choose the Correct Receive Mode Related Models: MFC-J480DW/MFC-J680DW/MFC-J880DW You must choose a Receive Mode depending on the external devices and telephone services you have on your line. By default, your machine automatically will receive any faxes that are sent to it. The diagram below will help you select the correct mode.
2. Press a or b to display the [Fax Only], [Fax/Tel], [External TAD], or [Manual] option, and then press the option you want. 3. Press .
Home > Fax > Receive a Fax > Receive Mode Settings > Set the Number of Rings Before the Machine Answers (Ring Delay) Set the Number of Rings Before the Machine Answers (Ring Delay) Related Models: MFC-J480DW/MFC-J680DW/MFC-J880DW When somebody calls your machine, you will hear the normal telephone ring sound. The number of rings is set in the Ring Delay option. • The Ring Delay setting sets the number of times the machine rings before it answers in [Fax Only] and [Fax/Tel] modes.
Home > Fax > Receive a Fax > Receive Mode Settings > Set the F/T Ring Time (Pseudo/Double-ring) Set the F/T Ring Time (Pseudo/Double-ring) Related Models: MFC-J480DW/MFC-J680DW/MFC-J880DW When you set the Receive Mode to [Fax/Tel], if the call is a fax, your machine will receive it automatically. However, if it is a voice call, the machine will sound the F/T ring (pseudo/double-ring) for the time you set in the F/T Ring Time option. When you hear the F/T ring, it means that a voice caller is on the line.
Home > Fax > Receive a Fax > Receive Mode Settings > Set Fax Detect Set Fax Detect Related Models: MFC-J480DW/MFC-J680DW/MFC-J880DW If Fax Detect is On: The machine receives a fax call automatically, even if you answer the call. When the message that your machine is receiving a fax appears on the LCD or when you hear “chirps” through the handset you are using, just replace the handset. Your machine will do the rest.
Home > Fax > Receive a Fax > Fax Preview Fax Preview Use the Fax Preview feature to view received faxes on the LCD. • • Set Fax Preview to On Preview New Faxes When a fax is received, a message appears on the LCD.
Home > Fax > Receive a Fax > Fax Preview > Set Fax Preview to On Set Fax Preview to On Related Models: MFC-J880DW • This feature is available only for monochrome faxes. • When Fax Preview is turned on, a backup copy of received faxes will not be printed for Fax Forwarding, PCFax Receiving and Forward to Cloud operations, even if you set Backup Print to [On].
Home > Fax > Receive a Fax > Fax Preview > Preview New Faxes Preview New Faxes Related Models: MFC-J880DW When a fax is received, a message appears on the LCD. • This feature is available only for monochrome faxes. • To see a fax you already previewed, press [Fax] and [Received Faxes]. 1. Press [View]. 2. The fax list includes old and new faxes. A blue mark appears next to new faxes. Press the fax you want. If you want to print or delete all the faxes in the list, press [Print/Delete].
Button Result Enlarge the fax. Reduce the fax. a or b Scroll vertically. d or c Scroll horizontally. Rotate the fax clockwise. Delete the fax. Press Yes to confirm. Go back to the previous page. Go to the next page. Go back to the fax list. Start Print the fax. If the fax is a single page, it starts printing. A Touchscreen message asks if you want to delete the fax from the machine's memory. To delete the fax, press Yes. To keep the fax in the machine's memory, press No.
Home > Fax > Receive a Fax > Shrink Page Size of an Oversized Incoming Fax Shrink Page Size of an Oversized Incoming Fax Related Models: MFC-J480DW/MFC-J680DW/MFC-J880DW When the [Auto Reduction] feature is [On], your Brother machine reduces any oversized incoming fax page to fit on your paper. The machine calculates the reduction ratio using the page size of the fax and your Paper Size setting. >> MFC-J480DW >> MFC-J680DW/MFC-J880DW MFC-J480DW 1. Press Settings. 2.
Home > Fax > Receive a Fax > Set the Fax Receive Stamp Set the Fax Receive Stamp Related Models: MFC-J480DW/MFC-J680DW/MFC-J880DW Set the machine to print the date and time of receipt at the top of each incoming fax page. Make sure you have set the current date and time on the machine. This feature is available only for monochrome faxes. >> MFC-J480DW >> MFC-J680DW/MFC-J880DW MFC-J480DW 1. Press Settings. 2. Press a or b to select the following: a. Select [Fax]. Press OK. b. Select [Setup Receive].
Home > Fax > Receive a Fax > Receive a Fax at the End of a Telephone Conversation Receive a Fax at the End of a Telephone Conversation Related Models: MFC-J480DW/MFC-J680DW/MFC-J880DW If you are speaking on the telephone connected to your Brother machine and the other party is also speaking on a telephone connected to his fax machine, at the end of the conversation, the other party can send you a fax before you both hang up. • Your machine's ADF must be empty.
Home > Fax > Receive a Fax > Memory Receive Options Memory Receive Options Use Memory Receive options to direct incoming faxes while you are away from the machine. You can use only one Memory Receive option at a time. Memory Receive can be set to: • Fax Forwarding (MFC-J680DW/MFC-J880DW) • Fax Storage (MFC-J680DW/MFC-J880DW) • PC-Fax Receive • Forward to Cloud (MFC-J880DW) The machine forwards your received faxes to the online services. For more information, see the Web Connect Guide.
Home > Fax > Receive a Fax > Memory Receive Options > Forward Incoming Faxes to Another Machine Forward Incoming Faxes to Another Machine Related Models: MFC-J680DW/MFC-J880DW Use the Fax Forwarding feature to automatically forward your incoming faxes to another machine. This feature is available only for monochrome faxes. 1. Press [Settings] > [All Settings] > [Fax] > [Setup Receive] > [Memory Receive]. 2. Press a or b to display the [Fax Forward] option, and then press it. 3.
Home > Fax > Receive a Fax > Memory Receive Options > Store Incoming Faxes in the Machine's Memory Store Incoming Faxes in the Machine's Memory Related Models: MFC-J680DW/MFC-J880DW Use the Fax Storage feature to store incoming faxes in the machine's memory. Retrieve your stored fax messages from a fax machine at another location using the Remote Retrieval commands. Your machine prints a backup copy of each stored fax. • This feature is available only for monochrome faxes.
Home > Fax > Receive a Fax > Memory Receive Options > Use PC-Fax Receive to Transfer Received Faxes to Your Computer (Windows® only) Use PC-Fax Receive to Transfer Received Faxes to Your Computer (Windows® only) Related Models: MFC-J480DW/MFC-J680DW/MFC-J880DW Turn on the PC-Fax Receive feature, automatically store incoming faxes to your machine's memory, and then send them to your computer. Use your computer to view and store these faxes. • This feature is available only for monochrome faxes.
6. Press . To change the destination computer, repeat these steps.
Home > Fax > Receive a Fax > Memory Receive Options > Change Memory Receive Options Change Memory Receive Options Related Models: MFC-J680DW/MFC-J880DW If there are faxes in your machine's memory when you change any Memory Receive option, the LCD displays one of the following questions: • • • If received faxes have already been printed, the Touchscreen displays [Erase all documents?] • If you press [Yes], faxes in the memory will be erased before the setting changes.
Home > Fax > Receive a Fax > Memory Receive Options > Turn Off Memory Receive Turn Off Memory Receive Related Models: MFC-J480DW/MFC-J680DW/MFC-J880DW Turn off Memory Receive if you do not want the machine to save or transfer incoming faxes. >> MFC-J480DW >> MFC-J680DW/MFC-J880DW MFC-J480DW 1. Press Settings. 2. Press a or b to select the following: a. Select [Fax]. Press OK. b. Select [Setup Receive]. Press OK. c. Select [Memory Receive]. Press OK. d. Select [Off]. Press OK.
Home > Fax > Receive a Fax > Memory Receive Options > Print a Fax Stored in the Machine's Memory Print a Fax Stored in the Machine's Memory Related Models: MFC-J480DW/MFC-J680DW/MFC-J880DW Follow these steps to print faxes in the machine's memory. • This feature is available only for monochrome faxes. • After you print the fax, it is erased from the machine's memory.
Home > Fax > Receive a Fax > Remote Fax Retrieval Remote Fax Retrieval Use Remote Retrieval to call your machine from any touch-tone telephone or fax machine, and use a remote access code and remote commands to retrieve fax messages. • Set a Remote Access Code Set a Remote Access Code to access and control your Brother machine even when you are away from it.
Home > Fax > Receive a Fax > Remote Fax Retrieval > Set a Remote Access Code Set a Remote Access Code Related Models: MFC-J680DW/MFC-J880DW Set a Remote Access Code to access and control your Brother machine even when you are away from it. 1. Press [Settings] > [All Settings] > [Fax] > [Remote Access]. 2. Enter a three-digit code using the numbers [0] through [9], [*], or [#] using the Touchscreen (The preset '*' cannot be changed). Press [OK].
Home > Fax > Receive a Fax > Remote Fax Retrieval > Use Your Remote Access Code Use Your Remote Access Code Related Models: MFC-J680DW/MFC-J880DW 1. When away from your Brother machine, dial your fax number from a touch-tone telephone or fax machine. 2. When your machine answers, immediately enter your three-digit Remote Access Code, followed by *. 3.
Home > Fax > Receive a Fax > Remote Fax Retrieval > Remote Retrieval Commands Remote Retrieval Commands Related Models: MFC-J680DW/MFC-J880DW Use the Remote Commands in this table to access fax commands and options when you are away from your Brother machine. When you call the machine and enter your remote access code (three digits followed by *), the system will sound two short beeps and you must enter a Remote Command (column 1), followed by one of the options (column 2) for that command.
Home > Fax > Receive a Fax > Remote Fax Retrieval > Forward Faxes Remotely Forward Faxes Remotely Related Models: MFC-J680DW/MFC-J880DW Call your Brother machine from any touch-tone telephone or fax machine to forward incoming faxes to another machine. • You must turn on Fax Storage , or Fax Preview (MFC-J880DW) before you use this feature. 1. Dial your fax number. 2. When your machine answers, enter your Remote Access Code (three digits followed by *). If you hear one long beep, you have messages. 3.
Home > Fax > Receive a Fax > Remote Fax Retrieval > Change the Fax Forwarding Number Change the Fax Forwarding Number Related Models: MFC-J680DW/MFC-J880DW 1. Dial your fax number. 2. When your machine answers, enter your Remote Access Code (three digits followed by *). If you hear one long beep, you have messages. 3. When you hear two short beeps, press 9 5 4. 4.
Home > Fax > Receive a Fax > Fax Polling Fax Polling Polling lets you set up your machine so the other party pays for the call when receiving a fax from you. It also lets you pay for the call when you call someone's fax machine to retrieve a fax. The polling feature must be set up on both machines to work. Not all fax machines support polling. • Polled Transmit • Polling Receive Polling Receive lets you call another fax machine to receive a fax.
Home > Fax > Receive a Fax > Fax Polling > Polling Receive Polling Receive Polling Receive lets you call another fax machine to receive a fax. • Setup for Polling Receive • Setup for Polling Receive with Secure Code Secure Polling lets you poll another fax machine to receive a fax the other party has set up with a security code. • Setup for Delayed Polling Receive Delayed Polling Receive lets you set your machine to begin polling receive at a later time.
Home > Fax > Receive a Fax > Fax Polling > Polling Receive > Setup for Polling Receive Setup for Polling Receive Related Models: MFC-J680DW/MFC-J880DW 1. Press [Fax]. (MFC-J880DW) If [Fax Preview] is set to [On], press [Fax] > [Sending Faxes]. 2. Press [Options] > [Polling RX]. 3. Press [Standard]. 4. Enter the fax number you are polling using the Address Book or keyboard. 5. Press [Fax Start].
Home > Fax > Receive a Fax > Fax Polling > Polling Receive > Setup for Polling Receive with Secure Code Setup for Polling Receive with Secure Code Related Models: MFC-J680DW/MFC-J880DW Secure Polling lets you poll another fax machine to receive a fax the other party has set up with a security code. • Secure Polling only works with Brother fax machines. To get a fax from a secured Brother machine you must enter the secure code. 1. Press [Fax].
Home > Fax > Receive a Fax > Fax Polling > Polling Receive > Setup for Delayed Polling Receive Setup for Delayed Polling Receive Related Models: MFC-J680DW/MFC-J880DW Delayed Polling Receive lets you set your machine to begin polling receive at a later time. You can set up only one delayed polling operation. 1. Press [Fax]. (MFC-J880DW) If [Fax Preview] is set to [On], press [Fax] > [Sending Faxes]. 2. Press [Options] > [Polling RX]. 3. Press [Timer]. 4. Enter the time you want to start polling.
Home > Fax > Receive a Fax > Fax Polling > Polling Receive > Setup for Sequential Polling Receive Setup for Sequential Polling Receive Related Models: MFC-J680DW/MFC-J880DW Sequential Polling Receive lets you request documents from several fax machines in one operation. Afterwards, a Sequential Polling Report will be printed. This feature is available only for monochrome faxes. 1. Press [Fax]. (MFC-J880DW) If [Fax Preview] is set to [On], press [Fax] > [Sending Faxes]. 2.
Home > Fax > Receive a Fax > Fax Polling > Polling Receive > Cancel a Sequential Polling Job Cancel a Sequential Polling Job Related Models: MFC-J680DW/MFC-J880DW 1. Press . 2. Do one of the following: • To cancel the entire sequential polling job, press [Entire Seq. Poll]. Press [Yes] to confirm or press [No] to exit without cancelling. • To cancel the current number being dialled, press the name or number on the Touchscreen. Press [Yes] to confirm or press [No] to exit without cancelling.
Home > Fax > Receive a Fax > Fax Polling > Polling Receive > Stop Polling Stop Polling Related Models: MFC-J680DW/MFC-J880DW To cancel the polling process, press while the machine is dialling.
Home > Fax > Voice Operations and Fax Numbers Voice Operations and Fax Numbers • Voice Operations • Store Fax Numbers • Set up Groups for Broadcasting A Group, which can be stored in the Address Book, allows you to send the same fax message to many fax numbers.
Home > Fax > Voice Operations and Fax Numbers > Voice Operations Voice Operations • Send Tone Signals If you have a Pulse dialling service, but must send Tone signals (for example, for telephone banking), follow these steps. If you have a Touch Tone service, you will not need this feature to send tone signals.
Home > Fax > Voice Operations and Fax Numbers > Voice Operations > Send Tone Signals Send Tone Signals Related Models: MFC-J480DW/MFC-J680DW/MFC-J880DW If you have a Pulse dialling service, but must send Tone signals (for example, for telephone banking), follow these steps. If you have a Touch Tone service, you will not need this feature to send tone signals. This feature is not available in the New Zealand. >> MFC-J480DW >> MFC-J680DW/MFC-J880DW MFC-J480DW 1. Press Hook. 2.
Home > Fax > Voice Operations and Fax Numbers > Voice Operations > Pick up a Voice Call in Fax/Tel Receive Mode Pick up a Voice Call in Fax/Tel Receive Mode Related Models: MFC-J480DW/MFC-J680DW/MFC-J880DW When the machine is in Fax/Tel mode, it will use the F/T Ring (pseudo/double-ringing) to alert you to pick up a voice call. If you are at the machine, lift the external telephone’s handset, and then press Hook button or [Pickup] button to answer.
Home > Fax > Voice Operations and Fax Numbers > Store Fax Numbers Store Fax Numbers • • Store Address Book Numbers Store Address Book Numbers from Outgoing Calls You can store Address Book numbers from the Outgoing Call history. • Store Address Book Numbers from Caller ID History If you have Caller ID subscriber service from your telephone company, you can store Address Book numbers from incoming calls in the Caller ID history.
Home > Fax > Voice Operations and Fax Numbers > Store Fax Numbers > Store Address Book Numbers Store Address Book Numbers Related Models: MFC-J480DW/MFC-J680DW/MFC-J880DW >> MFC-J480DW >> MFC-J680DW/MFC-J880DW MFC-J480DW You can store up to 40 two-digit Speed Dial codes, and each code has a name. 1. Press (Address Book). 2. Press a or b to select [Set Speed Dial] and then press OK. 3. Do the following steps: a. Press a or b to select the two-digit Speed Dial code where you want to store the number.
Related Information • Store Fax Numbers • Set up Groups for Broadcasting 280
Home > Fax > Voice Operations and Fax Numbers > Store Fax Numbers > Store Address Book Numbers from Outgoing Calls Store Address Book Numbers from Outgoing Calls Related Models: MFC-J480DW/MFC-J680DW/MFC-J880DW You can store Address Book numbers from the Outgoing Call history. >> MFC-J480DW >> MFC-J680DW/MFC-J880DW MFC-J480DW 1. Press Redial/Pause. 2. Press a or b to select the following:. a. Select the number you want to store. Press OK. b. Select [Add to AddressBook]. Press OK.
Home > Fax > Voice Operations and Fax Numbers > Store Fax Numbers > Store Address Book Numbers from Caller ID History Store Address Book Numbers from Caller ID History Related Models: MFC-J480DW/MFC-J680DW/MFC-J880DW If you have Caller ID subscriber service from your telephone company, you can store Address Book numbers from incoming calls in the Caller ID history. This feature is not available for Taiwan and some countries. >> MFC-J480DW >> MFC-J680DW/MFC-J880DW MFC-J480DW 1.
Home > Fax > Voice Operations and Fax Numbers > Store Fax Numbers > Change or Delete Address Book Names or Numbers Change or Delete Address Book Names or Numbers Related Models: MFC-J480DW/MFC-J680DW/MFC-J880DW You can change or delete an Address Book name or number that has already been stored. >> MFC-J480DW >> MFC-J680DW/MFC-J880DW MFC-J480DW 1. Press (Address Book). 2. Press a or b to select [Set Speed Dial] and then press OK. 3. Press a or b to select the following: a.
Enter the new fax or telephone number (up to 20 digits) using the Touchscreen. Press [OK]. How to change the stored name or number: To change a character, press d or c to position the cursor to highlight the character you want to change, and then press . Enter the new character. 5. Press [OK] to finish. 6. Press .
Home > Fax > Voice Operations and Fax Numbers > Set up Groups for Broadcasting Set up Groups for Broadcasting Related Models: MFC-J480DW/MFC-J680DW/MFC-J880DW A Group, which can be stored in the Address Book, allows you to send the same fax message to many fax numbers. >> MFC-J480DW >> MFC-J680DW/MFC-J880DW MFC-J480DW First, you must store each fax number in the Address Book. Then you can include them as numbers in the Group. Each Group uses up a Speed Dial code.
• Change a Group Name • Delete a Group • Add or Delete Group Members • Send the Same Fax to More than One Recipient (Broadcasting) • Store Address Book Numbers 286
Home > Fax > Voice Operations and Fax Numbers > Set up Groups for Broadcasting > Change a Group Name Change a Group Name Related Models: MFC-J480DW/MFC-J680DW/MFC-J880DW >> MFC-J480DW >> MFC-J680DW/MFC-J880DW MFC-J480DW 1. Press (Address Book). 2. Press a or b to select [Setup Groups] and then press OK. 3. Press a or b to select the following: a. Select the Group to change. Press OK. b. Select [Change Group Name]. Press OK. c. Enter the new Group name (up to 16 characters) using the dial pad. Press OK.
Home > Fax > Voice Operations and Fax Numbers > Set up Groups for Broadcasting > Delete a Group Delete a Group Related Models: MFC-J480DW/MFC-J680DW/MFC-J880DW >> MFC-J480DW >> MFC-J680DW/MFC-J880DW MFC-J480DW 1. Press (Address Book). 2. Press a or b to select [Setup Groups] and then press OK. 3. Press a or b to select the following: a. Select the Group to delete. Press OK. b. Select [Delete]. Press OK. 4. Press 1 [Yes] to confirm. 5. Press Stop/Exit. MFC-J680DW/MFC-J880DW 1.
Home > Fax > Voice Operations and Fax Numbers > Set up Groups for Broadcasting > Add or Delete Group Members Add or Delete Group Members Related Models: MFC-J480DW/MFC-J680DW/MFC-J880DW >> MFC-J480DW >> MFC-J680DW/MFC-J880DW MFC-J480DW 1. Press (Address Book). 2. Press a or b to select [Setup Groups], and then press OK. 3. Press a or b to select the Group you want to change, and then press OK. 4.
Home > Fax > Telephone Services and External Devices Telephone Services and External Devices • Distinctive Ring • Caller ID • FaxAbility • Voice Over Internet Protocol (VoIP/Telephone Line Interference) • External TAD (Telephone Answering Device) • External and Extension Telephones 290
Home > Fax > Telephone Services and External Devices > Distinctive Ring Distinctive Ring Related Models: MFC-J480DW/MFC-J680DW/MFC-J880DW This feature is available only for some countries. For Australia Distinctive Ring is a function of your Brother machine that allows a person with one line to receive fax and voice calls through two different phone numbers on that one line. Brother uses the term “Distinctive Ring”, but telephone companies market the service under a variety of names.
Your machine has a Distinctive Ring function, allowing you to dedicate one phone number just for receiving faxes. You will need to set Distinctive Ring to On. • You can switch it off temporarily, then turn it back on. When you get a new fax number, make sure you reset this function. • The machine will answer only calls to the Distinctive Ring number.
Home > Fax > Telephone Services and External Devices > Distinctive Ring > Turn on Distinctive Ring Turn on Distinctive Ring Related Models: MFC-J480DW/MFC-J680DW/MFC-J880DW This feature is available only for some countries. For Australia After you set the Distinctive Ring feature to [On], the receive mode is automatically set to [Manual]. Your Distinctive Ring Number does not allow Voice calls - only Faxes. You cannot change the receive mode to another mode while the Distinctive Ring is set to on.
Home > Fax > Telephone Services and External Devices > Distinctive Ring > Turn off Distinctive Ring Turn off Distinctive Ring Related Models: MFC-J480DW/MFC-J680DW/MFC-J880DW This feature is available only for some countries. >> MFC-J480DW >> MFC-J680DW/MFC-J880DW MFC-J480DW 1. Press Settings. 2. Press a or b to select the following: a. Select [Fax]. Press OK. b. Select [Miscellaneous]. Press OK. c. Select [Distinctive]. Press OK. d. Select [Off]. Press OK. 3. Press Stop/Exit.
Home > Fax > Telephone Services and External Devices > Caller ID Caller ID Related Models: MFC-J480DW/MFC-J680DW/MFC-J880DW This feature is not available for Taiwan and some countries. For Australia and New Zealand Caller ID is a telephone service that allows the subscriber to see a display of the caller’s phone number or name as the telephone rings. It is a fast way to screen your calls. You can respond quickly to calls you missed, because Caller IDs are received and stored in your machine memory.
• You can print a list of Caller ID information received by your machine. • Caller ID service varies with different carriers. Call your local phone company to determine the kind of service available in your area.
Home > Fax > Telephone Services and External Devices > FaxAbility FaxAbility Related Models: MFC-J480DW/MFC-J680DW/MFC-J880DW This feature is available only in New Zealand. FaxAbility is a service offered by Telecom that allows you to have an additional number on one phone line, with its own distinctive ring pattern. This way, when you get an incoming call, you can identify the number being called by its ring.
Home > Fax > Telephone Services and External Devices > FaxAbility > Turn FaxAbility Off or On Turn FaxAbility Off or On Related Models: MFC-J480DW/MFC-J680DW/MFC-J880DW This feature is available only in New Zealand. The FaxAbility function is designed to accommodate the FaxAbility service provided by Telecom. Call Waiting beeps caused by incoming calls on your main number can affect fax transmissions. If you have FaxAbility Service but don’t have Call Waiting, you need do nothing at this stage.
Home > Fax > Telephone Services and External Devices > Voice Over Internet Protocol (VoIP/Telephone Line Interference) Voice Over Internet Protocol (VoIP/Telephone Line Interference) Related Models: MFC-J480DW/MFC-J680DW/MFC-J880DW VoIP is a type of phone system that uses an Internet connection instead of a traditional telephone line. Telephone providers frequently bundle VoIP together with Internet and cable services. Your machine may not work with some VoIP systems.
Home > Fax > Telephone Services and External Devices > External TAD (Telephone Answering Device) External TAD (Telephone Answering Device) Related Models: MFC-J480DW/MFC-J680DW/MFC-J880DW You can connect an external Telephone Answering Device (TAD) to the same line as your machine. When the TAD answers a call, your machine will “listen” for the CNG (fax calling) tones sent by a sending fax machine. If it hears them it will take over the call and receive the fax.
Home > Fax > Telephone Services and External Devices > External TAD (Telephone Answering Device) > Connect an External TAD Connect an External TAD Related Models: MFC-J480DW/MFC-J680DW/MFC-J880DW 1. Set your external TAD to one or two rings. The machine’s Ring Delay setting does not apply. 2. Record the outgoing message on your external TAD. 3. Set the TAD to answer calls. 4. Set the Receive Mode on your machine to [External TAD].
Home > Fax > Telephone Services and External Devices > External TAD (Telephone Answering Device) > Record an Outgoing Message (OGM) on the External TAD Record an Outgoing Message (OGM) on the External TAD Related Models: MFC-J480DW/MFC-J680DW/MFC-J880DW 1. Record five seconds of silence at the beginning of your message. This allows your machine time to listen for fax tones. We recommend beginning your OGM with an initial five second silence because the machine cannot hear fax tones over a loud voice.
Home > Fax > Telephone Services and External Devices > External TAD (Telephone Answering Device) > Multi-line Connections (PABX) Multi-line Connections (PABX) Related Models: MFC-J480DW/MFC-J680DW/MFC-J880DW Most offices use a central telephone system. Brother recommends that all our machines be connected to a discreet (dedicated) line. Although a particular PABX may appear to work with a particular model of fax machine, we cannot guarantee that the unit will operate correctly.
Home > Fax > Telephone Services and External Devices > External and Extension Telephones External and Extension Telephones • Connect an External or Extension Telephone • Operation from External and Extension Telephones • Use a Cordless External Telephone • Use the Remote Codes 304
Home > Fax > Telephone Services and External Devices > External and Extension Telephones > Connect an External or Extension Telephone Connect an External or Extension Telephone Related Models: MFC-J480DW/MFC-J680DW/MFC-J880DW You can connect a separate telephone to your machine as shown in the diagram below.
Home > Fax > Telephone Services and External Devices > External and Extension Telephones > Operation from External and Extension Telephones Operation from External and Extension Telephones Related Models: MFC-J480DW/MFC-J680DW/MFC-J880DW If you answer a fax call at an extension or an external telephone, you can make your machine take the call by using the Remote Activation Code. When you press the Remote Activation Code *51 (*91 for New Zealand), the machine starts to receive the fax.
Home > Fax > Telephone Services and External Devices > External and Extension Telephones > Use a Cordless External Telephone Use a Cordless External Telephone Related Models: MFC-J480DW/MFC-J680DW/MFC-J880DW Once the base unit of the cordless telephone has been connected to the same telephone line as the machine, you can answer calls on the cordless handset during the Ring Delay.
Home > Fax > Telephone Services and External Devices > External and Extension Telephones > Use the Remote Codes Use the Remote Codes Related Models: MFC-J480DW/MFC-J680DW/MFC-J880DW Remote Activation Code If you answer a fax call on an extension or external telephone, you can tell your machine to receive it by pressing the Remote Activation Code *51 (*91 for New Zealand). Wait for the chirping sounds then replace the handset.
Home > Fax > Telephone Services and External Devices > External and Extension Telephones > Use the Remote Codes > Change the Remote Codes Change the Remote Codes Related Models: MFC-J480DW/MFC-J680DW/MFC-J880DW The preset Remote Activation Code is *51 (*91 for New Zealand). The preset Remote Deactivation Code is #51 (#91 for New Zealand). If you are always disconnected when accessing your External TAD remotely, try changing the three-digit remote codes using the numbers 0-9, *, #.
Home > Fax > Fax Reports Fax Reports • Set the Transmission Verification Report's Style You can use the Transmission Verification Report as proof that you sent a fax. This report lists the receiving party's name or fax number, the time and date of transmission, duration of transmission, number of pages sent, and whether or not the transmission was successful.
Home > Fax > Fax Reports > Set the Transmission Verification Report's Style Set the Transmission Verification Report's Style Related Models: MFC-J480DW/MFC-J680DW/MFC-J880DW You can use the Transmission Verification Report as proof that you sent a fax. This report lists the receiving party's name or fax number, the time and date of transmission, duration of transmission, number of pages sent, and whether or not the transmission was successful.
Home > Fax > Fax Reports > Set the Fax Journal's Interval Period Set the Fax Journal's Interval Period Related Models: MFC-J480DW/MFC-J680DW/MFC-J880DW You can set the machine to print a Fax Journal at specific intervals (every 50 faxes, 6, 12 or 24 hours, 2 or 7 days). (MFC-J480DW/MFC-J680DW) When using the Auto Power Off feature and the machine powers off before the chosen Interval Period, the machine will print a Fax Journal report, and then erase all fax jobs from the Journal's memory.
5. If you selected [Every 7 Days], press [Day]. Press a or b to display the [Every Monday], [Every Tuesday], [Every Wednesday], [Every Thursday], [Every Friday], [Every Saturday] or [Every Sunday] option, and then press the first day of the seven-day countdown. 6. Press .
Home > Fax > PC-FAX PC-FAX • PC-FAX for Windows® • PC-FAX for Macintosh Use Brother's PC-FAX software to send faxes directly from your Macintosh without printing them. This feature helps reduce your paper consumption and save time.
Home > Fax > PC-FAX > PC-FAX for Windows® PC-FAX for Windows® • PC-FAX Overview (Windows®) Reduce paper consumption and save time by using Brother's PC-FAX software to send faxes directly from your machine. • Send a Fax Using PC-FAX (Windows®) • Receive Faxes on Your Computer (Windows®) Use Brother's PC-FAX software to receive faxes on your computer, screen them and print only those faxes you want.
Home > Fax > PC-FAX > PC-FAX for Windows® > PC-FAX Overview (Windows®) PC-FAX Overview (Windows®) Reduce paper consumption and save time by using Brother's PC-FAX software to send faxes directly from your machine. • Configure PC-FAX (Windows®) Before sending faxes using PC-FAX, personalise the send options in each tab of the PC-FAX Setup dialog box. • Configure your PC-Fax Address Book (Windows®) Add, edit and delete members and groups to personalise your Brother Address Book.
Home > Fax > PC-FAX > PC-FAX for Windows® > PC-FAX Overview (Windows®) > Configure PC-FAX (Windows®) Configure PC-FAX (Windows®) Related Models: MFC-J480DW/MFC-J680DW/MFC-J880DW Before sending faxes using PC-FAX, personalise the send options in each tab of the PC-FAX Setup dialog box. 1. Do one of the following: • (Windows® XP, Windows Vista® and Windows® 7) Click (Start) > All Programs > Brother > Brother Utilities. Click the drop-down list and select your model name (if not already selected).
Related Information • PC-FAX Overview (Windows®) 318
Home > Fax > PC-FAX > PC-FAX for Windows® > PC-FAX Overview (Windows®) > Configure your PC-Fax Address Book (Windows®) Configure your PC-Fax Address Book (Windows®) Add, edit and delete members and groups to personalise your Brother Address Book. • Add a Member to the Address Book (Windows®) Add new people and their fax information to the PC-Fax Address Book if you want to send a fax using Brother PC-Fax software.
Home > Fax > PC-FAX > PC-FAX for Windows® > PC-FAX Overview (Windows®) > Configure your PC-Fax Address Book (Windows®) > Add a Member to the Address Book (Windows®) Add a Member to the Address Book (Windows®) Related Models: MFC-J480DW/MFC-J680DW/MFC-J880DW Add new people and their fax information to the PC-Fax Address Book if you want to send a fax using Brother PC-Fax software. 1.
3. Type the member's information in the corresponding fields. Only the Name field is required. 4. Click OK.
Home > Fax > PC-FAX > PC-FAX for Windows® > PC-FAX Overview (Windows®) > Configure your PC-Fax Address Book (Windows®) > Create a Group in the Address Book (Windows®) Create a Group in the Address Book (Windows®) Related Models: MFC-J480DW/MFC-J680DW/MFC-J880DW Create a group to broadcast the same PC-FAX to several recipients at one time. 1. Do one of the following: • (Windows® XP, Windows Vista® and Windows® 7) Click (Start) > All Programs > Brother > Brother Utilities.
3. Type the name of the new group in the Group Name field. 4. In the Available Names field, select each name you want to include in the group, and then click Add >>. Members added to the group appear in the Group Members box. 5. When finished, click OK. Each group can contain up to 50 members.
Home > Fax > PC-FAX > PC-FAX for Windows® > PC-FAX Overview (Windows®) > Configure your PC-Fax Address Book (Windows®) > Edit Member or Group Information (Windows®) Edit Member or Group Information (Windows®) Related Models: MFC-J480DW/MFC-J680DW/MFC-J880DW 1. Do one of the following: • (Windows® XP, Windows Vista® and Windows® 7) Click (Start) > All Programs > Brother > Brother Utilities. Click the drop-down list and select your model name (if not already selected).
Home > Fax > PC-FAX > PC-FAX for Windows® > PC-FAX Overview (Windows®) > Configure your PC-Fax Address Book (Windows®) > Delete a Member or Group (Windows®) Delete a Member or Group (Windows®) Related Models: MFC-J480DW/MFC-J680DW/MFC-J880DW 1. Do one of the following: • (Windows® XP, Windows Vista® and Windows® 7) Click (Start) > All Programs > Brother > Brother Utilities. Click the drop-down list and select your model name (if not already selected).
Home > Fax > PC-FAX > PC-FAX for Windows® > PC-FAX Overview (Windows®) > Configure your PC-Fax Address Book (Windows®) > Export the Address Book (Windows®) Export the Address Book (Windows®) Related Models: MFC-J480DW/MFC-J680DW/MFC-J880DW You can export the Address Book as an ASCII text file (*.csv), a vCard (an electronic business card), or Remote Setup Dial Data and save it on your computer. • You cannot export the group settings when you export the Address Book data. 1.
4. In the Available Items field, select the data you want to export, and then click Add >>. Select and add the items in the order you want them listed. 5. If you are exporting to an ASCII file, under the Divide Character section, select the Tab or Comma option to separate the data fields. 6. Click OK. 7. Browse to the folder on your computer where you want to save the data, type the file name, and then click Save.
Home > Fax > PC-FAX > PC-FAX for Windows® > PC-FAX Overview (Windows®) > Configure your PC-Fax Address Book (Windows®) > Import Information to the Address Book (Windows®) Import Information to the Address Book (Windows®) Related Models: MFC-J480DW/MFC-J680DW/MFC-J880DW You can import ASCII text files (*.csv), vCards (electronic business cards), or Remote Setup Dial Data into your Address Book. 1.
You must select and add fields from the Available Items list in the same order they are listed in the import text file. 5. If you are importing an ASCII file, under the Divide Character section, select the Tab or Comma option to separate the data fields. 6. Click OK. 7. Browse to the folder where you want to import the data, type the file name, and then click Open.
Home > Fax > PC-FAX > PC-FAX for Windows® > Send a Fax Using PC-FAX (Windows®) Send a Fax Using PC-FAX (Windows®) Related Models: MFC-J480DW/MFC-J680DW/MFC-J880DW PC-FAX supports only monochrome faxes. A monochrome fax will be sent even if the original data is colour and the receiving fax machine supports colour faxes. 1. Create a file in any application on your computer. 2. Select the print command in your application. 3. Select Brother PC-FAX as your printer, and then complete your print operation.
Home > Fax > PC-FAX > PC-FAX for Windows® > Receive Faxes on Your Computer (Windows®) Receive Faxes on Your Computer (Windows®) Use Brother's PC-FAX software to receive faxes on your computer, screen them and print only those faxes you want. • Receive Faxes Using PC-FAX Receive (Windows®) Brother's PC-FAX Receive software lets you view and store faxes on your computer. It is automatically installed when you install the Brother software and drivers and works on locally- or network-connected machines.
Home > Fax > PC-FAX > PC-FAX for Windows® > Receive Faxes on Your Computer (Windows®) > Receive Faxes Using PC-FAX Receive (Windows®) Receive Faxes Using PC-FAX Receive (Windows®) Related Models: MFC-J480DW/MFC-J680DW/MFC-J880DW Brother's PC-FAX Receive software lets you view and store faxes on your computer. It is automatically installed when you install the Brother software and drivers and works on locally- or network-connected machines. • PC-FAX Receive supports only monochrome faxes.
Home > Fax > PC-FAX > PC-FAX for Windows® > Receive Faxes on Your Computer (Windows®) > Receive Faxes Using PC-FAX Receive (Windows®) > Run Brother's PC-FAX Receive on Your Computer (Windows®) Run Brother's PC-FAX Receive on Your Computer (Windows®) Related Models: MFC-J480DW/MFC-J680DW/MFC-J880DW We recommend selecting the Start PC-FAX Receive on computer startup check box so that the software runs automatically and can transfer any faxes upon computer startup. 1.
Home > Fax > PC-FAX > PC-FAX for Windows® > Receive Faxes on Your Computer (Windows®) > Receive Faxes Using PC-FAX Receive (Windows®) > Run Brother's PC-FAX Receive on Your Computer (Windows®) > Set Up Your Computer for PC-FAX Receiving (Windows®) Set Up Your Computer for PC-FAX Receiving (Windows®) Related Models: MFC-J480DW/MFC-J680DW/MFC-J880DW 1. Double-click the (PC-FAX Receive) icon in your computer task tray. The PC-FAX Receive window appears. 2. Click Settings. 3.
Home > Fax > PC-FAX > PC-FAX for Windows® > Receive Faxes on Your Computer (Windows®) > Receive Faxes Using PC-FAX Receive (Windows®) > Run Brother's PC-FAX Receive on Your Computer (Windows®) > Add Your Brother Machine to PC-FAX Receiving (Windows®) Add Your Brother Machine to PC-FAX Receiving (Windows®) Related Models: MFC-J480DW/MFC-J680DW/MFC-J880DW • If you installed the machine following the instructions for a network user, then the machine should already be configured for your network. 1.
5. To change the computer name that will appear on the machine's LCD, type the new name in the Enter your PC display name (Max 15 Characters) field. 6. Click OK.
Home > Fax > PC-FAX > PC-FAX for Windows® > Receive Faxes on Your Computer (Windows®) > Receive Faxes Using PC-FAX Receive (Windows®) > View Received Messages (Windows®) View Received Messages (Windows®) Related Models: MFC-J480DW/MFC-J680DW/MFC-J880DW Receiving Status Icon Indicated Status Standby mode No unread messages Receiving messages Messages received Unread messages 1. Double-click the (PC-FAX Receive) icon in your computer task tray. The PC-FAX Receive window appears. 2.
Even after closing the window, PC-FAX Receive is active and the (PC-FAX Receive ) icon will remain in your computer task tray. To close PC-FAX Receive, click the icon in the computer task tray and click Close.
Home > Fax > PC-FAX > PC-FAX for Macintosh PC-FAX for Macintosh Use Brother's PC-FAX software to send faxes directly from your Macintosh without printing them. This feature helps reduce your paper consumption and save time.
Home > Fax > PC-FAX > PC-FAX for Macintosh > Send Faxes from Your Application (Macintosh) Send Faxes from Your Application (Macintosh) Related Models: MFC-J480DW/MFC-J680DW/MFC-J880DW PC-FAX supports only monochrome faxes. A monochrome fax will be sent even if the original data is colour and the receiving fax machine supports colour faxes. 1. Create a document in a Macintosh application. 2. From an application, such as Apple TextEdit, click the File menu, and then select Print. 3.
To send a fax to more than one number, click the Add button after entering the first fax number and type the next fax number. The destination fax numbers will be listed in the Destination Fax Numbers field. 6. Click Print to send the fax.
Home > PhotoCapture Center PhotoCapture Center • Print Photos Directly from Media When your machine is not connected to your computer, you can print photos directly from digital camera media or a USB Flash memory drive, scan documents and save them directly to a memory card or USB flash drive. When your machine is connected to a computer, you can use your computer to access a memory card or USB flash drive inserted in the front of the machine.
Home > PhotoCapture Center > Print Photos Directly from Media Print Photos Directly from Media When your machine is not connected to your computer, you can print photos directly from digital camera media or a USB Flash memory drive, scan documents and save them directly to a memory card or USB flash drive. When your machine is connected to a computer, you can use your computer to access a memory card or USB flash drive inserted in the front of the machine.
Home > PhotoCapture Center > Print Photos Directly from Media > Compatible Memory Cards and USB Flash Drives Compatible Memory Cards and USB Flash Drives Related Models: DCP-J562DW/MFC-J680DW/MFC-J880DW Your Brother machine has media drives (slots) for use with common data storage and digital camera media. IMPORTANT The USB direct interface supports only USB flash drives, PictBridge-compatible cameras and digital cameras that use the USB mass storage standard. Other USB devices are not supported.
Home > PhotoCapture Center > Print Photos Directly from Media > Important Information about PhotoCapture Center Important Information about PhotoCapture Center Related Models: DCP-J562DW/MFC-J680DW/MFC-J880DW USB flash drives are available only for certain models. Your machine is designed to be compatible with modern digital camera image files, memory cards and USB flash drives. Read the points below to avoid errors: • The image file extension must be .JPG (other image file extensions like .JPEG, .TIF, .
Home > PhotoCapture Center > Print Photos Directly from Media > Print Photos from Media Using the Photo Button on the Brother Machine Print Photos from Media Using the Photo Button on the Brother Machine • Preview and Print Photos and Movie Files from Media Preview your photos on the LCD before you print them. Print images from movie files that are stored on a memory card or USB flash drive.
Home > PhotoCapture Center > Print Photos Directly from Media > Print Photos from Media Using the Photo Button on the Brother Machine > Preview and Print Photos and Movie Files from Media Preview and Print Photos and Movie Files from Media Related Models: DCP-J562DW/MFC-J680DW/MFC-J880DW Preview your photos on the LCD before you print them. Print images from movie files that are stored on a memory card or USB flash drive.
Home > PhotoCapture Center > Print Photos Directly from Media > Print Photos from Media Using the Photo Button on the Brother Machine > Print a Photo Index Sheet (Thumbnails) from Media Print a Photo Index Sheet (Thumbnails) from Media Related Models: DCP-J562DW/MFC-J680DW/MFC-J880DW Print a photo Index Sheet to see small preview versions of all pictures on your memory card or USB flash drive. • The PhotoCapture Center assigns numbers for images (such as No.1, No.2, No.3, and so on).
Home > PhotoCapture Center > Print Photos Directly from Media > Print Photos from Media Using the Photo Button on the Brother Machine > Print Photos by Image Number Print Photos by Image Number Related Models: DCP-J562DW/MFC-J680DW/MFC-J880DW Before you can print an individual image, you must print the photo Index Sheet (thumbnails) to know the image number. 1. Open the media slot cover. 2. Put the memory card or USB flash drive in the correct slot. 3. Press [Photo] > [Index Print] > [Print Photos]. 4.
Home > PhotoCapture Center > Print Photos Directly from Media > Print Photos from Media Using the Photo Button on the Brother Machine > Enhance Photos Using Advanced Editing Options Enhance Photos Using Advanced Editing Options Related Models: MFC-J880DW Edit and add effects to your photos and view them on the LCD before printing. The Enhance Photos feature is supported by technology from Reallusion, Inc. 1. Open the media slot cover. 2. Put the memory card or USB flash drive in the correct slot. 3.
Option Description Monochrome Convert your photo to monochrome. Sepia Convert the colour of your photo to sepia. Auto Correct & Remove Red-Eye The machine decides the appropriate effects for your photo and attempts to remove red-eye. • There are some cases when red-eye may not be removed. • When the face is too small in the image. • When the face is turning too far up, down, left, or right. • Press [Cancel] to return to the list of effects.
Home > PhotoCapture Center > Print Photos Directly from Media > Print Photos from Media Using the Photo Button on the Brother Machine > Print Photos with Custom Cropping Print Photos with Custom Cropping Related Models: MFC-J880DW Crop your photos and view them on the LCD before printing. The Crop Photos feature is supported by technology from Reallusion, Inc. 1. Open the media slot cover. 2. Put the memory card or USB flash drive in the correct slot. 3. Press [Photo] > [Enhance Photos].
Home > PhotoCapture Center > Print Photos Directly from Media > Print Photos from Media Using the Photo Button on the Brother Machine > Print ID Photos Print ID Photos Related Models: DCP-J562DW/MFC-J680DW/MFC-J880DW Select a photo stored in a memory card or USB flash drive and print ID photos for your resume, passport and so on. You can print four ID photos on one sheet of paper, and crop large images to preset sizes.
Home > PhotoCapture Center > Print Photos Directly from Media > Print Photos from Media Using the Photo Button on the Brother Machine > Print Photos from Media in Digital Print Order Format (DPOF) Print Photos from Media in Digital Print Order Format (DPOF) Related Models: DCP-J562DW/MFC-J680DW/MFC-J880DW Major digital camera manufacturers (Canon, Inc.
Home > PhotoCapture Center > Print Photos Directly from Media > Print Photos from Media Using the Photo Button on the Brother Machine > Print Photos with Auto Cropping Print Photos with Auto Cropping Related Models: DCP-J562DW/MFC-J680DW/MFC-J880DW If your photo is too long or too wide to fit the space in your layout, part of the image will be cropped. • The factory setting is On. To print the whole image, change this setting to Off.
Home > PhotoCapture Center > Print Photos Directly from Media > Print Photos from Media Using the Photo Button on the Brother Machine > Print Borderless Photos from Media Print Borderless Photos from Media Related Models: DCP-J562DW/MFC-J680DW/MFC-J880DW This feature expands the printable area to the edges of the paper. Printing time will be slower. 1. Open the media slot cover. 2. Put the memory card or USB flash drive in the correct slot. 3. Press [Photo] > [View Photos]. 4.
Home > PhotoCapture Center > Print Photos Directly from Media > Print Photos from Media Using the Photo Button on the Brother Machine > Print the Date from Your Photo's Data Print the Date from Your Photo's Data Related Models: DCP-J562DW/MFC-J680DW/MFC-J880DW Print the date if it is already in your photo’s information. The date will be printed on the lower-right corner. To use this setting, the photo must include the date.
Home > PhotoCapture Center > Print Photos Directly from Media > Print Photos from Media Using the Photo Button on the Brother Machine > Print Settings for Photos Print Settings for Photos Related Models: DCP-J562DW/MFC-J680DW/MFC-J880DW Press the [Print Settings] button to display the settings shown in the table. Option Description Print Quality Select the print resolution for your type of document.
Print Size Option Printed Position 9x13cm 10x15cm 13x18cm 15x20cm Max.
Home > PhotoCapture Center > Copy Photos from Media to a Computer Copy Photos from Media to a Computer If you would like to copy photos stored in a memory card or USB flash drive to a folder on your computer, follow the steps for your connection type and Operating System. • Before Copying Photos • Copy Photos from Media Over a Local Connection You can copy photos from media to your computer when it is locally connected (via USB) to your machine.
Home > PhotoCapture Center > Copy Photos from Media to a Computer > Before Copying Photos Before Copying Photos Related Models: DCP-J562DW/MFC-J680DW/MFC-J880DW IMPORTANT DO NOT start your computer with a memory card or USB flash drive in the media drive of the machine. You could lose your data or damage the media. • The PhotoCapture Center will read only the media that was put in first.
Home > PhotoCapture Center > Copy Photos from Media to a Computer > Copy Photos from Media Over a Local Connection Copy Photos from Media Over a Local Connection Related Models: DCP-J562DW/MFC-J680DW/MFC-J880DW You can copy photos from media to your computer when it is locally connected (via USB) to your machine. 1. Open the machine's media slot cover. 2. Insert a memory card or USB flash drive into your machine. 3.
Home > PhotoCapture Center > Copy Photos from Media to a Computer > Copy Photos from Media Over a Network Connection Copy Photos from Media Over a Network Connection Related Models: DCP-J562DW/MFC-J680DW/MFC-J880DW You can copy photos from media to your computer when it is connected to the machine using a Network connection. 1. Open the machine's media slot cover. 2. Insert a memory card or USB flash drive into your machine. 3. Type the IP address of your Brother machine in your web browser (where XXX.XXX.
Home > PhotoCapture Center > Print Photos from ControlCenter4 (Windows®) Print Photos from ControlCenter4 (Windows®) You can print and edit photos using various ControlCenter features. 1. Make sure you have loaded the correct media in the paper tray. IMPORTANT • We recommend using the photo paper tray located on the top of the output tray cover to print on Photo (10 x 15 cm) and Photo L (9 x 13 cm) paper. (available only for certain models) • For best results, use Brother paper.
Option Description Select All Selects all thumbnails in the current view. Deselect All Deselects all thumbnails in the current view. 6. Specify the number of copies you want to print (1-99) by clicking . 7. To trim the photo before printing, click Edit. 8. Click Print. The print settings window appears. 9. Configure the settings for the Paper Size, Media Type, and Layout options. 10. Click the Properties button to configure the Print Quality, Colour / Greyscale and Colour Mode options, if needed.
Home > PhotoCapture Center > Print Photos from ControlCenter4 (Windows®) > Edit Photos Using ControlCenter4 (Windows®) Edit Photos Using ControlCenter4 (Windows®) 3 4 5 1. This area shows which images are currently selected, and how many copies of each image will be printed. 2. These buttons allow you to control how you view the selected image. Description Buttons (Compare) Compare the edited image with the original. (Undo) Cancel the last edit applied to the selected image.
Sepia Select this option to remove colour information from the image and add a sepia tone. 5. Image Enhancement Nature Scene Select this option to enhance natural colours, such as green and blue. Night Scene Select this option to optimise the image adjustments for a night scene photo. Soft Light Select this option to soften bright edges.
Home > Network Network • Get Started We recommend setting up and connecting to your network using the Brother installation CD-ROM. This section provides more information on network connection types, introduces various methods to manage your network and explains some useful network features of your Brother machine. • Network Management Software and Utilities Configure and change your Brother machine's network settings using a management utility.
Home > Network > Get Started Get Started We recommend setting up and connecting to your network using the Brother installation CD-ROM. This section provides more information on network connection types, introduces various methods to manage your network and explains some useful network features of your Brother machine. • Supported Basic Network Features The print server supports various features depending on the operating system.
Home > Network > Get Started > Supported Basic Network Features Supported Basic Network Features The print server supports various features depending on the operating system. Use this chart to see what network features and connections are supported by each operating system. Operating Systems Windows® XP Windows Vista® Windows Server® 2003/2008/2012/2012 R2 OS X v10.8.5 OS X v10.9.x OS X v10.10.
Home > Network > Network Management Software and Utilities Network Management Software and Utilities Configure and change your Brother machine's network settings using a management utility.
Home > Network > Network Management Software and Utilities > Learn about Network Management Software and Utilities Learn about Network Management Software and Utilities BRAdmin Light (Windows® and Macintosh) BRAdmin Light is a utility for the initial setup of Brother network-connected devices. This utility can search for Brother products on your network, view the status and configure the basic network settings, such as IP address.
Home > Network > Additional Methods of Configuring Your Brother Machine for a Wireless Network Additional Methods of Configuring Your Brother Machine for a Wireless Network To connect your machine to your wireless network, we recommend using the Installation CD-ROM.
Home > Network > Additional Methods of Configuring Your Brother Machine for a Wireless Network > Before Configuring Your Brother Machine for a Wireless Network Before Configuring Your Brother Machine for a Wireless Network Before attempting to configure a wireless network, confirm the following: • To achieve optimum results with normal everyday document printing, place the Brother machine as close to the wireless LAN access point/router as possible with minimal obstructions.
Home > Network > Additional Methods of Configuring Your Brother Machine for a Wireless Network > Configure Your Machine for a Wireless Network Using the One Push Method of Wi-Fi Protected Setup™ (WPS) or AOSS™ Configure Your Machine for a Wireless Network Using the One Push Method of Wi-Fi Protected Setup™ (WPS) or AOSS™ If your wireless access point/router supports either WPS (Push Button Configuration) or AOSS™, you can use WPS or AOSS™ from your machine's control panel menu to configure your wireless ne
DCP-J562DW/MFC-J680DW/MFC-J880DW 1. Press [Settings] > [All Settings] > [Network] > [WLAN] > [WPS/AOSS]. 2. When [Switch Network interface to wireless?] or [Enable WLAN?] appears, press [Yes]. This will start the wireless setup wizard. To cancel, press [No]. 3. When the Touchscreen instructs you to start WPS or AOSS™, press the WPS or AOSS™ button on your wireless access point/router. Then press [OK] on your machine.
Home > Network > Additional Methods of Configuring Your Brother Machine for a Wireless Network > Configure Your Machine for a Wireless Network Using the PIN Method of Wi-Fi Protected Setup™ (WPS) Configure Your Machine for a Wireless Network Using the PIN Method of Wi-Fi Protected Setup™ (WPS) If your wireless LAN access point/router supports WPS, you can use the Personal Identification Number (PIN) Method to configure your wireless network settings.
c. Select [WPS w/PIN Code]. Press OK. 3. When [Enable WLAN?] appears, press OK. This will start the wireless setup wizard. To cancel, press Stop/Exit. 4. The LCD displays an eight-digit PIN and the machine starts searching for a wireless LAN access point/router. 5. Using a computer that is on the network, type "http://access point's IP address" in your browser (where "access point's IP address" is the IP address of the device that is being used as the Registrar). 6.
If you are using a Windows Vista®, Windows® 7, or Windows® 8 computer as a Registrar, complete the following steps: 6. Do one of the following: (Windows Vista®) • Click (Start) > Network > Add a wireless device. (Windows® 7) • Click (Start) > Devices and Printers > Add a device. (Windows® 8) • Move your mouse to the lower right corner of your desktop. When the menu bar appears, click Settings > Control Panel > Hardware and Sound > Devices and Printers > Add a device.
Home > Network > Additional Methods of Configuring Your Brother Machine for a Wireless Network > Configure Your Machine for a Wireless Network in Ad-Hoc Mode Using a New SSID Configure Your Machine for a Wireless Network in Ad-Hoc Mode Using a New SSID You must connect to a new SSID from your computer when it is configured for Ad-Hoc mode. >> MFC-J480DW >> DCP-J562DW/MFC-J680DW/MFC-J880DW MFC-J480DW 1. Press Settings. 2. Press a or b to select the following: a. Select [Network]. Press OK. b.
For more information about how to enter text, see the Appendix. 6. Press [Ad-hoc]. 7. Press either [None] or [WEP]. 8. If you selected the [WEP] option for Encryption type, enter the WEP key, and then press [OK]. Your Brother machine supports the use of the first WEP key only. 9. To apply the settings, press [Yes]. To cancel, press [No]. 10. The machine will attempt to connect to the wireless device you have selected. If your wireless device is connected successfully, the LCD displays [Connected].
Home > Network > Additional Methods of Configuring Your Brother Machine for a Wireless Network > Configure Your Machine for a Wireless Network Settings When the SSID is Not Broadcast Configure Your Machine for a Wireless Network Settings When the SSID is Not Broadcast >> MFC-J480DW >> DCP-J562DW/MFC-J680DW/MFC-J880DW MFC-J480DW Before configuring your machine, we recommend writing down your wireless network settings. You will need this information before you continue with the configuration. 1.
8. Do one of the following: • If you selected the [Open System] option, press a or b to select the Encryption type [None] or [WEP], and then press OK. If you selected the [WEP] option for Encryption type, enter the WEP key, and then press OK. • If you selected the [Shared Key] option, enter the WEP key, and then press OK. • If you selected the [WPA/WPA2-PSK] option, press a or b to select the Encryption type [TKIP+AES] or [AES], and then press OK. Enter the WPA key, and then press OK.
3. When [Switch Network interface to wireless?] or [Enable WLAN?] appears, press [Yes]. This will start the wireless setup wizard. To cancel, press [No]. 4. The machine will search for your network and display a list of available SSIDs. Press a or b to display the [] option, and then press it. 5. Press [OK]. 6. Enter the SSID name, and then press [OK]. For more information about how to enter text, see the Appendix. 7. Press [Infrastructure]. 8. Select the Authentication Method, and then press it.
Home > Network > Additional Methods of Configuring Your Brother Machine for a Wireless Network > Use Wi-Fi Direct® Use Wi-Fi Direct® • Print or Scan from Your Mobile Device Using Wi-Fi Direct • Configure Your Wi-Fi Direct Network Configure your Wi-Fi Direct network settings from your machine's control panel.
Home > Network > Additional Methods of Configuring Your Brother Machine for a Wireless Network > Use Wi-Fi Direct® > Print or Scan from Your Mobile Device Using Wi-Fi Direct Print or Scan from Your Mobile Device Using Wi-Fi Direct Wi-Fi Direct is one of the wireless configuration methods developed by the Wi-Fi Alliance®.
Home > Network > Additional Methods of Configuring Your Brother Machine for a Wireless Network > Use Wi-Fi Direct® > Configure Your Wi-Fi Direct Network Configure Your Wi-Fi Direct Network Configure your Wi-Fi Direct network settings from your machine's control panel. • Wi-Fi Direct Network Configuration Overview The following instructions offer five methods for configuring your Brother machine in a wireless network environment. Select the method you prefer for your environment.
Home > Network > Additional Methods of Configuring Your Brother Machine for a Wireless Network > Use Wi-Fi Direct® > Configure Your Wi-Fi Direct Network > Wi-Fi Direct Network Configuration Overview Wi-Fi Direct Network Configuration Overview The following instructions offer five methods for configuring your Brother machine in a wireless network environment. Select the method you prefer for your environment. Check your mobile device for configuration. 1.
Home > Network > Additional Methods of Configuring Your Brother Machine for a Wireless Network > Use Wi-Fi Direct® > Configure Your Wi-Fi Direct Network > Configure Your Wi-Fi Direct Network Using the OnePush Method Configure Your Wi-Fi Direct Network Using the One-Push Method >> MFC-J480DW >> DCP-J562DW/MFC-J680DW/MFC-J880DW MFC-J480DW If your mobile device supports Wi-Fi Direct, follow these steps to configure a Wi-Fi Direct network: When the machine receives the Wi-Fi Direct request from your mobile de
• When your Brother machine is not the G/O, it will display available device names with which to configure a Wi-Fi Direct network. Select the mobile device to which you want to connect and press [OK]. Search for available devices again by pressing [Rescan]. 5. If your mobile device connects successfully, the machine displays [Connected]. You have completed the Wi-Fi Direct network setup.
Home > Network > Additional Methods of Configuring Your Brother Machine for a Wireless Network > Use Wi-Fi Direct® > Configure Your Wi-Fi Direct Network > Configure Your Wi-Fi Direct Network Using the OnePush Method and Wi-Fi Protected Setup™ (WPS) Configure Your Wi-Fi Direct Network Using the One-Push Method and Wi-Fi Protected Setup™ (WPS) >> MFC-J480DW >> DCP-J562DW/MFC-J680DW/MFC-J880DW MFC-J480DW If your mobile device supports WPS (PBC; Push Button Configuration), follow these steps to configure a Wi
5. If your mobile device connects successfully, the machine displays [Connected]. You have completed the Wi-Fi Direct network setup. For more information on printing from or scanning to your mobile device, download the Mobile Print/Scan Guide for Brother iPrint&Scan or the AirPrint Guide from your model's Manuals page on the Brother Solutions Center at http://support.brother.com.
Home > Network > Additional Methods of Configuring Your Brother Machine for a Wireless Network > Use Wi-Fi Direct® > Configure Your Wi-Fi Direct Network > Configure Your Wi-Fi Direct Network Using the PIN Method Configure Your Wi-Fi Direct Network Using the PIN Method >> MFC-J480DW >> DCP-J562DW/MFC-J680DW/MFC-J880DW MFC-J480DW If your mobile device supports the PIN Method of Wi-Fi Direct, follow these steps to configure a Wi-Fi Direct network: When the machine receives the Wi-Fi Direct request from your
1. Press [Settings] > [All Settings] > [Network] > [Wi-Fi Direct] > [PIN Code]. 2. When [Wi-Fi Direct On?] appears, press [On] to accept. To cancel, press [Off]. 3. Activate Wi-Fi Direct on your mobile device (see your mobile device's user's guide for instructions) when [Activate Wi-Fi Direct on other device. Then Press [OK].] appears. Press [OK] on your Brother machine. This will start the Wi-Fi Direct setup. 4.
Home > Network > Additional Methods of Configuring Your Brother Machine for a Wireless Network > Use Wi-Fi Direct® > Configure Your Wi-Fi Direct Network > Configure Your Wi-Fi Direct Network Using the PIN Method of Wi-Fi Protected Setup™ (WPS) Configure Your Wi-Fi Direct Network Using the PIN Method of Wi-Fi Protected Setup™ (WPS) >> MFC-J480DW >> DCP-J562DW/MFC-J680DW/MFC-J880DW MFC-J480DW If your mobile device supports the PIN Method of Wi-Fi Protected Setup™ (WPS), follow these steps to configure a Wi-
4. The machine will wait for a connection request from your mobile device. When [PIN Code] appears, enter the PIN displayed on your mobile device in the machine. Press [OK]. 5. If your mobile device connects successfully, the machine displays [Connected]. You have completed the Wi-Fi Direct network setup.
Home > Network > Additional Methods of Configuring Your Brother Machine for a Wireless Network > Use Wi-Fi Direct® > Configure Your Wi-Fi Direct Network > Configure Your Wi-Fi Direct Network Manually Configure Your Wi-Fi Direct Network Manually >> MFC-J480DW >> DCP-J562DW/MFC-J680DW/MFC-J880DW MFC-J480DW If your mobile device does not support Wi-Fi Direct or WPS, you must configure a Wi-Fi Direct network manually. 1. Press Settings. 2. Press a or b to select the following: a. Select [Network]. Press OK.
Home > Network > Advanced Network Features Advanced Network Features • Print the Network Configuration Report The Network Configuration Report lists the network configuration, including the network print server settings.
Home > Network > Advanced Network Features > Print the Network Configuration Report Print the Network Configuration Report The Network Configuration Report lists the network configuration, including the network print server settings. • Node Name: The Node Name appears on the current Network Configuration Report. The default Node Name is "BRNxxxxxxxxxxxx" for a wired network or "BRWxxxxxxxxxxxx" for a wireless network (where "xxxxxxxxxxxx" is your machine's MAC Address / Ethernet Address.
Home > Network > Technical Information for Advanced Users Technical Information for Advanced Users • Reset the Network Settings to Factory Default You can use your machine's control panel to reset the print server to its default factory settings. This resets all information, such as the password and IP address. • Print the WLAN Report The WLAN Report reflects your machine's wireless status. If the wireless connection fails, check the error code on the printed report.
Home > Network > Technical Information for Advanced Users > Reset the Network Settings to Factory Default Reset the Network Settings to Factory Default You can use your machine's control panel to reset the print server to its default factory settings. This resets all information, such as the password and IP address. IMPORTANT (MFC-J480DW/MFC-J680DW) When you reset the machine, your faxes that are stored in the machine's memory may be deleted.
Home > Network > Technical Information for Advanced Users > Print the WLAN Report Print the WLAN Report The WLAN Report reflects your machine's wireless status. If the wireless connection fails, check the error code on the printed report. >> MFC-J480DW >> DCP-J562DW/MFC-J680DW/MFC-J880DW MFC-J480DW 1. Press Settings. 2. Press a or b to select the [Print Reports] option, and then press OK. 3. Press a or b to select the [WLAN Report] option, and then press OK. 4. Press Mono Start or Colour Start.
Home > Network > Technical Information for Advanced Users > Print the WLAN Report > Wireless LAN Report Error Codes Wireless LAN Report Error Codes If the Wireless LAN Report shows that the connection failed, check the error code on the printed report and see the corresponding instructions in the table: Error Code Problem and Recommended Solutions TS-01 The wireless setting is not activated, change the wireless setting to ON.
Error Code Problem and Recommended Solutions TS-08 Two or more wireless access points that have WPS or AOSS™ enabled are detected. • Confirm that only one wireless access point/router within range has the WPS or AOSS™ method active and try again. • Try starting again after a few minutes to avoid interference from other access points.
Home > Security Security • Lock the Machine Settings Before turning on the machine's access lock feature, make a careful note of your password. If you forget the password, you must reset all passwords stored in the machine by calling your administrator or Brother customer service.
Home > Security > Lock the Machine Settings Lock the Machine Settings Before turning on the machine's access lock feature, make a careful note of your password. If you forget the password, you must reset all passwords stored in the machine by calling your administrator or Brother customer service. • • About Using Memory Security About Using TX Lock Block unauthorised data transmission to and from the machine.
Home > Security > Lock the Machine Settings > About Using Memory Security About Using Memory Security Related Models: MFC-J880DW Memory Security lets you prevent unauthorised access to the machine. Although you cannot schedule Delayed Faxes or Polling jobs, any pre-scheduled Delayed Faxes will be sent. You must turn off PC Fax Receive before you can turn on Memory Security.
Home > Security > Lock the Machine Settings > About Using Memory Security > Set the Memory Security Password Set the Memory Security Password Related Models: MFC-J880DW Make a careful note of your password. 1. Press [Settings] > [All Settings] > [Fax] > [Miscellaneous] > [Memory Security]. 2. Enter a four-digit number for the password using the Touchscreen. Press [OK]. 3. When the Touchscreen displays [Verify], re-enter the password using the Touchscreen. Press [OK]. 4. Press .
Home > Security > Lock the Machine Settings > About Using Memory Security > Change the Memory Security Password Change the Memory Security Password Related Models: MFC-J880DW 1. Press [Settings] > [All Settings] > [Fax] > [Miscellaneous] > [Memory Security] > [Set Password]. 2. Enter the registered four-digit number for the current password using the Touchscreen. Press [OK]. 3. Enter a four-digit number for a new password using the Touchscreen. Press [OK]. 4.
Home > Security > Lock the Machine Settings > About Using Memory Security > Turn Memory Security On/Off Turn Memory Security On/Off Related Models: MFC-J880DW 1. Press [Settings] > [All Settings] > [Fax] > [Miscellaneous] > [Memory Security] > [Set Security]. 2. Enter the registered four-digit password using the keyboard on the Touchscreen. Press [OK]. The machine goes offline and the Touchscreen displays [Memory Security]. Turning off Memory Security: a. Press [Unlock]. b.
Home > Security > Lock the Machine Settings > About Using TX Lock About Using TX Lock Related Models: MFC-J480DW/MFC-J680DW Block unauthorised data transmission to and from the machine. TX Lock lets you prevent unauthorised access to the machine.
Home > Security > Lock the Machine Settings > About Using TX Lock > Set the TX Lock Password Set the TX Lock Password Related Models: MFC-J480DW/MFC-J680DW >> MFC-J480DW >> MFC-J680DW MFC-J480DW 1. Press Settings. 2. Press a or b to select the following: a. Select [Fax]. Press OK. b. Select [Miscellaneous]. Press OK. c. Select [TX Lock]. Press OK. 3. Enter a four-digit number for the password. Press OK. 4. When the LCD displays [Verify]: re-enter the password. Press OK. 5. Press Stop/Exit. MFC-J680DW 1.
Home > Security > Lock the Machine Settings > About Using TX Lock > Change the TX Lock Password Change the TX Lock Password Related Models: MFC-J480DW/MFC-J680DW >> MFC-J480DW >> MFC-J680DW MFC-J480DW 1. Press Settings. 2. Press a or b to select the following: a. Select [Fax]. Press OK. b. Select [Miscellaneous]. Press OK. c. Select [TX Lock]. Press OK. d. Select [Set Password]. Press OK. 3. Enter the four-digit number of the current password. Press OK. 4. Enter a four-digit number for the new password.
Home > Security > Lock the Machine Settings > About Using TX Lock > Turn TX Lock On/Off Turn TX Lock On/Off Related Models: MFC-J480DW/MFC-J680DW >> MFC-J480DW >> MFC-J680DW MFC-J480DW 1. Press Settings. 2. Press a or b to select the following: a. Select [Fax]. Press OK. b. Select [Miscellaneous]. Press OK. c. Select [TX Lock]. Press OK. d. Select [Set TX Lock]. Press OK. 3. Enter the registered four-digit password. Press OK. The machine goes offline and the LCD displays [TX Lock Mode].
Home > Mobile/Web Connect Mobile/Web Connect • Use Web Services from Your Brother Machine • Use Brother Web Services Brother Web Services allow you to scan, print, and perform other features that help you save files to the Cloud, upload to other services. Brother Web Services also manage cloud servers, so you can transfer received faxes.
Home > Mobile/Web Connect > Use Web Services from Your Brother Machine Use Web Services from Your Brother Machine Certain websites provide services that allow users to upload and view images and files on the website. Your Brother machine can scan images and upload them to these services, and also download from and print images that are already uploaded to these services. 1 3 2 4 1. Printing 2. Scanning 3. Photos, images, documents and other files 4.
Home > Mobile/Web Connect > Use Brother Web Services Use Brother Web Services Brother Web Services allow you to scan, print, and perform other features that help you save files to the Cloud, upload to other services. Brother Web Services also manage cloud servers, so you can transfer received faxes. • Outline and Scan Use a red pen to outline sections of your document, and then scan the document.
Related Information • Mobile/Web Connect 418
Home > Mobile/Web Connect > Print with Google Cloud Print™ Print with Google Cloud Print™ Google Cloud Print™ is a Google-provided service that allows you to print to a printer registered to your Google account using a network-compatible device (such as a mobile phone or computer) without installing the printer driver on the device. 1 2 3 4 1. Print request 2. Internet 3. Google Cloud Print™ 4. Printing For more information, see the Google Cloud Print Guide.
Home > Mobile/Web Connect > Print with AirPrint Print with AirPrint Use Brother AirPrint to wirelessly print photos, emails, web pages, and documents from your iPad, iPhone and iPod touch without installing a printer driver on the device. 1 2 1. Print request 2. Printed photos, emails, web pages, and documents • AirPrint also lets you send faxes directly from your Macintosh computer without printing them. 1 2 3 1. Wired or wireless network 2. Telephone line 3.
Home > Mobile/Web Connect > Print with Mopria™ Print with Mopria™ Mopria™ Print Service is a print functionality on Android™ phone or tablet (Android™ version 4.4 or later) developed by the Mopria Alliance. With this service, you can connect to the same network as the printer and print without additional setup. Many native Android™ apps, including Google Chrome™, Gmail and Gallery, support printing. 2 1 3 1. Android™ 4.4 or later 2. Wi-Fi® Connection 3.
Home > Mobile/Web Connect > Print and Scan from a Mobile Device Print and Scan from a Mobile Device Use Brother iPrint&Scan to print and scan from various mobile devices. • For Android™ Devices Brother iPrint&Scan allows you to use features of your Brother machine directly from your Android™ device, without using a computer. Download and install Brother iPrint&Scan from the Google Play™ Store app.
Home > Mobile/Web Connect > Print and Scan Using Near-Field Communication (NFC) Print and Scan Using Near-Field Communication (NFC) Related Models: MFC-J880DW Near-Field Communication (NFC) allows for simple transactions, data exchange and wireless connections between two devices that are in close range of each other.
Home > ControlCenter ControlCenter Use Brother's ControlCenter software utility to quickly access your frequently-used applications. Using ControlCenter gives you direct access to specific applications.
Home > ControlCenter > ControlCenter4 (Windows®) ControlCenter4 (Windows®) • Change the Operation Mode in ControlCenter4 (Windows®) • Scan Using ControlCenter4 Home Mode (Windows®) Use ControlCenter4 Home Mode to access your machine's main features. • Scan Using ControlCenter4 Advanced Mode (Windows®) ControlCenter4 Advanced Mode gives you more control over the details of your machine's features and allows you to customise one-button scan actions.
Home > ControlCenter > ControlCenter4 (Windows®) > Change the Operation Mode in ControlCenter4 (Windows®) Change the Operation Mode in ControlCenter4 (Windows®) ControlCenter4 has two operation modes: Home Mode and Advanced Mode. You can change modes at any time. Home Mode Advanced Mode • Home Mode ControlCenter4 Home Mode lets you access your machine's main features easily.
• Advanced Mode ControlCenter4 Advanced Mode gives you more control over the details of your machine's features and allows you to customise one-button scan actions. To change operation mode: 1. Click the (ControlCenter4) icon in the task tray, and then select Open. 2. Click the Configuration button, and then select Mode Select. 3. The mode selection dialog box appears. Select either the Home Mode or Advanced Mode option. 4. Click OK.
Home > ControlCenter > ControlCenter4 (Windows®) > Scan Using ControlCenter4 Home Mode (Windows®) Scan Using ControlCenter4 Home Mode (Windows®) Use ControlCenter4 Home Mode to access your machine's main features.
Home > ControlCenter > ControlCenter4 (Windows®) > Scan Using ControlCenter4 Advanced Mode (Windows®) Scan Using ControlCenter4 Advanced Mode (Windows®) ControlCenter4 Advanced Mode gives you more control over the details of your machine's features and allows you to customise one-button scan actions. • Scan Photos and Graphics Using ControlCenter4 Advanced Mode (Windows®) Send scanned photos or graphics directly to your computer.
Home > ControlCenter > ControlCenter4 (Windows®) > Set Up the Brother Machine Using ControlCenter4 (Windows®) Set Up the Brother Machine Using ControlCenter4 (Windows®) Related Models: MFC-J480DW/MFC-J680DW/MFC-J880DW 1. Click the (ControlCenter4) icon in the task tray, and then click Open. 2. Click the Device Settings tab. 3. Click the Remote Setup button. 4. Configure the settings as needed. Export Click to save the current configuration settings to a file.
Print Click to print the selected items on the machine. You cannot print the data until it is uploaded to the machine. Click Apply to upload the new data to the machine, and then click Print. OK Click to start uploading data to the machine, and then exit the Remote Setup Program. If an error message appears, confirm that your data is correct, and then click OK. Cancel Click to exit the Remote Setup Program without uploading data to the machine.
Home > ControlCenter > ControlCenter4 (Windows®) > Create a Custom Tab Using ControlCenter4 Advanced Mode (Windows®) Create a Custom Tab Using ControlCenter4 Advanced Mode (Windows®) You can create up to three customised tabs, each including up to five customised buttons, with your preferred settings. Select Advanced Mode as the mode setting for ControlCenter4. 1. Click the (ControlCenter4) icon in the task tray, and then click Open. 2. Click the Configuration button, and then select Create custom tab.
Related Information • ControlCenter4 (Windows®) 433
Home > ControlCenter > ControlCenter2 (Macintosh) ControlCenter2 (Macintosh) • Scan Using ControlCenter2 (Macintosh) Use Brother's ControlCenter software to scan photos and save them as JPEGs, PDFs, or other file formats. • Set Up the Brother Machine Using ControlCenter2 (Macintosh) • Turn the AutoLoad Feature On (Macintosh) Turn AutoLoad on to launch ControlCenter2 automatically each time you start your Macintosh.
Home > ControlCenter > ControlCenter2 (Macintosh) > Scan Using ControlCenter2 (Macintosh) Scan Using ControlCenter2 (Macintosh) Use Brother's ControlCenter software to scan photos and save them as JPEGs, PDFs, or other file formats. • Scan Using ControlCenter2 (Macintosh) Send scanned photos or graphics directly to your computer.
Home > ControlCenter > ControlCenter2 (Macintosh) > Set Up the Brother Machine Using ControlCenter2 (Macintosh) Set Up the Brother Machine Using ControlCenter2 (Macintosh) Related Models: MFC-J480DW/MFC-J680DW/MFC-J880DW 1. In the Finder menu bar, click Go > Applications > Brother, and then double-click the (ControlCenter) icon. The ControlCenter2 screen appears. 2. Click the DEVICE SETTINGS tab. 3. Click the Remote Setup button. The Remote Setup Program screen appears.
4. Configure the settings as needed. Export Click to save the current configuration settings to a file. Click Export to save your address book or all settings for your machine. Import Click to read the settings from a file. Print Click to print the selected items on the machine. You cannot print the data until it is uploaded to the machine. Click Apply to upload the new data to the machine, and then click Print. OK Click to start uploading data to the machine, and then exit the Remote Setup Program.
Home > ControlCenter > ControlCenter2 (Macintosh) > Turn the AutoLoad Feature On (Macintosh) Turn the AutoLoad Feature On (Macintosh) Turn AutoLoad on to launch ControlCenter2 automatically each time you start your Macintosh. 1. In the Finder menu bar, click Go > Applications > Brother, and then double-click the (ControlCenter) icon. The ControlCenter2 screen appears. 2. Click the Configuration button, and then select Preferences. 3. Select the Start ControlCenter on computer startup check box. 4.
Home > Troubleshooting Troubleshooting If you think there is a problem with your machine, first check each of the items below, then try to identify the problem, and follow our troubleshooting tips. You can correct most problems yourself. If you need additional help, the Brother Solutions Center offers the latest FAQs and troubleshooting tips. Visit us at http://support.brother.com. Click FAQs & Troubleshooting and search for your model name.
Home > Troubleshooting > Error and Maintenance Messages Error and Maintenance Messages As with any sophisticated office product, errors may occur and supply items may have to be replaced. If this happens, your machine identifies the error or required routine maintenance and shows the appropriate message. The most common error and maintenance messages are shown in the table. You can correct most errors and perform routine maintenance yourself.
Error Message Cause Action If a sending machine has a colour fax, the machine's "handshake" will ask that the fax be sent as monochrome. Cannot Detect You installed a new ink cartridge too quickly and the machine did not detect it. Take out the new ink cartridge and reinstall it slowly and firmly until it latches. An ink cartridge is not installed correctly. See Related Information: Replace the Ink Cartridges. A used ink cartridge was reinstalled.
Error Message Cause Action The ink cartridge cover is not locked in the Firmly close the ink cartridge cover until it closed position. locks into place. Data Remaining Print data is left in the machine's memory. Press Stop/Exit. The machine will cancel the job and clear it from the memory. Try to print again. Disconnected The other person or other person's fax machine stopped the call. Try to send or receive again.
Error Message Cause Action the machine requires, the faster these boxes will fill up. Repairs resulting from the use of nonBrother supplies may not be covered under the stated product warranty. Ink Low Jam A Inside/Front One or more of the ink cartridges are near the end of their lives. If one of the colour ink cartridges is near the end of its life and someone is sending you a colour fax, your machine's "handshake" will ask that the fax be sent as monochrome.
Error Message Cause Action address of your mobile device has been configured via DHCP. No Ink Cartridge An ink cartridge is not installed correctly. Take out the new ink cartridge and reinstall it slowly and firmly until it latches. See Related Information: Replace the Ink Cartridges. No Paper Fed The machine is out of paper or paper is not correctly loaded in the paper tray. Do one of the following: • Refill the paper tray, and then press Mono Start or Colour Start.
Error Message Cause Action See Related Information: Print a Fax Stored in the Machine's Memory. Paper Size Mismatch The paper size setting does not match the 1. Check that the paper size you chose size of paper in the tray. on the machine's display matches the size of the paper in the tray. -ORYou did not set the paper guides in the tray to the indicators for the paper size you are using. See Related Information: Change the Paper Size and Paper Type. 2.
Error Message Cause Action Wrong Ink Cartridge The ink cartridge model number is not compatible with your machine. Verify the cartridge model number will work with your machine. See Related Information: Supply Specifications. Wrong Ink Colour An ink cartridge has been installed in the wrong position. Check which ink cartridges are not matched by colour to their ink cartridge positions and move them to their correct positions.
Error Message Cause Action If you are using non Brother Original ink, the machine may not detect the ink cartridge. Replace the cartridge with a Brother Original ink cartridge. If the error message remains, contact Brother customer service or your local Brother dealer. The ink cartridge must be replaced. Replace the cartridge with a Brother Original ink cartridge. The new ink cartridge has an air bubble.
Error Message Cause Action Disconnected The other person or other person's fax machine stopped the call. Try to send or receive again. (MFC models) If calls are stopped repeatedly and you are using a VoIP (Voice over IP) system, try changing the Compatibility to Basic (for VoIP). See Related Information: Telephone Line Interference/VoIP. Document Jam/too Long (ADF models) The document was not inserted or fed correctly, or the document scanned from the ADF was too long.
Error Message Cause Action frequent cleanings because non-Brother ink could cause poor print quality which is resolved by cleaning. The more cleaning the machine requires, the faster these boxes will fill up. Repairs resulting from the use of nonBrother supplies may not be covered under the stated product warranty. Ink Absorber Pad NearFull The ink absorber box or flushing box is nearly full. The ink absorber box or flushing box must be replaced soon.
Error Message Cause Action Media card error Multiple data storage devices were in the machine when it was turned on. The machine can read only one memory card or USB flash drive at a time. Remove the memory card(s) or USB flash drive that you are not using. Media Error The memory card is either corrupted, improperly formatted, or there is a problem with the memory card. Remove the memory card from the media drive (slot) of the machine and format it correctly.
Error Message Cause Action See Related Information: Load Photo or Photo L Paper in Photo Paper Tray. The paper was not inserted in the centre position of the manual feed slot. Remove the paper and reinsert it in the centre of the manual feed slot, and then follow the on-screen instructions. See Related Information: Load Paper in the Manual Feed Slot. The Jam Clear Cover is not closed correctly. Make sure the Jam Clear Cover is closed evenly at both ends.
Error Message Cause Action 3. After you have checked the paper size and the paper position, follow the onscreen instructions. If you are printing from your computer, make sure the paper size you chose in the printer driver matches the size of paper in the tray. See Related Information: Print Settings (Windows®) or Print Options (Macintosh). Paper Tray not detected The paper tray is not completely inserted. Slowly push the paper tray completely into the machine.
Error Message Cause (MFC models) Action disconnecting the machine so you will not lose any important messages. Then, disconnect the machine from the power for several minutes and reconnect it. (MFC-J880DW: The machine can be turned off without losing faxes stored in the memory. ) See Related Information: Transfer Your Faxes or Fax Journal Report. Unusable Device Disconnect device from front connector & turn machine off & then on A broken device is connected to the USB direct interface.
• Print a Fax Stored in the Machine's Memory • Paper is Jammed Inside and in the Front of the Machine (Jam A Inside/Front) • Paper is Jammed in the Front of the Machine (Jam B Front) • Paper is Jammed in the Back of the Machine (Jam C Rear) • Change the Paper Size and Paper Type • Print Settings (Windows®) • Print Options (Macintosh) • Paper Handling and Printing Problems 454
Home > Troubleshooting > Error and Maintenance Messages > Transfer Your Faxes or Fax Journal Report Transfer Your Faxes or Fax Journal Report Related Models: MFC-J480DW/MFC-J680DW/MFC-J880DW If the LCD shows: • [Unable to Clean XX] • [Unable to Initialize XX] • [Unable to Print XX] • [Unable to Scan XX] We recommend transferring your faxes to another fax machine or to your computer. See Related Information: Transfer Faxes to Another Fax Machine.
Home > Troubleshooting > Error and Maintenance Messages > Transfer Your Faxes or Fax Journal Report > Transfer Faxes to Another Fax Machine Transfer Faxes to Another Fax Machine Related Models: MFC-J480DW/MFC-J680DW/MFC-J880DW If you have not set up your Station ID, you cannot enter fax transfer mode. >> MFC-J480DW >> MFC-J680DW/MFC-J880DW MFC-J480DW 1. Press Stop/Exit to interrupt the error temporarily. 2. Press Settings. 3. Press a or b to select the following: a. Select [Service]. Press OK. b.
Home > Troubleshooting > Error and Maintenance Messages > Transfer Your Faxes or Fax Journal Report > Transfer Faxes to Your Computer Transfer Faxes to Your Computer Related Models: MFC-J480DW/MFC-J680DW/MFC-J880DW You can transfer the faxes from your machine's memory to your computer. >> MFC-J480DW >> MFC-J680DW/MFC-J880DW MFC-J480DW 1. Press Stop/Exit to interrupt the error temporarily. 2. Make sure you have installed Brother driver on your computer, and then turn on PC-FAX Receive on the computer.
When faxes in the machine's memory are not sent to your computer: Make sure you have set [PC Fax Receive] on the machine. If faxes are in the machine's memory when you set up PC-Fax Receive, the Touchscreen will ask if you want to transfer the faxes to your computer. Press [Yes] to transfer all faxes in the memory to your computer. If Fax Preview 1 is set to Off, you will be asked if you want to print backup copies.
Home > Troubleshooting > Error and Maintenance Messages > Transfer Your Faxes or Fax Journal Report > Transfer the Fax Journal Report to Another Fax Machine Transfer the Fax Journal Report to Another Fax Machine Related Models: MFC-J480DW/MFC-J680DW/MFC-J880DW If you have not set up your Station ID, you cannot enter fax transfer mode. >> MFC-J480DW >> MFC-J680DW/MFC-J880DW MFC-J480DW 1. Press Stop/Exit to interrupt the error temporarily. 2. Press Settings. 3. Press a or b to select the following: a.
Home > Troubleshooting > Document Jams Document Jams • Document is Jammed in the Top of the ADF Unit • Document is Jammed inside the ADF Unit • Remove Paper Scraps Jammed in the ADF • Error and Maintenance Messages 460
Home > Troubleshooting > Document Jams > Document is Jammed in the Top of the ADF Unit Document is Jammed in the Top of the ADF Unit Related Models: MFC-J480DW/MFC-J680DW/MFC-J880DW 1. Take out any paper from the ADF that is not jammed. 2. Open the ADF cover. 3. Remove the jammed document by pulling it upward. 4. Close the ADF cover. 5. Press Stop/Exit or . IMPORTANT To avoid future document jams, close the ADF cover correctly by pressing it down in the centre.
Home > Troubleshooting > Document Jams > Document is Jammed inside the ADF Unit Document is Jammed inside the ADF Unit Related Models: MFC-J480DW/MFC-J680DW/MFC-J880DW 1. Take any paper that is not jammed out of the ADF. 2. Lift the document cover. 3. Pull the jammed document out to the left. 4. Close the document cover. 5. Press Stop/Exit or .
Home > Troubleshooting > Document Jams > Remove Paper Scraps Jammed in the ADF Remove Paper Scraps Jammed in the ADF Related Models: MFC-J480DW/MFC-J680DW/MFC-J880DW 1. Lift the document cover. 2. Insert a piece of stiff paper, such as cardstock, into the ADF to push any small paper scraps through. 3. Close the document cover. 4. Press Stop/Exit or .
Home > Troubleshooting > Printer Jam or Paper Jam Printer Jam or Paper Jam Locate and remove the jammed paper.
Home > Troubleshooting > Printer Jam or Paper Jam > Paper is Jammed Inside and in the Front of the Machine (Jam A Inside/Front) Paper is Jammed Inside and in the Front of the Machine (Jam A Inside/ Front) If the LCD displays [Jam A Inside/Front] or [Repeat Jam A Inside/Front], follow these steps: 1. Unplug the machine from the electrical socket.
1 6. If the LCD displays [Repeat Jam A Inside/Front], move the print head (if needed) to take out any paper remaining in this area. Make sure scraps of paper are not left in the corners of the machine (1) and (2). 2 1 IMPORTANT • DO NOT touch the encoder strip, a thin strip of plastic that stretches across the width of the machine (1). Doing this may cause damage to the machine. 1 • If the print head is in the right corner as shown in the illustration (2), you cannot move the print head.
2 3 • If ink gets on your skin or clothing, immediately wash it off with soap or detergent. 7. Gently close the scanner cover using both hands. 8. Slowly pull the jammed paper (1) out of the machine. 1 If the LCD displays [Repeat Jam A Inside/Front], do the following: a. Make sure you look carefully inside (1) for any scraps of paper. 1 b. Squeeze both levers (1), and then open the Jam Clear Cover at the back of the machine.
1 c. Slowly pull the jammed paper out of the machine. d. Close the Jam Clear Cover. Make sure the cover is closed completely. 9. Put the paper tray firmly back in the machine. 10. While holding the paper tray in the machine, pull out the paper support (1) until it locks into place, and then unfold the paper support flap (2). 2 1 11. Reconnect the power cord.
Home > Troubleshooting > Printer Jam or Paper Jam > Paper is Jammed in the Front of the Machine (Jam B Front) Paper is Jammed in the Front of the Machine (Jam B Front) If the LCD displays [Jam B Front] or [Repeat Jam B Front], follow these steps: 1. Unplug the machine from the electrical socket.
1 b. Squeeze both levers (1), and then open the Jam Clear Cover at the back of the machine. 1 c. Slowly pull the jammed paper out of the machine. d. Close the Jam Clear Cover. Make sure the cover is closed completely. 5. Put the paper tray firmly back in the machine.
6. While holding the paper tray in the machine, pull out the paper support (1) until it locks into place, and then unfold the paper support flap (2). 2 1 7. Reconnect the power cord.
Home > Troubleshooting > Printer Jam or Paper Jam > Paper is Jammed in the Back of the Machine (Jam C Rear) Paper is Jammed in the Back of the Machine (Jam C Rear) If the LCD displays [Jam C Rear], follow these steps: 1. Unplug the machine from the electrical socket. IMPORTANT (MFC-J480DW/MFC-J680DW) Before you unplug the machine from the power source, you can transfer your faxes that are stored in the machine's memory to your computer or another fax machine so you will not lose any important messages. 2.
6. Close the Jam Clear Cover. Make sure the cover is closed completely. 7. Put the paper tray firmly back in the machine. 8. While holding the paper tray in the machine, pull out the paper support (1) until it locks into place, and then unfold the paper support flap (2). 2 1 9. Reconnect the power cord.
Home > Troubleshooting > If You Are Having Difficulty with Your Machine If You Are Having Difficulty with Your Machine For technical help, you must contact Brother customer support. If you think there is a problem with your machine, check the following topics. You can correct most problems yourself. If you need additional help, the Brother Solutions Center offers the latest FAQs and troubleshooting tips. Visit http://support.brother.com.
Home > Troubleshooting > If You Are Having Difficulty with Your Machine > Paper Handling and Printing Problems Paper Handling and Printing Problems Printing Difficulties Difficulties Suggestions No printout Check that the correct printer driver has been installed and selected. Check to see if the machine's display is showing an error message. See Related Information: Error and Maintenance Messages.
Difficulties Suggestions • Windows® 7 and Windows Server® 2008 R2 Click • /Start > Devices and Printers > Printers and Faxes. Windows® 8 Move your mouse to the lower right corner of your desktop. When the menu bar appears, click Settings > Control Panel. In the Hardware and Sound group, click View devices and printers > Printers. • Windows Server® 2012 Move your mouse to the lower right corner of your desktop. When the menu bar appears, click Settings > Control Panel.
Difficulties Suggestions Make sure you are using Brother Original Innobella ink. Brother does not recommend the use of cartridges other than Brother Original cartridges or the refilling of used cartridges with ink from other sources. Make sure you are using one of the recommended types of paper. See Related Information: Acceptable Paper and Other Print Media. The recommended environment for your machine is between 20 °C to 33 °C. White horizontal lines appear in text or graphics. Clean the print head.
Difficulties Suggestions Make sure you are using Brother Original Innobella ink. Make sure you are using the paper support flap. See Related Information: Load Paper. Make sure the paper feed rollers are not dirty with ink. See Related Information: Clean the Paper Feed Rollers. The machine prints dense lines on Windows® the page. Select Reverse Order in the Basic tab of the printer driver. The printouts are wrinkled.
Difficulties Suggestions Make sure the paper guides are set to the correct paper size. The paper jams when you use 2sided copy or 2-sided print. Use one of the jam prevention settings, 2-sided 1 or 2-sided 2. For copying See Related Information: Copy on Both Sides of the Paper (1-sided to 2-sided/2sided to 2-sided).
• Clean the Paper Feed Rollers • Clean the Paper Pick-up Rollers • Printer Jam or Paper Jam • Copy on Both Sides of the Paper (1-sided to 2-sided/2-sided to 2-sided) • Shrink Page Size of an Oversized Incoming Fax • Paper Weight and Thickness • Print Settings (Windows®) • Print Options (Macintosh) • Print a Photo (Macintosh) • Prevent Smudged Printouts and Paper Jams When Printing on Both Sides of the Paper (Windows®) • Prevent Smudged Printouts and Paper Jams When Printing on Both Sides of the Paper (Macin
Home > Troubleshooting > If You Are Having Difficulty with Your Machine > Telephone and Fax problems Telephone and Fax problems Related Models: MFC-J480DW/MFC-J680DW/MFC-J880DW Telephone Line or Connections Difficulties Suggestions Dialling does not work. (No dial tone) Check all line cord connections. Make sure the telephone line cord is plugged into the telephone wall socket and the LINE socket of the machine. Make sure your machine has a dial tone by pressing the Hook button in Fax mode.
Difficulties Suggestions a slight interruption is crucial to your business, we recommend using a separate telephone line with no custom features. Receiving Faxes Difficulties Suggestions Cannot receive a fax. Make sure your machine has a dial tone by pressing the Hook button in Fax mode. If you hear static or interference on your fax line, contact your local telephone provider. Check all line cord connections.
Difficulties Suggestions See Related Information: External TAD (Telephone Answering Device). 2. Set your answering machine to answer in one or two rings. 3. Record the outgoing message on your answering machine. • Record five seconds of silence at the beginning of your outgoing message. • Limit your speaking to 20 seconds. • End your outgoing message with your Remote Activation Code for people sending manual faxes.
Difficulties Suggestions See Related Information: Load Documents in the Automatic Document Feeder (ADF). See Related Information: Load Documents on the Scanner Glass. Vertical black lines when sending. Black vertical lines on faxes you send are typically caused by dirt or correction fluid on the glass strip. Clean the glass strip. See Related Information: Clean the Scanner.
Home > Troubleshooting > If You Are Having Difficulty with Your Machine > Telephone and Fax problems > Set Dial Tone Detection Set Dial Tone Detection Related Models: MFC-J480DW/MFC-J680DW/MFC-J880DW Setting the Dial Tone to [Detection] will shorten the Dial Tone detect pause. >> MFC-J480DW >> MFC-J680DW/MFC-J880DW MFC-J480DW 1. Press Settings. 2. Press a or b to select the following: a. Select [Initial Setup]. Press OK. b. Select [Dial Tone]. Press OK. c. Select [Detection] or [No Detection]. Press OK.
Home > Troubleshooting > If You Are Having Difficulty with Your Machine > Telephone and Fax problems > Telephone Line Interference/VoIP Telephone Line Interference/VoIP Related Models: MFC-J480DW/MFC-J680DW/MFC-J880DW If you are having problems sending or receiving a fax due to possible interference on the telephone line or if you are using a VoIP system, we recommend changing the modem speed to minimise errors in fax operations. >> MFC-J480DW >> MFC-J680DW/MFC-J880DW MFC-J480DW 1. Press Settings. 2.
• Voice Over Internet Protocol (VoIP/Telephone Line Interference) • Error and Maintenance Messages 487
Home > Troubleshooting > If You Are Having Difficulty with Your Machine > Other Problems Other Problems Copying Difficulties Difficulties Suggestions Vertical black lines or streaks appear in copies. Black vertical lines on copies are typically caused by dirt or correction fluid on the glass strip. Clean the glass strip, scanner glass, and the white bar and white plastic above them. See Related Information: Clean the Scanner. Black marks or spots appear in copies.
Difficulties Suggestions Removable Disk does not work correctly. 1. Take out the memory card or USB Flash drive and put it back in again. 2. If you have tried “Eject” from within Windows®, take out the memory card or USB Flash drive before you continue. 3. If an error message appears when you try to eject the memory card or USB Flash drive, it means the card is being accessed. Wait a while, and then try again. 4.
Home > Troubleshooting > If You Are Having Difficulty with Your Machine > Network Problems Network Problems You can resolve most errors yourself. If, after reading this guide, you are unable to resolve the problem, go to the Brother Solutions Center at http://support.brother.com. Click FAQs & Troubleshooting and search for your model name. • Use the Network Connection Repair Tool (Windows®) Use the Network Connection Repair Tool to fix the Brother machine's network settings.
Home > Troubleshooting > If You Are Having Difficulty with Your Machine > Network Problems > Use the Network Connection Repair Tool (Windows®) Use the Network Connection Repair Tool (Windows®) Use the Network Connection Repair Tool to fix the Brother machine's network settings. It will assign the correct IP address and Subnet Mask. • (Windows® XP/XP Professional x64 Edition/Windows Vista®/Windows® 7/Windows® 8) You must log on with Administrator rights.
Home > Troubleshooting > If You Are Having Difficulty with Your Machine > Network Problems > Where Can I Find My Brother Machine's Network Settings? Where Can I Find My Brother Machine's Network Settings? • Change Machine Settings from Your Computer • Print the Network Configuration Report The Network Configuration Report lists the network configuration, including the network print server settings.
Home > Troubleshooting > If You Are Having Difficulty with Your Machine > Network Problems > I Cannot Complete the Wireless Network Setup Configuration I Cannot Complete the Wireless Network Setup Configuration Turn your wireless router off and back on. Then try to configure the wireless settings again. If you are unable to resolve the problem, follow the instructions below: Investigate the problem using the WLAN Report. Cause Action Your security settings (SSID/ • Network Key) are not correct.
Cause Action If you have checked and • tried all of the above, but still cannot complete the Wi-Fi • Direct configuration, do the following: Interface Turn your Brother machine off and back on. Then try to configure Wi-Fi Direct the Wi-Fi Direct settings again. If you are using your Brother machine as a client, confirm how many devices are allowed in the current Wi-Fi Direct network, and then check how many devices are connected.
Home > Troubleshooting > If You Are Having Difficulty with Your Machine > Network Problems > My Brother Machine Cannot Print, Scan, or PC-FAX Receive over the Network My Brother Machine Cannot Print, Scan, or PC-FAX Receive over the Network Cause Action Your security software blocks your machine's access to the network. (The Network scanning feature does not work. ) • (Windows®) Interface Wired/Wireless Configure the third-party Security/Firewall Software to allow Network scanning.
Cause Action • Interface (Windows® XP/Windows Server® 2003) Click Start > Printers and Faxes. • (Windows Vista®) Click (Start) > Control Panel > Hardware and Sound > Printers. • (Windows® 7) Click (Start) > Devices and Printers > Printers and Faxes. • (Windows® 8) Move your mouse to the lower right corner of your desktop. When the menu bar appears, click Settings > Control Panel. In the Hardware and Sound group, click View devices and printers > Printers.
Home > Troubleshooting > If You Are Having Difficulty with Your Machine > Network Problems > I Want to Check that My Network Devices are Working Correctly I Want to Check that My Network Devices are Working Correctly Check Action Interface Wired/Wireless Check that your Brother Check the following: machine, access point/ • The power cord is connected correctly and the Brother machine is router, or network hub is turned on. turned on.
Home > Troubleshooting > If You Are Having Difficulty with Your Machine > Network Problems > I Want to Check that My Network Devices are Working Correctly > Check Network Devices Using the Ping Command Check Network Devices Using the Ping Command Check the IP addresses of both your computer and your Brother machine, and then confirm whether the network is operating correctly.
Home > Troubleshooting > Check the Machine Information Check the Machine Information Follow these instructions to check your Brother machine's serial number, firmware version and firmware update. >> MFC-J480DW >> DCP-J562DW/MFC-J680DW/MFC-J880DW MFC-J480DW 1. Press Settings. 2. Press a or b to select [Machine Info.]. Press OK. 3. Press a or b to select one of the following options: Option Description Serial No. Check your machine's serial number. Version Check your machine's firmware version.
Home > Troubleshooting > Reset Your Brother Machine Reset Your Brother Machine IMPORTANT (MFC-J480DW/MFC-J680DW) When you reset the machine, your faxes that are stored in the machine's memory may be deleted. Before you reset the machine, you can transfer your faxes to your computer or another fax machine so you will not lose any important messages. >> MFC-J480DW >> DCP-J562DW/MFC-J680DW/MFC-J880DW MFC-J480DW 1. Press Settings. 2. Press a or b to select the following: a. Select [Initial Setup]. Press OK.
Home > Troubleshooting > Reset Your Brother Machine > Reset Functions Reset Functions IMPORTANT (MFC-J480DW/MFC-J680DW) When you reset the machine, your faxes that are stored in the machine's memory may be deleted. Before you reset the machine, you can transfer your faxes to your computer or another fax machine so you will not lose any important messages. The following reset functions are available: 1.
Home > Routine Maintenance Routine Maintenance • Replace the Ink Cartridges • Clean Your Brother Machine • Check Your Brother Machine • Correct the Paper Feed to Clear Vertical Lines Adjust the paper feed to reduce vertical lines. (This feature is available only for Plain paper.
Home > Routine Maintenance > Replace the Ink Cartridges Replace the Ink Cartridges Your Brother machine is equipped with an ink dot counter. The ink dot counter automatically monitors the level of ink in each of the four cartridges. When the machine detects an ink cartridge is running out of ink, the machine will display a message. The LCD displays which ink cartridge is low or needs replacing. Be sure to follow the LCD prompts to replace the ink cartridges in the correct order.
3. Open the new ink cartridge bag for the colour indicated on the LCD, and take out the ink cartridge. 4. Turn the green release lever on the orange protective packing (1) counterclockwise until it clicks to release the vacuum seal. Then remove the orange protective packing as shown. IMPORTANT • DO NOT shake the ink cartridges. If ink stains your skin or clothing, wash with soap or detergent at once.
The machine will automatically reset the ink dot counter. • If you replaced an ink cartridge, for example, the Black cartridge, the LCD may ask you to verify that it is a brand new one (for example, [Did you change Black]). For each new cartridge you installed, select [Yes] to reset the ink dot counter for that colour. If the ink cartridge you installed is not a brand new one, be sure to select [No].
Home > Routine Maintenance > Clean Your Brother Machine Clean Your Brother Machine • • Clean the Scanner Clean the Print Head from Your Brother Machine To maintain good print quality, the machine automatically cleans the print head when needed. If there is a print quality problem, start the cleaning process manually. • Clean the Print Head from Your Computer (Windows®) To maintain good print quality, the machine automatically cleans the print head when needed.
Home > Routine Maintenance > Clean Your Brother Machine > Clean the Scanner Clean the Scanner 1. Unplug the machine from the electrical socket. 2. Lift the document cover (1). Clean the scanner glass (2) and the white plastic (3) with a soft lint-free cloth moistened with a non-flammable glass cleaner. 1 3 2 3. In the ADF unit, clean the white bar (1) and the glass strip (2) with a lint-free cloth moistened with a nonflammable glass cleaner.
Related Information • Clean Your Brother Machine • Telephone and Fax problems • Other Problems 508
Home > Routine Maintenance > Clean Your Brother Machine > Clean the Print Head from Your Brother Machine Clean the Print Head from Your Brother Machine To maintain good print quality, the machine automatically cleans the print head when needed. If there is a print quality problem, start the cleaning process manually. • Clean the print head if there is a horizontal line or a blank space in the text or graphics on printed pages.
Related Information • Clean Your Brother Machine • Paper Handling and Printing Problems • Clean the Print Head from Your Computer (Windows®) • Clean the Print Head from Your Computer (Macintosh) 510
Home > Routine Maintenance > Clean Your Brother Machine > Clean the Print Head from Your Computer (Windows®) Clean the Print Head from Your Computer (Windows®) To maintain good print quality, the machine automatically cleans the print head when needed. If there is a print quality problem, start the cleaning process manually. 1. Do one of the following: • (For Windows® XP and Windows Server® 2003) Click Start > Printers and Faxes.
Home > Routine Maintenance > Clean Your Brother Machine > Clean the Print Head from Your Computer (Macintosh) Clean the Print Head from Your Computer (Macintosh) To maintain good print quality, the machine automatically cleans the print head when needed. If there is a print quality problem, start the cleaning process manually. 1. Select System Preferences from the Apple Menu. 2. Do one of the following: • (OS X v10.8.5) Select Print & Scan, and then select the machine. • (OS X v10.9.x, 10.10.
Home > Routine Maintenance > Clean Your Brother Machine > Clean the Machine's LCD Clean the Machine's LCD IMPORTANT DO NOT use liquid cleaners (including ethanol). 1. Press and hold down to turn off the machine. The LCD displays [Shutting Down] for a few seconds before the power goes off. 2. Clean the LCD with a dry, soft lint-free cloth.
Home > Routine Maintenance > Clean Your Brother Machine > Clean the Outside of the Machine Clean the Outside of the Machine IMPORTANT • Use neutral detergents. Cleaning with volatile liquids such as thinner or benzine will damage the outside surface of the machine. • DO NOT use cleaning materials that contain ammonia. • DO NOT use isopropyl alcohol to remove dirt from the control panel. It may crack the panel. 1. If the paper support flap is open, close it, and then close the paper support. 2.
Related Information • Clean Your Brother Machine 515
Home > Routine Maintenance > Clean Your Brother Machine > Clean the Machine's Printer Platen Clean the Machine's Printer Platen WARNING Be sure to unplug the machine from the electrical socket before cleaning the printer platen to avoid an electrical shock. 1. Place both hands under the plastic tabs on both sides of the machine to lift the scanner cover into the open position. 2. Clean the machine’s printer platen (1) and the area around it, wiping off scattered ink with a dry, soft lint-free cloth.
Home > Routine Maintenance > Clean Your Brother Machine > Clean the Paper Feed Rollers Clean the Paper Feed Rollers If the paper feed rollers are stained with ink or have a buildup of paper dust, it may cause paper feed problems. 1. Unplug the machine from the electrical socket. 2. If the paper support flap is open, close it, and then close the paper support. 3. Pull the paper tray (1) completely out of the machine. 1 4.
Related Information • Clean Your Brother Machine • Paper Handling and Printing Problems 518
Home > Routine Maintenance > Clean Your Brother Machine > Clean the Paper Pick-up Rollers Clean the Paper Pick-up Rollers Cleaning the paper pick-up rollers periodically may prevent paper jams by ensuring that paper feeds properly. 1. Unplug the machine from the electrical socket. 2. If the paper support flap is open, close it, and then close the paper support. 3. Pull the paper tray completely out of the machine.
Home > Routine Maintenance > Check Your Brother Machine Check Your Brother Machine • Check the Print Quality If faded or streaked colours and text appear or if text is missing on your printouts, the print head nozzles may be clogged. Print the Print Quality Check Sheet and look at the nozzle check pattern. • Check the Print Alignment from Your Brother Machine If your printed text becomes blurred or images become faded after transporting the machine, adjust the print alignment.
Home > Routine Maintenance > Check Your Brother Machine > Check the Print Quality Check the Print Quality If faded or streaked colours and text appear or if text is missing on your printouts, the print head nozzles may be clogged. Print the Print Quality Check Sheet and look at the nozzle check pattern. >> MFC-J480DW >> DCP-J562DW >> MFC-J680DW/MFC-J880DW MFC-J480DW 1. Press Settings. 2. Press a or b to select the following: a. Select [Ink/Maintenance]. Press OK. b. Select [Impr. PrintQuality]. Press OK.
When a print head nozzle is clogged, the printed sample looks like this. After the print head nozzle is cleaned, the horizontal lines are gone. DCP-J562DW 1. Press [Ink] > [Improve Print Quality] > [Check Print Quality]. You can also press [Settings] > [Maintenance] > [Improve Print Quality] > [Check Print Quality]. 2. Press [Start]. The machine prints the Print Quality Check Sheet. 3. Check the quality of the four colour blocks on the sheet. 4. The Touchscreen asks about the print quality.
IMPORTANT DO NOT touch the print head. Touching the print head may cause permanent damage and may void the print head's warranty. When a print head nozzle is clogged, the printed sample looks like this. After the print head nozzle is cleaned, the horizontal lines are gone. MFC-J680DW/MFC-J880DW 1. Press [Ink] > [Improve Print Quality] > [Check Print Quality]. You can also press [Settings] > [Maintenance] > [Improve Print Quality] > [Check Print Quality]. 2. Press [Start].
• If print head cleaning is not needed, the Maintenance screen reappears on the LCD. Press . 7. After the cleaning procedure is finished, the Touchscreen asks if you want to print the Print Quality Check Sheet again. Press [Yes], and then press [Start]. The machine prints the Print Quality Check Sheet again. Check the quality of the four colour blocks on the sheet again.
Home > Routine Maintenance > Check Your Brother Machine > Check the Print Alignment from Your Brother Machine Check the Print Alignment from Your Brother Machine If your printed text becomes blurred or images become faded after transporting the machine, adjust the print alignment. >> MFC-J480DW >> DCP-J562DW/MFC-J680DW/MFC-J880DW MFC-J480DW 1. Press Settings. 2. Press a or b to select the following: a. Select [Ink/Maintenance]. Press OK. b. Select [Impr. PrintQuality]. Press OK. c. Select [Alignment].
2. Press [Next], and then press [Start]. The machine starts printing the Alignment Check Sheet. (A) 3. For the (A) pattern, press a or b to display the number of the test print with the fewest visible vertical stripes (1-9), and then press it (in the example above, row number 6 is the best choice). Press [OK]. Repeat this step for the rest of the patterns. When the print alignment is not adjusted correctly, text looks blurry or crooked, like this.
Home > Routine Maintenance > Check Your Brother Machine > Check the Ink Volume Check the Ink Volume Although an ink volume icon appears on the machine's LCD, you can use the ink menu to see a large graph showing the ink left in each cartridge. >> MFC-J480DW >> DCP-J562DW/MFC-J680DW/MFC-J880DW MFC-J480DW 1. Press Settings. 2. Press a or b to select the following: a. Select [Ink/Maintenance]. Press OK. b. Select [Ink Volume]. Press OK. The LCD displays the ink volume.
Related Information • Check Your Brother Machine • LCD Overview • Settings Screen Overview • Print a Document (Windows®) • Print a Document (Macintosh) • Monitor Machine Status from Your Computer (Windows®) 528
Home > Routine Maintenance > Check Your Brother Machine > Monitor Machine Status from Your Computer (Windows®) Monitor Machine Status from Your Computer (Windows®) The Status Monitor utility is a configurable software tool for monitoring the status of one or more devices; it allows you to get immediate notification of errors. • Do one of the following: icon in the task tray. • Double-click the • (Windows® XP, Windows Vista® and Windows® 7) Click (Start) > All Programs > Brother > Brother Utilities.
• Turn Off the Show Status Monitor Feature (Windows®) • Turn Off the Status Monitor (Windows®) • Cancel a Print Job (Windows®) • Check the Ink Volume 530
Home > Routine Maintenance > Check Your Brother Machine > Monitor Machine Status from Your Computer (Windows®) > Status Monitor Indicators and What They Mean (Windows®) Status Monitor Indicators and What They Mean (Windows®) When you start up your computer, the Brother Status Monitor icon appears on the task tray. • A green icon indicates the normal stand-by condition. • A yellow icon indicates a warning. • A red icon indicates an error has occurred. • A grey icon indicates the machine is offline.
Home > Routine Maintenance > Check Your Brother Machine > Monitor Machine Status from Your Computer (Windows®) > Turn Off the Show Status Monitor Feature (Windows®) Turn Off the Show Status Monitor Feature (Windows®) The Show Status Monitor feature lets you know if there is a problem with a device that your computer is monitoring. The default setting is Only when printing from this PC. To turn it off, follow these steps: 1.
Home > Routine Maintenance > Check Your Brother Machine > Monitor Machine Status from Your Computer (Windows®) > Turn Off the Status Monitor (Windows®) Turn Off the Status Monitor (Windows®) 1. Right-click the (Brother Status Monitor) icon or window, and then select Exit. 2. Click OK.
Home > Routine Maintenance > Check Your Brother Machine > Monitor Machine Status from Your Computer (Macintosh) Monitor Machine Status from Your Computer (Macintosh) Brother's Status Monitor utility program is a configurable software tool for monitoring the status of a device and notifying you immediately in the event of an error. 1. Select System Preferences from the Apple Menu. 2. Do one of the following: • (OS X v10.8.5) Select Print & Scan, and then select the machine. • (OS X v10.9.x, 10.10.
Error icons Icon Description The ink level is low. The ink cartridge is at the end of its life. There is a problem with the ink cartridge.
Home > Routine Maintenance > Correct the Paper Feed to Clear Vertical Lines Correct the Paper Feed to Clear Vertical Lines Adjust the paper feed to reduce vertical lines. (This feature is available only for Plain paper.) >> MFC-J480DW >> DCP-J562DW/MFC-J680DW/MFC-J880DW MFC-J480DW 1. Press Settings. 2. Press a or b to select the following: a. Select [Ink/Maintenance]. Press OK. b. Select [Impr. PrintQuality]. Press OK. c. Select [Correct Paper Feed]. Press OK. 3.
Home > Routine Maintenance > Pack and Ship Your Brother Machine Pack and Ship Your Brother Machine • When you transport the machine, use the packing materials that came with your machine. If you do not pack the machine correctly, any damage that may occur in transit may not be covered by your warranty. • The machine should be adequately insured with the carrier. IMPORTANT It is important to allow the machine to “park” the print head after a print job.
• If you are not able to find the orange protective part, ship the machine without it. DO NOT leave the ink cartridges in the machine during shipping. 8. Wrap the machine in the bag. 9. Pack the machine and the printed materials in the original carton with the original packing material as shown below. 10. Close the carton and tape it shut.
Related Information • Routine Maintenance • Replace the Ink Cartridges 539
Home > Machine Settings Machine Settings Customise settings and features, create shortcuts, and work with options displayed on the machine's LCD to make your Brother machine a more efficient work tool.
Home > Machine Settings > Change Machine Settings from the Control Panel Change Machine Settings from the Control Panel • In the Event of Power Failure (Memory Storage) • General Settings • Save Your Favourite Settings as a Shortcut • Print Reports • Settings and Features Tables 541
Home > Machine Settings > Change Machine Settings from the Control Panel > In the Event of Power Failure (Memory Storage) In the Event of Power Failure (Memory Storage) DCP-J562DW/MFC-J480DW/MFC-J680DW • Your menu settings are stored permanently and will not be lost. • Temporary settings (for example: Contrast and Overseas Mode) will be lost. • The date and time must be re-entered. • (MFC models) Programmed fax timer jobs and other fax jobs in the machine's memory will be lost.
Home > Machine Settings > Change Machine Settings from the Control Panel > General Settings General Settings • Set the Mode Timer You can change the amount of time after the last Fax, Scan, Copy or Web operation before the machine returns to Ready Mode. If you choose [Off], the machine stays in the mode you used last. • Adjust the Machine Volume • Change for Daylight Saving Time Manually You can program the machine to change for daylight saving time.
Home > Machine Settings > Change Machine Settings from the Control Panel > General Settings > Set the Mode Timer Set the Mode Timer Related Models: MFC-J480DW You can change the amount of time after the last Fax, Scan, Copy or Web operation before the machine returns to Ready Mode. If you choose [Off], the machine stays in the mode you used last. 1. Press Settings. 2. Press a or b to select the following: a. Select [General Setup]. Press OK. b. Select [Mode Timer]. Press OK. c.
Home > Machine Settings > Change Machine Settings from the Control Panel > General Settings > Adjust the Machine Volume Adjust the Machine Volume >> MFC-J480DW >> DCP-J562DW/MFC-J680DW/MFC-J880DW MFC-J480DW 1. Press Settings. 2. Press a or b to select the following: a. Select [General Setup]. Press OK. b. Select [Volume]. Press OK. 3. Press a or b to select one of the following options: Option Description Ring Adjust the ring volume.
You can also adjust the speaker volume using the Hook button. a. Press [Fax] 1. b. Press [Hook]. c. Press or 2. d. Press or on the Touchscreen. Each press decreases or increases the volume. e. When finished, press [Hook] again. Related Information • General Settings 1 MFC-J880DW only: When [Fax Preview] is set to [On], press [Sending Faxes]. 2 MFC-J880DW only: When [Fax Preview] is set to [On], press this icon twice.
Home > Machine Settings > Change Machine Settings from the Control Panel > General Settings > Change for Daylight Saving Time Manually Change for Daylight Saving Time Manually Related Models: MFC-J480DW/MFC-J680DW/MFC-J880DW You can program the machine to change for daylight saving time. When selecting [Forward Hour] it will forward the time by an hour and backward one hour when selecting [Backward Hour]. Make sure you have set the correct date and time in the [Date & Time] setting.
Home > Machine Settings > Change Machine Settings from the Control Panel > General Settings > Set Sleep Mode Countdown Set Sleep Mode Countdown The Sleep Mode (or Power Save Mode) setting can reduce power consumption. When the machine is in Sleep Mode, it acts as though it is turned off. The machine will wake up and start printing when it receives a print job or a fax. Use these instructions to set a time delay to send the machine into Sleep Mode.
Home > Machine Settings > Change Machine Settings from the Control Panel > General Settings > Set the Machine to Power Off Automatically Set the Machine to Power Off Automatically The Auto Power Off feature can save power consumption. Set the amount of time that the machine will be in Sleep Mode before it automatically powers off. When this feature is set to [Off], you must power off the machine manually. To turn on the machine after the Auto Power Off feature has turned it Off, press .
Home > Machine Settings > Change Machine Settings from the Control Panel > General Settings > Set the Date & Time Set the Date & Time (MFC models) The LCD displays the date and time. If they are not current, re-enter them. You can add the date and time to each fax you send by setting your Station ID. (DCP models) If the machine's power has been off, the machine's date and time may not be current. Re-enter them. >> MFC-J480DW >> DCP-J562DW/MFC-J680DW/MFC-J880DW MFC-J480DW 1. Press Settings. 2.
Related Information • General Settings • Set Your Station ID 551
Home > Machine Settings > Change Machine Settings from the Control Panel > General Settings > Adjust the LCD Backlight Brightness Adjust the LCD Backlight Brightness If you are having difficulty reading the LCD, try changing the brightness setting. >> MFC-J480DW >> DCP-J562DW/MFC-J680DW/MFC-J880DW MFC-J480DW 1. Press Settings. 2. Press a or b to select the following: a. Select [General Setup]. Press OK. b. Select [LCD Settings]. Press OK. c. Select [Backlight]. Press OK. d.
Home > Machine Settings > Change Machine Settings from the Control Panel > General Settings > Change How Long the LCD Backlight Stays On Change How Long the LCD Backlight Stays On You can set how long the LCD backlight stays on after the last finger press. >> MFC-J480DW >> DCP-J562DW/MFC-J680DW/MFC-J880DW MFC-J480DW 1. Press Settings. 2. Press a or b to select the following: a. Select [General Setup]. Press OK. b. Select [LCD Settings]. Press OK. c. Select [Dim Timer]. Press OK. d.
Home > Machine Settings > Change Machine Settings from the Control Panel > General Settings > Set Your Station ID Set Your Station ID Related Models: MFC-J480DW/MFC-J680DW/MFC-J880DW Set the machine's Station ID if you want the date and time to appear on each fax you send. >> MFC-J480DW >> MFC-J680DW/MFC-J880DW MFC-J480DW 1. Press Settings. 2. Press a or b to select the following: a. Select [Initial Setup]. Press OK. b. Select [Station ID]. Press OK. 3.
Home > Machine Settings > Change Machine Settings from the Control Panel > General Settings > Set Tone or Pulse Dialling Mode Set Tone or Pulse Dialling Mode Related Models: MFC-J480DW/MFC-J680DW/MFC-J880DW Your Brother machine is set for a Tone dialling service. If you have a Pulse dialling (rotary) service, you must change the dialling mode. This feature is not available in some countries. >> MFC-J480DW >> MFC-J680DW/MFC-J880DW MFC-J480DW 1. Press Settings. 2. Press a or b to select the following: a.
Home > Machine Settings > Change Machine Settings from the Control Panel > General Settings > Reduce Printing Noise Reduce Printing Noise The Quiet Mode setting can reduce printing noise. When Quiet Mode is turned on, the print speed becomes slower. The factory setting is [Off]. • When the Quiet Mode setting is turned on, is displayed on the Home screen. >> MFC-J480DW >> DCP-J562DW/MFC-J680DW/MFC-J880DW MFC-J480DW 1. Press Settings. 2. Press a or b to select the following: a. Select [General Setup].
Home > Machine Settings > Change Machine Settings from the Control Panel > General Settings > Change the Language Displayed on the LCD Change the Language Displayed on the LCD Change the LCD language if needed. This feature is not available in some countries. >> MFC-J480DW >> DCP-J562DW/MFC-J680DW/MFC-J880DW MFC-J480DW 1. Press Settings. 2. Press a or b to select the following: a. Select [Initial Setup]. Press OK. b. Select [Local Language]. Press OK. c. Select your language. Press OK. 3. Press Stop/Exit.
Home > Machine Settings > Change Machine Settings from the Control Panel > General Settings > Change the Keyboard Setting Change the Keyboard Setting Related Models: DCP-J562DW/MFC-J680DW/MFC-J880DW You can choose the type of keyboard for the LCD. 1. Press [Settings] > [All Settings] > [General Setup] > [Keyboard Settings]. 2. Press [QWERTY] or [ABC]. 3. Press .
Home > Machine Settings > Change Machine Settings from the Control Panel > Save Your Favourite Settings as a Shortcut Save Your Favourite Settings as a Shortcut • Add Shortcuts You can add the fax, copy, scan and Web Connect settings you use most frequently by saving them as your Shortcuts. Later you can recall and apply these settings instead of re-entering them. • Change or Delete Shortcuts You can change the settings in a Shortcut.
Home > Machine Settings > Change Machine Settings from the Control Panel > Save Your Favourite Settings as a Shortcut > Add Shortcuts Add Shortcuts Related Models: DCP-J562DW/MFC-J680DW/MFC-J880DW You can add the fax, copy, scan and Web Connect settings you use most frequently by saving them as your Shortcuts. Later you can recall and apply these settings instead of re-entering them. Some Shortcut menus are not available depending on your model. These instructions describe how to add a Copy Shortcut.
Home > Machine Settings > Change Machine Settings from the Control Panel > Save Your Favourite Settings as a Shortcut > Change or Delete Shortcuts Change or Delete Shortcuts Related Models: DCP-J562DW/MFC-J680DW/MFC-J880DW You can change the settings in a Shortcut. You cannot change a Web Connect Shortcut. If you need to change a Web Connect Shortcut, delete it, and then add a new Shortcut. 1. Press [Shortcuts]. 2. Press d or c to display the Shortcut you want to change. 3.
Home > Machine Settings > Change Machine Settings from the Control Panel > Print Reports Print Reports • Reports • Print a Report • Fax Reports • Telephone and Fax problems 562
Home > Machine Settings > Change Machine Settings from the Control Panel > Print Reports > Reports Reports The following reports are available: Transmission Verify (MFC models) The Transmission Verify prints a Transmission Verification Report for your last transmission. Address Book (MFC models) The Address Book report prints an alphabetical list of names and numbers stored in the Address Book memory.
Home > Machine Settings > Change Machine Settings from the Control Panel > Print Reports > Print a Report Print a Report >> MFC-J480DW >> DCP-J562DW/MFC-J680DW/MFC-J880DW MFC-J480DW 1. Press Settings. 2. Press a or b to select the following: a. Select [Print Reports]. Press OK. b. Select the report you want to print. Press OK. 3. Press Mono Start. 4. Press Stop/Exit. DCP-J562DW/MFC-J680DW/MFC-J880DW 1. Press [Settings] > [All Settings] > [Print Reports]. 2.
Home > Machine Settings > Change Machine Settings from the Control Panel > Settings and Features Tables Settings and Features Tables • Settings Tables (1.8"(44.9 mm) Colour LCD) • Features Tables (1.8"(44.9 mm) Colour LCD) • Settings Tables (2.7"(67.5 mm) Touchpanel models) • Features Tables (2.7"(67.
Home > Machine Settings > Change Machine Settings from the Control Panel > Settings and Features Tables > Settings Tables (1.8"(44.9 mm) Colour LCD) Settings Tables (1.8"(44.9 mm) Colour LCD) Related Models: MFC-J480DW These tables will help you understand your machine's menu selections and options. Settings > [Ink/Maintenance] Level 1 Descriptions Impr. PrintQuality Check and correct the print quality, alignment and paper feeding according to the on-screen instructions.
Level 1 Setup Receive Level 2 Level 3 Descriptions Auto Reduction - Reduce the size of incoming faxes. Memory Receive - Set the machine to send faxes to your computer. If you select PC-Fax Receive, you can turn on the Backup Print safety feature. Setup AddressBook Report Setting Fax Rx Stamp - Print the received time and date on the top of the received faxes. Set Speed Dial - Store Speed Dial numbers, so you can dial by pressing only a few buttons.
Level 1 WLAN Level 2 Wi-Fi Direct Level 3 Descriptions WLAN Assistant - Configure your wireless network settings using the Brother CD-ROM. Setup Wizard - Configure your internal print server manually. WPS/AOSS - Configure your wireless network settings using the onebutton push method. WPS w/PIN Code - Configure your wireless network settings using WPS with a PIN. WLAN Status Status View the current wireless network status. Signal View the current wireless network signal strength.
Level 1 Descriptions Network Config Print a list of your Network settings. WLAN Report Print the wireless LAN connection results. Caller ID hist. Print a list of the available Caller ID information about the last 30 received faxes and telephone calls. (Not available for Taiwan and some countries) Settings > [Machine Info.] Level 1 Descriptions Serial No. Check your machine's serial number. Version Check your machine's firmware version.
Home > Machine Settings > Change Machine Settings from the Control Panel > Settings and Features Tables > Features Tables (1.8"(44.9 mm) Colour LCD) Features Tables (1.8"(44.9 mm) Colour LCD) Related Models: MFC-J480DW FAX Level 1 Level 2 Level 3 Descriptions Fax Resolution - - Set the resolution for outgoing faxes. Contrast - - Adjust the contrast. Address Book Search - Dial by pressing only a few buttons.
Level 1 Descriptions Web Service Scan data using the Web Service protocol. (Appears when you install a Web Services Scanner, which is displayed in your computer’s Network explorer.) COPY Level 1 Level 2 Descriptions Quality - Select the Copy resolution for your type of document. Paper Type - Select the paper type that matches the paper in the tray. Paper Size - Select the paper size that matches the paper in the tray.
Redial/Pause Level 1 Level 2 Descriptions Outgoing Call history Send a fax Select a number from the Outgoing Call history and then send a fax to it, add it to the Address Book, or delete it. Add to AddressBook Delete Caller ID hist. Send a fax (Not available for Taiwan and some countries) Add to AddressBook Select a number from the Caller ID history and then send a fax to it, add it to the Address Book, or delete it.
Home > Machine Settings > Change Machine Settings from the Control Panel > Settings and Features Tables > Settings Tables (2.7"(67.5 mm) Touchpanel models) Settings Tables (2.7"(67.5 mm) Touchpanel models) Related Models: DCP-J562DW/MFC-J680DW/MFC-J880DW These tables will help you understand your machine's menu selections and options. [Settings] Level 1 (Date & Time) Level 2 Descriptions Date (MFC models) Time Add the date and time on the screen and in the headings of the faxes you send.
Level 1 Level 2 Descriptions All Settings - Configure the detailed settings. [Settings] > [All Settings] > [General Setup] Level 1 Level 2 Descriptions Maintenance Improve Print Quality Check and correct the print quality, alignment and paper feeding according to the on-screen instructions. Print Head Cleaning Clean the print head according to the on-screen instructions. Ink Volume Check the available ink volume. Ink Cartridge Model Check your ink cartridge numbers.
Level 1 Setup Receive Level 2 Level 3 Descriptions Fax Detect - Receive fax messages automatically when you answer a call and hear fax tones. Remote Codes - Answer calls at an extension or external telephone and use codes to turn the machine on or off. You can personalise the codes. Auto Reduction - Reduce the size of incoming faxes.
Level 1 Wired LAN (MFC-J880DW) WLAN Wi-Fi Direct Level 2 TCP/IP Level 3 Descriptions WINS Server Specify the IP address of the primary or secondary WINS server. DNS Server Specify the IP address of the primary or secondary DNS server. APIPA Set the machine to allocate the IP address from the link-local address range automatically. IPv6 Turn the IPv6 protocol on or off. To use the IPv6 protocol, go to the Brother Solutions Center at http://support.brother.com for more information.
Level 1 Wi-Fi Direct Level 2 Level 3 Descriptions PIN Code - Configure your Wi-Fi Direct network settings using WPS with a PIN code. Manual - Configure your Wi-Fi Direct network settings manually. Group Owner - Set your machine as the Group Owner. Device Information Device Name View your machine's device name. SSID View the Group Owner's SSID. When the machine is not connected, the LCD displays Not Connected. Status Information IP Address View your machine's current IP Address.
Level 1 Descriptions WLAN Report Print the wireless LAN connection results. Caller ID history Print a list of the available Caller ID information about the last 30 received faxes and telephone calls. (MFC models) (Not available for Taiwan and some countries) [Settings] > [All Settings] > [Machine Info.] Level 1 Level 2 Descriptions Serial No. - Check your machine's serial number. Firmware Version Main Version Check your machine's firmware version.
Level 1 Level 2 Descriptions (Available only for some countries.
Home > Machine Settings > Change Machine Settings from the Control Panel > Settings and Features Tables > Features Tables (2.7"(67.5 mm) Touchpanel models) Features Tables (2.7"(67.5 mm) Touchpanel models) Related Models: DCP-J562DW/MFC-J680DW/MFC-J880DW [Fax] (When [Fax Preview] is [Off]) (MFC models) Fax Preview is not available for MFC-J680DW. Level 1 Level 2 Level 3 Descriptions - Search within the Address Book.
Level 1 Options Level 2 Call History Level 3 Descriptions (Not available for Taiwan and some countries) Address Book Search within the Address Book. (Search:) Save as Shortcut Edit Store Address Book numbers, set up Group numbers for Broadcasting, and change and delete Address Book numbers. Set New Default - Save your settings as the default. Factory Reset - Restore all settings back to the factory settings. - - Save the current settings as a shortcut.
Level 1 Sending Faxes Level 2 Options Level 3 Level 4 Descriptions Polling RX - Set the machine to poll another fax machine. Overseas Mode - Set to On if you have difficulty sending faxes overseas. Glass Scan Size - Adjust the scan area of the scanner glass to the size of the document. Call History Redial Redial the last number you dialled. Outgoing Call Select a number from the Outgoing Call history and then send a fax to it, add it to the Address Book, or delete it.
Level 1 Call History Level 2 Level 3 Level 4 some countries) Descriptions Select a number from the Caller ID history and then send a fax to it, add it to the Address Book, or delete it. [Copy] Level 1 Level 2 Level 3 Descriptions - Select the Copy resolution for your type of document. Paper Type - Select the paper type that matches the paper in the tray. Paper Size - Select the paper size that matches the paper in the tray.
Level 1 to E-mail Level 2 PC Select Level 3 Descriptions Save as Shortcut Send a scanned document as an email attachment. to Web - - Upload the scanned data to an Internet service. WS Scan Scan PC Select (Appears when you install a Web Services Scanner, which is displayed in your computer’s Network explorer.) Scan for E-mail Scan data using the Web Service protocol.
[Web] Level 1 Descriptions OneNote® Connect the Brother machine to an Internet service. OneDrive Web services may have been added and service names may have been changed by the provider since this document was published. Box For more information, see the Web Connect Guide. Go to your model's Manuals page on the Brother Solutions Center at http://support.brother.com to download the guide.
Level 1 Add Shortcut Level 2 Fax Level 3 Call History (Options ) (MFC models) Address Book Level 4 Descriptions some countries) - Select a number from the Address Book. to File - Scan documents and save them to a folder on your computer. to OCR - Convert your scanned document to an editable text file. to Image - Scan photos or graphics into your graphics applications. to Media - Scan documents and save them directly to a memory card or USB flash drive without using a computer.
Level 1 Descriptions Print Head Cleaning Clean the print head according to the on-screen instructions. WiFi Level 1 Descriptions Setup Wizard Configure your internal print server manually. WPS/AOSS Configure your wireless network settings using the one-button push method. WLAN Assistant Configure your wireless network settings using the Brother CD-ROM. When you have put the memory card or USB Flash drive in the correct slot Level 1 Descriptions Photo Select photo menu.
Home > Machine Settings > Change Machine Settings from Your Computer Change Machine Settings from Your Computer • Change the Machine Settings Using Remote Setup The Remote Setup program lets you configure many of your Brother machine's machine settings from your computer. When you start Remote Setup, the settings on your Brother machine will be downloaded to your computer and displayed on your screen. If you change the settings on your computer, you can upload them directly to the machine.
Home > Machine Settings > Change Machine Settings from Your Computer > Change the Machine Settings Using Remote Setup Change the Machine Settings Using Remote Setup The Remote Setup program lets you configure many of your Brother machine's machine settings from your computer. When you start Remote Setup, the settings on your Brother machine will be downloaded to your computer and displayed on your screen. If you change the settings on your computer, you can upload them directly to the machine.
Home > Machine Settings > Change Machine Settings from Your Computer > Change the Machine Settings Using Remote Setup > Remote Setup (Windows®) Remote Setup (Windows®) • Set Up the Brother Machine from Your Computer (Windows®) • Set Up the Brother Machine Using ControlCenter4 (Windows®) • Set Up Your Brother Address Book Using ControlCenter4 (Windows®) Use Remote Setup through CC4 to add or change Address Book numbers on your computer.
Home > Machine Settings > Change Machine Settings from Your Computer > Change the Machine Settings Using Remote Setup > Remote Setup (Windows®) > Set Up the Brother Machine from Your Computer (Windows®) Set Up the Brother Machine from Your Computer (Windows®) Related Models: MFC-J480DW/MFC-J680DW/MFC-J880DW 1. Do one of the following: • (Windows® XP, Windows Vista® and Windows® 7) Click (Start) > All Programs > Brother > Brother Utilities.
Export Click to save the current configuration settings to a file. Click Export to save your address book or all settings for your machine. Import Click to read the settings from a file. Print Click to print the selected items on the machine. You cannot print the data until it is uploaded to the machine. Click Apply to upload the new data to the machine, and then click Print. OK Click to start uploading data to the machine, and then exit the Remote Setup Program.
• If your computer is protected by a firewall and is unable to use Remote Setup, you may need to configure the firewall settings to allow communication through port numbers 137 and 161. • If you are using Windows® Firewall and you installed the Brother software and drivers from the CD-ROM, the necessary firewall settings have already been set.
Home > Machine Settings > Change Machine Settings from Your Computer > Change the Machine Settings Using Remote Setup > Remote Setup (Windows®) > Set Up the Brother Machine Using ControlCenter4 (Windows®) Set Up the Brother Machine Using ControlCenter4 (Windows®) Related Models: MFC-J480DW/MFC-J680DW/MFC-J880DW 1. Click the (ControlCenter4) icon in the task tray, and then click Open. 2. Click the Device Settings tab. 3. Click the Remote Setup button. 4. Configure the settings as needed.
Print Click to print the selected items on the machine. You cannot print the data until it is uploaded to the machine. Click Apply to upload the new data to the machine, and then click Print. OK Click to start uploading data to the machine, and then exit the Remote Setup Program. If an error message appears, confirm that your data is correct, and then click OK. Cancel Click to exit the Remote Setup Program without uploading data to the machine.
Home > Machine Settings > Change Machine Settings from Your Computer > Change the Machine Settings Using Remote Setup > Remote Setup (Windows®) > Set Up Your Brother Address Book Using ControlCenter4 (Windows®) Set Up Your Brother Address Book Using ControlCenter4 (Windows®) Related Models: MFC-J480DW/MFC-J680DW/MFC-J880DW Use Remote Setup through CC4 to add or change Address Book numbers on your computer. 1. Click the (ControlCenter4) icon in the task tray, and then click Open. 2.
Home > Machine Settings > Change Machine Settings from Your Computer > Change the Machine Settings Using Remote Setup > Remote Setup (Macintosh) Remote Setup (Macintosh) • Set Up the Brother Machine Using ControlCenter2 (Macintosh) • Set Up Your Brother Address Book Using ControlCenter2 (Macintosh) Use Remote Setup through ControlCenter2 to add or change Address Book numbers on your computer.
Home > Machine Settings > Change Machine Settings from Your Computer > Change the Machine Settings Using Remote Setup > Remote Setup (Macintosh) > Set Up the Brother Machine Using ControlCenter2 (Macintosh) Set Up the Brother Machine Using ControlCenter2 (Macintosh) Related Models: MFC-J480DW/MFC-J680DW/MFC-J880DW 1. In the Finder menu bar, click Go > Applications > Brother, and then double-click the (ControlCenter) icon. The ControlCenter2 screen appears. 2. Click the DEVICE SETTINGS tab. 3.
4. Configure the settings as needed. Export Click to save the current configuration settings to a file. Click Export to save your address book or all settings for your machine. Import Click to read the settings from a file. Print Click to print the selected items on the machine. You cannot print the data until it is uploaded to the machine. Click Apply to upload the new data to the machine, and then click Print.
OK Click to start uploading data to the machine, and then exit the Remote Setup Program. If an error message appears, enter the correct data again, and then click OK. Cancel Click to exit the Remote Setup Program without uploading data to the machine. Apply Click to upload data to the machine without exiting the Remote Setup Program. 5. When finished, click OK.
Home > Machine Settings > Change Machine Settings from Your Computer > Change the Machine Settings Using Remote Setup > Remote Setup (Macintosh) > Set Up Your Brother Address Book Using ControlCenter2 (Macintosh) Set Up Your Brother Address Book Using ControlCenter2 (Macintosh) Related Models: MFC-J480DW/MFC-J680DW/MFC-J880DW Use Remote Setup through ControlCenter2 to add or change Address Book numbers on your computer. 1.
Home > Appendix Appendix • Specifications • Enter Text on Your Brother Machine • Supply Specifications 602
Home > Appendix > Specifications Specifications General Specifications Printer Type Print Head Inkjet Mono Piezo with 210 nozzles x 1 Colour • DCP-J562DW/MFC-J480DW Piezo with 70 nozzles x 3 • MFC-J680DW/MFC-J880DW Piezo with 210 nozzles x 3 Memory Capacity 128 MB LCD (liquid crystal display) • MFC-J480DW 1 1.8 in. (44.9 mm) TFT Colour LCD • DCP-J562DW/MFC-J680DW/MFC-J880DW 2.7 in. (67.
227 mm 172 mm 400 mm 411 mm 341 mm 474 mm • MFC-J680DW/MFC-J880DW 227 mm 172 mm 400 mm 411 mm 341 mm 583 mm Weights • DCP-J562DW 7.2 kg • MFC-J480DW/MFC-J680DW/MFC-J880DW 8.3 kg 1 Measured diagonally 2 Measured when the machine is connected to the USB interface. Power consumption varies slightly depending on the usage environment or part wear. 3 When single-sided printing, resolution: standard / document: ISO/IEC 24712 printed pattern.
2 ADF models only Document Size Specifications Document Size ADF Width 1 148 to 215.9 mm ADF Length 1 2 148 to 355.6 mm Scanner Glass Width Max. 215.9 mm Scanner Glass Length Max. 297 mm 1 ADF models only 2 Documents that are longer than 297 mm must be fed one page at a time.
Resolution 203 dpi (Horizontal) Resolution Standard: (Vertical) 98 dpi (Mono) 196 dpi (Colour) Fine: 196 dpi (Mono) 196 dpi (Colour) Superfine: 392 dpi (Mono) Photo: 196 dpi (Mono) Address Book • MFC-J480DW 40 numbers • MFC-J680DW/MFC-J880DW 100 names x 2 numbers Groups Up to 6 Broadcasting • MFC-J480DW 90 (40 Address Book/50 Manual Dial) • MFC-J680DW/MFC-J880DW 250 (200 Address Book/50 Manual Dial) Automatic Redial 3 times at 5 minute intervals Memory Transmission • MFC-J480DW Up to 1
Compatible Media 1 • DCP-J562DW/MFC-J680DW/MFC-J880DW Memory Stick Duo™ (16 MB - 128 MB) Memory Stick PRO Duo™ (256 MB - 32 GB) Memory Stick Micro™ (M2™) with Adapter (256 MB - 32 GB) MultiMediaCard (32 MB - 2 GB) MultiMediaCard plus (128 MB - 4 GB) MultiMediaCard mobile with Adapter (64 MB - 1 GB) SD Memory Card (16 MB - 2 GB) miniSD with Adapter (16 MB - 2 GB) microSD with Adapter (16 MB - 2 GB) SDHC Memory Card (4 GB - 32 GB) miniSDHC with Adapter (4 GB - 32 GB) microSDHC with Adapter (4 GB - 32 GB) SD
TWAIN Compliant Yes (Windows® XP 1/ Windows Vista® / Windows® 7 / Windows® 8) (OS X v10.8.5 / 10.9.x /10.10.x) WIA Compliant Yes (Windows® XP 1/ Windows Vista® / Windows® 7 / Windows® 8) ICA Compliant Yes (OS X v10.8.5 / 10.9.x /10.10.
Network Specifications You can connect your machine to a network for Network Printing, Network Scanning, PC-Fax Send, PC-Fax Receive (Windows® only), Remote Setup, and to access photos from PhotoCapture Center. Also included is Brother BRAdmin Light 1 Network Management software. (Windows®) If you require more advanced machine management, use the latest Brother BRAdmin Professional utility version. Go to your model's Downloads page on the Brother Solutions Center at http:// support.brother.
Windows Server® 2012 R2 Macin tosh Oper ating Syste m OS X v10.8.5 Printing OS X v10.9.x PC-Fax (Send) 5 OS X Scanning v10.10.x Removable Disk (USB or Memory card) 6 Intel® Processor 80 MB 550 MB Network Media Access (LAN) 6 1 Third party USB ports are not supported. 2 MFC-J880DW only 3 For WIA, 1200 x 1200 resolution. Brother Scanner Utility enables enhancing up to 19200 x 19200 dpi.
Home > Appendix > Enter Text on Your Brother Machine Enter Text on Your Brother Machine • The characters that are available may differ depending on your country. • For Touchscreen models, the keyboard layout may differ depending on the function you are setting. >> MFC-J480DW >> DCP-J562DW/MFC-J680DW/MFC-J880DW MFC-J480DW When you are setting certain menu selections, such as the Station ID, you may need to enter text into the machine.
• Press to cycle between letters, numbers and special characters. • Press to cycle between lowercase and uppercase letters. • To move the cursor to the left or right, press d or c. Inserting spaces • To enter a space, press [Space]. Or, you can press c to move the cursor. Making corrections • If you entered an incorrect character and want to change it, press d or c to highlight the incorrect character. Press , and then enter the correct character.
Home > Appendix > Supply Specifications Supply Specifications Ink The machine uses individual Black, Yellow, Cyan and Magenta ink cartridges that are separate from the print head assembly. Service Life of The first time you install a set of ink cartridges the machine will use an amount of ink to fill the ink Ink Cartridge delivery tubes for high quality printouts. This process will only happen once.
Home > Glossary Glossary This is a comprehensive list of features and terms that appear in Brother manuals. Availability of these features depends on the model you purchased.
Home > Glossary D • Delayed Fax • Density • DHCP • DNS Client • DNS Server • Domain Name • Driver Deployment Wizard E • ECM (Error Correction Mode) • Encryption • Extension Telephone • External Phone F • F/T Ring Time • Fax Detect • Fax Forwarding • Fax Journal • Fax Storage • Fax Tones • Fax/Tel • FaxAbility (New Zealand only) • Fine Resolution G • Gateway • Grey Scale • Group Number I • IEEE 802.
Home > Glossary L • LAN • LLMNR • LPD • LPR M • MAC Address • MAC Address Filtering • Manual Fax • mDNS • Memory Receive N • NetBIOS Name Resolution • Network Configuration Report • Network Connection Repair Tool • Network Key • Network PC-FAX • Network PhotoCapture Center • Network Remote Setup • Network Shared Printing • Node Name O • OCR (Optical Character Recognition) • Open System • Overseas Mode P • Pause • Peer-to-Peer • Photo resolution (Mono only) •
Home > Glossary • Real Time Transmission • Remaining Jobs • Remote Access Code • Remote Activation Code (Fax/Tel Mode Only) • Remote Deactivation Code (Fax/Tel Mode only) • Remote Retrieval Access • Remote Setup • Resolution • Ring Delay • Ring Volume S • Scanning • Search • Settings Tables • SNMP • SSID • Standard resolution • Station ID • Status Monitor • Subnet Mask • Super Fine resolution (Mono only) • Switching Hub T • TAD (Telephone Answering Device) • TCP/
Home > Glossary • Wi-Fi Direct® • WINS • WINS Server • Wireless LAN Access Point/Router • WLAN Report • WPA-PSK/WPA2-PSK Authentication Method • WPS X • Xmit Report (Transmission Verification Report) 618
Home > Glossary Ad-Hoc Mode The mode of operation in a wireless network, in which all devices (machines and computers) are connected without an access point/router. Address Book Names and numbers you have stored for easy dialling. Address Book List A listing of names and numbers stored in the Address Book memory, in alphabetical order. ADF (Automatic Document Feeder) The document can be placed in the ADF and scanned one page at a time automatically.
Home > Glossary Authentication Methods for a Personal Wireless Network A personal wireless network is a small network (such as a home wireless network) without IEEE 802.1x support. • Open system Wireless devices are allowed to access the network without any authentication. • Shared key A secret pre-determined key is shared by all devices that will access the wireless network. The Brother wireless machine uses the WEP key as the pre-determined key.
Home > Glossary BRAdmin Light BRAdmin Light is a utility for the initial setup of Brother network-connected devices. This utility can search for Brother products on your network, view the status and configure the basic network settings, such as IP address. Go to your model's Downloads page on the Brother Solutions Center at http://support.brother.com to download BRAdmin Light.
Home > Glossary Coding Method Method of coding the information contained in the document. All fax machines must use a minimum standard of Modified Huffman (MH). Your machine is capable of greater compression methods, Modified Read (MR), Modified Modified Read (MMR) and JPEG, if the receiving machine has the same capability. Colour Enhancement Adjusts the colour in the image for better print quality by improving sharpness, white balance and colour density. Communication Error (or Comm.
Home > Glossary DNS Server The Domain Name System (DNS) is a technology to manage the names of web sites and internet domains. A DNS server allows your computer to find its IP address automatically. Domain Name Generally, in an e-mail address such as "taro@brother.co.jp", the domain name is the "brother.co.jp" portion of the address after the @ mark. Driver Deployment Wizard Brother's Installation CD-ROM includes the Windows® printer driver and Brother network port driver (LPR and NetBIOS).
Home > Glossary External Phone A TAD (telephone answering device) or telephone that is connected to your machine. F/T Ring Time The length of time that the Brother machine pseudo/double-rings (when the Receive Mode setting is Fax/Tel) to notify you to pick up a voice call that it answered. Fax Detect Enables your machine to respond to CNG tones if you interrupt a fax call by answering it. Fax Forwarding Sends a fax received into the memory to another pre-programmed fax number.
Home > Glossary communicates with other networks, you may need to configure the Gateway IP address. If you do not know the Gateway IP address, then contact your Network Administrator. Grey Scale The shades of grey available for copying and faxing photographs. Group Number A combination of Address Book numbers that are stored in Address Book for Broadcasting. IEEE 802.11b/g/n Wireless LAN standards that were established by IEEE (Institute of Electrical and Electronics Engineers). IEEE802.
Home > Glossary Journal Period The pre-programmed time period between automatically printed Fax Journal Reports. You can print the Fax Journal on demand without interrupting the cycle. LAN The acronym for Local Area Network. Refers to a network of computers that are located in the same building, on the same floor, and so on, and are connected using an Ethernet or other connection method. This type of network is considered a closed network.
Home > Glossary NetBIOS Name Resolution Network Basic Input/Output System (NetBIOS) name resolution enables you to obtain the IP address of the other device using its NetBIOS name during the network connection. Network Configuration Report The Network Configuration Report prints a report listing the current network configuration, including the network print server settings.
Home > Glossary Network Remote Setup The Remote Setup software allows you to configure network settings from either a Windows® or Macintosh computer. Network Shared Printing Network Shared Printing is a type of printing in a network shared environment. In a network shared environment, each computer sends data via a server or print server. Node Name The Node Name is a machine name on the network.
Home > Glossary PictBridge Allows you to print photos directly from your digital camera at high resolution for photo quality printing. Ping This is a computer network administration utility to test whether sent data can reach a specified host. Polling The process of a fax machine calling another fax machine to retrieve waiting fax messages. Protocols Protocols are the standardised sets of rules for transmitting data on a network. Protocols allow users to gain access to network-connected resources.
Home > Glossary Remote Deactivation Code (Fax/Tel Mode only) When the machine answers a voice call, it pseudo/double-rings. You can pick up at an extension telephone by pressing this code (# 5 1 (# 9 1 for New Zealand)). Remote Retrieval Access The ability to access your machine remotely from a touch tone telephone. Remote Setup The Remote Setup program lets you configure many machine and network settings from a computer application.
Home > Glossary information. When your wireless network device receives a beacon, you can identify the wireless network that is close enough for the radio waves to reach your device. Standard resolution 203 × 98 dpi (monochrome). 203 × 196 dpi (colour). It is used for regular sized text and the quickest transmission. Station ID The stored information that appears on the top of faxed pages. It includes the sender’s name and fax number.
Home > Glossary TAD (Telephone Answering Device) You can connect an external TAD to your machine. TCP/IP Transmission Control Protocol/Internet Protocol (TCP/IP) is the most popular set of protocols used for communication, such as Internet and email. This protocol can be used in almost all operating systems, including Windows®, Windows Server®, OS X and Linux®. Temporary Settings You can choose certain options for each fax transmission and copy without changing the default settings.
Home > Glossary WEP Wired Equivalent Privacy (WEP) is one of the encryption methods used in a wireless network. When using WEP, the data is transmitted and received with a secure key. Wi-Fi Direct® Wi-Fi Direct is one of the wireless configuration methods developed by the Wi-Fi Alliance®. This type of connection is a Wi-Fi standard that allows devices to connect with each other without a wireless access point, using secured method.
Visit us on the World Wide Web http://www.brother.