
User Manual
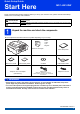
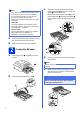

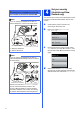
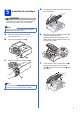
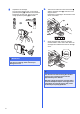
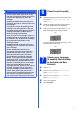
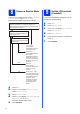

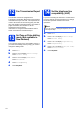
Table Of Contents
- Quick Setup Guide MFC-J5910DW
- Start Here
- 1 Unpack the machine and check the components
- 2 Load plain A4 paper
- 3 Connect the power cord and telephone line
- 4 Set your country (Australia and New Zealand only)
- 5 Install the ink cartridges
- 6 Check the print quality
- 7 Choose your language (if needed) (Not available in Australia and New Zealand)
- 8 Choose a Receive Mode
- 9 Set the LCD contrast (if needed)
- 10 Set the date and time
- 11 Enter personal information (Station ID)
- 12 Fax Transmission Report
- 13 Set Tone or Pulse dialling mode (Not available in New Zealand)
- 14 Set the telephone line compatibility (VoIP)
- 15 Choose your connection type
- For USB interface users (Windows® XP Home/XP Professional/Windows Vista®/Windows® 7)
- For USB interface users (Mac OS X 10.4.11, 10.5.x, 10.6.x)
- For wired network interface users (Windows® XP Home/XP Professional/Windows Vista®/Windows® 7)
- For wired network interface users (Mac OS X 10.4.11, 10.5.x, 10.6.x)
- For wireless network interface users
- 16 Before you begin
- 17 Choose your wireless install method
- 18 Configuration using the CD-ROM installer and a USB cable (Windows® only)
- 18 Manual configuration from the control panel (Windows® and Macintosh)
- 18 One-push configuration using WPS or AOSS™ (Windows® and Macintosh)
- Troubleshooting
- Install the drivers & software (Windows® XP Home/XP Professional/Windows Vista®/Windows® 7)
- Install the drivers & software (Mac OS X 10.4.11, 10.5.x, 10.6.x)
- Install Optional Applications Windows®
- For Network Users
- Consumables
- brother ARL/ASA/NZ
- Start Here

7
6
Check the print quality
a When the preparation process has finished, the
LCD shows Set Paper and Press Start.
Press Start.
b Check the quality of the four colour blocks on
the sheet. (black/yellow/cyan/magenta)
c If all lines are clear and visible, press Yes to
finish the quality check and go to step 7.
If you can see missing short lines, press No and
follow the steps on the LCD.
7
Choose your language
(if needed) (Not available
in Australia and New
Zealand)
a Press Menu.
b Press s or t to choose Initial Setup.
Press Initial Setup.
c Press s or t to choose Local Language.
Press Local Language.
d Press your language.
e Press Stop/Exit.
IMPORTANT
• DO NOT take out ink cartridges if you do not
need to replace them. If you do so, it may
reduce the ink quantity and the machine will
not know the quantity of ink left in the
cartridge.
• DO NOT repeatedly insert and remove the
cartridges. If you do so, ink may seep out of
the cartridge.
• If you mix the colours by installing an ink
cartridge in the wrong position, clean the
print head several times after correcting the
cartridge installation. (uuBasic User’s
Guide: Cleaning the print head)
• Once you open an ink cartridge, install it in
the machine and use it up within six months
of installation. Use unopened ink cartridges
by the expiration date written on the
cartridge package.
• DO NOT dismantle or tamper with the ink
cartridge, this can cause the ink to leak out
of the cartridge.
• Brother multifunction machines are
designed to work with ink of a particular
specification and will work to a level of
optimum performance when used with
genuine Brother branded ink cartridges.
Brother cannot guarantee this optimum
performance if ink or ink cartridges of other
specifications are used. Brother does not
therefore recommend the use of cartridges
other than genuine Brother branded
cartridges with this machine or the refilling
of empty cartridges with ink from other
sources. If damage is caused to the print
head or other parts of this machine as a
result of using incompatible products with
this machine, any repairs required as a
result may not be covered by the warranty.
OK
Poor