BASIC USER’S GUIDE MFC-J5910DW Version 0 USA/CAN
If you need to call Customer Service Please complete the following information for future reference: Model Number: MFC-J5910DW Serial Number: 1 Date of Purchase: Place of Purchase: 1 The serial number is on the back of the unit. Retain this User's Guide with your sales receipt as a permanent record of your purchase, in the event of theft, fire or warranty service. Register your product on-line at http://www.brother.
Brother numbers IMPORTANT For technical help, you must call the country where you bought the machine. Calls must be made from within that country. Register your product By registering your product with Brother International Corporation, you will be recorded as the original owner of the product.
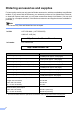
Ordering accessories and supplies For best quality results use only genuine Brother accessories, which are available at most Brother retailers. If you cannot find the accessory you need and you have a Visa, MasterCard, Discover, or American Express credit card, you can order accessories directly from Brother. (You can visit us online for a complete selection of the Brother accessories and supplies that are available for purchase.) Note In Canada only Visa and MasterCard are accepted.
Description Item Multipurpose Paper - Plain Paper (Letter size / 500 sheets) BP60MPLTR (USA only) Matte Inkjet Paper (Letter size / 25 sheets) BP60ML (USA only) Plain Inkjet Paper (Ledger size / 100 sheets) BP60PLGR (USA only) (Letter size / 100 sheets) BP60PL100 (USA only) Telephone Line Cord LG3077001 (USA only) Basic User's Guide LX8860001 (English for USA and Canada) LX8860002 (French for Canada) CD ROM for Windows® & Mac LX8382001 iii
Notice - Disclaimer of Warranties (USA and Canada) BROTHER'S LICENSOR(S), AND THEIR DIRECTORS, OFFICERS, EMPLOYEES OR AGENTS (COLLECTIVELY BROTHER'S LICENSOR) MAKE NO WARRANTIES, EXPRESS OR IMPLIED, INCLUDING WITHOUT LIMITATION THE IMPLIED WARRANTIES OF MERCHANTABILITY AND FITNESS FOR A PARTICULAR PURPOSE, REGARDING THE SOFTWARE.
Compilation and Publication Notice Under the supervision of Brother Industries, Ltd., this manual has been compiled and published, covering the latest product descriptions and specifications. The contents of this manual and the specifications of this product are subject to change without notice.
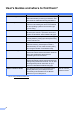
User's Guides and where to find them? Which manual? What's in it? Where is it? Product Safety Guide Read this Guide first. Please read the Safety Instructions before you set up your machine. See this Guide for trademarks and legal limitations. Printed / In the box Quick Setup Guide Follow the instructions for setting up your machine and installing the drivers and software for the operating system and connection type you are using.
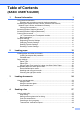
Table of Contents (BASIC USER’S GUIDE) 1 General information 1 Using the documentation .......................................................................................1 Symbols and conventions used in the documentation ....................................1 Accessing the Advanced User’s Guide, Software User’s Guide, Network User’s Guide, and Network Glossary ...................................................2 Viewing Documentation....................................................................
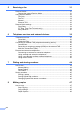
5 Receiving a fax 31 Receive Modes ....................................................................................................31 Choose the correct Receive Mode ................................................................31 Using Receive Modes..........................................................................................33 Fax Only ........................................................................................................33 Fax/Tel.....................................
9 PhotoCapture Center™: Printing photos from a memory card or USB Flash memory drive 50 PhotoCapture Center™ operations (PHOTO mode) ........................................... 50 Using a memory card or USB Flash memory drive .......................................50 Getting started ..................................................................................................... 51 Print Images.........................................................................................................
C Menu and features 95 On-screen programming......................................................................................95 Memory Storage ..................................................................................................95 Menu table ...........................................................................................................96 Entering Text .....................................................................................................123 Inserting spaces ...
Table of Contents (ADVANCED USER’S GUIDE) The Advanced User’s Guide explains the following features and operations. You can view the Advanced User’s Guide on the CD-ROM. 1 General setup 8 Memory storage Volume Settings Automatic Daylight Saving Time Sleep Mode LCD screen Dial Prefix Mode Timer 2 3 PhotoCapture Center™ operations Print Images PhotoCapture Center™ print settings Scan to a memory card or USB Flash memory drive Security features Secure Function Lock 2.
xii
1 General information Using the documentation 1 WARNING 1 WARNING indicates a potentially hazardous situation which, if not avoided, could result in death or serious injuries. Thank you for buying a Brother machine! Reading the documentation will help you make the most of your machine. Symbols and conventions used in the documentation The following symbols and conventions are used throughout the documentation.
Chapter 1 Accessing the Advanced User’s Guide, Software User’s Guide, Network User’s Guide, and Network Glossary Viewing Documentation (Windows®) To view the documentation, from the Start menu, select Brother, MFC-XXXX (where XXXX is your model name) from the programs group, and then choose User’s Guides. If the model name screen appears, click your model name. c If the language screen appears, click your language. The CD-ROM Top Menu will appear. d e Click Documentation.
General information e How to find Network setup instructions After the list of User’s Guides appears, choose the guide you want to read. How to find Scanning instructions There are several ways you can scan documents. You can find the instructions as follows: 1 Your machine can be connected to a wireless or wired network.
Chapter 1 Accessing Brother Support (Windows®) 1 You can find all the contacts you will need, such as Web support (Brother Solutions Center), Customer Service and Brother Authorized Service Centers in Brother numbers uu page i and on the CD-ROM. Click Brother Support on the Top Menu. The following screen will appear: To access our Web site (http://www.brother.com/), click Brother Home Page.
General information Accessing Brother Support (Macintosh) 1 1 You can find all the contacts you will need, such as Web support (Brother Solutions Center) on the CD-ROM. Double-click the Brother Support icon. The following screen will appear: To download and install Presto! PageManager, click Presto! PageManager. To register your machine from the Brother Product Registration Page (http://www.brother.com/registration/), click On-Line Registration.
Chapter 1 Control panel overview 1 7 6 1 1 Mode keys: 2 Telephone keys: Redial/Pause Redials the last 30 numbers called. It also inserts a pause when dialing numbers. Hook Press before dialing when you want to listen to make sure a fax machine has answered, and then press Black Start or Color Start. Also, press this key after picking up the handset of the external telephone during the F/T pseudo/double-ring. 3 Start keys: FAX Lets you access FAX mode. SCAN Lets you access SCAN mode.
General information 1 6 5 4 2 4 Stop/Exit Stops an operation or exits the menu. 5 6 Dial Pad Use these keys to dial telephone and fax numbers and as a keyboard for entering information into the machine. 1.9" Touchscreen plus Touchpanel controls This is a screen. You can access the menus and options by pressing buttons displayed on the screen. Also, you can adjust the angle of the screen by lifting it. 7 3 On/Off You can turn the machine on and off. Press On/Off to turn the machine on.
Chapter 1 1.9" Touchscreen plus Touchpanel controls SpeedDial Lets you set up Speed Dial and Group numbers. Also, you can search for the number you want to dial. 9 Current Receive Mode Lets you see the current Receive Mode. Fax (Fax Only) F/T (Fax/Tel) TAD (External TAD) Mnl (Manual) 1 The screen shows the current machine status when the machine is idle. 10 9 8 7 8 6 Note 1 2 3 4 5 1 Menu Lets you access the main menu. 2 Ink Lets you see the available ink volume.
General information Basic Operations 1 g Press Fax/Tel. 1 To operate the screen use your finger to press the Menu or option button directly on the screen. To display and access all the screen menus or options in a setting, press s or t to scroll through them. IMPORTANT DO NOT press the screen with a sharp object, such as a pen or stylus. It may damage the machine. Note Press h to go back to the previous level. Press Stop/Exit. The following steps show how to change a setting in the machine.
Chapter 1 Favorite Settings You can register the fax, copy and scan settings you use most often by setting them as your Favorite Settings. Later you can recall and apply these settings quickly and easily. You can register three Favorites. 1 Registering Favorite Settings a Press Create New Favorite. Go to step d. Press Menu. Go to step b. Copy Quality b Press s or t to display Favorite Settings. Press Favorite Settings. c Press a Favorite displayed as ”-Blank-”.
General information j To finish and register the settings for this Favorite, press Yes. k l Press OK to confirm. Deleting Favorite Settings 1 1 You can delete a Favorite. a b Press Menu. You can change the settings registered to a Favorite. c Press the Favorite (1, 2, or 3) you want to delete. a b d Press Delete to delete the Favorite that you chose in step c. Press Yes to confirm. e Press Stop/Exit. Press Stop/Exit. Changing Favorite Settings c d e f 1 Press Menu.
2 Loading paper Loading paper and other print media Note 2 Load only one size of paper and one type of paper in the paper tray at any one time. a 2 Pull the paper tray completely out of the machine. • When you are using Legal, Ledger or A3 size paper, press the universal guide release button (1) as you slide out the front of the paper tray.
Loading paper b Open the output paper tray cover (1). d Fan the stack of paper well to avoid paper jams and misfeeds. 2 1 Note Always make sure that the paper is not curled or wrinkled. c With both hands, gently press and slide the paper length guide (1) and then the paper side guides (2) to fit the paper size. Make sure that the triangular marks (3) on the paper length guide (1) and paper side guides (2) line up with the mark for the paper size you are using.
Chapter 2 g Note • When there are only a few sheets of paper left in the paper tray, the machine may start to misfeed. Load at least 10 sheets of paper into the paper tray. • When you put Photo L size into the paper tray, you need to release the hinges on both sides of the output paper tray cover, and push the cover over. And then slide the paper length guide. f Gently adjust the paper side guides (1) to fit the paper using both hands. Make sure the paper side guides touch the sides of the paper.
Loading paper Note Before you shorten the tray, take the paper out of the tray. Then shorten the tray by pressing the universal guide release button (1). Adjust the paper length guide (2) to fit the paper size you are going to use. Then put the paper in the tray. Loading envelopes and postcards 2 About envelopes 2 Use envelopes that weigh from 20 to 25 lb (80 to 95 g/m2). Some envelopes need margin settings to be set in the application.
Chapter 2 Loading envelopes and postcards a Before loading, press the corners and sides of envelopes or postcards to make them as flat as possible. IMPORTANT If envelopes or postcards are “doublefeeding,” put one envelope or postcard in the paper tray at a time. 2 b Put envelopes or postcards in the paper tray with the address side down. If the envelope flaps are on the long edge, load the envelopes with the flap on the left, as shown in the illustration.
Loading paper If you have problems printing on envelopes with the flap on the short edge, try the following: a b Open the envelope flap. c Select Reverse Print in the printer driver’s dialog box, and then adjust the size and margin in your application. uuSoftware User’s Guide: Printing (Windows®) uuSoftware User’s Guide: Printing and Faxing (Macintosh) 2 2 Put the envelope into the paper tray with the address side down and the flap positioned as shown in the illustration.
Chapter 2 Printable area 2 The printable area depends on the settings in the application you are using. The figures below show the unprintable areas on cut-sheet paper and envelopes. The machine can print in the shaded areas of cut-sheet paper only when the Borderless print feature is available and turned on.
Loading paper Paper settings Paper Type To get the best print quality, set the machine for the type of paper you are using. a b c d e f g Press Menu. Press s or t to display General Setup. Press General Setup. Press s or t to display Paper Type. Press Paper Type. Press s or t to display Plain Paper, Inkjet Paper, Brother BP71, Brother BP61, Other Glossy or Transparency, and then press the option you want.
Chapter 2 Secure Paper Feed mode for Ledger size Short Grain Paper If your printed pages are smudged when using Ledger paper, your paper may be short grain paper. Choose LGR - Short Grain and set it to On to avoid this problem. a b c d e f g Press Menu. 2 Acceptable paper and other print media The print quality can be affected by the type of paper you use in the machine. To get the best print quality for the settings you have chosen, always set the Paper Type to match the type of paper you load.
Loading paper Recommended print media IMPORTANT 2 DO NOT use the following kinds of paper: To get the best print quality, we suggest using Brother paper. (See the table below.) • Damaged, curled, wrinkled, or irregularly shaped We recommend using “3M Transparency Film” when you print on transparencies. Brother paper Paper Type 1 Item Premium Plus Glossy Photo Ledger BP71GLGR Letter BP71GLTR 4" 6" BP71GP 1 1 0.08 in. (2 mm) or greater curl may cause jams to occur.
Chapter 2 Choosing the right print media 2 Paper type and size for each operation Paper Type Cut-Sheet Paper Size Fax Copy Photo Printer Capture 11 17 in. (279.4 431.8 mm) Yes Yes Yes Yes Letter 8 1/2 11 in. (215.9 279.4 mm) Yes Yes Yes Yes A3 11.7 16.5 in. (297 420 mm) Yes Yes Yes Yes A4 8.3 11.7 in. (210 297 mm) Yes Yes Yes Yes Legal 8 1/2 14 in. (215.9 355.6 mm) Yes Yes – Yes Executive 7 1/4 10 1/2 in. (184 267 mm) – Yes – Yes JIS B4 10.
Loading paper Paper weight, thickness and capacity Paper Type 2 Weight Thickness No. of sheets Plain Paper 17 to 32 lb (64 to 120 g/m2) 3 to 6 mil (0.08 to 0.15 mm) 250 1 Inkjet Paper 17 to 53 lb (64 to 200 g/m2) 3 to 10 mil (0.08 to 0.25 mm) 20 Glossy Paper Up to 58 lb (Up to 220 g/m2) Up to 10 mil (Up to 0.25 mm) 20 2 Photo 4" 6" Up to 58 lb (Up to 220 g/m2) Up to 10 mil (Up to 0.25 mm) 20 2 Index Card Up to 32 lb (Up to 120 g/m2) Up to 6 mil (Up to 0.
3 Loading documents How to load documents How to load documents • DO NOT pull on the document while it is feeding. • DO NOT use paper that is curled, wrinkled, folded, ripped, stapled, paper clipped, pasted or taped. 3 • DO NOT use cardboard, newspaper or fabric. The ADF can hold up to 35 pages and feeds each sheet individually. Use paper that is within the sizes and weights shown in the table below. Always fan the pages before placing them in the ADF. Document Sizes and Weights Length: 5.
Loading documents c How to load documents Adjust the paper guides (1) to fit the width of your document. 3 Note To use the scanner glass, the ADF must be empty. a b 1 d Lift the document cover. Using the document guidelines on the left and top, place the document face down in the upper left corner of the scanner glass. Place your document, face up, top edge first in the ADF underneath the guides until the screen shows ADF Ready and you feel it touch the feed rollers.
Chapter 3 c Close the document cover. IMPORTANT If you are scanning a book or thick document, DO NOT slam the cover down or press on it. Unscannable area 3 The scannable area depends on the settings in the application you are using. The figures below show unscannable areas. 1 3 4 2 Usage Fax Document Size Top (1) Left (3) Bottom (2) Right (4) Letter 0.12 in. (3 mm) 0.16 in. (4 mm) Legal Copy Scan 1 26 A4 0.12 in. 1 (3 mm) All paper sizes 0.12 in. (3 mm) The unscannable area is 0.
4 Sending a fax b How to send a fax 4 The following steps show how to send a fax. a When the machine is idle, the time appear on the screen. When you want to send a fax, or change fax send or receive settings, press the key to illuminate it in blue. 4 (FAX) Do one of the following to load your document: Place the document face up in the ADF. (See Using the ADF uu page 24.) Load your document face down on the scanner glass. (See Using the scanner glass uu page 25.
Chapter 4 c You can change the following fax-sending settings. Press FAX and then press Options. Press s or t to scroll through the fax settings. When the setting you want is displayed, press it and choose your option. d Using the dial pad Using Speed Dial SpeedDial Using call history (Basic User’s Guide) Outgoing For details about changing the following fax-sending settings uu pages 29 to 30.
Sending a fax Stop faxing 4 To stop faxing, press Stop/Exit. Setting scanner glass size for faxing d e Press 4 If you want to cancel a fax while the machine is scanning, dialing or sending, press Stop/Exit. 4 When documents are A4 size, you need to set the Scan Size to A4. If you do not, the bottom portion of the faxes will be missing. a b c Canceling a fax in progress Transmission Verification Report 4 You can use the Transmission Verification Report as proof that you sent a fax.
Chapter 4 a b c d e f g h i Press Menu. Press s or t to display Fax. Press Fax. Press s or t to display Report Setting. Press Report Setting. Press s or t to display Transmission. Press Transmission. Press s or t to display On, On+Image, Off or Off+Image, and then press the option you want. Press Stop/Exit. Note • If you choose On+Image or Off+Image the image will only appear on the Transmission Verification Report if Real Time Transmission is set to Off.
5 Receiving a fax 5 Receive Modes 5 Choose the correct Receive Mode 5 The correct Receive Mode is determined by the external devices and telephone subscriber services (Voice Mail, Distinctive Ring, etc.) you will be using on the same line as the Brother machine.
Chapter 5 To set the Receive Mode follow the instructions below: a b c d e f Press Menu. g Press Stop/Exit. The screen will display the current Receive Mode. 32 Press s or t to display Initial Setup. Press Initial Setup. Press s or t to display Receive Mode. Press Receive Mode. Press s or t to display Fax Only, Fax/Tel, External TAD or Manual, and then press the option you want.
Receiving a fax Using Receive Modes 5 5 Fax Only mode will automatically answer every call as a fax call. Fax/Tel Fax/Tel mode helps you automatically manage incoming calls, by recognizing whether they are fax or voice calls and handling them in one of the following ways: Faxes will be automatically received. Voice calls will start the F/T Ring to tell you to pick up the line. The F/T Ring is a fast pseudo/double-ring made by your machine.
Chapter 5 Receive Mode settings Ring Delay The Ring Delay sets the number of times the machine rings before it answers in Fax Only or Fax/Tel mode. If you have external or extension telephones on the same line as the machine, keep the ring delay setting of 4 rings. (See Using external and extension telephones uu page 42 and Easy Receive uu page 35.) a b c d e f g h i Press Menu. Press s or t to display Fax. Press Fax. Press s or t to display Setup Receive. Press Setup Receive.
Receiving a fax Easy Receive If Easy Receive is On: 5 5 The machine can receive a fax automatically, even if you answer the call. When you see Receiving on the screen or hear a click on the phone line through the handset you are using, just replace the handset. Your machine will do the rest. If Easy Receive is Off: 5 If you are at the machine and answered a call first by lifting the external handset, press Black Start or Color Start, and then press Receive to receive.
6 Telephone services and external devices Telephone services 6 Your machine supports the Caller ID and Distinctive Ring subscriber telephone services that some telephone companies offer. Get the Distinctive Ring service from your telephone company. Distinctive Ring is a feature of your Brother machine that allows a person with one line to receive fax and voice calls through two different phone numbers on that one line.
Telephone services and external devices Distinctive Ring 6 Do you have Voice Mail? If you have Voice Mail on the telephone line that you will install your new machine on, there is a strong possibility that Voice Mail and the machine will conflict with each other while receiving incoming calls. However, the Distinctive Ring feature allows you to use more than one number on your line, so both Voice Mail and the machine can work together without any problems.
Chapter 6 Note Ring Pattern #1 is often called Short-Short and is the most commonly used. If the ring pattern you received is not on this chart, please call your telephone company and ask for one that is shown. f g h Press Distinctive. i Press Stop/Exit. Distinctive Ring is now set to On. The machine will only answer calls to its registered number. The first two rings are silent on the machine.
Telephone services and external devices Connecting an external TAD (telephone answering device) • If You Do Not Subscribe to the Distinctive Ring Service: You must plug your TAD into the EXT. jack of your machine. If your TAD is plugged into a wall jack, both your machine and the TAD will try to control the telephone line. (See the illustration below.) 6 You may choose to connect an external answering device.
Chapter 6 Connections The external TAD must be plugged into the jack labeled EXT. Your machine cannot work properly if you plug the TAD into a wall jack (unless you are using Distinctive Ring). a b Plug the telephone line cord from the telephone wall jack into the jack labeled LINE. Remove the protective cap (1) from the jack labeled EXT., and then plug the telephone line cord from the external TAD into the EXT. jack.
Telephone services and external devices Multi-line connections (PBX) We suggest you ask the company who installed your PBX to connect your machine. If you have a multi-line system we suggest you ask the installer to connect the unit to the last line on the system. This prevents the machine being activated each time the system receives telephone calls. If all incoming calls will be answered by a switchboard operator we recommend that you set the Receive Mode to Manual.
Chapter 6 Using external and extension telephones 6 Using extension telephones If you let the machine answer first, you will have to go to the machine so you can press Hook to send the call to the cordless handset. If the machine answers a voice call and pseudo/double-rings for you to take over, you can take the call at an extension telephone by pressing the Telephone Answer Code # 5 1. (See F/T Ring Time (Fax/Tel mode only) uu page 34.
Telephone services and external devices Changing the remote codes The preset Fax Receive Code is l 5 1. The preset Telephone Answer Code is # 5 1. If you want to, you can replace them with your own codes. a b c d e f g h i Press Menu. Press s or t to display Fax. 6 Note • If you are always disconnected when accessing your external TAD remotely, try changing the Fax Receive Code and Telephone Answer Code to another three-digit code (such as # # # and 9 9 9).
7 Dialing and storing numbers How to dial 7 Manual dialing 7 Press all of the digits of the fax or telephone number. Fax Redial a Redial/Pause only works if you dialed from the control panel. If you are sending a fax automatically and the line is busy, the machine will automatically redial once after five minutes. 7 (FAX) and then press SpeedDial. b Do one of the following: Press Alphabetical or Numerical, and then press the number you want to dial.
Dialing and storing numbers Storing numbers f Enter the name (up to 16 characters) by pressing the buttons on the screen. You can set up your machine to do the following types of easy dialing: Speed Dial and Groups for broadcasting faxes. When you dial a Quick Dial number, the screen shows the number. Press OK. (To help you enter letters, see Entering Text uu page 123.) Note To store the number without a name, press OK.
Chapter 7 g Note If you want to change the name, press Name. Enter the new name (up to 16 characters) by pressing the buttons on the screen. (See Entering Text uu page 123.) If the 2-digit Speed Dial location you choose is already taken, the OK button on the screen will not work. Choose a different location. j When the screen displays your settings, press OK to confirm. k Do one of the following: Press OK. If you want to change the first fax or telephone number, press .
8 Making copies How to copy 8 b 8 Place the document face up in the ADF. The following steps show the basic copy operation. a Do one of the following to load your document: (See Using the ADF uu page 24.) When you want to make a copy, press Place the document face down on the scanner glass. (COPY) to illuminate it in blue. (See Using the scanner glass uu page 25.) Make sure you are in COPY mode. c If you want more than one copy, enter the number (up to 99).
Chapter 8 Copy settings You can change the following copy settings. Press COPY and then press Options. Press s or t to scroll through the copy settings. When the setting you want is displayed, press it and choose your option. 8 Paper Options Paper Type 8 If you are copying on special paper, set the machine for the type of paper you are using to get the best print quality. (Basic User’s Guide) For details about changing the following copy settings uu page 48.
Making copies Paper Size 8 If you are copying on paper other than Letter size, you will need to change the Paper Size setting. You can copy only on Letter, Legal, Ledger, A4, A5, A3, Executive or Photo 4" 6" (10 15 cm) paper. a Press b c d e f g Load your document. h (COPY). Enter the number of copies you want. Press Options. Press s or t to display Paper Size. Press Paper Size. Press s or t to display Letter, Legal, Ledger, A4, A5, A3, EXE or 4"x6", and then press the option you want.
9 PhotoCapture Center™: Printing photos from a memory card or USB Flash memory drive PhotoCapture Center™ operations (PHOTO mode) 9 Even if your machine is not connected to your computer, you can print photos directly from digital camera media or a USB Flash memory drive. (See Print Images uu page 53.) You can scan documents and save them directly to a memory card or USB Flash memory drive. (See How to scan to a memory card or USB Flash memory drive uu page 54.
PhotoCapture Center™: Printing photos from a memory card or USB Flash memory drive Getting started 9 Firmly put a memory card or USB Flash memory drive into the correct slot. 1 2 1 USB Flash memory drive IMPORTANT The USB direct interface supports only a USB Flash memory drive, a PictBridge-compatible camera, or a digital camera that uses the USB mass storage standard. Any other USB devices are not supported.
Chapter 9 IMPORTANT DO NOT insert a Memory Stick Duo™ into the lower SD slot. Doing this may cause damage to the machine. PHOTO key lights: PHOTO light is on, the memory card or USB Flash memory drive is properly inserted. PHOTO light is off, the memory card or USB Flash memory drive is not properly inserted. PHOTO light is blinking, the memory card or USB Flash memory drive is being read or written to.
PhotoCapture Center™: Printing photos from a memory card or USB Flash memory drive Print Images View Photos You can preview your photos on the screen before you print them. If your photos are large files there may be a delay before each photo is displayed on the screen. a Make sure you have put the memory card or USB Flash memory drive in the proper slot. Press b c (PHOTO). Press View Photos. Press s or t to display the photo you want to print.
Chapter 9 How to scan to a memory card or USB Flash memory drive 9 d Press s or t to display Scan to Media. e f Press Scan to Media. You can scan black & white and color documents into a memory card or USB Flash memory drive. Black & white documents will be stored in PDF (*.PDF) or TIFF (*.TIF) file formats. Color documents may be stored in PDF (*.PDF) or JPEG (*.JPG) file formats. The factory setting is Color 200 dpi and the default file format is PDF.
10 How to print from a computer Printing a document 10 10 The machine can receive data from your computer and print it. To print from a computer, you must install the printer driver. uuSoftware User’s Guide: Printing (Windows®) uuSoftware User’s Guide: Printing and Faxing (Macintosh) a Install the Brother printer driver on the CD-ROM. (uuQuick Setup Guide) b From your application, choose the Print command. c Choose the name of your machine in the Print dialog box and click Preferences.
11 How to scan to a computer Scanning a document 11 There are several ways to scan documents. You can use the SCAN key on the machine or the scanner drivers on your computer. a To use the machine as a scanner, you must install a scanner driver. If the machine is on a Network, configure it with a TCP/IP address. Install the scanner drivers on the CD-ROM.
How to scan to a computer Scanning using a scanner driver 11 uuSoftware User’s Guide: Scanning a document using the TWAIN driver (Windows®) uuSoftware User’s Guide: Scanning a document using the WIA driver (Windows®) Scanning using the ControlCenter 11 uuSoftware User’s Guide: ControlCenter4 (Windows®) uuSoftware User’s Guide: ControlCenter2 (Macintosh) uuSoftware User’s Guide: Scanning a document using the TWAIN driver (Macintosh) uuSoftware User’s Guide: Scanning a document using the ICA driver (Ma
A Routine maintenance Replacing the ink cartridges Your machine is equipped with an ink dot counter. The ink dot counter automatically monitors the level of ink in each of the four cartridges. When the machine detects an ink cartridge is running out of ink, the machine will display a message on the screen. The screen will show which ink cartridge is low or needs replacing. Be sure to follow the screen prompts to replace the ink cartridges in the correct order.
Routine maintenance b Press the lock release lever as shown to release the cartridge for the color indicated on the screen. Remove the cartridge from the machine. d Turn the green release lever on the orange protective packing (1) clockwise until it clicks to release the vacuum seal. Then remove the orange protective packing as shown. 1 1 c Open the new ink cartridge bag for the color shown on the screen, and then take out the ink cartridge. e Each color has its own correct position.
f Gently push the back of the ink cartridge marked “PUSH” until it clicks, and then close the ink cartridge cover. IMPORTANT • DO NOT take out ink cartridges if you do not need to replace them. If you do so, it may reduce the ink quantity and the machine will not know the quantity of ink left in the cartridge. • DO NOT touch the cartridge insertion slots. If you do so, the ink may stain your skin. • If ink gets on your skin or clothing immediately wash it off with soap or detergent.
Routine maintenance Cleaning and checking the machine Cleaning the scanner Note A A a Unplug the machine from the AC power outlet. b Lift the document cover (1). Clean the scanner glass (2) and the white plastic (3) with a soft lint-free cloth moistened with a non-flammable glass cleaner. In addition to cleaning the scanner glass and glass strip with a non-flammable glass cleaner, run your fingertip over the glass to see if you can feel anything on it.
Cleaning the print head To maintain good print quality, the machine will automatically clean the print head when needed. You can start the cleaning process manually if there is a print quality problem. Clean the print head if you get a horizontal line in the text or graphics, or blank text on your printed pages. You can clean Black only, three colors at a time (Yellow/Cyan/Magenta), or all four colors at once. Cleaning the print head consumes ink. Cleaning too often uses ink unnecessarily.
Routine maintenance j k After the cleaning procedure is finished, press Start. The machine starts printing the Print Quality Check Sheet again and then return to step f. Press Stop/Exit. If you repeat this procedure at least five times and the print quality is still poor, replace the ink cartridge for the clogged color. After replacing the ink cartridge, check the print quality. If the problem still exists, repeat the cleaning and test print procedures at least five times for the new ink cartridge.
B Troubleshooting Error and Maintenance messages As with any sophisticated office product, errors may occur and consumable items may need to be replaced. If this happens, your machine identifies the problem and shows an error message. The most common error and maintenance messages are shown below. You can correct most errors and clear routine maintenance messages by yourself. If you need more help, the Brother Solutions Center offers the latest FAQs and troubleshooting tips. Visit us at http://solutions.
Troubleshooting Error Message Cause Action B&W Print Only One or more of the color ink cartridges have reached the end of their life. Replace the ink cartridges. (See Replacing the ink cartridges uu page 58.) Replace Ink You can use the machine in black & white mode for approximately four weeks depending on the number of pages you print.
Error Message Cause Action Cannot Print One or more of the ink cartridges have reached the end of their life. The machine will stop all print operations. While memory is available, black & white faxes will be stored in the memory. If a sending machine has a color fax, the machine's “handshake” will ask that the fax be sent as black & white. If the sending machine has the ability to convert it, the color fax will be stored in the memory as a black & white fax. Replace the ink cartridges.
Troubleshooting Error Message Cause Action Ink Absorber Full The ink absorber box or flushing box is full. These components are periodic maintenance items that may require replacement after a period of time to ensure optimum performance from your Brother machine. Because these components are periodic maintenance items, the replacement is not covered under the warranty.
Error Message Cause Action Ink low One or more of the ink cartridges are near the end of their life. If one of the color ink cartridges is near the end of its life and someone is sending you a color fax, your machine’s “handshake” will ask that the fax be sent as black & white. If the sending machine has the ability to convert it, the color fax will be printed at your machine as a black & white fax. Order a new ink cartridge. You can continue printing until the screen shows Cannot Print.
Troubleshooting Error Message Cause Action No Paper Fed The machine is out of paper or paper is not properly loaded in the paper tray. Do one of the following: Refill the paper in the paper tray, and then press Black Start or Color Start. Remove the paper and load it again, and then press Black Start or Color Start. (See Loading paper and other print media uu page 12.) The paper is jammed in the machine. Remove the jammed paper by following the steps in Printer jam or paper jam uu page 75.
Error Message Cause Action Out of Memory The machine's memory is full. If a copy operation is in process: Press Stop/Exit and wait until the other operations in progress finish, and then try again. Paper Jam [Front] The memory card or USB Flash memory drive you are using does not have enough free space to scan the document. Press Stop/Exit. Paper is jammed in the machine. Remove the jammed paper by following the steps in Paper is jammed at the front of the machine uu page 75.
Troubleshooting Error Message Cause Action Unable to CleanXX The machine has a mechanical problem. Open the scanner cover and remove any foreign objects and paper scraps from inside the machine. If the error message continues, disconnect the machine from the power for several minutes and reconnect it. Unable to Init.XX Unable to PrintXX Unable to ScanXX Unusable Device Disconnect device from front connector & turn machine off & then on Unusable Device Please Disconnect USB Device.
Error animation B g If the screen shows No Data, there are no faxes left in the machine's memory. Error animations display step-by-step instructions when paper gets jammed. You can read the steps at your own pace by pressing t to see the next step and s to go back a step. Transferring your faxes or Fax Journal report Press Stop/Exit. Enter the fax number to which faxes will be forwarded. h Transferring faxes to your PC You can transfer the faxes from your machine's memory to your PC.
Troubleshooting Transferring the Fax Journal report to another fax machine If you have not set up your Station ID, you cannot enter fax transfer mode. (uuQuick Setup Guide: Set your Station ID) a Press Stop/Exit to interrupt the error temporarily. b c d e f g Press Menu. h Press Black Start. Press s or t to display Service. Press Service. Press Data Transfer. Document jam B B Documents can jam in the ADF unit if they are not inserted or fed properly, or if they are too long.
Document is jammed inside the ADF unit a Take out any paper from the ADF that is not jammed. b c Lift the document cover. d e 74 B Removing small documents jammed in the ADF a b Lift the document cover. c d Close the document cover. Pull the jammed document out to the right. Close the document cover. Press Stop/Exit. Insert a piece of stiff paper, such as cardstock, into the ADF to push any small paper scraps through. Press Stop/Exit.
Troubleshooting Printer jam or paper jam B d Lift the Jam Clear Flap, and remove the jammed paper. e Put the paper tray firmly back in the machine. Take out the jammed paper depending on where it is jammed in the machine. Paper is jammed at the front of the machine B If the screen shows Paper Jam [Front], follow these steps: a Unplug the machine from the AC power outlet. b Pull the paper tray (1) completely out of the machine. 1 c Pull out the jammed paper (1).
Paper is jammed at the back of the machine d Close the Jam Clear Cover. Make sure the cover is closed properly. e Re-connect the power cord. B If the screen shows Paper Jam [Rear], follow these steps: a Unplug the machine from the AC power outlet. b Open the Jam Clear Cover (1) at the back of the machine. 1 c 76 Pull the jammed paper out of the machine.
Troubleshooting Paper is jammed at the front and back of the machine d Lift the Flap, and remove the jammed paper. (With tray removed, go to step e.) e Open the Jam Clear Cover (1) at the back of the machine. B If the screen shows PaperJam Front,Rear, follow these steps: a Unplug the machine from the AC power outlet. b Pull the paper tray (1) completely out of the machine. 1 c Pull out the jammed paper (1).
f g Pull the jammed paper out of the machine. Close the Jam Clear Cover. Make sure the cover is closed properly. h Put the paper tray firmly back in the machine. i Using both hands, use the finger holds on each side of the machine to lift the scanner cover (1) into the open position. Move the print head (if necessary) to take out any paper remaining in this area. Make sure that jammed paper is not left in the corners of the machine (2) and (3).
Troubleshooting IMPORTANT j • If the paper is jammed under the print head, unplug the machine from the power source, and then move the print head to take out the paper. Lift the scanner cover (1) to release the lock. Gently push the scanner cover support down (2) and close the scanner cover (3) using both hands. 1 • If the print head is in the right corner as shown in the illustration, you cannot move the print head. Re-connect the power cord.
Additional paper jam clear operations a Prepare one sheet of thick letter or A4 sized paper, such as glossy paper, and insert it into the machine in the landscape orientation through the opening as shown, until you feel it grab the paper. B c Lift the scanner cover (1) to release the lock. Gently push the scanner cover support down (2) and close the scanner cover (3) using both hands. The paper you inserted will be fed through the machine and ejected. 1 3 2 Note We recommend you use glossy paper.
Troubleshooting Troubleshooting B IMPORTANT For technical help, you must call the country where you bought the machine. Calls must be made from within that country. If you think there is a problem with your machine, check the chart below and follow the troubleshooting tips. Most problems can be easily resolved by yourself. If you need additional help, the Brother Solutions Center offers the latest FAQs and troubleshooting tips. Visit us at http://solutions.brother.com/.
If you are having difficulty with your machine B Printing Difficulty Suggestions No printout. Check the interface cable or wireless connection on both the machine and your computer. (uuQuick Setup Guide) Check that the machine is plugged in and that the On/Off key is on. One or more ink cartridges have reached the end of their life. (See Replacing the ink cartridges uu page 58.) Check to see if the screen is showing an error message. (See Error and Maintenance messages uu page 64.
Troubleshooting Printing (continued) Difficulty Suggestions Poor print quality. Check the print quality. (See Checking the print quality uu page 62.) Make sure that the Media Type setting in the printer driver or the Paper Type setting in the machine’s menu matches the type of paper you are using. See Paper Type uu page 19. uuSoftware User’s Guide: Printing (Windows®) uuSoftware User’s Guide: Printing and Faxing (Macintosh) Make sure that your ink cartridges are fresh.
Printing (continued) Difficulty Suggestions The printouts are wrinkled. (Windows® users) In the printer driver Advanced tab, click Color Settings, and uncheck Bi-Directional Printing. (Macintosh users) In the printer driver, choose Print Settings, click Advanced, choose Other Print Options, and uncheck Bi-Directional Printing. Make sure you are using Genuine Brother Innobella™ Ink. Cannot perform “Page Layout” printing.
Troubleshooting Printing (continued) Difficulty Suggestions Machine does not print from Try to reduce the print resolution. Adobe® Illustrator®. uuSoftware User’s Guide: Printing (Windows®) uuSoftware User’s Guide: Printing and Faxing (Macintosh) Ink is smudged or running when using glossy photo paper. Make sure to check the front and back of the paper. Place the glossy surface (printing surface) face down. (See Paper Type uu page 19.
Printing Received Faxes Difficulty Suggestions Condensed print and white streaks across the page or the top and bottom of sentences are cut off. You probably had a bad connection, with static or interference on the telephone line. Ask the other party to send the fax again. Vertical black lines when receiving. The sender's scanner may be dirty. Ask the sender to make a copy to see if the problem is with the sending machine. Try receiving from another fax machine.
Troubleshooting Receiving Faxes Difficulty Suggestions Cannot receive a fax. Make sure your machine has a dial tone by pressing the Hook key. If you hear static or interference on your fax line, please contact your local telephone company. Check all line cord connections. Make sure the telephone line cord is plugged into the telephone wall jack and the LINE jack of the machine. If you subscribe to DSL, VoIP or MagicJack services, please contact your service provider for connection instructions.
Receiving Faxes (continued) Difficulty Suggestions Cannot receive a fax. If you are using a telephone answering machine (External TAD mode) on the same line as the Brother machine, make sure your answering machine is set up correctly. (See Connecting an external TAD (telephone answering device) uu page 39.) (continued) 1 Plug the telephone line cord directly from the wall telephone jack to your Brother machine’s LINE jack. 2 Remove the protective cap from your Brother machine’s EXT.
Troubleshooting Sending Faxes Difficulty Suggestions Cannot send a fax. Check all line cord connections. Make sure the telephone line cord is plugged into the telephone wall jack and the LINE jack of the machine. Make sure that the FAX key is illuminated. Ask the other party to check that the receiving machine has paper. Print the Transmission Verification Report and check for an error. (uuAdvanced User’s Guide: Reports) Transmission Verification Report says “RESULT:NG”.
Handling Incoming Calls (continued) Difficulty Suggestions Custom features on a single line. If you have Call Waiting, Call Waiting/Caller ID, Voice Mail, an alarm system or other custom feature on a single telephone line with your machine, it may create a problem sending or receiving faxes.
Troubleshooting Software Difficulties Difficulty Suggestions Cannot install software or print. (Windows® users only) Run the Repair MFL-Pro Suite program on the CD-ROM. This program will repair and reinstall the software. “Device Busy” Make sure the machine is not showing an error message on the screen. Cannot print images from FaceFilter Studio. To use FaceFilter Studio, you must install the FaceFilter Studio application from the CD-ROM supplied with your machine.
Network Difficulties (continued) Difficulty Suggestions The network scanning feature does not work. It is necessary to configure the third-party Security/Firewall Software to allow Network scanning. To add port 54925 for Network scanning, enter the information below: In Name: Enter any description, for example Brother NetScan. In Port number: Enter 54925. In Protocol: UDP is selected.
Troubleshooting Dial Tone Setting the dial tone to Detection will shorten the dial detect pause. a b c d e f g Press Menu. Press s or t to display Initial Setup. Press Initial Setup. Press s or t to display Dial Tone. Press Dial Tone. Press Detection or No Detection. B Telephone line interference / VoIP B If you are having problems sending or receiving a fax due to possible interference on the telephone line, we recommend that you change the modem speed to minimize errors in fax operations.
Machine Information Checking the serial number 3 All Settings B You can restore all settings to their factory defaults. B You can see the machine’s serial number on the screen. a b c d e Brother strongly recommends performing this procedure before handing over or disposing of the machine. Note Press Menu. Unplug the interface cable before you choose Network or All Settings. Press s or t to display Machine Info. Press Machine Info. How to reset the machine Press Serial No. Press Stop/Exit.
C Menu and features On-screen programming Your machine is designed to be easy to operate with on-screen programming using the menu buttons on the screen. Userfriendly programming helps you take full advantage of all the menu selections your machine has to offer. C Memory Storage C C Even if there is a power failure, you will not lose your menu settings because they are stored permanently. Temporary settings (such as Overseas Mode) will be lost. You may have to reset the time and date.
Menu table C The menu table will help you understand the menu selections and options that are found in the machine's programs. The factory settings are shown in Bold with an asterisk. Menu C Level1 Level2 Level3 Options Descriptions Page Favorite Settings Copy — Quality Lets you quickly and easily recall and apply your previously registered preferred settings.
Menu and features Level1 Level2 Level3 Options Descriptions Page General Setup Ink Test Print Print Quality Lets you check the print quality or alignment. 62 Lets you clean the print head. 62 See Alignment Cleaning Black Color All Mode Timer Ink Volume — Lets you check the available ink volume. — Off Sets the length of time before the machine will return to FAX mode and before the machine will change from a restricted user to Public user mode when using Secure Function Lock.
Level1 Level2 Level3 Options Descriptions Page General Setup Volume Ring Off Adjusts the ring volume. See (Continued) Low Med* High Beeper Off Low* Adjusts the beeper volume. Med High Speaker Off Low Adjusts the speaker volume. Med* High Auto Daylight — On Off* LCD Settings Adjust the contrast of the LCD. LCD Contrast Backlight Change this setting to On if you want the machine to change automatically for Daylight Saving Time.
Menu and features Level1 Level2 Level3 Options Descriptions Page General Setup LGR - Short Grain — On Turn on this setting when you use Ledger short grain paper. 20 You can restrict selected machine operation for up to 10 restricted users and for all other non-authorized Public users. See Sets the number of rings before the machine answers in Fax Only or Fax/Tel mode. 34 Sets the length of the pseudo/double-ring time in Fax/Tel mode.
Level1 Level2 Level3 Options Descriptions Page Fax Setup Speed Dial Set Speed Dial Add Number You can store Speed Dial numbers, so you can dial by pressing only a few buttons on the screen (and Start). 45 (Continued) Add Number from History Report Setting See Setup Groups — You can set up Group numbers for Broadcasting. Change — You can change Speed Dial numbers. Delete — You can delete Speed Dial numbers.
Menu and features Network menu C Level1 Level2 Level3 Level4 Options Descriptions Page Network Wired LAN TCP/IP BOOT Method Auto* Choose the BOOT method that best suits your needs. See Static RARP . BOOTP DHCP IP Address [000-255]. [000-255]. Enter the IP address. [000-255]. [000-255] Subnet Mask [000-255]. [000-255]. Enter the Subnet mask. [000-255]. [000-255] Gateway [000-255]. [000-255]. Enter the Gateway address. [000-255].
Level1 Level2 Level3 Level4 Options Descriptions Page Network Wired LAN TCP/IP IPv6 On See (Continued) (Continued) (Continued) Enable or disable the IPv6 protocol. If you want to use the IPv6 protocol, visit http://solutions. brother.com/ for more information. Ethernet Off* — Auto* 100B-FD Chooses the Ethernet link mode. 100B-HD 10B-FD 10B-HD WLAN MAC Address — — You can see your machine’s MAC address.
Menu and features Level1 Level2 Level3 Level4 Options Descriptions Page Network WLAN TCP/IP WINS Server (Continued) (Continued) Specifies the IP address of the primary or secondary WINS server. See (Continued) (Primary) 000.000.000.000 (Secondary) 000.000.000.000 DNS Server (Primary) 000.000.000.000 (Secondary) 000.000.000.000 APIPA On* Off IPv6 On Off* . Specifies the IP address of the primary or secondary DNS server.
Level1 Level2 Level3 Level4 Options Descriptions Page Network WLAN WLAN Status Status — See (Continued) (Continued) You can see the current wireless network status. Signal — You can see the current wireless network signal strength. SSID — You can see the current SSID. Comm. Mode — You can see the current Communication Mode. MAC Address — — You can see your machine’s MAC address. Email Address — — Enter the mail address.
Menu and features Level1 Level2 Level3 Level4 Options Descriptions Page Network Email/IFax Setup Server Mailbox Name — See (Continued) (Available after IFAX is downloaded) (Continued) Enter the mail box name. (Up to 60 characters) Mailbox Pwd — Enter the password to login to the POP3 server. (Up to 32 characters) APOP On Enables or disables APOP. . (Continued) Off* Setup Mail RX Auto Polling On* Off Poll Frequency 1Min (Available when Auto Polling is set to On.
Level1 Level2 Level3 Level4 Options Descriptions Page Network Email/IFax Setup Relay Rly Broadcast On See (Continued) (Available after IFAX is downloaded) Relays a document to another fax machine over the Internet. Off* (Continued) Relay Domain — Registers the Domain name. Relay Report On Prints the Relay Broadcast Report. Off* Time Zone — UTCXXX:XX — Sets the time zone for your country. Network I/F — Wired LAN* — You can choose the network connection type.
Menu and features Menu (continued) C Level1 Level2 Level3 Options Descriptions Page Print Reports Transmission — — See Quick Dial — Alphabetical Order Prints these lists and reports. . Numerical Order Fax Journal — — User Settings — — Network Config — — WLAN Report — — Caller ID hist. — — Machine Info. Serial No. — — Lets you check the serial number of your machine. 94 Initial Setup Receive Mode — Fax Only* Choose the Receive Mode that best suits your needs.
Level1 Level2 Level3 Options Descriptions Page Initial Setup Reset Network — Resets the print server back to its factory default settings, such as the password and IP address information. 94 Speed Dial&Fax — Deletes all stored Speed Dial numbers and faxes, restores the Station ID, Quick Dial List, Transmission Verification Report and Fax Journal back to the factory default settings. All Settings — Resets all the machine’s settings back to the factory settings.
Menu and features FAX ( ) C Level1 Level2 Level3 Options Descriptions Page History Outgoing Send a fax — See More Add Speed Dial You can choose a number from the Outgoing Call history and then send a fax to it, add it to Speed Dial, or delete it. Delete Incoming Send a fax — More Add Speed Dial Delete SpeedDial — You can choose a number from the Caller ID history and then send a fax to it, add it to Speed Dial, or delete it.
Level1 Level2 Level3 Options Descriptions Page Options Batch TX — On Combines delayed faxes to the same fax number at the same time of day into one transmission.
Menu and features Level1 Level2 Level3 Options Descriptions Page Options Set New Default — Fax Resolution You can save your fax settings. See (Continued) Contrast . Real Time TX Glass ScanSize Factory Reset — — You can restore all settings back to the factory settings. See Advanced User’s Guide. The factory settings are shown in Bold with an asterisk.
SCAN ( ) C Level1 Option1 Option2 Option3 Descriptions Page Scan to File — — — You can scan a black & white or a color document into your computer. See Scan to Media (when a memory card or USB Flash memory drive is inserted) Start — — Lets you scan directly to a memory card or USB Flash memory drive. 54 Options Quality Color 100 dpi You can choose the scan resolution and file format for your document. 54 Color 200 dpi* .
Menu and features Level1 Option1 Option2 Option3 Descriptions Page Scan to email PC — — You can scan a black & white or a color document into your E-mail application. See E-mail Server Manual — (Available after IFAX is downloaded) Speed Dial You can scan a black & white or a color document into your E-mail Server. . Manual: You can enter an E-mail address using the buttons on the LCD. Speed Dial: You can search for an E-mail address that you have stored in the machine.
Level1 Option1 Option2 Option3 Descriptions Page Scan to email E-mail Server Manual Set New Default See (Continued) (Available after IFAX is downloaded) Speed Dial (Options) You can save your scan settings. (Continued) Quality File Type (Continued) Factory Reset You can restore all settings back to the factory settings. — — — You can have your text document converted to an editable text file. Scan to Image — — — You can scan a color picture into your graphics application.
Menu and features COPY ( ) C Level1 Level2 Level3 Options Descriptions Page Black Start — — — Lets you make a monochrome copy. 47 Color Start — — — Lets you make a color copy. Options Quality — Fast Choose the Copy resolution for the next copy. See Choose the paper type that matches the paper in the tray. 48 Choose the paper size that matches the paper in the tray. 49 Normal* .
Level1 Level2 Level3 Options Descriptions Page Options Enlarge/Reduce 100%* — — See Enlarge 198% 4"x6"iA4 You can choose the enlargement ratio for the next copy. (Continued) 186% 4"x6"iLTR 130% LTRiLGR 104% EXEiLTR Reduce 97% LTRiA4 93% A4iLTR You can choose the reduction ratio for the next copy. 85% LTRiEXE 83% LGLiA4 78% LGLiLTR 46% LTRi4"x6" Density Fit to Page — Your machine will adjust the size automatically to the paper size you set.
Menu and features Level1 Level2 Level3 Options Descriptions Page Options Duplex Copy Off* — You can choose the duplex print settings. See Portrait LongEdgeFlip — Landscape LongEdgeFlip — Portrait ShortEdgeFlip — Landscape ShortEdgeFlip — Advanced Normal* (Continued) . Duplex1 Duplex2 Advanced Settings — Off* Ink Save Mode Thin Paper Copy You can choose various copy settings such as Thin Paper Copy and Book Copy.
PHOTO ( ) C Level1 Level2 Level3 Options Descriptions Page View Photos OK Start — You can print your chosen photos. 53 Options For details, see the Options in the following table. You can adjust your photos with the options. See Start — — You can print all photos in your memory card or USB Flash memory drive. Options — For details, see the Options in the following table. You can adjust your photos with the options.
Menu and features Options (for PHOTO) C Option1 Option2 Option3 Option4 Descriptions Page Print Quality Normal — — Choose the print quality. See (Does not appear when DPOF Print is chosen.) Photo* Paper Type Plain Paper — — Choose the paper type. (When A4 or Letter is chosen) — Choose the paper and print size. — — Adjusts the brightness. — — Adjusts the contrast. . Inkjet Paper Brother BP71 Brother BP61 Other Glossy* Paper Size 4"x6"* 5"x7" 3"x4" Letter Ledger 3.
Option1 Option2 Option3 True2Life On White Balance Option4 -2 Off* Descriptions Page Adjusts the hue of the white areas. See -1 0 +1 +2 Sharpness -2 Enhances the detail of the image. -1 0 +1 +2 Color Density -2 Adjusts the total amount of color in the image. -1 0 +1 +2 Cropping On* — — Crops the image around the margin to fit the paper size or print size. Turn this feature off if you want to print whole images or prevent unwanted cropping.
Menu and features Option1 Option2 Option3 Option4 Descriptions Page Factory Reset — — — You can restore all the settings back to the factory settings. See . See Advanced User’s Guide. The factory settings are shown in Bold with an asterisk. Options (for Index Sheet) C Level1 Level2 Level3 Options Descriptions Page Paper Type Plain Paper* — — Choose the paper type. See — — Choose the paper size. .
History C Level1 Level2 Level3 Options Descriptions Page History Outgoing Send a fax — See More Add Speed Dial You can choose a number from the Outgoing Call history and then send a fax to it, add it to Speed Dial, or delete it. Delete Incoming Send a fax — More Add Speed Dial Delete . You can choose a number from the Caller ID history and then send a fax to it, add it to Speed Dial, or delete it. See Advanced User’s Guide. The factory settings are shown in Bold with an asterisk.
Menu and features Entering Text C When you are setting certain menu selections, you may need to enter text into the machine. Press to cycle between letters, numbers and special characters. By pressing the proper button repeatedly, you can access the character you want. Inserting spaces To enter a space, press C to choose special characters, then press the space button or . Or, you can press the c twice to move the cursor. Note The characters available may differ depending on your country.
D Specifications D General D Note This chapter provides a summary of the machine’s specifications. For additional specifications visit http://www.brother.com/ for details. Printer Type Inkjet Print Head Black: Piezo with 210 nozzles 1 Color: Piezo with 210 nozzles 3 Memory Capacity 64 MB LCD (Liquid Crystal Display) 1.9 in. (49.0 mm) STN Color LCD Touchscreen plus Touchpanel controls 1 Power Source AC 100 to 120 V 50/60 Hz Power Consumption 2 Copy Mode: Approx.
Specifications Dimension 11.3 in. 10.2 in. (286 mm) (260 mm) 20.2 in. (514 mm) 21.8 in. (554 mm) 18.1in. (461 mm) 22.8 in. (580 mm) Weight 30.0 lb (13.6 kg) Noise Operating: 50 dB or less 1 Temperature Operating: 50 to 95 F (10 to 35 C) Best Print Quality: 68 to 91 F (20 to 33 C) Operating: 20 to 80% (without condensation) Best Print Quality: 20 to 80% (without condensation) Humidity ADF (automatic document feeder) Up to 35 pages Document Size ADF Width: 5.8 in. to 8.5 in.
Print media Paper Input D Paper Tray Paper Type: Plain Paper, Inkjet Paper (coated paper), Glossy Paper 1 and Transparency 1 2 Paper Size: Letter, Ledger, A3, Legal, Executive, A4, A5, A6, Envelopes (commercial No.10, DL, C5, Monarch), Photo 4" 6", Photo L 3.5" 5", Photo 2L 5" 7" and Index Card 5" 8" 3 Width: 3.5 in. - 11.7 in. (89 mm - 297 mm) Length: 5.0 in. - 17 in. (127 mm - 431.8 mm) For more details, see Paper weight, thickness and capacity uu page 23.
Specifications Fax D Compatibility ITU-T Super Group 3 Modem Speed Automatic Fallback 33,600 bps Scanning Width 8.2 in. (208 mm) (Letter) Printing Width 10.76 in. (273.4 mm) (Ledger) 11.5 in.
Copy D Color/Black Yes/Yes Copy Width Max. 8.26 in. (210 mm) Multiple Copies Stacks/Sorts up to 99 pages Enlarge/Reduce 25% to 400% (in increments of 1%) Resolution Prints up to 1200 1200 dpi Duplex (2-sided) Yes Paper Type: Plain paper Paper Size: Letter, Ledger 1, A3 1, Legal, A4, A5, Executive 1 Minimum top and bottom margins of 0.87 in.
Specifications PhotoCapture Center™ D Compatible Media 1 Memory Stick™ (16 MB - 128 MB) Memory Stick PRO™ (256 MB - 32 GB) (Not available for music data with MagicGate™) Memory Stick Duo™ (16 MB - 128 MB) Memory Stick PRO Duo™ (256 MB - 32 GB) Memory Stick Micro™ (M2™) with Adapter (256 MB - 32 GB) MultiMedia Card (32 MB - 2 GB) MultiMedia Card plus (128 MB - 4 GB) MultiMedia Card mobile with Adapter (64 MB - 1 GB) SD Memory Card (16 MB - 2 GB) miniSD with Adapter (16 MB - 2 GB) microSD with Adapter (16
PictBridge Compatibility D Supports the Camera & Imaging Products Association PictBridge standard CIPA DC-001. Visit http://www.cipa.jp/pictbridge/ for more information.
Specifications Scanner D Color/Black Yes/Yes TWAIN Compliant Yes (Windows® XP 1/Windows Vista®/Windows® 7) Mac OS X 10.4.11, 10.5.x, 10.6.x 2 WIA Compliant Yes (Windows® XP 1/Windows Vista®/Windows® 7) ICA Compliant Yes (Mac OS X 10.6.
Printer D Resolution Up to 1200 6000 dpi Printing Width 3 10.76 in. [11 in. (borderless) 1] Borderless 2 Letter, A4, Ledger, A3, A6, Photo 4" 6", Index Card 5" 8", Photo L 3.5" 5", Photo 2L 5" 7" Duplex (2-sided) Paper Type: Plain paper Paper Size: Letter, A4, Ledger 5, A3 5, Legal, A5, A6, Executive Print Speed 4 1 When the Borderless feature is set to On. 2 See Paper type and size for each operation uu page 22. 3 When printing on Ledger size paper.
Specifications Interfaces D USB 1 2 Use a USB 2.0 interface cable that is no longer than 6 feet (2 m). LAN 3 Use an Ethernet UTP cable category 5 or greater. Wireless LAN IEEE 802.11b/g/n (Infrastructure/Ad-hoc Mode) 1 Your machine has a USB 2.0 Hi-Speed interface. The machine can also be connected to a computer that has a USB 1.1 interface. 2 Third party USB ports are not supported. 3 See Network (LAN) uu page 136.
Computer requirements D SUPPORTED OPERATING SYSTEMS AND SOFTWARE FUNCTIONS Supported PC Software Functions PC Interface Windows® XP Home 1 4 Printing, PC Fax 3, Windows® XP Scanning, Professional 1 4 Removable ® Windows XP 5 Professional x64 Disk Edition 1 4 USB, 10/100 Base-TX (Ethernet), Wireless 802.
Specifications Consumable items D Ink The machine uses individual Black, Yellow, Cyan and Magenta ink cartridges that are separate from the print head assembly. Service Life of Ink Cartridge Starter ink cartridges are in the box. The first time you install the ink cartridges the machine will use extra ink to fill the ink delivery tubes. This is a one-time process that enables high quality printing. Afterward, replacement ink cartridges will print the specified number of pages.
Network (LAN) D Note For more information about the Network specifications, see the Network User’s Guide. LAN You can connect your machine to a network for Network Printing, Network Scanning, PC Fax Send, PC Fax Receive (Windows® only), Remote Setup, and access photos from PhotoCapture Center™ 1. Also included is Brother BRAdmin Light 2 Network Management software.
E Index E A D Accessories and supplies .......................... ii ADF (automatic document feeder) ...........24 Answering machine (TAD) .......................39 connecting ............................................40 Apple Macintosh See Software User's Guide. Automatic fax receive ............................................31 Easy Receive .....................................35 Data Ident-A-Call ..................................... 36 Dialing a pause ............................................
F I Favorite Settings ......................................10 changing ...............................................11 deleting .................................................11 recalling .................................................11 registering .............................................10 Fax codes changing ...............................................43 Fax Receive Code ......................... 35, 42 Telephone Answer Code ......................42 using .................................
P Q Paper .............................................. 20, 126 capacity .................................................23 loading ........................................... 12, 15 loading envelopes and postcards .........15 printable area ........................................18 size .......................................................19 size of document ...................................24 type ................................................
T W TAD (telephone answering device), external ............................................. 31, 39 connecting ...................................... 39, 40 Receive Mode .......................................31 recording OGM .....................................40 Teen Ring ................................................36 Telephone line connections ...........................................40 difficulties ..............................................86 interference / VoIP ............................
Brother International Corporation 100 Somerset Corporate Boulevard P.O. Box 6911 Bridgewater, NJ 08807-0911 USA Brother International Corporation (Canada) Ltd. 1 rue Hôtel de Ville, Dollard-des-Ormeaux, QC, Canada H9B 3H6 Visit us on the World Wide Web http://www.brother.com/ This machine is approved for use in the country of purchase only. Local Brother companies or their dealers will only support machines purchased in their own countries.