Secure Print+ User’s Guide User’s Guide © 2020 Brother Industries, Ltd. All rights reserved.
Definitions of Notes We use the following symbol throughout this User's Guide: Tips icons indicate helpful hints and supplementary information. Copyright Information in this document is subject to change without notice. The screens in this document are for illustration purposes only and may differ from the actual screens. The software described in this document is furnished under license agreements. The software may be used or copied only in accordance with the terms of those agreements.
Table of Contents 1. Introduction .......................................................................................................................................... 1 2. Configuration (Standalone Mode) ...................................................................................................... 3 2.1 Requirements ................................................................................................................................................... 3 2.
1. Introduction Brother's Secure Print+ solution improves print security and protects confidential documents. When a secure print job is sent to a Brother machine, it will not be printed until the authorized user releases it using an NFC ID card.
・ ・ To activate this solution, you need a valid license code and software that can send license codes to target machines. For more information, contact your local Brother office.
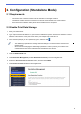
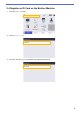
2. Configuration (Standalone Mode) 2.1 Requirements - The Secure Print+ software solution must be activated on the target machine. - The Brother machine must be connected to a network and accessible from a web browser. - Users must have a Brother native printer driver installed on their computers. 2.2 Enable Print Data Storage 1. Start your web browser. 2.
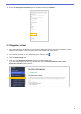
8. Ensure the Storage PC Print Data option is enabled, and then click Submit. 2.3 Register a User 1. Type “http://machine's IP address” in your browser's address bar (where “machine's IP address” is the IP address of the machine or the print server name). For example: http://192.168.1.2. 2. If the machine prompts you for a password, type it, and then click . 3. Click the Administrator tab. 4. Click one of the Restricted Functions options in the left navigation bar.
5. Type the name of the user profile you want to configure in the User List / Restricted Functions column. This is the User ID. We recommend using the user’s Windows login name as the user name. 6. Click Submit. 7. Click one of the User List options in the left navigation bar. If you are configuring Secure Print+ for the first time, click the first User List option in the list. 8. Type the new user’s name in the first free cell in the User List column. 9.
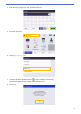
2.4 Register an ID Card on the Brother Machine 1. Press the [Public] profile. 2. Press [Change User]. 3. Press the user name you just registered in Web Based Management.
4. Enter the PIN you set for the user, and then press [OK]. 5. Press the user name. 6. Press [Register Card]. 7. Touch the ID card to the NFC symbol ( ) on the machine's control panel. The machine registers the ID number of the new NFC card. 8. Press [OK].
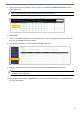
2.5 Verify User ID and ID Card Confirm that the ID card has been assigned correctly in Web Based Management. 1. Type “http://machine's IP address” in your browser's address bar (where “machine's IP address” is the IP address of the machine or the print server name). For example: http://192.168.1.2. 2. If the machine prompts you for a password, type it, and then click . 3. Click the Administrator tab. 4. Click Secure Function Lock in the left navigation bar. 5.
2.6 Test the New ID Card 1. Send a secure print job to the machine you configured. 2. Touch the ID card to the NFC symbol ( ) on the machine’s control panel to release the print job. If the job prints Give the ID card to the user. Select the print retrieval method and optimize print job storage (see section 4. Optional Settings). If the job does not print Confirm the following: - User settings are configured in the machine’s Web Based Management screen.
3. Configuration (Active Directory Mode) 3.1 Requirements Brother Machine Requirements - The target machine must support Active Directory® Authentication and be compatible with the Secure Print+ software solution’s Active Directory Mode. For more information, contact your local Brother office. - The Secure Print+ software solution must be activated on the target machine. - The Brother machine must be connected to a network and accessible from a web browser.
6. Select the Active Directory Authentication radio button, and then click Submit. 3.3 Enable Print Data Storage 1. Click the Administrator tab. 2. Click Active Directory Authentication. 3. Ensure the Storage PC Print Data option is enabled, and then click Submit.
3.4 Configure Active Directory Settings 1. In the Active Directory Server Address field, type the IP address or Fully Qualified Domain Name (FQDN) of your Active Directory server. If you are using the FQDN name, configure the DNS settings under Network > Wired or Wireless > Advanced Settings. 2. Specify the Active Directory Domain Name (also known as the NETBIOS name).
3. Select the protocol and authentication method used by your Active Directory server. The standard setting is “LDAP + kerberos”. If you selected any other authentication method, go to step 6. 4. Specify the LDAP Server Port number (Default: 389).
5. Specify the LDAP Search Root to indicate the part of your Active Directory server with which the Brother machine needs to communicate. Most modern Active Directory servers can help you configure this. Click the Fetch DNs button and then select the LDAP search root you want from the list. 6. Click Submit.
3.5 Configure LDAP Settings 1. Click the Administrator tab. 2. Click Active Directory Authentication. 3. Click LDAP. 4. Enable the LDAP Search option.
5. In the LDAP Server Address field, type the IP address or Fully Qualified Domain Name (FQDN) of your Active Directory server (1 – 64 ASCII characters). For example: 192.0.0.1, ldap.example.net. If you are using the FQDN name, configure the DNS settings under Network > Wired or Wireless > Advanced Settings. 6. Specify the Port number (1 – 65535, Default: 389).
7. Specify the Search Root option to indicate the part of your Active Directory server with which the Brother machine needs to communicate (1 – 255 UTF8 characters). For example: dc = example, ou = sales, o = company. Most modern AD servers can help you configure this. Click the Fetch DNs button and then select the LDAP search root you want from the list. 8. Select the Authentication method to connect to the LDAP server.
9. Depending on the authentication method you selected, do the following: For “Anonymous” Go to step 10. For “Simple” a. Type the Username and Password of the service account as follows: - Username: ID name (cn = admin, ou = sales, o = company) (1 – 255 UTF8 characters) - Password: Your service account password (1 – 32 UTF8 characters) b. Go to step 10. For “Kerberos” a.
11. Specify the attribute name necessary to connect to the LDAP server in the Attribute of Name field (1 – 64 ASCII characters, default: cn). 12. Click Submit. If the configuration is successful The Brother machine returns a search query from the LDAP address book, for example a user’s email address. If the configuration is unsuccessful The machine shows the appropriate error message. For more information, see section 6. Troubleshooting.
3.6 Configure the Card Reader Settings 1. Click the Administrator tab. 2. Click Card Reader Setting. If you use an external card reader Enable USB card reader support. If you use an internal card reader a. Enable Internal NFC reader. b. Select the supported types of the internal NFC card reader from the Supported Types drop-down list (ALL/MIFARE/my-d/Tag-it/ICODE/FeliCa, Default: ALL). c.
3.7 Test the New ID Card 1. Send a secure print job to the machine you configured. 2. Touch the ID card to the NFC symbol ( ) on the machine’s control panel to release the print job. If the job prints Give the ID card to the user. Select the print retrieval method and optimize print job storage (see section 4. Optional Settings). If the job does not print Confirm the following: - The ID registered in Active Directory matches the NFC card’s ID.
4. Optional Settings 4.1 Enable the Job List Enable the print job list so users are required to select their secure print jobs instead of allowing the machine to release them automatically. Access the print job list from the machine’s control panel by pressing Secure Print on either the Home Screen or the Functions screen. 1. Start your web browser. 2. Type “http://machine's IP address” in your browser's address bar (where “machine's IP address” is the IP address of the machine or the print server name).
4.2 Purge Uncollected Jobs We recommend optimizing Secure Print+ to avoid running out of memory on your Brother machine. If the machine’s memory is full, the machine stops printing and does not accept any new secure print jobs. Configure your machine to purge any uncollected print jobs from its memory. 1. Start your web browser. 2. Type “http://machine's IP address” in your browser's address bar (where “machine's IP address” is the IP address of the machine or the print server name).
5. Usage - 5.1 If the Job List is Disabled - 5.2 If the Job List is Enabled 5.1 If the Job List is Disabled 1. Send a secure print job to your Brother machine. 2. Touch your ID card to the NFC symbol ( ) on the machine's control panel. 3. Your user name appears in the top left corner and your print job is released. 5.2 If the Job List is Enabled - 5.2.1 If the print job is sent before you log into the machine - 5.2.2 If you are already logged into the machine and then send a print job 5.2.
5.2.2 If you are already logged into the machine and then send a print job 1. Send a secure print job to your Brother machine. 2. On the Home Screen, press the Secure Print+ icon. 3. Select the print job you want, and then press [Print]. ・ ・ ・ ・ Print jobs are stored in the machine’s memory only until the job is released. Secure print jobs cannot be collected from other machines. If an unauthorized user tries to print a secure job, an error notification appears.
6. Troubleshooting 6.1 General Error Solution No Data Stored No jobs are stored in the machine’s memory. Send a print job to the machine. Out of Memory Clear the error by pressing [X], and then turn the machine off and on again. Secure Print+ uses between 20% and 30% of the Brother machine’s memory. If the number or size of unreleased documents exceeds the machine’s memory, the machine stops printing and does not accept any new jobs. 6.
Visit us on the World Wide Web global.