
Basic User's Guide
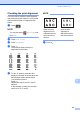


Table Of Contents
- Basic User’s Guide MFC-J6520DW MFC-J6720DW
- Brother numbers
- Ordering accessories and supplies
- Notice - Disclaimer of Warranties (USA and Canada)
- Compilation and Publication Notice
- User's Guides and where do I find them?
- Table of Contents
- 1 General information
- 2 Loading paper
- 3 Loading documents
- 4 Sending a fax
- 5 Receiving a fax
- 6 Using PC-FAX
- 7 Telephone services and external devices
- 8 Dialing and storing numbers
- 9 Making copies
- 10 PhotoCapture Center™: Printing photos from a memory card or USB Flash drive
- 11 How to print from a computer
- 12 How to scan to a computer
- A Routine maintenance
- B Troubleshooting
- C Settings and features tables
- D Specifications
- Index
- brother USA/CAN

100
Setting the date and
time
A
The Touchscreen displays the date and time.
If it is not current, re-enter it here.
You can add the date and time to each fax
you send by setting your Station ID.
a Press (Settings).
b Press All Settings.
c Press a or b to display
Initial Setup.
d Press Initial Setup.
e Press a or b to display Date & Time.
f Press Date & Time.
g Press Date.
h Enter the last two digits of the year on
the Touchscreen, and then press OK.
i Enter the two digits for the month on the
Touchscreen, and then press OK.
j Enter the two digits for the day on the
Touchscreen, and then press OK.
k Press Clock Type.
l Press 12h Clock or 24h Clock.
m Press Time.
n To enter the time, do one of the
following:
If you chose 12h Clock in step l,
enter the time (in 12-hour format)
using the keyboard on the
Touchscreen, and then press AM or
PM.
Press OK.
If you chose 24h Clock in step l,
enter the time (in 24-hour format)
using the keyboard on the
Touchscreen.
Press OK.
(For example, enter 19:45 for
7:45 PM.)
o Press .