
Basic User's Guide
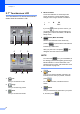
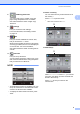
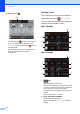
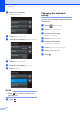
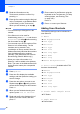
Table Of Contents
- Basic User’s Guide MFC-J6520DW MFC-J6720DW
- Brother numbers
- Ordering accessories and supplies
- Notice - Disclaimer of Warranties (USA and Canada)
- Compilation and Publication Notice
- User's Guides and where do I find them?
- Table of Contents
- 1 General information
- 2 Loading paper
- 3 Loading documents
- 4 Sending a fax
- 5 Receiving a fax
- 6 Using PC-FAX
- 7 Telephone services and external devices
- 8 Dialing and storing numbers
- 9 Making copies
- 10 PhotoCapture Center™: Printing photos from a memory card or USB Flash drive
- 11 How to print from a computer
- 12 How to scan to a computer
- A Routine maintenance
- B Troubleshooting
- C Settings and features tables
- D Specifications
- Index
- brother USA/CAN

Chapter 1
16
l Review the settings you have chosen:
If you need to make more changes,
return to step i.
If you are satisfied with your
changes, press
Save as Shortcut.
m Review your settings on the
Touchscreen, and then press OK.
n Enter a name for the Shortcut using the
keyboard on the Touchscreen. (For help
entering letters, see Entering Text
on page 186.)
Press OK.
o Read the information on the
Touchscreen, and then press OK to save
your Shortcut.
Adding Web Connect
Shortcuts 1
The settings for the following services can be
included in a Web Connect Shortcut:
SKYDRIVE
®
BOX
GOOGLE DRIVE™
EVERNOTE
®
DROPBOX
FACEBOOK
PICASA WEB ALBUMS™
FLICKR
®
NOTE
• Web services may have been added
and/or service names may have been
changed by the provider since this
document was published.
• To add a Web Connect Shortcut, you
need to have an account with the desired
service. (For more information, see Web
Connect Guide.)
a Press (Shortcuts).
b Press where you have not added a
Shortcut.
c Press a or b to display Web.
d Press Web.
e If information about the Internet
connection is displayed, read and
confirm it by pressing OK.
f Press a or b to display the available
services, and then press the desired
service.
g Press your account.
If the account needs a PIN, enter the
PIN for the account using the keyboard
on the Touchscreen.
Press OK.
h Choose the function you want to use.
NOTE
The available functions vary depending on
the chosen service.
i Read and confirm the displayed list of
functions you have chosen, and then
press OK.
j Enter a name for the Shortcut using the
keyboard on the Touchscreen. (For help
entering letters, see Entering Text
on page 186.)
Press OK.
k Press OK to save your Shortcut.