Quick Setup Guide Start Here MFC-J6920DW Please read the Product Safety Guide first before you set up your machine. Then, read this Quick Setup Guide for the correct setup and installation. WARNING WARNING indicates a potentially hazardous situation which, if not avoided, could result in death or serious injuries. CAUTION CAUTION indicates a potentially hazardous situation which, if not avoided, may result in minor or moderate injuries.
a NOTE • Save all packing materials and the box in case for any reason you must ship your machine. • You need to purchase the correct interface cable for the interface you want to use (for USB or network connection). USB cable We recommend using a USB 2.0 cable (Type A/B) that is no more than five metres long. Network cable Use a straight-through Category5 (or greater) twisted-pair cable for 10BASE-T or 100BASE-TX Fast Ethernet Network.
c Connect the telephone line cord. Connect one end of the telephone line cord to the socket marked LINE on the machine. Carefully guide the telephone line cord into the cable channel and out the back of the machine. Connect the other end to a modular wall socket. NOTE If you are sharing one telephone line with an external telephone, connect it as shown below. 1 2 a Extension telephone b External telephone Please make sure you use an external telephone with a cable no more than three metres long.
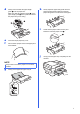
3 Install the ink cartridges c Remove the orange protective part a. CAUTION If ink gets in your eyes, wash it out with water at once and call a doctor if you are concerned. NOTE Make sure you install the Introductory Ink Cartridges included with your machine first. a Make sure that the power is turned on. The Touchscreen will show No Ink Cartridge. NOTE You can adjust the angle of the control panel by lifting it.
e Store the orange protective part in the holder inside the machine as shown. Make sure that the two projections on the bottom of the orange protective part fit into the two slots in the holder. g Unpack the ink cartridge. Turn the green release lever on the orange protective packing a counterclockwise until it clicks to release the vacuum seal. Then remove the orange protective packing a as shown. IMPORTANT • DO NOT shake the ink cartridges.
h Take care to match the sticker colour a with the cartridge colour b as shown in the diagram below. Install each ink cartridge in the direction of the arrow on the label. 1 a 4 Load plain A4 paper Pull paper tray #1, the upper tray a completely out of the machine. 2 1 i Gently push the back of the ink cartridge marked “PUSH” until the cartridge lever lifts. After all the ink cartridges are installed, close the ink cartridge cover.
d Gently press and slide the paper length guide a to fit the paper size. h Make sure that the triangular marks b on the paper length guide a lines up with the mark for the paper size you are using. Gently adjust the paper side guides to fit the paper with both hands. Make sure that the paper side guides touch the sides of the paper. 1 2 i Check that the paper is flat in the tray and below the maximum paper mark a. 1 e f Close the output paper tray cover.
k 5 While holding the paper tray in place, pull out the paper support a until it clicks, and then unfold the paper support flap b. Check the print quality NOTE If your machine has two paper trays, make sure there is paper in tray #1, the upper tray, when checking the print quality. 2 1 NOTE • For printing and copying on special print media, open the manual feed slot a on the back of the machine. Feed only one sheet at a time.
6 The Touchscreen displays the date and time. You can also add the current date and time to each fax you send by setting your Station ID (see step 10). a 7 Set the date and time Enter the last two digits of the year on the Touchscreen, and then press OK. Set the paper settings For your machine to produce the best print quality and to feed the correct paper size, the paper type and size must be set to match the paper in the tray.
9 Choose a Receive Mode There are four possible receive modes: Fax Only, Fax/Tel, Manual and External TAD. uuBasic User’s Guide: Using Receive Modes If you are not using this machine for faxing, go to the next step.
Transmission Verification Report Your Brother machine is equipped with a Transmission Verification Report that can be used as confirmation that you sent a fax. This report lists the name or fax number of the receiving party, the date, time, and duration of the transmission, the number of pages transmitted, and whether or not the transmission was successful.
14 Set the telephone line compatibility (VoIP) If you are connecting the machine to a VoIP service (over the Internet), you need to change the compatibility setting. NOTE If you are using an analogue telephone line, you can skip this step. a b c d e f Press . Press All Settings. Swipe up or down, or press a or b to display Initial Setup. Press Initial Setup. Swipe up or down, or press a or b to display Compatibility. Press Compatibility. Press Basic(for VoIP). Press 15 .
17 Choose your connection type These installation instructions are for Windows® XP Home, XP Professional, XP Professional x64 Edition, Windows Vista®, Windows® 7, Windows® 8, and Mac OS X v10.6.8, 10.7.x, 10.8.x. NOTE If your computer does not have a CD-ROM drive, the supplied CD-ROM does not contain drivers for your computer operating system, or you want to download manuals and utilities, visit your model’s home page at http://solutions.brother.com/.
USB Windows® For Windows® USB interface users (Windows® XP Home/XP Professional/Windows Vista®/Windows® 7/Windows® 8) 18 Before you install b Click Install MFL-Pro Suite and click Yes if you accept the license agreements. Follow the on-screen instructions. Make sure that your computer is ON and you are logged on with Administrator rights. NOTE • DO NOT connect the USB cable yet. • If there are any programs running, close them. • The screens may differ depending on your operating system.
USB 20 a Connect the USB cable Lift the scanner cover until it locks securely into the open position. IMPORTANT Make sure that the cable does not restrict the cover from closing, or an error may occur. d Connect the USB cable to the USB port marked with a symbol a. You will find the USB port inside the machine, as shown in the callout below. Gently close the scanner cover using the finger holds on each side. CAUTION 1 e Be careful not to pinch your fingers when you close the scanner cover.
USB 21 a Finish and restart Click Finish to restart your computer. After restarting the computer, you must log on with Administrator rights. Windows® b The following screens will appear. • When the Software Update Setting screen appears, choose the software update setting you want and click OK. • When the Brother Product Research and Support Program screen appears, select your preference and follow the on-screen instructions.
USB Macintosh For Macintosh USB interface users (Mac OS X v10.6.8, 10.7.x, 10.8.x) 18 Before you install b Connect the USB cable to the USB port marked with a symbol a. You will find the USB port inside the machine, as shown in the callout below. 1 Make sure your machine is connected to the power and your Macintosh is ON. You must be logged on with Administrator rights. NOTE For Mac OS X v10.6.0 to 10.6.7 users, upgrade to Mac OS X v10.6.8 - 10.8.x.
USB d Gently close the scanner cover using the finger holds on each side. Macintosh e f g Choose your machine from the list, and then click Next. When the Add Printer screen appears, click Add Printer. Choose your machine from the list. Click Add and then click Next. CAUTION Be careful not to pinch your fingers when you close the scanner cover. Always use the finger holds provided on each side of the scanner cover when opening and closing it.
USB 21 Macintosh Download and install Presto! PageManager When Presto! PageManager is installed, OCR capability is added to Brother ControlCenter2. You can easily scan, share and organize photos and documents using Presto! PageManager. a On the Brother Support screen, click the Presto! PageManager icon to go to the Presto! PageManager download site, and follow the on-screen instructions. The installation is now complete.
Wired Network Windows® For Windows® wired network interface users (Windows® XP Home/XP Professional/Windows Vista®/Windows® 7/Windows® 8) 18 Before you install Make sure that your computer is ON and you are logged on with Administrator rights. 19 a Connect the network cable Lift the scanner cover until it locks securely into the open position. NOTE • If there are any programs running, close them. • The screens may differ depending on your operating system.
Wired Network c Carefully guide the network cable into the cable channel and out the back of the machine. Connect the cable to your network. Windows® 20 a Install MFL-Pro Suite Put the CD-ROM into your CD-ROM drive. If the model name screen appears, choose your machine. If the language screen appears, choose your language. NOTE • If the Brother screen does not appear automatically, go to Computer (My Computer). (For Windows® 8: click the (File Explorer) icon on the taskbar, and then go to Computer.
Wired Network d When the Firewall/AntiVirus detected screen appears, choose Change the Firewall port settings to enable network connection and continue with the installation. (Recommended), and then click Next. Windows® f If the Environmental Advice for Imaging Equipment screen appears, click Next. g h i If you are not using the Windows® Firewall, see the instructions provided with your firewall software for information on how to add the following network ports.
Wired Network b The following screens will appear. • When the Software Update Setting screen appears, choose the software update setting you want and click OK. • When the Brother Product Research and Support Program screen appears, select your preference and follow the on-screen instructions. NOTE • Internet access is required for the software update and the Brother Product Research and Support Program. • When you install MFL-Pro Suite, Brother Help will also be installed automatically.
Wired Network Macintosh For Macintosh wired network interface users (Mac OS X v10.6.8, 10.7.x, 10.8.x) 18 Before you install b Connect the network cable to the Ethernet port marked with a symbol a. You will find the Ethernet port inside the machine, as shown in the callout below. Remove the orange protective cap b before connecting the cable. Make sure your machine is connected to the power and your Macintosh is ON. You must be logged on with Administrator rights. 1 NOTE 2 • For Mac OS X v10.6.
Wired Network d Gently close the scanner cover using the finger holds on each side. Macintosh d e After the installation, the Brother software will search for the Brother device. This will take a few moments to complete. Choose your machine from the list, and then click Next. NOTE CAUTION Be careful not to pinch your fingers when you close the scanner cover. Always use the finger holds provided on each side of the scanner cover when opening and closing it.
Wired Network f When the Add Printer screen appears, click Add Printer. g Choose your machine from the list. Click Add and then click Next. Macintosh 21 Download and install Presto! PageManager When Presto! PageManager is installed, OCR capability is added to Brother ControlCenter2. You can easily scan, share and organize photos and documents using Presto! PageManager.
For Wireless Network Users For wireless network interface users 18 Before you begin First you must configure the wireless network settings of your machine to communicate with your access point/router. After the machine is configured to communicate with your access point/router, computers on your network will have access to the machine. To use the machine from these computers, you will need to install the drivers and software.
For Wireless Network Users 19 Choose your wireless setup method The following instructions will offer three methods for setting up your Brother machine on a wireless network. Choose the method you prefer for your environment. Method a is the recommended way to connect (Windows® or Macintosh). a Setup using the CD-ROM (Windows® and Macintosh) • We recommend using a computer wirelessly connected to your network for this method. • A USB cable might be needed in some cases.
For Wireless Network Users For methods b and c, start your wireless setup by pressing the b Wi-Fi® button on the Touchscreen. Manual setup from the control panel using the Setup Wizard (Windows®, Macintosh and mobile devices) If your wireless access point/router does not support WPS (Wi-Fi Protected Setup™) or AOSS™, write down the wireless network settings of your wireless access point/router in the area below.
For Wireless Network Users 20 Setup using the CD-ROM d (Windows® and Macintosh) When the Firewall/AntiVirus detected screen appears, choose Change the Firewall port settings to enable network connection and continue with the installation. (Recommended), and then click Next. For Macintosh Users: Put the CD-ROM into your CD-ROM drive and double-click Start Here OSX. Select Wireless Network Connection and follow the Wireless Device Setup instructions on your computer screen.
For Wireless Network Users 20 a b Manual setup from the control panel using the Setup Wizard (Windows®, Macintosh and mobile devices) Press . Press Setup Wizard. When Switch Network interface to wireless? is displayed, press Yes to accept. This will start the wireless setup wizard. To cancel, press No. The machine will search for available SSIDs. It will take several seconds to display a list of available SSIDs.
For Wireless Network Users For mobile device users: • Connect your mobile device to a wireless access point/router using a Wi-Fi connection. • Download and install Brother iPrint&Scan (Android™/iOS/Windows® Phone) from your mobile device’s application download site. You can also use AirPrint (iOS) with this machine. • To download the User’s Guide for the application you are using (Brother iPrint&Scan/AirPrint), visit the Brother Solutions Center and click Manuals on your model’s page.
For Wireless Network Users 20 a b c One-push setup using WPS or AOSS™ (Windows®, Macintosh and mobile devices) Confirm your wireless access point/router has the WPS or AOSS™ symbol as shown below. Place the Brother machine within range of your WPS or AOSS™ access point/router. The range may differ depending on your environment. Refer to the instructions provided with your access point/router. Press . Press WPS/AOSS. When Switch Network interface to wireless? is displayed, press Yes to accept.
For Wireless Network Users Troubleshooting If you need assistance during setup and want to contact Brother Customer Service, make sure you have your SSID (Network Name) and Network Key ready. We cannot assist you in locating this information. How can I find the wireless security information (SSID and Network Key*) 1) Check the documentation provided with your wireless access point/router. 2) The initial SSID could be the manufacturer’s name or the model name.
For Wireless Network Users The Authentication/Encryption methods used by the selected wireless access point/router are not supported by your machine. For infrastructure mode, change the authentication and encryption methods of the wireless access point/router.
Wireless Network Windows® Install the drivers and software (Windows® XP Home/XP Professional/Windows Vista®/Windows® 7/Windows® 8) 21 Before you install b Click Install MFL-Pro Suite and click Yes if you accept the license agreements. Follow the on-screen instructions. Make sure that your computer is ON and you are logged on with Administrator rights. NOTE • If there are any programs running, close them. • The screens may differ depending on your operating system.
Wireless Network e Choose your machine from the list, and then click Next. Windows® 23 a Finish and restart Click Finish to restart your computer. After restarting the computer, you must log on with Administrator rights. NOTE • If your machine is not found over the network, confirm your settings by following the on-screen instructions. If you encounter this failure, go to step 19-b on page 29 and set up the wireless connection again.
Wireless Network b The following screens will appear. • When the Software Update Setting screen appears, choose the software update setting you want and click OK. • When the Brother Product Research and Support Program screen appears, select your preference and follow the on-screen instructions. • Internet access is required for the software update and the Brother Product Research and Support Program. • When you install MFL-Pro Suite, Brother Help will also be installed automatically.
Wireless Network Macintosh Install the drivers and software (Mac OS X v10.6.8, 10.7.x, 10.8.x) 21 Before you install e Choose your machine from the list, and then click Next. Make sure your machine is connected to the power and your Macintosh is ON. You must be logged on with Administrator rights. NOTE For Mac OS X v10.6.0 to 10.6.7 users, upgrade to Mac OS X v10.6.8 - 10.8.x. 22 a b NOTE If your wireless settings fail, the Wireless Device Setup Wizard screen appears.
Wireless Network g h When the Add Printer screen appears, click Add Printer. Choose your machine from the list. Click Add and then click Next. Macintosh 23 Download and install Presto! PageManager When Presto! PageManager is installed, OCR capability is added to Brother ControlCenter2. You can easily scan, share and organize photos and documents using Presto! PageManager.
Install Optional Applications 1 Install optional applications c Windows® Click the button for the application you want to install. BookScan&Whiteboard Suite supported by Reallusion, Inc The BookScan Enhancer software can correct your scanned book images automatically. The Whiteboard Enhancer software cleans up and enhances text and images from photos taken of your whiteboard. NOTE • The machine must be ON and connected to the computer. • Some applications require Internet access.
For Network Users Reset the network settings to factory default To restore all network settings of the internal Print/Scan server to the factory default, please follow the steps below: a b c d e f g h Make sure the machine is idle, then disconnect all the cables from the machine (except the power cord). Press . Press All Settings. Press Network. Swipe up or down, or press a or b to display Network Reset. Press Network Reset. Press Yes. Hold down Yes for two seconds to confirm.
Other Information How to open a PDF file in Adobe® Reader® (Windows® 8) a b c d Move your mouse to the lower right corner of your desktop. When the menu bar appears, click Settings, and then click Control Panel. Click Programs, click Default Programs, and then click Associate a file type or protocol with a program. Select .pdf, and then click the Change program... button. Brother CreativeCenter Get inspired.
Consumables Replacement consumables When the time comes to replace ink cartridges, an error message will be indicated on the Touchscreen. For more information about the ink cartridges for your machine, visit http://www.brother.com/original/ or contact your local Brother re-seller.