
User Manual
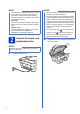
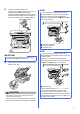
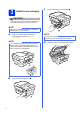


Table Of Contents
- Quick Setup Guide MFC-J6925DW
- Start Here
- 1 Unpack the machine and check the components
- 2 Connect the power cord and telephone line
- 3 Install the ink cartridges
- 4 Load plain Letter/A4 paper
- 5 Check the print quality
- 6 Set the date and time
- 7 Set the paper settings
- 8 Review Touchscreen display
- 9 Choose your language (if needed)
- 10 Choose the correct Receive Mode
- 11 Set your Station ID
- 12 Transmission Verification Report
- 13 Set Tone or Pulse dialing mode (Canada only)
- 14 Set the telephone line compatibility (VoIP)
- 15 Automatic Daylight Saving Time
- 16 Set the Time Zone
- 17 Choose your connection type
- For Windows® USB interface users (Windows® XP Home/XP Professional/Windows Vista®/Windows® 7/Windows® 8)
- For Macintosh USB interface users (Mac OS X v10.6.8, 10.7.x, 10.8.x)
- For Windows® wired network interface users (Windows® XP Home/XP Professional/Windows Vista®/Windows® 7/Windows® 8)
- For Macintosh wired network interface users (Mac OS X v10.6.8, 10.7.x, 10.8.x)
- For wireless network interface users
- 18 Before you begin
- 19 Choose your wireless setup method
- 20 Setup using the CD-ROM (Windows® and Macintosh)
- 20 Manual setup from the control panel using the Setup Wizard (Windows®, Macintosh and mobile devices)
- 20 One-push setup using WPS or AOSS™ (Windows®, Macintosh and mobile devices)
- Troubleshooting
- Install the drivers and software (Windows® XP Home/XP Professional/Windows Vista®/Windows® 7/Windows® 8)
- Install the drivers and software (Mac OS X v10.6.8, 10.7.x, 10.8.x)
- Install Optional Applications Windows®
- For Network Users
- Other Information
- Consumables
- brother USA-ENG
- Start Here

2
2
Connect the power cord
and telephone line
a Connect the power cord.
b Lift the scanner cover until it locks securely into
the open position.
NOTE
• Save all packing materials and the box in case
for any reason you must ship your machine.
• You need to purchase the correct interface
cable for the interface you want to use (for USB
or network connection).
USB cable
We recommend using a USB 2.0 cable (Type
A/B) that is no more than 16 feet (five meters)
long.
Network cable
Use a straight-through Category5 (or greater)
twisted-pair cable for 10BASE-T or
100BASE-TX Fast Ethernet Network.
NOTE
DO NOT connect the USB cable yet (if you are
using a USB cable).
NOTE
• If you do not plan to use the fax feature on this
machine, go to step 3 on page 4.
• To prolong the life of the print head, provide the
best ink cartridge economy and maintain print
quality, we do not recommend unplugging the
machine frequently and/or leaving the machine
unplugged for extended periods of time. Each
time you plug the machine in, it automatically
cleans the print heads, which uses some of
your ink.
We recommend using to power down the
machine. Using allows minimal power to
the machine, resulting in periodic, but less
frequent, cleaning of the print heads.