
User Manual
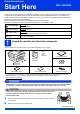
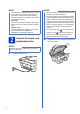
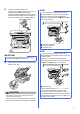
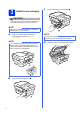


Table Of Contents
- Quick Setup Guide MFC-J6925DW
- Start Here
- 1 Unpack the machine and check the components
- 2 Connect the power cord and telephone line
- 3 Install the ink cartridges
- 4 Load plain Letter/A4 paper
- 5 Check the print quality
- 6 Set the date and time
- 7 Set the paper settings
- 8 Review Touchscreen display
- 9 Choose your language (if needed)
- 10 Choose the correct Receive Mode
- 11 Set your Station ID
- 12 Transmission Verification Report
- 13 Set Tone or Pulse dialing mode (Canada only)
- 14 Set the telephone line compatibility (VoIP)
- 15 Automatic Daylight Saving Time
- 16 Set the Time Zone
- 17 Choose your connection type
- For Windows® USB interface users (Windows® XP Home/XP Professional/Windows Vista®/Windows® 7/Windows® 8)
- For Macintosh USB interface users (Mac OS X v10.6.8, 10.7.x, 10.8.x)
- For Windows® wired network interface users (Windows® XP Home/XP Professional/Windows Vista®/Windows® 7/Windows® 8)
- For Macintosh wired network interface users (Mac OS X v10.6.8, 10.7.x, 10.8.x)
- For wireless network interface users
- 18 Before you begin
- 19 Choose your wireless setup method
- 20 Setup using the CD-ROM (Windows® and Macintosh)
- 20 Manual setup from the control panel using the Setup Wizard (Windows®, Macintosh and mobile devices)
- 20 One-push setup using WPS or AOSS™ (Windows®, Macintosh and mobile devices)
- Troubleshooting
- Install the drivers and software (Windows® XP Home/XP Professional/Windows Vista®/Windows® 7/Windows® 8)
- Install the drivers and software (Mac OS X v10.6.8, 10.7.x, 10.8.x)
- Install Optional Applications Windows®
- For Network Users
- Other Information
- Consumables
- brother USA-ENG
- Start Here

4
3
Install the ink cartridges
CAUTION
If ink gets in your eyes, wash it out with water at
once and call a doctor if you are concerned.
a Make sure that the power is turned on.
The Touchscreen will show No Ink
Cartridge.
b Open the ink cartridge cover a.
c Remove the orange protective part a.
d Lift the scanner cover into the open position.
NOTE
Make sure you install the Starter Ink Cartridges
included with your machine first.
NOTE
You can adjust the angle of the control panel by
lifting it. To lower this control panel, push the
release button that is located behind the control
panel, as shown in the illustration.
1
NOTE
Do not throw away the orange protective part.
You will need it if you transport the machine.
1