
User Manual
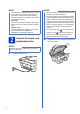
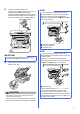
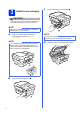


Table Of Contents
- Quick Setup Guide MFC-J6925DW
- Start Here
- 1 Unpack the machine and check the components
- 2 Connect the power cord and telephone line
- 3 Install the ink cartridges
- 4 Load plain Letter/A4 paper
- 5 Check the print quality
- 6 Set the date and time
- 7 Set the paper settings
- 8 Review Touchscreen display
- 9 Choose your language (if needed)
- 10 Choose the correct Receive Mode
- 11 Set your Station ID
- 12 Transmission Verification Report
- 13 Set Tone or Pulse dialing mode (Canada only)
- 14 Set the telephone line compatibility (VoIP)
- 15 Automatic Daylight Saving Time
- 16 Set the Time Zone
- 17 Choose your connection type
- For Windows® USB interface users (Windows® XP Home/XP Professional/Windows Vista®/Windows® 7/Windows® 8)
- For Macintosh USB interface users (Mac OS X v10.6.8, 10.7.x, 10.8.x)
- For Windows® wired network interface users (Windows® XP Home/XP Professional/Windows Vista®/Windows® 7/Windows® 8)
- For Macintosh wired network interface users (Mac OS X v10.6.8, 10.7.x, 10.8.x)
- For wireless network interface users
- 18 Before you begin
- 19 Choose your wireless setup method
- 20 Setup using the CD-ROM (Windows® and Macintosh)
- 20 Manual setup from the control panel using the Setup Wizard (Windows®, Macintosh and mobile devices)
- 20 One-push setup using WPS or AOSS™ (Windows®, Macintosh and mobile devices)
- Troubleshooting
- Install the drivers and software (Windows® XP Home/XP Professional/Windows Vista®/Windows® 7/Windows® 8)
- Install the drivers and software (Mac OS X v10.6.8, 10.7.x, 10.8.x)
- Install Optional Applications Windows®
- For Network Users
- Other Information
- Consumables
- brother USA-ENG
- Start Here

9
k While holding the paper tray in place, pull out
the paper support a until it clicks, and then
unfold the paper support flap b.
5
Check the print quality
a When the preparation process has finished, the
Touchscreen shows Load paper and
press [OK].
Press OK.
b Check the quality of the four color blocks on the
sheet (black/yellow/cyan/magenta).
c If all lines are clear and visible, press Yes to
finish the quality check and go to the next step.
If lines are missing, press No and follow the
steps on the Touchscreen.
NOTE
• For printing and copying on special print media,
open the manual feed slot a on the back of the
machine. Feed only one sheet at a time.
For more information, see Loading paper in the
manual feed slot in chapter 2 of the Basic
User’s Guide.
• For information about tray #2 (the lower tray),
see Loading paper in paper tray #2 in chapter
2 of the Basic User’s Guide.
1
2
1
NOTE
If your machine has two paper trays, make sure
there is paper in tray #1, the upper tray, when
checking the print quality.
OK
Poor