
User Manual


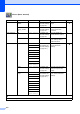
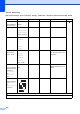
Table Of Contents
- Basic User’s Guide MFC-J6925DW
- User's Guides and where do I find them?
- Table of Contents
- 1 General information
- Using the documentation
- Accessing Brother Utilities (Windows® 8)
- Accessing the Advanced User’s Guide and Software and Network User’s Guide
- How to access Guides for Advanced Features
- Accessing Brother Support (Windows®)
- Accessing Brother Support (Macintosh)
- Control panel overview
- Shortcut Settings
- Volume Settings
- Touchscreen LCD
- 2 Loading paper
- 3 Loading documents
- 4 Sending a fax
- 5 Receiving a fax
- 6 Using PC-FAX
- 7 Telephone and external devices
- 8 Dialling and storing numbers
- 9 Making copies
- 10 Printing photos from a memory card or USB Flash drive
- 11 How to print from a computer
- 12 How to scan to a computer
- 13 How to print and scan with NFC (Near Field Communication)
- A Routine maintenance
- B Troubleshooting
- C Settings and feature tables
- D Specifications
- Index
- brother UK

178
Photo (More screen) C
Level1 Level2 Level3 Options Descriptions Page
Index Print Print Index
Sheet
Print Settings
For details, see
the Print Settings
on page 182.
You can print a thumbnail
page.
See .
Print Photos
Using Index
No.
Print Settings
For details, see
the Print Settings
on page 180.
You can print photos by
choosing the index
numbers.
View Photos* OK
Print Settings
For details, see
the Print Settings
on page 180.
You can adjust your
photos with the options.
84
Print All — — You can print all photos in
your memory card or
USB Flash drive.
Enhance Photos
Enhance Auto Correct
Print Settings
(For details, see
the Print Settings
on page 180.)
You can adjust your
photos with these
settings.
See .
Enhance Skin
Enhance Scenery
Remove Red-Eye
Night Scene
Fill Light
Whiteboard
Monochrome
Sepia
Auto Correct &
Remove Red-Eye
Crop
Print Settings
For details, see
the Print Settings
on page 180.
You can crop your photo
and print a part of the
image.
Enhance and
Crop
Auto Correct
Print Settings
(For details, see
the Print Settings
on page 180.)
You can adjust and crop
your photos with these
settings.
Enhance Skin
Enhance Scenery
Remove Red-Eye
Night Scene
Fill Light
Whiteboard
Monochrome
Sepia
Auto Correct &
Remove Red-Eye
See Advanced User’s Guide.
The default settings are shown in Bold with an asterisk.