
User Manual


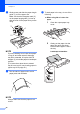


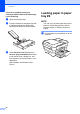
Table Of Contents
- Basic User’s Guide MFC-J6925DW
- User's Guides and where do I find them?
- Table of Contents
- 1 General information
- Using the documentation
- Accessing Brother Utilities (Windows® 8)
- Accessing the Advanced User’s Guide and Software and Network User’s Guide
- How to access Guides for Advanced Features
- Accessing Brother Support (Windows®)
- Accessing Brother Support (Macintosh)
- Control panel overview
- Shortcut Settings
- Volume Settings
- Touchscreen LCD
- 2 Loading paper
- 3 Loading documents
- 4 Sending a fax
- 5 Receiving a fax
- 6 Using PC-FAX
- 7 Telephone and external devices
- 8 Dialling and storing numbers
- 9 Making copies
- 10 Printing photos from a memory card or USB Flash drive
- 11 How to print from a computer
- 12 How to scan to a computer
- 13 How to print and scan with NFC (Near Field Communication)
- A Routine maintenance
- B Troubleshooting
- C Settings and feature tables
- D Specifications
- Index
- brother UK

Loading paper
23
2
b Adjust the tray length if needed:
When using A3, Ledger, Legal, or
Folio size paper
Press the universal guide release
button (1) as you slide out the front of
the paper tray.
Make sure that the triangular mark
on the output paper tray cover is
aligned with the line indicating Legal
or Folio (2) or A3 or Ledger (3) size,
as shown in the illustration.
When using A4, Letter, or smaller
size paper
If you are using A4 or Letter, you do
not have to extend the tray. If tray #2
is extended, then extend tray #1 and
pull up the stopper.
If you are using A5 or smaller size
paper, make sure the paper tray is
not extended.
c Gently press and slide the paper side
guides (1) to fit the paper size.
Make sure that the triangular mark (2)
on the paper side guide (1) lines up with
the mark for the paper size you are
using.
d Open the output paper tray cover (1).
1
2
3
2
1
1