
User Manual


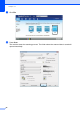

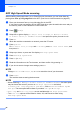
Table Of Contents
- Basic User’s Guide MFC-J6925DW
- Brother numbers
- Ordering accessories and supplies
- Notice - Disclaimer of Warranties (USA and Canada)
- Compilation and Publication Notice
- User's Guides and where do I find them?
- Table of Contents
- 1 General information
- 2 Loading paper
- 3 Loading documents
- 4 Sending a fax
- 5 Receiving a fax
- 6 Using PC-FAX
- 7 Telephone services and external devices
- 8 Dialing and storing numbers
- 9 Making copies
- 10 PhotoCapture Center™: Printing photos from a memory card or USB Flash drive
- 11 How to print from a computer
- 12 How to scan to a computer
- 13 How to print and scan with NFC (Near Field Communication)
- A Routine maintenance
- B Troubleshooting
- C Settings and features tables
- D Specifications
- Index
- brother USA-ENG

How to scan to a computer
95
12
e Press OK.
When the machine is connected to a network, press the PC Name.
Do one of the following:
If you want to use the default settings, go to step j.
If you want to change the default settings, go to step f.
f Press Options.
g Press Set with Touch Panel.
Press On.
h Choose the settings for 2-sided Scan, ADF High Speed Mode, Scan Type,
Resolution, File Type, Scan Size, Skip Blank Page and
Remove Background Color as needed.
i Press OK.
j Press Start.
The machine starts the scanning process.
NOTE
The following scan modes are available.
• to OCR
• to File
• to Image
• to Media
• to E-mail
• to E-mail Server
• to FTP
• to Network
• WS Scan
1
(Web Services Scan)
1
Windows
®
users only. (Windows Vista
®
SP2 or later, Windows
®
7 and Windows
®
8)
For more information, see Software and Network User’s Guide: Scan Using Web Services from the Brother Machine
(Windows Vista
®
SP2 or greater, Windows
®
7 and Windows
®
8).