
User Manual
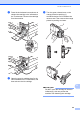
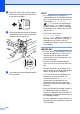
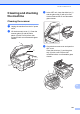
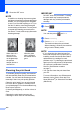
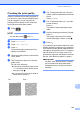


Table Of Contents
- Basic User’s Guide MFC-J6925DW
- Brother numbers
- Ordering accessories and supplies
- Notice - Disclaimer of Warranties (USA and Canada)
- Compilation and Publication Notice
- User's Guides and where do I find them?
- Table of Contents
- 1 General information
- 2 Loading paper
- 3 Loading documents
- 4 Sending a fax
- 5 Receiving a fax
- 6 Using PC-FAX
- 7 Telephone services and external devices
- 8 Dialing and storing numbers
- 9 Making copies
- 10 PhotoCapture Center™: Printing photos from a memory card or USB Flash drive
- 11 How to print from a computer
- 12 How to scan to a computer
- 13 How to print and scan with NFC (Near Field Communication)
- A Routine maintenance
- B Troubleshooting
- C Settings and features tables
- D Specifications
- Index
- brother USA-ENG

104
NOTE
When a print head nozzle is clogged, the
printed sample looks like this.
Letter, A4 and Executive
Ledger, A3, Legal, A5, A6, envelopes,
Photo (4 6 in.)/(10 15 cm),
Photo L (3.5 5in.)/(89 127 mm),
Photo 2L (5 7 in.)/(13 18 cm) and
Index Card (5 8 in.)/(127 203 mm)
After the print head nozzle is cleaned, the
horizontal lines are gone.
Checking the print alignment A
You may need to adjust the print alignment
after transporting the machine if your printed
text becomes blurred or images become
faded.
a Press .
NOTE
You can also press and Ink.
b Press Test Print.
c Press Alignment.
d Press OK.
The machine starts printing the
Alignment Check Sheet.
e For the “A” pattern, swipe up or down, or
press a or b to display the number of the
test print that has the least visible
vertical stripes (1-9), and then press it.
Press OK.
Repeat this step for the B, C and D
patterns.
In the example number 6 is the best
choice for A, B, C and D.
NOTE
f Press .
i
When the print
alignment is not
adjusted properly,
text looks blurry
like this.
After the print
alignment is
adjusted properly,
text looks like this.