
User Manual


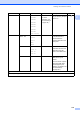

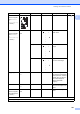

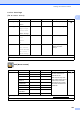


Table Of Contents
- Basic User’s Guide MFC-J6925DW
- Brother numbers
- Ordering accessories and supplies
- Notice - Disclaimer of Warranties (USA and Canada)
- Compilation and Publication Notice
- User's Guides and where do I find them?
- Table of Contents
- 1 General information
- 2 Loading paper
- 3 Loading documents
- 4 Sending a fax
- 5 Receiving a fax
- 6 Using PC-FAX
- 7 Telephone services and external devices
- 8 Dialing and storing numbers
- 9 Making copies
- 10 PhotoCapture Center™: Printing photos from a memory card or USB Flash drive
- 11 How to print from a computer
- 12 How to scan to a computer
- 13 How to print and scan with NFC (Near Field Communication)
- A Routine maintenance
- B Troubleshooting
- C Settings and features tables
- D Specifications
- Index
- brother USA-ENG

Settings and features tables
179
C
ID Photo Print
ID Photo Size 2x2inch
25x36mm
35x45mm
36x51mm
45x45mm
45x55mm
35x48mm
50x70mm
(2x2.75inch)
Print Settings
(For more
information, see
the Print Settings
on page 183.)
You can print ID photos
for your resume, passport
and so on.
See .
Slide Show Show Each
Photo for
3Secs*
10Secs
30Secs
1Min
5Mins
— Sets the time each photo
in the Slide Show is
shown before the
machine switches to the
next photo.
Effect Off*
Slide In
Fade In
Zoom In
— Sets the effect that is
used when the machine
switches to the next
photo in the Slide Show.
Start — — The machine starts a
Slide Show of your
photos.
You can choose a photo
during the Slide Show
and change the print
settings. (For details, see
the Print Settings
on page 180.)
Level1 Level2 Level3 Options Descriptions Page
See Advanced User’s Guide.
The factory settings are shown in Bold with an asterisk.