
Web Connect Guide
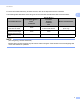
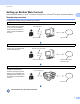
Table Of Contents
- Web Connect Guide
- Applicable models
- Definitions of notes
- Trademarks
- IMPORTANT NOTE
- Table of Contents
- 1 Introduction
- 2 Scan and Upload
- 3 Download, Print, and Save
- 4 Outline, Scan, and Copy or Cut
- 5 NotePrint and NoteScan
- 6 Shortcut Settings
- A Troubleshooting
- brother ENG

Introduction
6
1
Setting up Brother Web Connect 1
(For Picasa Web Albums™, Flickr
®
, Facebook, Google Drive™, Evernote
®
, Dropbox, OneDrive and Box)
Step-by-step overview 1
Configure the settings using the following procedure:
The machine can now use the service.
Step 1: Create an account with the desired service (see page 7).
Access the service’s website
using a computer and create
an account. (If you already
have an account, there is no
need to create an additional
account.)
Step 2: Apply for Brother Web Connect access (see page 7).
Start Brother Web Connect
access using a computer and
obtain a temporary ID.
Step 3: Register (on the machine), the account information that is needed to access the desired services (see
page 9
).
Enter the temporary ID to
enable the service on the
machine. Specify the account
name as you would like it to be
displayed on the machine, and
enter a PIN if you would like to
use one.
Web serviceObtain account
User registration
Brother Web Connect
application page
Obtain temporary ID
Enter account information
Web service
Enter temporary ID