
Network User's Guide
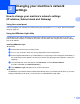

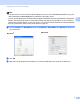
Table Of Contents
- NETWORK USER’S GUIDE
- Applicable models
- Definitions of notes
- Compilation and publication notice
- IMPORTANT NOTE
- Table of Contents
- 1 Introduction
- 2 Changing your machine’s network settings
- 3 Configuring your machine for a wireless network
- Overview
- Confirm your network environment
- Wireless configuration temporarily using a USB cable
- Wireless configuration temporarily using an Ethernet cable (For MFC-J825DW/J835DW/J5910DW and DCP-J925DW)
- One push configuration using Wi-Fi Protected Setup or AOSS™
- Configuration using the machine’s control panel Setup Wizard
- Configuration in Ad-hoc Mode
- 4 Control panel setup
- Network menu
- Restoring the network settings to factory default
- Printing the Network Configuration Report
- Printing the WLAN Report
- Function table and default factory settings
- 5 Web Based Management (MFC-J5910DW only)
- 6 Internet fax (MFC-J5910DW only)
- 7 Security features (MFC-J5910DW only)
- 8 Troubleshooting
- Appendix A
- Index

Changing your machine’s network settings
6
2
Note
• If the print server is set to its factory default settings (if you don’t use a DHCP/BOOTP/RARP server), the
device will appear as Unconfigured in the BRAdmin Light utility screen.
• You can find the Node Name and MAC Address (Ethernet Address) by printing the Network Configuration
Report. (See Printing the Network Configuration Report uu page 42 for information on how to print the
Network Configuration Report on your print server.) You can also find the Node Name and MAC Address
from the control panel. (See Control panel setup uu page 34.)
d Choose STATIC from Boot Method. Enter the IP Address, Subnet Mask and Gateway (if needed) of
your print server.
e Click OK.
f With the correctly programmed IP address, you will see the Brother print server in the device list.
Windows
®
Macintosh