
User Manual
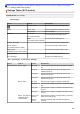
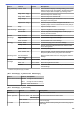
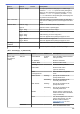
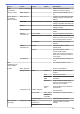
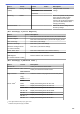
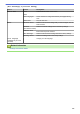
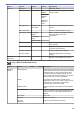
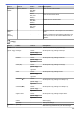
Table Of Contents
- Online User's Guide DCP-L5500D/MFC-L5700DN/MFC-L5755DW/MFC-L5900DW/MFC-L6700DW/MFC-L6900DW
- Table of Contents
- Before You Use Your Brother Machine
- Introduction to Your Brother Machine
- Paper Handling
- Print
- Print from Your Computer (Windows)
- Print a Document (Windows)
- Print More Than One Page on a Single Sheet of Paper (N in 1) (Windows)
- Print as a Poster (Windows)
- Print on Both Sides of the Paper (Windows)
- Print as a Booklet (Windows)
- Secure Print (Windows)
- Use a Macro from Your Computer (Windows)
- Use a Preset Print Profile (Windows)
- Change the Default Print Settings (Windows)
- Print a Document Using the BR-Script3 Printer Driver (PostScript® 3™ Language Emulation) (Windows)
- Monitor the Status of the Machine from Your Computer (Windows)
- Print Settings (Windows)
- Print from Your Computer (Mac)
- Print a Document (Mac)
- Print on Both Sides of the Paper (Mac)
- Print More Than One Page on a Single Sheet of Paper (N in 1) (Mac)
- Secure Print (Mac)
- Print a Document Using the BR-Script3 Printer Driver (PostScript® 3™ language emulation) (Mac)
- Monitor the Status of the Machine from Your Computer (Mac)
- Print Options (Mac)
- Print One Page Duplicates on Different Types of Paper
- Cancel a Print Job
- Test Print
- Print from Your Computer (Windows)
- Scan
- Scan Using the Scan Button on Your Brother Machine
- Scan Photos and Graphics
- Save Scanned Data to a Folder as a PDF File
- Save Scanned Data to a USB Flash Drive
- Scan to an Editable Text File (OCR)
- Scan to Email Attachment
- Send Scanned Data to an Email Server
- Scan to FTP
- Scan to SSH FTP (SFTP)
- Scan to Network (Windows)
- Scan to SharePoint
- Web Services for Scanning on Your Network (Windows Vista SP2 or greater, Windows 7 and Windows 8)
- Change Scan Button Settings from ControlCenter4 (Windows)
- Change Scan Button Settings from ControlCenter2 (Mac)
- Configure Certificate for Signed PDF
- Disable Scanning from Your Computer
- Scan from Your Computer (Windows)
- Scan Using ControlCenter4 Home Mode (Windows)
- Scan Using ControlCenter4 Home Mode (Windows)
- Select Document Type Using ControlCenter4 Home Mode (Windows)
- Change Scan Size Using ControlCenter4 Home Mode (Windows)
- Crop a Scanned Image Using ControlCenter4 Home Mode (Windows)
- Print Scanned Data Using ControlCenter4 Home Mode (Windows)
- Scan to an Application Using ControlCenter4 Home Mode (Windows)
- Save Scanned Data to a Folder as a PDF File Using ControlCenter4 Home Mode (Windows)
- Scan Both Sides of a Document Automatically Using ControlCenter4 Home Mode (Windows)
- Scan Settings for ControlCenter4 Home Mode (Windows)
- Scan Using ControlCenter4 Home Mode (Windows)
- Scan Using ControlCenter4 Advanced Mode (Windows)
- Scan Photos and Graphics Using ControlCenter4 Advanced Mode (Windows)
- Save Scanned Data to a Folder as a PDF File Using ControlCenter4 Advanced Mode (Windows)
- Scan Both Sides of a Document Automatically Using ControlCenter4 Advanced Mode (Windows)
- Scan Both Sides of an ID Card Using ControlCenter4 Advanced Mode (Windows)
- Scan to Email Attachment Using ControlCenter4 Advanced Mode (Windows)
- Scan to an Editable Text File (OCR) Using ControlCenter4 Advanced Mode (Windows)
- Scan Settings for ControlCenter4 Advanced Mode (Windows)
- Scan Using Nuance™ PaperPort™ 14SE or Other Windows Applications
- Scan Using Windows Photo Gallery or Windows Fax and Scan
- Scan Using ControlCenter4 Home Mode (Windows)
- Scan from Your Computer (Mac)
- Scan Using ControlCenter2 (Mac)
- Scan Using ControlCenter2 (Mac)
- Save Scanned Data to a Folder as a PDF File Using ControlCenter2 (Mac)
- Scan Both Sides of a Document Automatically Using ControlCenter2 (Mac)
- Scan Both Sides of an ID Card Using ControlCenter2 (Mac)
- Scan to Email Attachment Using ControlCenter2 (Mac)
- Scan to an Editable Text File (OCR) Using ControlCenter2 (Mac)
- Scan Using TWAIN-Compliant Applications (Mac)
- Scan Using ControlCenter2 (Mac)
- Configure Scan Settings Using Web Based Management
- Scan Using the Scan Button on Your Brother Machine
- Copy
- Fax
- Send a Fax
- Send a Fax
- Send a 2-sided Fax from the ADF
- Send a Fax Manually
- Send a Fax at the End of a Conversation
- Send the Same Fax to More than One Recipient (Broadcasting)
- Send a Fax in Real Time
- Send a Fax at a Specified Time (Delayed Fax)
- Add a Cover Page to Your Fax
- Cancel a Fax in Progress
- Check and Cancel a Pending Fax
- Fax Options
- Receive a Fax
- Receive Mode Settings
- Receive Modes Overview
- Choose the Correct Receive Mode
- Set the Number of Rings Before the Machine Answers (Ring Delay)
- Set the F/T Ring Time (Fast Double-ring)
- Set Fax Detect
- Shrink Page Size of an Oversized Incoming Fax
- Set the 2-sided Printing for Received Faxes
- Set the Fax Receive Stamp
- Receive a Fax at the End of a Telephone Conversation
- Memory Receive (Remote Fax) Options
- Remote Fax Retrieval
- Receive Mode Settings
- Voice Operations and Fax Numbers
- Telephone Services and External Devices
- Fax Reports
- PC-FAX
- Send a Fax
- Print Data Directly from a USB Flash Drive
- Network
- Get Started
- Network Management Software and Utilities
- Additional Methods of Configuring Your Brother Machine for a Wireless Network
- Before Configuring Your Brother Machine for a Wireless Network
- Configure Your Machine for a Wireless Network
- Configure Your Machine for a Wireless Network Using the One Push Method of Wi-Fi Protected Setup™ (WPS)
- Configure Your Machine for a Wireless Network Using the PIN Method of Wi-Fi Protected Setup™ (WPS)
- Configure Your Machine for a Wireless Network in Ad-Hoc Mode (For IEEE 802.11b/g/n)
- Configure Your Machine for a Wireless Network Using the Machine's Control Panel Setup Wizard
- Configure Your Machine for a Wireless Network When the SSID Is Not Broadcast
- Configure Your Machine for an Enterprise Wireless Network
- Use Wi-Fi Direct®
- Print or Scan from Your Mobile Device Using Wi-Fi Direct
- Configure Your Wi-Fi Direct Network
- Wi-Fi Direct Network Configuration Overview
- Configure Your Wi-Fi Direct Network Using the One-Push Method
- Configure Your Wi-Fi Direct Network Using the One-Push Method of Wi-Fi Protected Setup™ (WPS)
- Configure Your Wi-Fi Direct Network Using the PIN Method
- Configure Your Wi-Fi Direct Network Using the PIN Method of Wi-Fi Protected Setup™ (WPS)
- Configure Your Wi-Fi Direct Network Manually
- Advanced Network Features
- Print the Network Configuration Report
- Configure Your Mail Server Settings Using Web Based Management
- Configure the Brother Machine for Email or Internet Fax (I-Fax)
- I-Fax Options
- Use the Send Fax to Server Feature
- Print the WLAN Report
- Configure and Operate LDAP Search
- Synchronize Time with the SNTP Server Using Web Based Management
- Technical Information for Advanced Users
- Security
- Lock the Machine Settings
- Network Security Features
- Before Using Network Security Features
- Secure Function Lock 3.0
- Use Active Directory Authentication
- Use LDAP Authentication
- Manage Your Network Machine Securely Using SSL/TLS
- Introduction to SSL/TLS
- Certificates and Web Based Management
- Supported Security Certificate Features
- Create and Install a Certificate
- Manage Multiple Certificates
- Manage Your Network Machine Securely Using Web Based Management
- Manage Your Network Machine Securely Using BRAdmin Professional (Windows)
- Print Documents Securely Using SSL/TLS
- Manage Your Network Machine Securely Using IPsec
- Send or Receive an Email Securely
- Use IEEE 802.1x Authentication for a Wired or a Wireless Network
- Store Print Log to Network
- Mobile/Web Connect
- ControlCenter
- Troubleshooting
- Error and Maintenance Messages
- Document Jams
- Paper Jams
- Printing Problems
- Improve the Print Quality
- Telephone and Fax Problems
- Network Problems
- Error Messages
- Use the Network Connection Repair Tool (Windows)
- Where Can I Find My Brother Machine's Network Settings?
- I Cannot Complete the Wireless Network Setup Configuration
- My Brother Machine Cannot Print, Scan, or PC-FAX Receive over the Network
- I Want to Check that My Network Devices are Working Correctly
- Other Problems
- Check the Machine Information
- Reset Your Brother Machine
- Routine Maintenance
- Machine Settings
- Change Machine Settings from the Control Panel
- In the Event of Power Failure (Memory Storage)
- General Settings
- Adjust the Machine's Volume
- Change for Daylight Saving Time Automatically
- Set Sleep Mode Countdown
- About Deep Sleep Mode
- Set Auto Power Off Mode
- Set the Date and Time
- Set the Time Zone
- Adjust the LCD Backlight Brightness
- Change How Long the LCD Backlight Stays On
- Set Your Station ID
- Set Tone or Pulse Dialling Mode
- Reduce Toner Consumption
- Prevent Dialling a Wrong Number (Dial Restriction)
- Reduce Printing Noise
- Change the Language on the LCD
- Save Your Favourite Settings as a Shortcut
- Print Reports
- Settings and Features Tables
- Change Machine Settings from Your Computer
- Change Machine Settings from the Control Panel
- Appendix
- Glossary

Level 1 Level 2 Level 3 Descriptions
Tray Setting Check Size
- Select whether to display a message telling you to check
that the size and type of the paper in the machine and the
machine's Paper Size and Paper Type settings match.
Tray Use: Copy
- Select the tray to be used for Copy.
Tray Use: Print
- Select the tray to be used for Print.
Skip Tray
1
- Select a specific tray you do not want to use; if it is loaded
with paper of the wrong size.
Separator Tray
1
- Select the tray that contains the paper used as the
separator paper, which is inserted between each print job.
Volume Beep
- Adjust the beeper volume.
LCD Settings Backlight
- Adjust the brightness of the LCD backlight.
Dim Timer
- Set how long the LCD backlight stays on after you go
back to your Home screen.
Screen
Settings
Home Screen
- Set the default Home screen settings.
Copy Screen
- Set the default Copy screen settings.
Scan Screen
- Set the default Scan screen settings.
Ecology Toner Save
- Increase the page yield of the toner cartridge.
Sleep Time
- Set how much time will pass before the machine enters
Power Saving Mode.
Quiet Mode
- Decrease printing noise.
Auto Power Off
- Sets the number of hours that the machine will remain in
Deep Sleep Mode before going into Power Off Mode.
Setting Lock Set Password
- Restrict unauthorised users from changing the machine’s
settings.
Lock Off⇒On
-
Delete
Storage
Macro ID
Macro ID XX Delete the registered Macro data.
Font ID
Font ID XX Delete the registered Font data.
Format
- Restore the Macro and Font data of your machine to the
default settings.
1
Available if the Optional Tray(s) is installed.
[All Settings] > [Shortcut Settings]
Level 1
Level 2 Descriptions
(Select shortcut button)
Rename
Change the shortcut name.
Edit
Change the shortcut settings.
Delete
Delete the shortcut.
[All Settings] > [Printer]
Level 1
Level 2 Level 3 Descriptions
Emulation
- - Select the emulation mode.
Print Options Internal Font HP LaserJet
Print a list of the machine’s internal fonts.
BR-Script 3
Test Print
- Print a test page.
2-sided 2-sided Print
- Enable or disable 2-sided printing and choose long edge or
short edge.
625