
Secure Print+ User's Guide
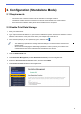
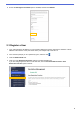
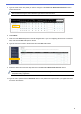
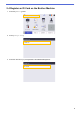
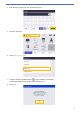
Table Of Contents

5
5. Type the name of the user profile you want to configure in the User List / Restricted Functions column.
This is the User ID.
6. Click Submit.
7. Click one of the User List options in the left navigation bar. If you are configuring Secure Print+ for the first
time, click the first User List option in the list.
8. Type the new user’s name in the first free cell in the User List column.
9. Select the same name from the drop-down list in the User List / Restricted Functions column.
10. Type the user’s password in the Password column. This password is required when you register the user’s
ID card on the machine.
We recommend using the user’s Windows login name as the user name.
Be careful when typing names and IDs. The user cannot be recognized if the user’s name is
misspelled during registration.