
Manual
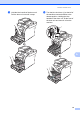
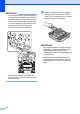
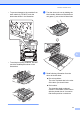
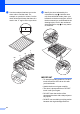
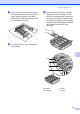
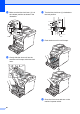

Table Of Contents
- Advanced User’s Guide MFC-L8600CDW/MFC-L8850CDW/MFC-L9550CDW
- User’s Guides and where do I find them?
- Table of Contents
- 1 General Setup
- 2 Security features
- Secure Function Lock 3.0
- Active Directory Authentication
- IPSec
- Setting Lock
- Restricting dialing
- 3 Sending a fax
- Additional sending options
- Additional sending operations
- Sending a fax manually
- Sending a fax at the end of a conversation
- Dual access
- Broadcasting
- Real Time Transmission
- Overseas Mode
- Delayed Fax
- Delayed batch transmission
- Checking and canceling waiting jobs
- Setting your changes as the new default
- Restoring all fax settings to the factory settings
- Saving fax options as a Shortcut
- Electronic cover page
- Destination Display
- 4 Receiving a fax
- 5 Dialing and storing numbers
- 6 Printing reports
- 7 Making copies
- Copy settings
- Stop copying
- Improving copy quality
- Enlarging or reducing copies
- 2-sided Copying
- Tray selection
- Adjusting Density and Contrast
- Sorting copies
- Making N in 1 copies (page layout)
- 2 in 1 ID Copy
- Adjusting the Color Saturation
- Making 2-sided N in 1 copies (MFC-L8850CDW and MFC-L9550CDW)
- Removing Background Color
- Saving copy options as a Shortcut
- Saving paper
- Copy settings
- A Routine maintenance
- Cleaning and checking the machine
- Cleaning the outside of the machine
- Cleaning the scanner
- Cleaning the laser scanner windows
- Cleaning the corona wires
- Cleaning the drum unit
- Cleaning the paper pick-up rollers
- Calibration
- Color Registration
- Auto Correction
- Printing the Test Print
- Checking the Page Counters
- Checking the remaining life of toner cartridges
- Checking the remaining life of parts
- Replacing periodic maintenance parts
- Packing and shipping the machine
- Cleaning and checking the machine
- B Options
- C Glossary
- Index

78
q Use the numbered markers next to the
drum roller to find the mark. For
example, a cyan dot in column 2 on the
check sheet would mean that there is a
mark in the “2” region of the cyan drum.
r Identify the drum indicated by the
colored dot in step q. Hold the drum
unit frame with both hands, place your
left thumb on the drum unit gear, and roll
the drum toward you, as illustrated in the
drawing below. Look in the numbered
area identified in step q for any marks
or scratches.
IMPORTANT
• To avoid print quality problems, DO NOT
touch the surface of the drum unit with
your bare hands.
• Handle the drum unit gear carefully.
• The drum is photosensitive so DO NOT
touch it with your fingers.
• DO NOT clean the surface of the
photosensitive drum with a sharp object or
any liquids.
• DO NOT use a scrubbing or wiping motion
because this might damage the drum.
BK
C
M
Y