
Manual
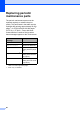
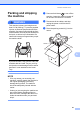
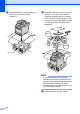
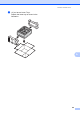
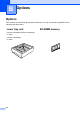
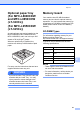
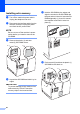
Table Of Contents
- Advanced User’s Guide MFC-L8600CDW/MFC-L8850CDW/MFC-L9550CDW
- User’s Guides and where do I find them?
- Table of Contents
- 1 General Setup
- 2 Security features
- Secure Function Lock 3.0
- Active Directory Authentication
- IPSec
- Setting Lock
- Restricting dialing
- 3 Sending a fax
- Additional sending options
- Additional sending operations
- Sending a fax manually
- Sending a fax at the end of a conversation
- Dual access
- Broadcasting
- Real Time Transmission
- Overseas Mode
- Delayed Fax
- Delayed batch transmission
- Checking and canceling waiting jobs
- Setting your changes as the new default
- Restoring all fax settings to the factory settings
- Saving fax options as a Shortcut
- Electronic cover page
- Destination Display
- 4 Receiving a fax
- 5 Dialing and storing numbers
- 6 Printing reports
- 7 Making copies
- Copy settings
- Stop copying
- Improving copy quality
- Enlarging or reducing copies
- 2-sided Copying
- Tray selection
- Adjusting Density and Contrast
- Sorting copies
- Making N in 1 copies (page layout)
- 2 in 1 ID Copy
- Adjusting the Color Saturation
- Making 2-sided N in 1 copies (MFC-L8850CDW and MFC-L9550CDW)
- Removing Background Color
- Saving copy options as a Shortcut
- Saving paper
- Copy settings
- A Routine maintenance
- Cleaning and checking the machine
- Cleaning the outside of the machine
- Cleaning the scanner
- Cleaning the laser scanner windows
- Cleaning the corona wires
- Cleaning the drum unit
- Cleaning the paper pick-up rollers
- Calibration
- Color Registration
- Auto Correction
- Printing the Test Print
- Checking the Page Counters
- Checking the remaining life of toner cartridges
- Checking the remaining life of parts
- Replacing periodic maintenance parts
- Packing and shipping the machine
- Cleaning and checking the machine
- B Options
- C Glossary
- Index

92
Installing extra memory B
a Turn off the machine’s power switch.
Unplug the telephone line cord.
b Disconnect the interface cable from the
machine, and then unplug the power
cord from the AC power outlet.
NOTE
Be sure to turn off the machine’s power
switch before you install or remove the
SO-DIMM.
c Remove the plastic (1) and then
metal (2) SO-DIMM covers.
d Unpack the SO-DIMM and hold it by its
edges.
IMPORTANT
To prevent damage to the machine from
static electricity, DO NOT touch the
memory chips or the board surface.
e Hold the SO-DIMM by the edges and
align the notches in the SO-DIMM with
the protrusions in the slot. Insert the SO-
DIMM diagonally (1), then tilt it toward
the interface board until it locks into
place (2).
f Put the metal (2) and then the plastic (1)
SO-DIMM covers back on.
2
1
12
2
1