
Operation Manual


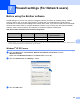
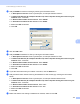

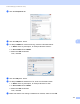
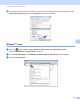

Table Of Contents
- SOFTWARE USER’S GUIDE
- Table of Contents
- Windows®
- 1 Printing
- Using the Brother printer driver
- Features
- Choosing the right type of paper
- Simultaneous printing, scanning and faxing
- Clearing data from the memory
- Status Monitor
- Printer driver settings
- Accessing the printer driver settings
- Basic tab
- Advanced tab
- Support
- Using FaceFilter Studio for photo printing by REALLUSION
- 2 Scanning
- Scanning a document using the TWAIN driver
- Scanning a document using the WIA driver (Windows® XP/Windows Vista®/Windows® 7)
- Scanning a document using the WIA driver (Windows Photo Gallery and Windows Fax and Scan users)
- Using ScanSoft™ PaperPort™11SE with OCR by NUANCE™ (Not available for DCP-J125, DCP-J315W, DCP-J515W, MFC-J220 and MFC-J265W)
- 3 ControlCenter3
- 4 Remote Setup (Not available for DCP models, MFC-J220, MFC-J265W, MFC-J410 and MFC-J415W)
- 5 Brother PC-FAX Software (MFC models only)
- 6 PhotoCapture Center™
- 7 Firewall settings (For Network users)
- 1 Printing
- Apple Macintosh
- 8 Printing and Faxing
- 9 Scanning
- 10 ControlCenter2
- 11 Remote Setup & PhotoCapture Center™
- Using the Scan key
- Index
- brother UK

Firewall settings (For Network users)
112
7
d Click the Exceptions tab.
e Click the Add port... button.
f To add port 54925 for network scanning, enter the information below:
1In Name: Enter any description, for example “Brother Scanner”.
2In Port number: Enter “54925”.
3Make sure UDP is selected.
Then, click OK.
g Click the Add port... button.
h To add port 54926 for Network PC-Fax, enter the information below:
1In Name: Enter any description, for example “Brother PC-Fax”.
2In Port number: Enter “54926”.
3Make sure UDP is selected.
Then, click OK.
i Make sure that the new setting is added and is checked, and then click OK.
1
2
3