
Operation Manual
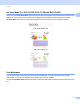
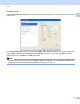
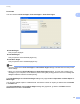
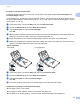
Table Of Contents
- SOFTWARE USER’S GUIDE
- Table of Contents
- Windows®
- 1 Printing
- Using the Brother printer driver
- Features
- Choosing the right type of paper
- Simultaneous printing, scanning and faxing
- Clearing data from the memory
- Status Monitor
- Printer driver settings
- Accessing the printer driver settings
- Basic tab
- Advanced tab
- Support
- Using FaceFilter Studio for photo printing by REALLUSION
- 2 Scanning
- Scanning a document using the TWAIN driver
- Scanning a document using the WIA driver (Windows® XP/Windows Vista®/Windows® 7)
- Scanning a document using the WIA driver (Windows Photo Gallery and Windows Fax and Scan users)
- Using ScanSoft™ PaperPort™11SE with OCR by NUANCE™ (Not available for DCP-J125, DCP-J315W, DCP-J515W, MFC-J220 and MFC-J265W)
- 3 ControlCenter3
- 4 Remote Setup (Not available for DCP models, MFC-J220, MFC-J265W, MFC-J410 and MFC-J415W)
- 5 Brother PC-FAX Software (MFC models only)
- 6 PhotoCapture Center™
- 7 Firewall settings (For Network users)
- 1 Printing
- Apple Macintosh
- 8 Printing and Faxing
- 9 Scanning
- 10 ControlCenter2
- 11 Remote Setup & PhotoCapture Center™
- Using the Scan key
- Index
- brother UK

Printing
22
1
Advanced Colour Settings 1
You can set the Halftone Pattern and Match Monitor for more colour adjustment.
Halftone Pattern
The machine can use two methods (Diffusion or Dither) to arrange dots to express halftones. There are
some predefined patterns and you can choose which one to use for your document.
• Diffusion
Dots are put at random to create the halftones. Use for printing photographs that have delicate shades
and graphics.
• Dither
Dots are arranged in a pre-defined pattern to make halftones. Use for printing graphics that have
definite colour boundaries or for printing charts such as business charts.
Match Monitor
Colour is adjusted to get the closest colour match with the PC monitor.