Basic User's Guide MFC-J6535DW MFC-J6935DW Brother recommends keeping this guide next to your Brother machine for quick reference. Online User's Guide This Basic User's Guide contains basic instructions and information for your Brother machine. For more advanced instructions and information, see the Online User's Guide at solutions.brother.
If you need to call Customer Service Please complete this information for future reference: Model Number: (Circle your model number) MFC-J6535DW/MFC-J6935DW Serial Number: 1 Date of Purchase: Place of Purchase: 1 The serial number is on the back of the machine. Retain this User’s Guide with your sales receipt as a permanent record of your purchase, in the event of theft, fire or warranty service. Register your product online at www.brother.
Brother Numbers IMPORTANT For technical help, you must call the country where you bought the machine. Calls must be made from within that country. FAQs (Frequently Asked Questions) The Brother Solutions Center is our one-stop resource for all your Fax Machine/Multi-Function Center needs. Download the latest software and utilities and read FAQs and troubleshooting tips to learn how to get the most from your Brother product. support.brother.com • Check here for Brother driver updates.
Ordering Accessories and Supplies For best quality results use only genuine Brother supplies, which are available at most Brother retailers. If you cannot find the supplies you need and have a Visa, MasterCard, Discover, American Express credit card, or PayPal account, you can order directly from Brother. Visit us online for a complete selection of the Brother accessories and supplies that are available for purchase. NOTE In Canada, only Visa and MasterCard are accepted.
Notice - Disclaimer of Warranties (USA and Canada) BROTHER’S LICENSOR(S), AND THEIR DIRECTORS, OFFICERS, EMPLOYEES OR AGENTS (COLLECTIVELY BROTHER’S LICENSOR) MAKE NO WARRANTIES, EXPRESS OR IMPLIED, INCLUDING WITHOUT LIMITATION THE IMPLIED WARRANTIES OF MERCHANTABILITY AND FITNESS FOR A PARTICULAR PURPOSE, REGARDING THE SOFTWARE.
You Can Use the Following Features High Speed Copy & Scan When you place a document, long edge first in the ADF or in the left side of the scanner glass, you can copy and scan with High Speed. Mobile Connect Use Brother iPrint&Scan to check the machine status and access various functions from mobile devices. Make sure your document size is Letter or A4.
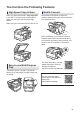
User's Guides and Where to Find Them Which Guide? What's in It? Where Is It? Product Safety Guide Read this Guide first. Please read the Safety Instructions before you set up your machine. See this Guide for trademarks and legal limitations. Printed / In the box Quick Setup Guide Follow the instructions for setting up your machine, and installing the drivers and software for the operating system and connection type you are using.
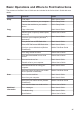
Basic Operations and Where to Find Instructions The contents of the Basic User's Guide are also included in the Online User's Guide with more details.
The Online User's Guide Helps You Get the Most Out of Your Machine We hope that you find this guide helpful. To learn more about your machine's features, please take a look at our Online User's Guide. It offers: Quicker Navigation! Search box Navigation index in a separate panel Comprehensive Format! Every topic in one guide Simplified Layout! Step-by-step instructions Feature summary at the top of the page 1 2 3 4 1. Search Box 2. Navigation 3. Summary 4.
Questions or Problems? Take a Look at our FAQs, Solutions, and Videos Online. Go to your model's FAQs & Troubleshooting page on the Brother Solutions Center at support.brother.com • Provides several ways to search • Displays related questions for more information • Receives regular updates based on customer feedback Since the Brother Solutions Center is updated regularly, this screen is subject to change without notice.
Definitions of Notes We use the following symbols and conventions throughout this User's Guide: WARNING WARNING indicates a potentially hazardous situation which, if not avoided, could result in death or serious injuries. CAUTION CAUTION indicates a potentially hazardous situation which, if not avoided, may result in minor or moderate injuries. IMPORTANT NOTE IMPORTANT indicates a potentially hazardous situation which, if not avoided, may result in damage to property or loss of product functionality.
Table of Contents 1 General Information ............................................................................................ 1 Control Panel Overview.............................................................................................1 Touchscreen LCD Overview ......................................................................................3 New Information from Brother..........................................................................6 Access Brother Utilities (Windows®) ......
Scan Using the Scan Button on Your Brother Machine...........................................27 Scan Using the Scan Button on the Machine ................................................27 6 Fax ...................................................................................................................... 28 Before Faxing ..........................................................................................................28 Set Your Station ID ..................................................
Printer Jam or Paper Jam..............................................................................57 C Appendix ............................................................................................................ 66 Enter Text on Your Brother Machine........................................................................66 Check the Machine Information...............................................................................66 Reset Your Brother Machine ...................................
1 General Information Control Panel Overview 1 2 3 4 5 1 General Information 6 1. NFC (Near Field Communication) symbol (MFC-J6935DW) You can use card authentication by touching the IC card to the NFC symbol on the control panel. If your Android™ device supports the NFC feature, you can print from your device or scan documents to your device in the same way. 2. Touchscreen Liquid Crystal Display (LCD) Access menus and options by pressing them on the Touchscreen.
3. Menu buttons (Back) Press to go back to the previous menu. (Home) Press to return to the Home screen. (Cancel) Press to cancel an operation. 4. Dial Pad Press the numbers to dial telephone or fax numbers and to enter the number of copies. 5. LED Power Indicator The LED lights up depending on the machine’s power status. When the machine is in Sleep Mode, the LED blinks. 6. Power On/Off Press to turn on the machine. Press and hold down to turn off the machine.
Touchscreen LCD Overview Home Screen 3 1 2 There are three Home screens that you can access by swiping left or right or pressing d or c. 1 From the Home screens, you can access Shortcuts, Wi‑Fi setup, Settings and Ink levels screens. 1 3 2 4 5 6 General Information Home Screen 1 7 Home screen 3 provides access to [LGR Copy Shortcuts]. 1. Date & Time Displays the date and time set on the machine. 2. 3 4 5 6 Quiet Mode This icon appears when the [Quiet Mode] setting is set to [On].
7. Modes: • [Fax] Press to access Fax mode. • [Copy] Press to access Copy mode. • Three Shortcuts tabs are available with six Shortcuts on each tab. • Press , displayed at the • Press to access Scan mode. • bottom of the screen to access the Home Screens. 4. For more information, see the Online User's Guide. • Wireless network is connected. A three-level indicator in each of the Home screens displays the current wireless signal strength. The wireless access point cannot be detected.
9. [New Fax(es):] • This product adopts the font of ARPHIC TECHNOLOGY CO.,LTD. 9 • DO NOT touch the LCD immediately after plugging in the power cord or turning on the machine. Doing this may cause an error. 1 General Information When [Fax Preview] is set to [On], [New Fax(es)] displays how many new faxes you have received and stored in the memory. to view the faxes on the Press Touchscreen.
New Information from Brother New information from Brother appears in the information bar when the notification settings such as [Message from Brother] and [Firmware Auto Check] are set to [On]. Press to view the details. Internet connection is needed, and data rates may apply. Access Brother Utilities (Windows®) Brother Utilities is an application launcher that offers convenient access to all Brother applications installed on your computer.
Select your machine. 3 Select the operation you want to use. 1 2 General Information Uninstall the Brother Software and Drivers (Windows®) 1 2 Launch (Brother Utilities). Click the drop-down list, and then select your model name (if not already selected). Click Tools in the left navigation bar, and then click Uninstall. Follow the instructions in the dialog box to uninstall the software and drivers.
2 Paper Handling Load Paper Loading Paper Overview 1 Load the paper in the paper tray as follows. Fan the stack of paper well. The paper size determines the orientation when loading paper. Tray #1 Tray #2 1 Letter ♦ Letter ♦ A4 ♦ A4 ♦ Executive (Plain paper and Recycled paper only) A5 - How to Load Paper Adjust the paper guides. A6 Adjust the paper guides.
MP Tray How to Load Paper Letter ♦ Landscape orientation A4 ♦ Executive Adjust the MP tray paper guides. 2 Ledger Paper Handling A3 Portrait orientation Legal Folio 2 Mexico Legal 1 India Legal A5 Adjust the MP tray paper guides. A6 Photo Photo L Photo 2L Index card Envelopes ♦ See the details in this chapter. For more information about other paper sizes, see the Online User's Guide: Load Paper. 2 Unfold the paper support flap.
Load Letter or A4 Size Paper in Paper Tray #1 / Paper Tray #2 (MFC-J6935DW) When you load paper in Tray #2, remove the tray top cover (1). • If the [Check Paper] setting is set to [On] and you pull the paper tray out of the machine, a message appears on the LCD asking if you want to change the paper type and paper size. Change the Paper Size and Paper Type settings if needed, following the LCD instructions. • Load only one size and type of paper in the paper tray at a time.
Always make sure the paper is not curled or wrinkled. 4 7 Make sure the paper is flat in the tray and below the maximum paper mark (1). Overfilling the paper tray may cause paper jams. Gently load paper in the paper tray with the printing surface face down. 1 Landscape orientation 2 Paper Handling (MFC-J6935DW) When you load paper in Tray #2, replace the tray top cover. 5 Make sure the paper length guide (1) touches the edges of the paper.
9 Pull out the paper support until it locks into place. Load Ledger, Legal, or A3 Size Paper in Paper Tray #1 / Paper Tray #2 • If the [Check Paper] setting is set to [On] and you pull the paper tray out of the machine, a message appears on the LCD asking if you want to change the paper type and paper size. Change the Paper Size and Paper Type settings if needed, following the LCD instructions. • Load only one size and type of paper in the paper tray at a time.
3 (MFC-J6935DW) When you load paper in Tray #2, remove the tray top cover (1). Gently press and slide the paper width guides (1) and then the paper length guide (2) to fit the paper size. Make sure the triangular mark (3) on the paper width guide (1) and paper length guide (2) line up with the marks for the paper you are using. 1 1 3 2 Paper Handling 2 Rest the tray on a flat surface. Push the green slider to the left and then extend the tray until it locks into place.
5 Gently load paper in the paper tray with the printing surface face down. 8 Make sure the paper is flat in the tray and below the maximum paper mark (1). Overfilling the paper tray may cause paper jams. Portrait orientation 1 6 Make sure the paper length guide (1) touches the edges of the paper. (MFC-J6935DW) When you load paper in Tray #2, replace the tray top cover. 1 7 Gently adjust the paper width guides (1) to fit the paper. 9 Slowly push the paper tray completely into the machine.
out the paper support (1) until it 10 Pull locks into place, and then unfold the paper support flap (2). Load Paper in the Multipurpose Tray (MP Tray) • If the [Check Paper] setting is set to [On] and you set the paper in the MP tray, a message appears on the LCD asking if you want to change the paper type and paper size. Change the Paper Size and Paper Type settings if needed, following the LCD instructions.
2 Gently press and slide the MP tray paper guides to match the width of the paper you are using. 4 Gently load the paper in the MP tray with the printing surface face up. Landscape orientation If you are having difficulty loading paper in the MP tray, push the release lever (1) toward the back of the machine, and then load the paper. 3 Fan the stack of paper well to avoid paper jams and misfeeds. 1 • Always make sure the paper is not curled or wrinkled.
Using both hands, gently adjust the MP tray paper guides to fit the paper. 6 Pull out the paper support until it locks into place. 7 Change the paper size setting in the machine's menu, if needed.
Change the Paper Size and Paper Type Set the Paper Size and Paper Type settings for the paper tray. • To get the best print quality, set the machine for the type of paper you are using. • When you change the size of the paper you load in the tray, you must change the Paper Size setting on the LCD at the same time.
Recommended Print Media Load Documents Load Documents in the Automatic Document Feeder (ADF) For the best print quality, we recommend using the Brother paper listed in the table. Brother paper Paper Type Item Premium Plus Glossy Photo Letter BP71GLTR 4" x 6" BP71GP20 Plain Inkjet Ledger BP60PLGR (USA only) Handle and Use Print Media • Store paper in its original packaging and keep it sealed. Keep the paper flat and away from moisture, direct sunlight and heat.
2 Adjust the paper guides (1) to fit the document size. 1 IMPORTANT DO NOT leave any documents on the scanner glass. If you do this, the ADF may jam. Load Documents on the Scanner Glass Use the scanner glass to fax, copy, or scan one page at a time. Document Sizes Supported 3 Place your document face up in the ADF, as shown in the illustration, until you feel the document touch the feed rollers and the machine beeps. Length: Up to 17.0 in. (431.8 mm) Width: Up to 11.7 in.
IMPORTANT If you are scanning a book or thick document, DO NOT slam or press on the document cover.
3 Print Print from Your Computer Before attempting any printing operation, confirm the following: • Make sure you have installed the Brother software and drivers. • For USB or network cable users: Make sure the interface cable is inserted correctly. 4 Complete your print operation. Various Printing To use the various printing features, click the printing properties or preferences button to change the printer setting.
Print Photos Directly from a USB Flash Drive Preview and Print Photos from a USB Flash Drive Preview your photos on the LCD before you print them. Print images that are stored on a USB flash drive. 1 7 Press [OK]. 8 Read and confirm the displayed list of options. 9 To change the print settings, press [Print Settings]. When finished, press [OK]. 10 Press [Start]. Put a USB flash drive in the USB slot. Print Settings Overview 2 Press [JPEG Print] > [Select Files].
Print a PDF File Directly from a USB Flash Drive 7 Press [Black Start] or [Color Start]. Related Models: MFC-J6935DW You can print a PDF file directly from a USB flash drive. PDF files that are 2 GB or more cannot be printed. 1 Put a USB flash drive in the USB slot. 2 Press [PDF Print]. 3 Swipe up or down or press a or b to display the PDF file you want to print, and then press it.
4 Copy Copy a Document 1 Make sure you have loaded the correct size paper in the paper tray. 2 Load your document. 3 After you have finished selecting new options, you can save them by pressing the [Save as Shortcut] button. 5 Press [Black Start] or [Color Start]. To stop copying, press Press . [Copy]. The Touchscreen displays: Other Copy Options 4 You can use various copy features by changing copy settings. Press the [Options] button.
5 Scan Before Scanning Before attempting to scan, confirm the following: • Make sure you have installed the Brother software and drivers. 2 Click the (ControlCenter4) icon in the task tray, and then click Open. 3 Click the Scan tab. 4 Click the File button. 5 Change the scan settings, such as file format, file name, resolution and color, if needed. 6 Click Scan. • For USB or network cable users: Make sure the interface cable is inserted correctly.
Scan Using the Scan Button on Your Brother Machine Scan Using the Scan Button on the Machine Use the Scan button on the machine to make temporary changes to the scan settings. To make permanent changes, use Brother's ControlCenter software. 1 Load your document. Press 3 Swipe left or right or press d or c to 8 To scan both sides of the document (for MFC-J6935DW only), press [2-sided Scan], and then select the document type.
6 Fax Before Faxing Set Your Station ID Set the machine's Station ID if you want the date and time to appear on each fax you send. NOTE 6 Press .
• VoIP (Voice over IP) is a type of phone system that uses an Internet connection, rather than a traditional phone line. Related Information • Error and Maintenance Messages on page 41 • Fax and Telephone Problems on page 53 Receive Modes Overview Some receive modes answer automatically ([Fax Only] and [Fax/Tel]). You may want to change the Ring Delay before using these modes. Fax Only [Fax Only] mode automatically answers every call as a fax.
Choose the Correct Receive Mode The correct Receive Mode for you is determined by the external devices and telephone subscriber services (Voice Mail, Distinctive Ring and so on) you will be using on the same line as the Brother machine. Will you be using a Distinctive Ring number for receiving faxes? (USA and Canada only) Brother uses the term "Distinctive Ring" but different telephone companies may have other names for this service.
Set the F/T Ring Time (Pseudo/Double-ring) When you set the Receive Mode to [Fax/ Tel], if the call is a fax, your machine will receive it automatically. However, if it is a voice call, the machine will sound the F/T ring (pseudo/double-ring) for the time you set in the F/T Ring Time option. When you hear the F/T ring, it means that a voice caller is on the line.
Store Numbers You can set up your machine to store fax numbers in the Address Book. If you lose electrical power, the Address Book numbers that are in the machine's memory will not be lost. Store Address Book Numbers 1 2 Press Change or Delete Address Book Names or Numbers 1 2 a. Press [Edit] > [Add New Address] > [Name]. c. Press [Address 1]. d. Enter the first fax or telephone number (up to 20 digits) using the Touchscreen. Press [OK].
Telephone Services and External Devices You may be able to use the following services and connections with your Brother machine. These are summaries of ways to connect your machine. For more information about each topic, see the Online User's Guide. Voice Mail If you have a Voice Mail service and your Brother machine on the same line, they will conflict with one another when receiving incoming calls.
Fax Using Your Machine Press [Call History] > [Caller ID History]. Select the number you want, and then press [Apply]. Send a Fax 1 Load your document in the ADF or place it on the scanner glass. 2 Press • [Address Book] (Select a number from the Address Book.) Press [Address Book]. Do one of the following: - Select the number you want, and then press [Apply]. [Fax]. - Press If [Fax Preview] is set to [On], press , and then enter the first letter of the name and press [OK].
[Color Setting], the Touchscreen asks if you want to send a color fax. Press [Yes (Color fax)] to confirm. The machine starts dialing and sending the document. 8 3 Click Print. 4 Enter the recipient’s fax number. When the Touchscreen displays [Next Page?], do one of the following: Repeat this step for each additional page. Fax Using Your Computer (PC-FAX) a. Use your computer keyboard or click the Brother PC-FAX user interface's numeric keypad. b. Click Add Send Address.
Receive Faxes on Your Computer (Windows® only) 1 Do one of the following: • Windows Vista® and Windows® 7 Click Use Brother's PC-FAX software to receive faxes on your computer, display them, and print only those faxes you want. (Start) > All Programs > Brother > Brother Utilities > PCFAX > Receive. • Windows® 8 and Windows® 10 Launch (Brother Utilities), and then click the drop-down list and select your model name (if not already selected).
A Routine Maintenance 4 Clean the Scanner 1 Unplug the machine from the AC power outlet. 2 Lift the document cover (1). Clean the scanner glass (2) and the white plastic (3) with a soft lint-free cloth moistened with water. (MFC-J6935DW) Open the scanner glass cover (1), and clean the white bar (2) and the glass strip (3) with a soft lintfree cloth moistened with water.
3 Check the quality of the four color blocks on the sheet. again. Press [Yes], and then press [Start]. 4 The Touchscreen asks about the print quality. Do one of the following: The machine prints the Print Quality Check Sheet again. Check the quality of the four color blocks on the sheet again. • If all lines are clear and visible, press [No], and then press to finish the Print Quality check. • If lines are missing (see Poor, below), press [Yes].
Check the Print Alignment from Your Brother Machine Repeat this step for the rest of the patterns. When the print alignment is not adjusted correctly, text looks blurry like this. If your printed text becomes blurred or images become faded after transporting the machine, adjust the print alignment. 1 After the print alignment is adjusted correctly, text looks like this. [Ink] > [Improve Press Print Quality] > [Alignment].
B Troubleshooting Use this section to resolve problems you may encounter when using your Brother machine. Identify the Problem Even if there seems to be a problem with your machine, you can correct most problems yourself. First, check the following: • The machine's power cord is connected correctly and the machine's power is on. • All of the machine's orange protective parts have been removed. • The ink cartridges are installed correctly. • The Scanner Cover and the Jam Clear Cover are fully closed.
Error and Maintenance Messages The most common error and maintenance messages are shown in the table. For more detailed information, see the Online User's Guide. You can correct most errors and perform routine maintenance yourself. If you need more tips, go to your model's FAQs & Troubleshooting page on the Brother Solutions Center at support.brother.com.
Error Message Action Cannot Detect Ink Use a new Genuine Brother Ink Cartridge. If the error is not cleared, Volume call Brother Customer Service. Data Remaining in Press . The machine will cancel the job and clear it from the Memory memory. Try to print again. Disconnected Try to send or receive again. If calls are stopped repeatedly and you are using a VoIP (Voice over IP) system, try changing the Compatibility to Basic (for VoIP).
Error Message Action Ink Low One or more of the ink cartridges are near the end of their lives. Order a new ink cartridge. You can continue printing until the Touchscreen displays Replace Ink. For more information, see the Online User's Guide: Replace the Ink Cartridges. • You can still scan even if the ink is low or needs to be replaced. Install Ink Remove the new ink cartridge and re-install it slowly and firmly until it locks into place.
Error Message Action No Paper Fed Do one of the following: No Paper Fed [Tray #1] No Paper Fed [MP Tray] No Paper Fed [Tray #2] • Refill the paper tray, and then follow the LCD instructions. • Remove and reload the paper, and then follow the LCD instructions. The paper was not inserted in the center position of the MP tray. Remove the paper and reinsert it in the center of the MP tray, and then follow the LCD instructions.
Error Message Action Paper Size Mismatch 1. Check that the paper size you selected on the machine's display matches the size of the paper in the tray. Paper Size Mismatch [Tray #1] Paper Size Mismatch [MP Tray] Paper Size Mismatch [Tray #2] See Related Information: Change the Paper Size and Paper Type at the end of this section. 2. Make sure you loaded the paper in the proper orientation and set the paper guides at the indicators for your paper size.
Error Message Action Tray #1 Settings This message is displayed when the setting to confirm the paper type and size is enabled. Tray #2 Settings MP Tray Settings To not display this confirmation message, change the setting to Off. See Related Information: Change the Check Paper Size Setting at the end of this section. Unable to Clean XX A foreign object, such as a paper clip or a piece of ripped paper, is in the machine.
Error Message Action Wrong Ink Color Check which ink cartridges are not matched by color to their ink cartridge positions and move them to their correct positions. Wrong Tray Settings Follow the instructions on the Touchscreen and try to print again. Configure the paper size setting for the tray according to the LCD instructions.
Troubleshooting for Wireless LAN setup Wireless LAN Report Error Codes If the Wireless LAN Report shows that the connection failed, check the error code on the printed report and see the corresponding instructions in the table: Error Code Problem and Recommended Solutions TS-01 The wireless setting is not activated, change the wireless setting to ON. If a network cable is connected to your machine, disconnect it and change the wireless setting of your machine to ON.
Print or Scan Problems IMPORTANT Using non-Brother supplies may affect the print quality, hardware performance, and machine reliability. If you cannot print or scan a document, check the following: 1 All of the machine's protective parts have been removed. 2 The interface cables are securely connected to the machine and the computer. 3 The printer or scanner driver has been installed correctly. 4 (Scan problem only) Confirm the machine is assigned with an available IP address. (Windows®) a.
• Change the LAN cable for a new one. • Use a different LAN port on your hub. • Make sure your machine's wired connection is on. For a wireless network connection: • Confirm your machine's wireless status on the LCD. Your machine is not connected to the wireless access point. Set up the wireless network connection. The wireless connection setting is disabled. Enable the WLAN connection and set up the wireless network connection. The wireless access point cannot be detected.
Troubleshooting for Other Print Problems Difficulties Suggestions Poor print quality Check the print quality. See Related Information: Check the Print Quality at the end of this section. Make sure the Media Type setting in the printer driver or the Paper Type setting in the machine’s menu matches the type of paper you are using. For more information, see the Online User's Guide: Print Settings (Windows®) or Print Options (Macintosh). White lines appear in text or graphics. Check the print quality.
Difficulties Suggestions Black marks or spots appear in copies. Black marks or spots on copies are typically caused by dirt or correction fluid on the scanner glass. Clean the scanner glass and white plastic above it. See Related Information: Clean the Scanner at the end of this section. Dark lines appear at regular intervals. Check and adjust the paper feed. For more information, see the Online User's Guide: Correct the Paper Feed to Clear Vertical Lines.
Fax and Telephone Problems If you cannot send or receive a fax, check the following: 1 Connect one end of the telephone line cord to the area labeled "LINE", and then connect the other end of the telephone line cord directly to a telephone wall jack. If you can send and receive faxes when the telephone line is directly connected to the fax, the problem may be unrelated to the machine. Please contact your telephone service provider for connection issues. 2 Check the receive mode.
Troubleshooting for Other Fax Problems Difficulties Suggestions Cannot send a fax. Check all line cord connections. Make sure the telephone line cord is plugged into the telephone wall jack and the LINE jack of the machine. Make sure your machine has a dial tone by pressing the Hook button in Fax mode. If you subscribe to DSL, VoIP, or magicJack services, call your service provider for connection instructions. Print the Transmission Verification Report and check for an error.
Difficulties Suggestions Left and right margins are cut off or a single page is printed on two pages. Turn on Auto Reduction. Dialing does not work. (No dial tone) Check all line cord connections. Poor sending quality. Try changing your resolution to Fine or S.Fine. Change Tone/Pulse setting. (Available only for some countries) Make a copy to check your machine’s scanner operation. If the copy quality is not good, clean the scanner.
Document and Paper Jams Document Jams Document is Jammed in the Bottom of the ADF Unit Related Information • Error and Maintenance Messages on page 41 Document is Jammed in the Top of the ADF Unit 1 Remove any paper that is not jammed from the ADF. 2 Open the ADF cover. 3 Remove the jammed document by pulling it upward. 1 Remove any paper that is not jammed from the ADF. 2 Lift the ADF document support, and remove the jammed paper. 3 Press .
3 Pull the jammed document out to the right. Printer Jam or Paper Jam Locate and remove the jammed paper. Related Information • Error and Maintenance Messages on page 41 Paper is Jammed in the Front of the Machine If the LCD displays the following paper jam messages, follow these steps: 4 Close the document cover. 5 Press • [Jam Front/Rear], [Repeat Jam Front/Rear] • [Jam Front], [Repeat Jam Front] . Remove Paper Scraps Jammed in the ADF 1 Lift the document cover.
If your LCD error message was repeat paper jam messages, for example [Repeat Jam Front/Rear], lift the paper support (1), and then pull it at an angle completely out of the machine as shown by the arrow. If your LCD error message was repeat paper jam messages, for example [Repeat Jam Front/Rear], do the following: a. Lift the Jam Clear Flap, and remove the jammed paper. 1 When finished, continue with the next step. 4 Slowly pull out the jammed paper (1). 1 b.
5 Using both hands, use the finger holds on each side of the machine to lift the scanner cover (1) into the open position. 1 6 If your LCD error message was repeat paper jam messages, for example [Repeat Jam Front/Rear], move the print head (if necessary) to take out any paper remaining in this area. Make sure pieces of paper are not left in the corners of the machine (1) and (2). 1 2 Slowly pull the jammed paper (1) out of the machine. When finished, continue with the next step.
IMPORTANT 7 Gently close the scanner cover using the finger holds on each side. 8 If your LCD error message was [Jam Front/Rear] or [Repeat Jam Front/Rear], do the following: • If the print head is in the right corner as shown in the illustration, you cannot move the print head. Close the scanner cover, and then reconnect the power cord. Open the scanner cover again, and then hold down until the print head moves to the center. Then unplug the machine from the power source and take out the paper. a.
c. Close the Jam Clear Cover. Make sure the cover is closed completely. 9 If your LCD error message was [Jam Front/MP Tray] or [Repeat Jam Front/MP Tray], make sure you look carefully inside the MP tray for jammed paper. Push the release lever (1) toward the back of the machine, and then slowly pull the jammed paper out of the MP tray. back in the machine. Make sure you fit the paper support into the channels. push Tray #1 completely into the 11 Slowly machine. 1 12 Reconnect the power cord.
• [Jam Tray2], [Repeat Jam Tray2] a. Open the Jam Clear Cover (1) at the back of the machine. 1 Unplug the machine from the AC power outlet. 2 If the paper is loaded in the MP tray, remove the paper. 3 Pull Tray #1 (1) completely out of the machine as shown by the arrow. 1 b. Slowly pull the jammed paper out of the machine. 1 (MFC-J6935DW) If your LCD error message was [Jam Tray2] or [Repeat Jam Tray2], also pull Tray #2 (2) completely out of the machine as shown by the arrow. c.
then slowly pull the jammed paper out of the MP tray. 1 If your LCD error message was repeat paper jam messages, for example [Repeat Jam Rear], move the print head (if necessary) to take out any paper remaining in this area. Make sure pieces of paper are not left in the corners of the machine (1) and (2). 1 6 Using both hands, use the finger holds on each side of the machine to lift the scanner cover (1) into the open position. 2 When finished, continue with the next step.
IMPORTANT 8 Gently close the scanner cover using the finger holds on each side. 9 (MFC-J6535DW) Slowly push Tray #1 completely into the machine. • If the print head is in the right corner as shown in the illustration, you cannot move the print head. Close the scanner cover, and then reconnect the power cord. Open the scanner cover again, and then hold down until the print head moves to the center. Then unplug the machine from the power source and take out the paper.
Related Information • Remove Paper Scraps on page 65 Remove Paper Scraps 1 If you repeatedly experience paper jams (3 times or more), the LCD displays a message asking if you want to remove the scraps. Press [Yes] to return to the Home screen. 2 3 Press [Settings] > [Maintenance] > [Remove Paper Scraps]. Follow the instructions on the LCD to locate and remove the jammed paper.
C Appendix Enter Text on Your Brother Machine • To insert a character, press d or c to move the cursor to the correct place, and then enter the character. • Press • The characters that are available may differ depending on your country. • The keyboard layout may differ depending on the function you are setting. for each character you want to erase, or press and hold to erase all the characters.
Reset Your Brother Machine 1 • History (Caller ID history and Outgoing Call) • Faxes in memory 4. [All Settings] Press [Settings] > [All Settings] > [Initial Setup] > [Reset]. Use the Settings Reset function to reset all machine's settings to the settings originally set at the factory. 2 Press the reset option you want to use. Brother strongly recommends you perform this operation when you dispose of the machine. 3 Press [OK] for two seconds to reboot the machine.
Supply Specifications Ink The machine uses individual Black, Yellow, Cyan and Magenta ink cartridges that are separate from the print head assembly. Service Life of Ink Cartridge The first time you install the ink cartridges, the machine will use extra ink to fill the ink delivery tubes. This is a one-time process that enables highquality printing. Replacement ink cartridges will print the number of pages specified later in this table.
D Index A Fax, from computer..............................35 Accessories and Supplies...................... ii Address Book changing and deleting..................... 32 setting up.........................................32 ADF (automatic document feeder).......19 Automatic fax receive.......................................29 J B Manual receive.............................................29 Brother Brother numbers.................................i Customer Service...............................
print or scan problems ....................49 V Voice Mail............................................ 33 VoIP systems................................. 28, 33 W Warranty is in the box Notice of disclaimer ......................... iii Wireless LAN report.............................
Brother International Corporation 200 Crossing Boulevard P.O. Box 6911 Bridgewater, NJ 08807-0911 USA Brother International Corporation (Canada) Ltd. 1 rue Hôtel de Ville, Dollard-des-Ormeaux, QC, Canada H9B 3H6 Visit us on the World Wide Web www.brother.com These machines are approved for use in the country of purchase only. Local Brother companies or their dealers will support only machines purchased in their own countries.