NB-80C 2 Word Processing, Spreadsheet, Drawing, Scrapbook, Addressbook, Planner Book Reader, Text File Editor, Games & Glossary _GEOS ® US ENGLISH
€ AbOut this Manual In this manual, Book 2, look for information on these desktop personal planning, and electronic accessory programs: • publishing, Creates, edits, ,and prints documents, such as Word Processing. memos, letters, and reports. • Spreadsheet. calculations, Creates and edits Spreadsheet and creates charts. • Drawing. Creates and editing. • Scrapbook. Processing, art, which Addressbook.
[ Model Number: Geoworks® Geoworks. application software and All fights reserved. United Part of the software Hardware [ in this product and software floating Serial Number: GEOS® operating system States Patent 5,327,529. is ©copyright point math operating CardTrick system flash file system Word for Word import software library software export copyright copyright software copyright copyright 1994-1997.
Keep this manual in a safe place for future reference. We recommend that you write the unit's model number and serial number (from the rear panel of the keyboard/printer unit) in the blank spaces at the top of the previous page. FCC NOTICE This equipment has been tested and found to comply with the limits for a Class B digital device, pursuant to Part 15 of the FCC Rules. These limits are designed to provide reasonable protection against harmful interference in a residential installation.
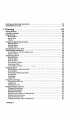
Table of Contents THE BASICS 1 Word Processing Word Processing 13ps ................................................................. Starting Word Processing ............................................................. Opening a Document ................................................................ Using the Tool Bars .................................................................. The Basic Functions Tool Bar ....................................................... The Advanced Functions Tool Bar ...
Wrapping Text ................................................................... Inserting, Appending, and Deleting Graphic Layouts 44 ................................. 45 Finishing Your Document ........................................................... Using Footnotes ................................................................. Creating a Table of Contents ....................................................... Creating a Bibliography ....................... . ..................................
Creating Notes .................................................................. Changing the Appearance of a Spreadsheet ............................................ Adjusting Column Width and Row Height .......................................... Changing Alignment ............................................................. Using Different Text Styles ........................................................ 81 82 "82 83 84 Working with Formulas .........................................................
Exporting and Importing Spreadsheet Error Codes 3 Drawing Spreadsheets ................................................ ............................................................ .......................................... 121 124 125 Starting Drawing .................................................................. Opening a Document .............................................................. Using the Tools .................................................................... Drawing Tools .....
Printing or Faxing Drawing Documents .............................................. Importing and Exporting Graphics .................................................. 4 Scrapbook 163 165 ........................................ 167 Starting Scrapbook ................................................................ Using 'Scrapbook Documents ....................................................... Placing and Deleting Clip Art and Other Scraps .....................................
Copying Event Descriptions ...................................................... Scheduling Repeating Events ..................................................... Changing a Repeating Event ..................................................... Removing a Repeating Event from the Calendar .................................... Finding Specific Events .......................................................... Printing or Faxing Planner Documents ...............................................
APPENDIX Spreadsheet Built-in Functions ........................ 215 Argument Rules ................................................................... Fina_idal Functions ................................................................ Information Functions .............................................................. 215 216 217 Logical Functions .................................................................. Mathematical Functions ............................................................
Contentsviii
1 Word Processing Before starting, review these basic procedures from the Getting Started This chapter explains how to create almost any type of document. It also explains how to write a form letter and merge it with names and addresses from Addressbook or Spreadsheet.
Starting Word Processing • To create a new document: By default, the Word Processing icon is automatically sel_cted (outlined in dotted white line) whenyou turn on your machine or any time you go 1othe Main Menu. 1. Click on Word Processing appears. from the Main Menu. The New/Open 2. Click on New. A new Word Pr_essing document dia/og box appears. Opening a Document_ Templates allow you to create standard • To open an existing documents, such as Word Processing 2 or template: 1.
Using the Tool Bars The tool bars provide quick access to menu functions. you can open five different tool bars: Basic Functions, Graphic Bar, Drawing Tools, In Word Processing, Advanced Functions, and Bitmap Tools. • To open a tool bar: 1. Select Show 2. the tool bar. The tool bar appears Select Tools from the Options menu. A submenu appears. on the screen. • To use a tool on the tool bar: 1. Select 2. Click on the tool button.
The Advanced Functions Tool Bar When opened, the Advanced Functions Functions tool bar. Find andreplace I above the Basic °.."0n.. Stylein use Zoomin Zoom I st°reStyle i R_cal,Style I I1_1 tool bar appears tofit Scale Hyphenation kZ!l'_l.o,m.,"1 [] ol t I-I=1=1-1 Alignment Linespacing View The Graphic Bar Use the Graphic bar for editing graphic objects created in or imported Word Processing.
The Drawing and Bitmap Tool Bars Pointer tool In Word Processing, the Drawing tool bar appears on the left of the window When you are working with this tool bar in Word Processing, remember the following: I-beamtool I'_ Text tool In Drawing, the Drawing and Bitmap tool bars are in different locations than they are in Word Processing, but they still contain the same tools. • To select a graphic.
Beginning a Document Before typing, first define the type of document your page size and page setup options. you are creating by setting Setting uP Your Page To select the page size: You can create a 1. Open a new 2. Select Page 3. asked if you want to scale the document or Select either Paper, Envelope, Label, or the width document if it is not a standard size. 4. Select pffnt it actua/ size. Select Print Actual 5. Click on Apply; then click on Close.
The columnsettingistwo. Thissampledocumentis set up with 2 columns,0.25inch spacing betweencolumns,and a vertical rule(line)betweencolumns. The verticalrule is 2 Working with Text This section explains how to enter, move, copy, and edit text. It also describes how to insert characters and symbols, change text style and format, use tone in text, and search for and replace text. -Entering Text.
!l_ To go to another You can also select a page to go to from the Basic Functions tool bar. Select Go to Page page: from the View menu. If your document has more than one page, tbe page you select appears, lf your document begins on a page other than I (you can set it up this way in Page Setup), Go to Page will still see the first page as page 1. l_ To correct Press as you type: BACKSPACE to erase characters to the lej_ of the insertion point.
• To select text with the keyboard: Press the keys shown below: Press This To Select SHIFT + --* or _- One character in the direction of the arrow; reduces or extends one' character at a time in the same direction. CTRL + The current word; the insertion point must be within the SPACEBAR word. SHIFT + t or, From the insertion point one line in the direction of the arrow; extends or reduces the selection in the same direction.
Deleting Text When you cut a • To delete text: selection, it is placed on the cl_board. You can paste the selection from the clipboard to another location as long as 1. Select the text you 2. Press CUT. want to delete. • To delete text using the keyboard: you have not cut or copied another item. With no text is selected, • BACKSPACE. use the following keystrokes Deletes the character • CTRL + BACKSPACE. word.
To copy a selection: 1. Select 2. Press the item or text you want clipboard, 3. to copy. COPY. The item remains Move replacing the insertion any point in your other document and aLso goes to the item in the clipboard. to the location where you want the item to appear. When you paste an item intoa document,it remains on the _lipboard unlessyou replace it. So you can continueto paste it. 4. Press PASTE. document. I_ To replace 1. Select 2. Type Select 2. Press 3.
Using Undo to Reverse CUT replaces the contents of the clipboard so that even Undo wi/I notbringit back.You can undoyourlastcut, butnot theonebeforeit. Your Last Action Sometimes you may delete some text or change the way it looks and immediately decide that it was not what you wanted. If you have not done anything else, select Undo from the Edit menu to restore the text. Once you select Undo, its name on the Edit menu changes to Redo.
. Fill in the dialog box: • Character any weight • Character Width (%). width from 25 to 200. • Character Spacing. Select the spacing between any spacing from -150 to 500. 4. Click on Apply. 5. Click on Close. Weight (%). Select from 75 to 125. Select the weight the width of the characters. of the characters. Select Select characters. any Select Changing fonts Fonts are different typefaces that define screen and when printed. Each character font to font.
If all the highlighted text is the same size, the currentsize is identifiedby a filled radio button in the Sizes menu. If the highlightedtext contains _rfferent sizes, none of the point sizes is marked. • To change 1. Select the text to change. 2. Select Sizes from the Character 3. Select one of the sizes from the list. Word Processing selected to the highlighted text. • To change 1. Changing menu. A submenu appears.
Aligning text You can decide how text lines up along a margin: left, centered, right, and iususqear. -- Alignedwith leftside of the margin -- Alignedwith rightside ofthe margin Centeredbetweensides ofthe margin I I I Rushagainstbothsidesof the margin(justified) _ To change Youcanalsoalign text byselectingAlignment from_e Paragraph menuor fromthe AdvancedFunctions tool bar. text alignment: 1.
. Fill in the dialog box: • % Shade_ Select the percent shading for the text tone. The lower the number, the more faded the tone. A setting of zero (0) causes the text to disappear. By default, this setting is 100. * Tone Tools. Select the text tone. 4. Click on Apply. (Continue to make changes satisfied with how the text looks.) as desired until you are 5. Click on Close; then deselect the text by clicking somewhere page. Tbe text appears in the tone you chose.
Finding and Replacing Text Use Find and Replace to quickly find a word or phrase in your document and, ff you like, to replace it with a different word or phrase. You can also replace all occurrences of a word or phrase in a document. Searching for text Find and Replace also appears in the Ec_t menu and on the Advanced FuncOons toolbar. Type exactly You can search for any sequence of numbers, letters, spaces, printable characters (such as punctuation marks). )_ To search for text: 1. Press CTRL + F.
Replace all occurrences of the search text with the replacement text. To do this, click on Replace All. A dialog box appears asking if you want to rep/ace a/! occurrences. Click on Yes to continue or No to quit. Replace in Selection is the same as Replace All, except that it replaces all occurrences only within selected text. 5. Using wildcards Click on Close. and special characters You can use two wildcards and all special formatting characters when you search and replace text.
• Graphic or Special Text. Adds a character to search for any graphic object or any special text character (dates, times, numbers, and so on) to the Find text. • Tab. • Carriage Replace • Page Break. With text. For special Adds a tab character Return. Adds With text. characters, Adds to the Find or Replace With text. a carriage a page break return character to the Find or character you can set the following to the Find or Replace options: Ignore Case/Accents.
Setting Line Spacing Line spacing is the space between lines in a paragraph, also called geadmg. Linespacingis the spacebetween linesin a paragraph. ) . . n . _ ]r . 12 . n . E . _ . 14 . = . B . _ . I; . + . 17 .......... . n . IB . 4 ] -I ' ! ! i To add more space between the lines of text in a paragraph, following line spacing settings: select from the • Single. This is considered normal spacing. There is no extra line space between each row of text.
• To change spacing between 1. Select one or more paragraphs 2. Select Paragraph paragraphs: to change. Spacing from the Paragraph 3. Fill in the dialog box, selecting menu. A dialog box appears. the options you want: • Space On Top. Select the spacing above a paragraph. • . Space On Bottom. Select the spacing below a paragraph. Click on Apply. 5. Click on Close.
3. Fill in the dialog box, selecting the options you want: • Left Indent of Fu'st Line. Select the distance of the first line from the left margin of the page. • Hanging Left Indent. margin of the page. Hangingindent • Right Indent. Select the distance of the text from the left Select the distance of the text from the right margin. 4. Click on Apply. 5. Click on Close. Setting tabs Use tabs numbers. to create aligned columns, such Add your own tabs by clicking as a table of contents on the ruler.
• Tab Type. Select the alignment of the text at the tab setting (Left, Center, Right, or Decimal). For example, use a decimal tab to align. columns of numbers along the decimal point. Tab Leader. Select the character that precedes Dot, Line, or Bullet). the tab setting (None, Vertical Line. This bption puts a vertical line at the tab position that spans the height of the paragraph. You can set the shading, line width, and line spacing. . Click on Apply. The tab is applied to selected paragrapbs. 5.
Using rulers When you open a new document, the margins are set for a 6-1/2 inch text area and the tabs are 1/2 inch apart. Use the ruler to change right and left indentations and to insert different tabs. Ruler changes do not affect header and footer text. For more information,see Using Headers an_l Footers on page 27. The indentations and tabs on the ruler affect the paragraph containing the insertion point.
Adding Borders You can place a border (lines or a box) around a paragraph to add emphas_. The border extends to the edge of the left and right indentation marker. You can also set the border tone to set it apart from other text. • To make a simple border: 1. Select one or more paragraphs to border. 2. 3. Select Borders from the Paragraph Select the border option you want menu. A submenu (None, Thin, appears. Thick, Double-l_dne, or Shadowed). • To make a custom border: 1.
4. Fill in the dialog box, selecting the options you want: • % Shaded. Select the percent shading for the border tone. The lower the number, the more faded the tone. A setting of zero (0) causes the border to disappear. By default, this setting is 100. • Tone Tools. Select the border tone from the tone palette. • Pattern. Select the pattet:n for the border tone. By default, this setting is solid. A transparent pattern is also available on this palette. 5. Click on Apply.
Using Headers and Footers A header contains anything (text, graphics, or both) that you want to appear at the top of every page. Likewise, a.footer contains anything you want to appear at the bottom.
• . Date of Printing. point. Crick on Close. The document created. l_ To change Pointertool J-_ at the insertion page reappeews with the beader or footer you the size of a header, or Edit Footer footer, or body text region: from the Layout menu. Select 2. From the Drawing tool bar, select the pointer tool and then select region (header, footer, or body text) you want to resize. 3. Point to any handle, until the text region from the Layout menu. Select the text Edit Header of printing 1.
I_ To delete the title page: 1. Select Title Page from the Layout menu. A submenu appears. 2. Select Delete Tide Page from the submenu. A dialog box appears asking if you are sure you want to delete the title page. 3. Click on Yes to delete the title page. Word ProcesMng deletes the titlepage. If the insertion point was on the title page, Word Processing moves it to the first page; othertzqse, the insertion point remains in the same location.
To set up multiple columns, specify column options in the Page Setup dialog box (from the File menu). When you set multiple columns, specify the number of columns, the gutter (or spacing) between columns, and the width of any vertical rule(s) (the lines in between the columns).
4. Click on Apply. 5. Click on Close. Using column breaks To force Word Processing to move text to the top of the next column, press CTRL + ENTER to insert a hard page break and create a new column. Using Text Style Sheets A style is a collection of text and paragraph formats under a common name. A text style sheet is the set of all the named text styles used in a document. Styles help ensure a consistentlook to your text.
4. Select the style, scrolling style formatting 5. Click on the window dialog Storing and recalling the list if necessary. to selected Word Processing applies the paragrapbs. control button in the top left comer to close the box. text attributes tempor=;rily You can temporarily store the text and paragraph attributes from one paragraph and then apply them to another without first creating a named style. To do so, use Store Style.
You can also define a new style without using a base style. Word Processing uses _e default attributes or the l_ To define a new style: 1. Select a paragraph for which you would like to change the style. Word Processing uses the attn'butes in the selected (or base) style to define the initial attn'butes of the new style. (You can also start out with no text selected, using the default text and paragraph attributes.) attributes of. selected text as the 2. Change staring point. 3.
• To update a style: 1. Select a paragraph in the style you want to change. 2. Set any character and paragraph attributes you want for this style. 3. Select Text Style Sheets from the Paragraph menu. A submenu appears. 4. Select Redefine Style from the submenu. Word Processing updates the style with the formatting in the selected paragraph. • To modify an existing style: 1. Select Text Style Sheets from the Paragraph menu. A submenu appears. 2. Select Manage Styles from the submenu.
. Click on Delete. Word Processing deletes the selected style. Word Processing attaches the base style to any paragraphs in the style you just deleted. Houmm_, Word Processing does not apply the attributes of those paragrapbs with the attributes in the base style. OR Click on Delete and Revert.
Using Master Pages to Design Documents Use master pages to specify information that repeats on each page of a document. For example, you might want a logo to appear on every page. Header................................. region ! i ! ! The maatarpage is a prototype of how text and graphics appear on every page. The master page defines the header and footer, the area where the body text appears on a page, and graphics (such as a logo) that repeat on iBodyi_gio_ ! every page.
• Redraw I)ooanent. implement 2. 3. Changing Click on this button any changes Make your changes include: you to the master any text or graphics to refresh and have made. page. • Adding • Resizing or moving the text region (including columns). The changesyou you want can make to the header for the header, When you are finished, click on Close. Word Processing affected pages with any changes you have made. text regions the screen or the footer.
• To move a text region: You can also select Copy, Paste, and Delete from the Edit menu or from their 1. Select the text region you want to move. 2. Point to the move handle in the center, drag the text region to where you want 3. Release hold clown the Drag it to appear. button, and the Drag button. • To copy a text region: buttons on the Basic Func_ons tool bar 1. Select (see page 3). 2. Press COPY. 3. Place the insertion 4. Press PASTE.
Using Frames for Graphics and Text A graphic frame is a rectangle that frames text or graphics. You can fill a graphic frame with tone and paRems, change the tone and thickness of its border, and make text wrap around it, wrap inside it, or even flow right through it. You can also resize, move, and delete a graphic frame. )_ To create a graphic frame: 1. Select Create Graphic Frame from the Layout menu. The Drawing tool bar appears on the left of the screen. 2.
• To create a graphic Texttool frame for text: 1. If the Drawing tool bar is not open, submenu of the Options menu. select 2. Select the Text tool from the Drawing it from the Show Tools tool bar. l-Beam _ To return to the' textin Place the insertion point in the document outline shows the frame. your document, select the I-Beam tool. 4. Begin typing. The text appears in the frame. , When you' use a frame for text,you can move the frame or create a borderaround it.
,To delete a graphic 1. Select the graphic 2. DELETE. To_na graphic frarno.,To frame you set area attributes set the area attributes. To a_ust the border of a frame, set He line attributes. Press frame: 1. Select the graphic 2. Select Area Attributes 3. If Filled is not selected, want. 4. Click on Apply; ,To want to delete. for a frame: frame. then from the Graphics click on it; then Select the graphic 2. Select Line Attributes 3. If Filled 4.
l!_ To set the grid spacing: 1. Select Grids from the Layout menu. A d_gg box appears. When you change the units of measure for the 2. Select the units of measure (Inches, Centimeters, Points, or Picas). By default, the units of measure are the same as the ruler setting. grid, you vwII find it helpful to change the units on the ruler also. 3. Select the distance between grid lines. 4. Click on Apply. See page 24. 5. Click on Close. I_ To snap graphics to the grid: 1.
I_ To change You can also change Ihe size by selecD'ngTransform from the Graphics menu and clicking on Scale. the size of a graphic 1. Select one or more 2. Point to any handle, press and handle until the graphic object 3. Release the Select graphic objects object: you want to resize. hold down the Select button, becomes the size you want. and drag the button. l!_To move a graphic object: 1. Select one or more graphic objects to move. 2.
9. Press PASTE. You are asked if you want the graphic on the text layer or graphics lays. Wrapping Text Wrapping text means that text'can go outside or inside the borders graphic object. The following illustration shows examples: of a This text is wrapped tight . Thistext is wrapped aroundthe graphics frame. This text is not wrapped. Thistext is wrapped insidetheobjecL • To set text wrapping: Select the graphic frame 2. Select Wrap from the Graphics 3.
Inserting, Appending, and Deleting Graphic Layouts To keep graphics and text together on the same page, use Insert, Append, and Delete. These functions allow you to insert or delete pages in between existing pages without changing the layout of the graphics and text on the existing pages. )_To insert or append a graphic layout: 1. Place the insertion point on a page in the document like to add a graphic layout. where you would 2. Select Graphic Layouts from the Layout menu. 3.
Finishing Your Document This section explains how to put the finishing touches on your document: footnotes, a table of contents, and a bibliography. usingFootnotes A footnote is a reference or explanation page or in a footnote section at the end. , or publication or clarifies that appears at the bottom of the A footnote typically cites an author a point. A footnote has two parts: a reference mark in the body and the accompanying footnote itself, which usually appears at the bottom on the same page.
l_ To create a footnote 1. Select Show Drawing Texttool ff you have a footer already, and you need more room for the Tools from the Options tool bar appears of a page: menu; then select Drawing Tools. The on the left of the screen. 2. Select 3. Point to where you want to anchor the upper-left comer of the text frame (usually near the bottom of the page), along the left margin and above the footer. 4.
Creating a Table of Contents Style sheets can help you create typically looks like this: ._11 . p t t_. a table R ..t • of contents S . t )6 . • for a document, t • IS . , . • • t which • ff • *it Dot tab leader iTabl_oJ'C¢_t4ram PEt 1 Frtedomof Corm:t_nce m
For example, create a style (such as Biblio) that is a hanging indented paragraph. Once you create this style, type the bibliography entry and apply the style to it. See page 31 for more information on creating and applying styles. Proofing Your Document Word Processing provides two proofreading misspelled words and typographical errors. similar meanings. ' tools.
• Check Selection. Checks only selected text. The first misspelled word (or word that is not in the dictionary) Change To box. appears in the 4. Select the action you want to take on this word: • Skip. Click on this button to ignore this spelling. • Skip All. Click on this button spelling. to ignore all occurrences of the • Replace. Type the word correctly; then click on this button to replace the misspelled word. • Replace All.
Creating a User Dictionary Use this feature when your document contains correctly spelled words not found in the dictionary, such as proper names or special terminology. You can also delete words in the user dictionary. l_ To create the user dictionary: I. Open a Word Processing document. 2. Press SPELL CHECK. A _ge appears dictionary tbat you would like to use. 3. Click on OK. Word Processing asking automatically you to insert a user creates a user dictionary.
I_ To use the Thesaurus: 1. Select 2. Thesaurus If you select automatically from the Edit menu. a word in your appear. text, A dialog its definition box appears. and synonym will OR Type the word and click on Lookup. . If more than one definition for the current word appears in the Definitions For box, select the definition you want. This list contains possible definitions for the current word, including the part of speech (noun, verb, adjective, and so on) and first part of the definition text.
• To fax: 1. Select Send 2. Select Fax.A dialog 3. Select the Fax options Merging Information from the File menu. A subraenu appears. box appears. and click on Fax. from Other Programs When you information print a Word Processing from other programs. document, you can merge (combine) Merging allows you to print form letters, envelopes, information Processing.
Setting up the Merge Fields The merge document is created in Word Processing, and it contains text, graphics, formatting, and page layout. It also contains merge fields (for names, addresses, etc.) that correspond to the information in the data document. The merge fields have field names, which must match exactly the field names used in the source data document. These fields are case-sensitive, meaning they must match uppercase and lowercase exactly. For example, a merge field with the name Home.
.... =" : • ,=.... =" : "" .... P" " " P" : • F'_ iI " I" 13.li Putthe_d data I t fv !. il.)X Iv Iz ! = _-lllI_-_l fx IL IMI"I" lP le 1_) S _ lip ""_" laiIl¢lII.lalI, 1I I a/Ill Index_f_d Addufi_d I- ']°IN IIIll _i_ _,-12_ _ Merging Addressbook Information _ I I ._ When using Addressbook to create a data document for merging information, you can copy one name or an names in the Addmssbook document to the clipboard.
I!_To copy all records 1. In Addressbook, 2. Select Export 3. Select Comma 4. Give the file a name select Other Document from the File menu. from Separated all the records Merging Spreadsheet to the clipboard: the submenu. Values format appears. box appears. from the right. and click on Export to the clipboard A submenu A dialog to Clipboard. and prepares Addr_s/xx_ mc/x_s the data for merging.
• Field names must be contiguous. between field names.) (You cannot have an empty cell Fill in the rows beneath the field names. (Each row will be used one at a time to create individual documents when merging.) 2. l_ To copy the Spreadsheet merge data to the clipboard: Do not look the _lles before merging. 1. Change the order of the rows so that the rows at the top are the ones you want to merge. 2. Select the first row (with field names) to merge. and any subsequent rows you want 3. Press COPY.
Special Effects Displaying Invisible Characters Youcan_day invisJ_le Imgsib_ c/_ur_ are characters that you type but do not normally see on-screen, such as spaces, tabs, paragraph marks (carriage returns), page and e(ft whatyouhave column break marks, and section break marks.
Using Abbreviated Phrases Use Abbreviated Phrase to quickly insert long phrases into your Woed Processing documents. For example, if you commonly use the phrase Chief Executive Officer, put it in the abbreviated phrase list with the abbreviation ceo. Then, whenever you want to inse_ the long phrase in the document, just type ceo, press CTRL + X, and Chief Executive Officer will appear.
Inserting Special Characters You can insert special characters in a document that display dates, times, and numbers. Special characters are useful because they save you from typing and calculating information. For example, if you want the current date in a letter template to be updated each day, use a special character instead of retyping the date. A page break is another kind of special character. For more information, see Page Breaks on page 29.
Inserting a number (counter) Once you insert special numbers, you cannot change their value; the value depends on internal WordProcessing calculations. Word Processing keeps track of certain information in a document, such as the current page number, or the number of pages. "[b display any of these numbers, insert the appropriate special number character in your document the format you want. l_ To insert a special • in numben 1. Place the insertion point 2. Select Insert Special from 3.
Once you insort special dates you cannol change their value; bSevalue depends on internal WordProcessing calcu_tJons. J_ To insert a special date: 1. Place the insertion point where you want to insert the date. 2. Select Insert Special from the Edit menu. A submenu appear_ 3. Select Special Date from the submenu. 4. Select the special following: • Today's date Date the character. Date Doom_ent from (Won't A dia/og box appears. the Type list. The choices Change).
Inserting special times Word Processing keeps track of time information, such as the current time and the time a document was created, revised, or printed. To display any of these times, insert the appropriate special time character in your document, in the format you want. For example, you might use special times in a footer to display when you printed or .Last saved a document. Once you insert l_ To insert a special special times, you cannot 'ch_e their 1. Place the insertion value; the value 2.
Importing and Exporting Documents You can open documents created with other word processing programs by importing them into Word Processing. Likewise, you can export a document from Word Processing to another word processing program. You can import from and export to the following word processing programs: Import and Export Programs ASCII or plain text Microsoft Word 3.0, 4.0, 5.0 & 5.5 WordPerfect 5.0 & 5.1 WordPerfect for Windows 5.1 WordStar 3.45 or below WordStar 4.0, 5.0, 5.5, 6.0 & 7.
2 Spreadsheet Spr_beet spreadsheets charts. Before starting, review these basic procedures from the Getting StaRed makes calculations quickly and efficiently. You can use for keeping track of a budget or for creating presentations with chapter in Book 1: • Working with Documents • Saving Documents • Working with Menus • Working with Dialog Boxes Starting Spreadsheet l_ To start Spreadsheet: If you receive error codes or messages, refer to page 124in thischapter.
Activecell address. Edit Bar • \ Thecelladdressoftheacbvecell. • candickheretoenterthecontents \ _ let, _ Ilxg._ca '_ Restorebutton.._.._ Clickheretocancelthe changesyouare currently enteringinthe Editarea. ="f-'=--'=" / ' oftheEditareaintotheactivecell. 4- D7 - E8 -1t" Editarea. , _ This,shows thecontents oftheactive cell. Opening a Document I_ To open a new spreadsheet For more information about usingthe New/Open dialog box, see All About Documents in Getting Started (Book 1). 1.
Using the Tool Bars The tool bars in Spreadsheet provide quick access to menu functions. Word Processing, Spreadsheet contains five tool bars: Basic Functions, Advanced Functions, Graphic Bar, Drawing Tools, and Bitmap Tools. Like I_ To open a tool bar: 1. Select Show 2. Select the tool bar. The too/bar The Basic Functions Tools from the Options menu. appem_ A submenu appears. on the screen.
The Advanced Functions Tool Bar Use the Advanced Functions tool bar for more advanced menu functions like creating charts from spreadsheet data. Textalignment Rnd andReplace Zoomout ] Centered Right ] I Delete I C I Zoomin Full I N°rmalsize I (100%) cdum. I I High_ow Bar l I I Pie , %:,nt I Charttypes Button [] [] [] [] iTool Name Description Column A column chart plots each category as a series of vertical bars. The height of the bar corresponds to the value of the category.
Moving around in a Spreadsheet You can scroll through a spreadsheet by clicking on the scroll bars at the right of the screen or by using the keyboard. I_ To scroll using the keYboard: Use any of the following keystrokes to scroll through • PAGE UP. Scrolls the screen up. • PAGE DOWN. • CTRL + PAGE UP. Scrolls the screen left. • CTRL + PAGE DOWN. a spreadsheet: Scrolls the screen down. Scrolls the screen right.
Like individual address of the address of the the address for Todeselecta cell, • selectsomethingelse. cells, ranges have addresses. A range address consists of the upper left cell, followed by a colon (:), followed by the lower right cell. In the illustration on the previous page, the selected range is B3:D13. To select a single cell: Click on the cell you When an area is locked with the L'ockTittes command (rows or columns),you cannot change any information or format of the cells in the locked area.
• To select a cell using the keyboard: Use any of the following • keystrokes to select a cell: ARROW KEYS (t x _ x _ x ---). Selects the next cell in the direction of the arrow. • HOME. Selects the f'_t cell in the current row. • CTRL + HOME. Selects the first cell in the spreadsheet (A1). • END. Selects the last filled cell in the current row. • CTRL + END. Selects the last filled cell in the spreadsheet's area. • active CTRL + _.
Working with Values and Labels Build a spreadsheet by entering Values. Values are numbers, quarters. Dates can be entered as labels or as formulas, depending on how you want to us'ethem. See Entering and Changing Dates on page 75. values, labels, for example, andformu/as. sales figures for the past four /abe/.,. Labels are text; they are the titles or descriptive text that describe the contents of rows and columns, for example, First Quarter, Second Quarter, Third Quarter, and Fourth Quarter.
Notes on Entering Labels If you enter a label wider than the cell, it spills over into the next cell to the right as long as that cell is empty. If the cell to the right is full, the text appears cut off. The complete text of the label is stored in the cell, but you cannot see it unless you make the column wider Appearance of a Spreadsheet on page 82).
Changing the Number Format for Values a value, Spreadsheet automatically shows it in a standard you can change the format to suit your needs. The When you enter format; however, following table shows the available Format formats for values: You Type... Spreadsheet Displays General Fixed (2 decimal Fixed with Commas Fixed Integer whole places) (rounded to a 1234567 1234567 123.4567 123.46 1234.567 1,234.57 1234.567 1235 1234.567 $1234.57 1234.56 $1,234.57 1234.
• To change 1. Select the format of values: the cell(s) containing the value(s) whose format you want to change. 2, Select Number Format from the Properties menu, A dialog box appears: NumdberFormat Sel_taformathem. Spreadsheetdisplaysan exampleof theselected formathere. 3. Select the format appears you in the dialog want from the Formats Click on Apply. Spreadsheet 5. Click on Close. The dialog Datesand There are two as formulas. ways of tbe format box. 4.
Entering dates and times as formulas Dates entered as formulas are stored as serial numbers representing the number of days since January 1, 1900. For example, January 1, 1993 would stored as the number 33969. be When a date is stored as a serial number, you can use Spreadsheet to change its format automatically. You can also use the date in formulas. For example, you can change Jan 15, 1993 to 1/15/93 without retyping.
Format Formulas When you enter a date or time value as a formula, Spreadsheet initially displays a number;, however, you can change the format to suit your needs.
Formatting Spreadsheets Formatting options do not affect calculations; the appearance of a spreadsheet. This section following: * Show and prim • Display • Create • Add tone, • Create instead, they allow you to change describes how to do the grid line_ cell borders headers and shades footers of gray, or various patterns notes Showing Grid Lines A grid is the matrix of horizontal or vertical lines dividing the spreadsheet into rows and columns. Each individual line is a grid lkte.
Using Headers and Footers Headers and footers are the text that pdnts at the top or bottom of each page. They can be as simple as the page number, or they can include more descriptive information, such as the following: Enter header and footer text in cells that are not part of the main information in your spreadsheet. Then, when you print, select a print range that excludes the cells containing the header and footertext.
Using Tones To add interest to your spreadsheet presentation, for the following elements in a spreadsheet: • Text • Background use tones or shades of gray • Cell borders • To change 1. Select tones. the cells that 2. Select Text Tone from 3. Fill in the dialog box: . the text to which the Properties menu. you want A dialog to apply different box appears. • % Shaded. Select the percent shading for the text tone. The lower the number, the more faded the tone.
3. Fill in the dialog . box: • % Shaded. Select the percent shading for the text tone. The lower the number, the more faded the tone. By default, this setting is 100. If Unfdled is selected, this attribute is set to zero (0). • Tone Tools. Select the text tone from Click on Apply. The dialog box remains that you can change the tone of different the tone palette. on the screen cell borders.
Changing the Appearance of a Spreadsheet You may want to change the appearance of a spreadsheet presentation. For example, you might want to emphasize a different text style or alignment.
I_ To set a column width exactly: 1. Select the column for which you want to set the width. To do so, you can' either click on the column header or select a cell in the column. A standard columnis 64 points wide. A point is nearly 1/72 of an inch. 2. Select 3. Enter the number 4. Click on Apply. The dialog'box remains that you can keep adjusting the width. 5. Click on Close. Normally the height of _I_To set Column a row Width from the Cell menu. of points you want A dialog box appears.
Using Different Text Styles Using different text styles can highlight important information and improve the overall appearance of a spreadsheet. You can change the text style for any cell or range of cells in your spreadsheet, whether they contain labels, values, or formulas. You can apply more than one style to your text, such as bold Italic. I_ To change the style of text: 1. Select the cell or range of cells you want to change. 2. Select Styles from the Properties menu.
Working with Formulas Spreadsheet uses floating point math, which has benefits such as speed. But it produces errors in the Formulas describe calculations you want Spreadsheet to perform. When you start to use formulas, you see the power of a spreadsheeL Each time you change the contents of a cell anywhere in your spreadsheet, Spreadsheet automatically recalculates every formula in the spreadsheet- 17th or 18th significant Formulas are made up of the following elements: digit.
)_ To enter a formula: 1. Select the cell in which 2. Type 3. Click on the first cell you want appears in the Edit Area. 4. Type the mathematical operator you want to use. For example, multiplication (see page 88 for a list of operators). 5. Click on the second Edit Area. 6. Continue - to begin appears 7. Using References Most formulas include at least one reference. you want the formula. clicking to enter The equal sign appears and typing Tbe cell address to use.
Absolute II references B r I' O.OS I s An absolute reference tells Spreadsheet the specific address of a ceg. An absolute reference is like telling someone your exact address: 3628 Sixteenth Avenue. When you copy a formula from one location to another, Spreadsheet does not adjust absolute references. Use an absolute reference when you want to refer to the same cell, regardless of where you may copy the formula in the spreadsheet. (For detaiis on copying formulas, see page 95.
Using Operators Notice that percentage is a form of muttip/ication, To use the exponentiation operator, click on the SYM button to open the On-screen in Formulas Operators describe the type of calculation you want to perform, for example, addition or subtraction. The following table shows the operators you can use in formulas. Operator Description Example % Percentage A14*22% " Exponentiation 13"3 * and / Multiplication + and - Addition & Concatenation Keyboard.
To specify arguments, use a list of values, separated by commas and enclosed in parentheses. If the values are in cells, you can list those cells as the arguments. For example, to sum the numbers 2, 3, 5, and 6 enter SUM(2,3,5,6). Or if those numbers are in cells A1, 3_2, A3, and A4, you can enter one of the following: SUM(A1,A2,A3,A4) Placeholder z or SUM(AX-A4) arguments When you insert a built-in functionin a cell, you can automatically insert placeholders for the arguments.
3. Select the function from the Functions list on the fight. You can select a function type from the list on the left so that the Functions list shows only functions of the type you select. 4, Select Paste Arguments (the default) arguments with the function. ff you want Click on Paste. The function in the Edit Area . appears to insert placeholder with p[acebolders. 6. Click on Close. Spreadsheet's built-in function types are 7. In the Edit Area, double-click 8.
Spreadsheet's Built.in Functions Spreadsheet provides the following • Financial • Information • Logical • Math • Print • Statistical • String • Time and Date • Trigonometric built-in function types: When you select Insert Function from the Formula menu, a dialog box appears with a list of these function types on the left and the built-in functions on the fight. For example, when you select MATH from the left, the corresponding math functions appear on the fight.
Logical functions The logical functions evaluate relationships and return true or false results. For example, the IF function looks at a condition, such as whether the contents of B13 = 500, and returns a true or false answer (true=l, false=0). Mathematical functions Mathematical functions provide common mathematical formulas. For example, INT (Integer) truncates a value to the nearest whole number. The arguments for mathematical functions are either values or addresses of cells that contain values.
Editing the Spreadsheet After you have created a spreadsheet, you may want to make some changes. This section describes how to do the following: * Edit the contents • Copy • Insert and remove • Fill a range Editing the Contents and move of a cell information rows with a series in a spreadsheet and columns of incremental values of a Cell Change entries to correct an error or to update the spreadsheet to reflect new information.
You may want to delete information l_ To delete the contents using Cut from the Edit menu; that way, if you accidentally cut the wrong information, you can paste if back in place. 1. Select the cell or range 2. Press of cells: of cells whose DELETE. The coments contents of the cell or range you want to delete. are permanently deleted. OR Press CUT.
Copying to adjacent cells Fill Right and Fill Down provide a handy shortcut when you want to copy the contents of the active cell across a row or down a column. This is useful when you want When copying references. to copy formulas, Spreadsheet • To copy a formula 1. Select 2. formulas. a range automatically to adjacent of cells starting adjusts the relative cells: with the cell containing Select Fill Down from the Cell menu cells beneath it.
Using Drag and Drop You can over, de the Use drag and drop to move or copy cells in your spreadsheet. default drag and drop by holding down CTRL if you want to copy within a document or the MENU key if yotJ want to move text from one document to another. works the same way in Spreadsheet and drop within'the same document, information: If you drag behavior is to copy. and drop from one document ll_ To drag and drop information the cell, range, row(s), Drag and drop as it does in other programs.
Filling a Range of Cells with Incremental Values Using Fill Series from the Cell menu, you can automatically fill a range of ceils with a series of incremental values. Select the range of cells and specify the starting value and the increment. Spreadsheet does the rest. If the first cell in a series contains a 1, the next cell will be 2, the following and so on. If the first cell contains a date, Fill Sedes increments the date; Monday increments to Tuesday, Wednesday, Thursday, and so on.
Options for Spreadsheet This section t Formulas describes how • Show and hide • Assign names • Turn • Use circular to do the following: formulas to cells for'formulas automatic recalculation references on and off and iteration in calculations Showing and Hiding Formulas To see a formula for a single cell, select the cell and look at the formula in the Edit Bar. If you want, you can display all of the formulas in the spreadsheet cells.
Define a name that refers to a specific cell or range. For example, you might define RATE as A3; then, when entering formulas, you can type RATE instead of typing A3. To define a name: 1. Select Define Name from,the Formula menu. A dialog box appears with a list of any names you bare previously defined. 2. Click on New. Another dialog box appears: Add a _ .ar_ Llaw_. I [ 1 I Derenitioe_ , m 3.
Once you have defined a name, l_ To insert a name in a formula: you can usa it in 1. Select any formulas you create. To do so, 2. When the insertion point in the Edit Bar is in the position for the name you want to use, select Insert Name from the Formula menu. The Insert Name dialog box appears, with the names you have created. 3. Select 4. Click on Paste./'be 5. Click on Close. type the name in the formula. If you prefer, you can also select the name from a list in a dialog box.
l_ To turn automatic You can also recalculate by clickingon the calculatebutton from the Basic Functionstoolbar. 1. Select Calculation 2. Select Automatic 3. Click on OK. 4. Click on Close. from the Options or Manual !_ To recalculate Select Calculate recalculation on or off: menu. to specify A dialog box appears. the type of calculation you want. manually: Now from the Options menu.
. Click on OK. 4. Click on Close. 5. Create the formula with a circular reference. Spreadsbeet recalculates the formula the specified number of times or stops when the stated value for maximum change is calculated. Charting in Spreadsheet Spreadsheet lets you create a variety of charts that represent numeric trends or results. You can include a chart as a part of your spreadsheet. Or, after creating a chart, you can copy it to the clipboard and use it in other programs like Drawing or Word Processing.
If you must use a number for the chart title, sedes name, or categoryname, place a quote mark (') before the number so Spreadsheet interpretsit as text. Chart Tide. The tide of the chart. This label is optional. If you do not place any text in this cell, the chart will not be tided. You can tide it later using theTitles and Legends choice on the Chart menu. Series Name. The series names are the labels of the spreadsheet Category Name.
Stacked Percentage. that the total height shown as that value's vertical pie chart. The columns in each category are stacked so represents 100%. The height of each value is percentage of the whole category. This is like a One Tone With Values. Columns all have the same tone and are labeled with their numcric values. One Tone With No Space Between Categories. Columns all have the same tone, and the last column in category 1 touches the first column in category 2 with no space between them.
Matkea-s Only. Draws only the markers for each point; does not connect the markers with lines. Drop Lines. Draws the markers for each point, and then connects the points in each category with a vertical line; does not draw lines connecting the values. Area chart An area chart is a line chart in which the area below the line is filled with a pattern or solid tone. The illustrations below show a typical line chart The chart on the left shows the result when the data is entered horizontally.
X-Y Plot chart An X-Ypiot chart, sometimes called a scauerp/ot, looks similar to a line chart, but there is a significant difference between the two. Une charts plot a value against a label (see the line chart on page 104), whereas X-Y plot charts plot one value against another.
High/Low [1l 14 : chart .: 3311 3"11 38i : 41i A high/low chart is useful for tracking pairs of data that mark a high and low or a start and end value, such as the price of stocks or the day's temperature range. Each pair of data points is plotted as a single vertical line. You can also show a third or fourth relative value along with each pair, such as the stock's daily closing priCe or the average temperature. High/low charts require two categories of data and may show up to four categories.
Creating Charts Once your labels and _1_TO create _1 chartdata are in place on the spreadsheet, you can 1. From a spreadsheet, select the cells that contain the data you want to chart. create charts using either the ChWts menu . or the chading buttons on the Advanced Functions tool bar (see page 68): Open the Chart menu and select a chart type from the Create submenu. The chart appears as a graphic object in the lower right corner of the Spreadsheet window.
Manipulating Charts The procedures in this When you create a chart, it appears with small black boxes around the perimeter and a diamond-shaped spot in the center. These band/_s indicate the chart is the currently selected object. section explain how to perform basic operations with graphic objects. For more informa_on about Use the handles center resize working with graphic objects, see the Drawing'chapter. alows it. you to manipulate to move 'your chart.
Changing Chart Properties and Attributes Attributes are visual elements such as tone, line thickness, and fill pattern. If you select a chart and then click one part of it, such as a wedge of a pie chart, you can change the attributes of that part of the chart. To select multiple text items, press CTRL as you dick. You cannot move any labels that the chart has generated. !_ To change text properties in a chart: 1. Select the chart by clicking on it. Handles appear around the chart. 2.
Adding Titles and a Legend • To add titles and legend . to a chart: Select the chart. 2. Select Titles & Legend from. the Chart menu. A dialog box appears. 3. Fill in the dialog box, selecting • the options you want: Chart Title. Select this option to add a title to the cha_. Spreadsheet looks for title text in the upper left of the selected chart range. If Spreadsheet cannot find any text, a text object with the words "Chart Title" appears at the top of your chart. You can change the title later.
. Enter the new text. 5. When you are finished with the Text tool, select the Pointer tool from the Drawing tool bar and click on an empty area of the chart to remove the outline around the text (so that other changes are not accidentally made to the text). Pointertool Open the Drawing tool bar from the Show Tools submenu of the Options menu. About legends Spreadsheet generates legend labels from the category names in the column left of the data (usually column A).
• To add axis markings to a chart: 1. With the chart selected, choose Axis from the Chart menu. The Axis dialog. box appears. 2. Select the type of axis markings you want and click on Apply. The markings appear in your chart. The following illustration shows a chart with tick marks along the X Axis: 59 49 44 3. 1i¢kmarks Click on Close. • To addgrid lines to a chart: 1. With the chart selected, choose _'nes dialog box appears: !::i::iiii:J Grid Lines X Axis= Y Axis= _ ._. "_..-.._ .
Changing Marker Shapes Marker Markers show the data points on a chart. They are found only on X-Y plot and line charts. Changing the shape of the markers can help make the chart easier to read. I_ To change 1. Select chart. the marker shape: the markers The markers you want to change by clicking in that category are surrounded on one of them in your by outlines to indicate they are selected. 2. Select Marker Shape from the Charts menu. A drip, box containing marker shapes appears. 3.
* SHIFT + ENTER. Moves the active cell up one row. • TAB. Moves the active cell fight one column. Spreadsheet sorts all selected cells by the row or column containingthe active cell. • SHIFT + TAB. Moves the active cell left one column. Select Sort from the Edit menu. A dim_g box appem's. 4. Fill in the dialog box: . • Sort By. You can sort either rows or columns. • Sort Order. for example, You can sort in either ascending A, B, C, D or Z, Y, X, W. • Sort Options.
Creating Number and Date Formats While Spreadsheet offers a wide variety of standard number and date formats, you can create additional number and date formats to suit your needs. For example, if you want to show values with six decimal places, you can create a special format. )_ To create a number 1. Select 2. Select a format on which you can base the new format. For example, you want to create a format for displaying numbers with six decimal places, you might pick Fixed and specify six decimal places.
• To delete a number 1. Select Number 2. the format Select want to delete or date format that you created: Format from the Properties to delete the format. menu. and click on Delete. Select Yes, and A dialog box appears. You are asked the format if you really is deleted. Using Rulers The spreadsheet rulers are normally the row numbers and column can turn off the row and column headers or select altemate rulers.
Locking Titles Lock Tides in the View menu locks specific rows or columns of a page on-screen as tides. When you scroll the page, the tides remain fixed on-screen while the rows below (or to the right) scroll as usual. • To lock titles on-screen: 1. Scroll the spreadsheet so the column(s) or row(s) wanted as tides are visible in the upper left comer of the window. You cannot adjust the position of the titles after they are locked.
Information Therefore, you paste into other programs if you change the spreadsheet, is not automatically updated. you must recopy it into the Word Processing the same. document the information if you • To use spreadsheet want to keep data in another 1. Create the spreadsheet data you 2. Select the range 3. Press COPY. 4. Save your document 5. Open the program information. 6. Move the insertion point spreadsheet information. 7. Press PASTE.
Scale to Fit on One Page. Select this option if you want to reduce your spreadsheet to fit on a single page. If your spreadsheet is too large, it may be reduced so much that you cannot read it. Continuous Printing. Use this option printed as one long continuous page. you can tape the sheets together. ff you want your spreadsheet If you print on single sheets, Center Horizontally. Use this option to center the printed spreadsheet on the page. Center Vertically.
• To fax: 1. Press PRINT. A submenu appears. 2. Select Fax. The Fax Document 3. Select your fax options dt2dog box appears. and click on Fax. • To print a chart: 1. Make a note of the cells that the chart either completely (you will use this note in step 5). or partially covers 2. Press PRINT. A submenu appears. 3. Select Print. A dialog box appears. 4. Select your printing options.
For more information about DOS file names, see Naming a DOS File in Getting 5. Select name box, name 6. Click on Export. Staaed(Book1). When you export in CSV or dBase IV format, Spreadsheet creates fieldnames (Field1, FTeld2, Field& etc.), which correspond to the spreadsheet columns. Mapping allowsyou to change the order of those fields. the folder where you want to save the exported f'tle; then enter a for the exported tile.
10. Click on Done. The dialog box disappeam. box remains. 1"beExport Document dialog 11. Click on Export. 12. Name the document and press ENTER. After a few seconds, the information mcpom. l_ To import a Spreadsheet document Comma Separated Value forrnat: 1. Select New/Open ! from Lotus 1-2-3 or from the File menu. 1"beNew/Open dialog box appears. Ifyou areknportJng a documentand donot knowtheprogramit wascreatedin,select No Idea,and Spreadsheet will analyzethe document 2.
Spreadsheet Error Codes The following describes the error codes in Spreadsheet. cell when an error occurs. Error Codes Explanation #OVRFLW# Formula has a division by zero or division by an empty cell. Correct formula entries. ### 124 Cell too narrow to accommodate entry or formula results. Refer to page 82 in this chapter. #TYPE# One or more of the cells referenced in a formula contain an alphanumeric entry. Rewrite the formula to include only cell addresses containing numbers.
3 Drawing Before starting, review Drawing allows you to cream many types of designs, pictures, and these basic procedures illustrations. After you create a.drawing, you can copy it into a Word from the Getting Started Processing or Spreadsheet document. You can also import and export chapter in Book 1: Drawing files. • Workingwith Documents • SavingDocuments • Workingwith Menus • Working with Dialog Boxes Starting Drawing • To open Drawing: Click on the Drawing icon from the Main Menu. appears.
Opening a Document • To open an existing For information on templates, see Using Templatesin Getting Started (Book 1). drawing document: 1. Click on Drawing from the Main Menu. 1"beNew/Open 2. Click on Open: Open an existing document. 3. Select the document dialog box appears. The Open dt2dog box appears. and click on Open. Drawing opens your jWe. Using the Tools For informa_on on the AtMbutes toolbar, see page 136. Drawing Selecting a tool from a tool bar is like picking up a pencil or pen.
Cut tooL object from your drawing. Cuts a selected Copy tool. Copies an object to the clipboard. Paste tool. Pastes the contents of the clipboard at the insertion point. Select All tool. Selects all graphics appear around all items. handles Delete tool. Removes selected and text graphics in a documenL Black or text. Bitmap Tools Frame tool. Creates a frame into which you can place bitmap drawings. Selection tool. Selects all or part of an object paste.
Pointers Select a drawing tool by clicking on it in the tool bar. When you move the on-screen pointer into the drawing area, it changes shape. This shape depends on the tool you are using and the location of the pointer. Pointer. If you are using the pointer tool, it remains active until you select an item in the drawing area. The pointer will change to crossed arrows when you move or size a selected object. ÷ Vertical/horizontal crossed arrows. This pointer appears you move an object in the drawing area.
Creating and Editing Simple Objects With Drawing, you can create objects from shapes can select, edit, and manipulate individual objects. (tone or pattern) or the _ (outline). or lines. Once created, you You can also change the Drawing offers two ways to create objects: with the drawing tools or from the Create submenu in the Edit menu (see page 134 on using the Create submenu). l_ To draw a rectangle or ellipse with the drawing tools: 1.
ll_To create an unfilled object: Pressing CTRL as you Press CTRL while you hold the Select button and drag to create a shape. draw creates an unfilled When you release the Select button, the unfilled object appears: object when the defaultis set to filled, and it creates a filled object when the defaultis set to unfilled. To change the default, selectArea Attributes from the Attributes menu, click on Filled or Unfilled, and click on Apply. II Unfilledobject Filledobject II_To draw a line: 1.
3. Hold the Drag button and drag the line to a new I_ To add an arrowhead CTRL while Press you ended drawing location. at the end of a line: a line. An arrowhead appears at tbepoint where the line. OR 1. Select Line Attributes from the Attributes menu. The Line Attributes dialog box appears. 2. Click on the Arrowhead style. 3. Click on the Arrowhead at End check box and click on Close. An arrowhead appears at the poim wbere you ended the line.
• To select all objects: To select all but a couple of objects in your drav#ng,choose Select All from the Edit menu, then press CTRL, and clickon only those objectsyou want to deselect. PressCTRL + I. Hand/esappeararound a!/the objects. Resizing Objects You can enlarge and reduce objects by dragging the resize handles. Dragging toward the • center of the object reduces R while draggingaway from the center enlarges it. As you drag, an outline shows the changing size of the object.
Changing the On-screen You may View find it easier to draw by adjusting the on-screen view. For example, you can enlarge the view of an object (zoom in) to focus on free details. can also hide scroll bars or redraw the screen to clean it up. You !_ To zoom in on an object: 1. Select the Zoom tool from the tool bar. The pointer changes magnifying glass when you move it onto the drawing area. 2. Place the Zoom pointer on the area you want You can click several times to move closer.
Advanced Work with Objects In Drawing, you can change the appearance can: of objects in many ways. You • draw lines, arcs, and complex objects with the Create submenu; and • set attributes to change the appearance of each object. • I Drawmg Objects, Arcs, and Straight Lines To create simple shapes like triangles or more complex shapes like polygons with up to 100 sides, use Create from the Edit menu.
• To create a polygon: 1. Select Create from the Edit menu. 2. Select Polygons from the Create submenu. - IPOItJIgOn_l_st:flg_. IlOept The radii for a polygon represent the horizontaland vertical radii of an ellipse in which the polygon can be inscribed. . . Fill in the dialog IIIP_II_I A dialog box appears: IlOOpt I[l_'_ I box: • Number of Polygon Sides. The defauk is 5 sides. • Polygon Radius. Select the polygon's horizontal radius and vertical radius. The default is 100 (about 1.
• Inner ellipse Radius. The inner radii of the star represent the radii of an that touches each of the star's inverted angles. The left box specifies the horizontal measure, and the right box specifies the vertical measure, in point increments. The default is 40 points (about 0.56 inches); the minimum size is 1 point (about and the maximum size is 288 points (4 inches). . Click on Create Star. Drawingplaces 1/72 of an inch); the star in the drawing area. 5. Click on Close.
Use these tools to change the attributes of selected objects. If no object is selected, use the tools to set the attributes of future objects you draw. Setting area attributes Area attributes apply rectangles, and arcs. • Fill tone • Tone • Pattern to the area inside ellipses, rectangles, rounded You can set any of the following area aRributes: shading You can set all of these menu or using the tools attributes using on the Attribute !_ To set area attributes 1. Select one or more 2.
• To shade an object: 1. Select one or more graphic objects to shade. 2. Click on the Area Shading tool. A horizontalpop-up menu appears. The option fim'tbest to the lej_ is 100% shading while the option farthest night is 0%, the same as an unfilled object. 3. Select the shading you want. ,Drawing applies to the the area shading. • To fill an object with a pattern: 1. Select one or more 2. Click on the Area Pattern 3. Select you want.
Changing arc attributes To create an arc, use the An arc is a portion am tool from the Dra_ng too/bat, around, a 90 degree is half of an ellipse. All angles are measured You can set the precise size (in degrees) of the starting angle and ending angle of any arc. You can also.specify whether you would like your arc's end points connected by radii or by a chord. The following illustration shows angle conventions used in Drawing and what radii and chord connected arcs look like.
To shade a line: [I\=J 1. Select one or more lines or graphic objects. 2. Click on the Line Shading tool. A borizonta/pop-up menu appe¢_. option farthest to the left is 100% sbading_ while the option farthest right is 0%. 3. Select the shading To change line you want. Drawing applies The to the the line shading. width: 1. Select one or more lines or graphic objects, 2. Click on the Line Width tool. A bon'zontalpop-up 3. Select the width you want. Drawing menu appears.
Transforming Objects You can transform scaling, rotating, transformation. an object and skewing to give it special (slanting). visual effects You can also undo such as flipping, any Flipping Objects Use the Transform You can also use keyboard shortcuts to flip objects when the Transformmenu is pulled down. Press L (as in Left-to-right) to flip the selected object left-to-right.Press T (as in Top-to-bottom) to flip /t top-to-bottom. menu to flip objects left-to-right or top-to-bottom.
Rotating Objects To rotate an object, use the Rotate tool or select Rotate from the Transform menu, where you can select the exact degree of rotation. The selected object rotates multiple objects, and they you want multiple objects fhst group them (see page around its center point You can also select will rotate around their respective center points. If to rotate around a common center point, you must 148). )_ To rotatetheanobject object with tothe Rotate 1. Select you want rotate. Handlestool: appear 2.
Skewing Objects You can skew an object to make or vertically at a precise it slant horizontally angle. ] Skew 14- nn 1. Select one or more 2. Select Skew objects from the Transform 3. Select the skew angle skew angle you chose. j -Tm • Horizontal. you want. A positive negative value skews -89 to 89 degrees. • that you want menu. to skew. The dialog Drawing value box at the left appears. skews selected skews the object objects the to the left, and a it to the right.
I_ To duplicate Shortcut: Press D to duplicate the selected object(s); press P to duplicate the selected 1. Select 2. object(s) in place. an object: the object Select Duplicate bandies around tbe object. )_To custom you want duplicate 1. Select one 2. Select Duplicate to duplicate. Handles appear around the object. from the Edit menu. The copo_d object appears with it. You can use the move bandle on the duplicate to move or more an object: objects that you want from the Edit menu.
Converting to a Graphic You can also group graphic objects and transformthem. Converting to a Graphic is helpful when you want to manipulate text or a graphic to create special visual effects. For example, you could convert a text object with numbers to a graphic; then resize and skew the text, as shown in the following illustration: You can also use this feature to save any transformations (skewing, rotating, scaling, and so on) for a single object.
Arranging Objects The Arrange menu provides in your drawing. Moving objects several ways of controlling placement of objects to the Front or Back Whenever two or more objects ovedap, you can place one of the objects behind the others or you can place it in front. , I_ To move an object to the front or back: 1. Moving an objectone layer is useful when you cannot see objects Select the object you want to move to the front or back. 2. Select either Bring to Front or Send to Back from the Arrange menu.
Moving one object !_ To move several objects: moves all the selected 1. Select the Pointer tool from the Drawing tool bar. objects.As you drag, an outlineof the objects 2. Place the on-screen arrow near the objects, hold the Select button, and followsyour motion, drag across the screen to make a box around the objects. Handles appear indcating where the around the obj_ts. object will be placed 3. Move the on-screen pointer over the move handle for one of the objects, whenyou release the Drag button.
Nudge means to move a small To nudge objects: amount. To nudge 1. Select the object object(s) using the keyboard, press and hold SHIFT 2. Select Move 3. Select moves Nudge Left, Nudge Right, Nudge Up, or Nudge one pixel in the direction you select. while pressing an or objects. from the Arrange menu. A submenu appears. Down. The object arrow key that points the direction you want to move.
Pasting Inside When you paste a single object. object an object that inside another you can manipulate object, Drawing as you would combines any other them into Drawing The boundaries of the outside object become the boundaries of the inside object. Once you have pasted an object inside another, you can free tune the position of the inside object by moving it one pixel at a time. You can also break the object Paste Inside command.
• To nudge inside: 1. Select the object that contains the object or objects you want to nudge inside, 2. Select Paste Inside from the Edit menu. 3. Select Nudge 4. Select Nudge Left, Right, Up, or Down. one pixel in the direction you select. Inside. A submenu A submenu appears. appears. Drawing nudges the inside object • To break out paste reside: 1. Select the object 2. Select Paste 3. Select Break objects. you want Inside to break out. from the Edit menu. Out Paste Inside.
Using Grids Drawing can position objects using the grids, snapping objects into place for you automatically. The grid is a pattern of evenly-spaced vertical and horizontal lines that help you align and size objects in a drawing. You can also change the spacing of the grid. You can also automatically snap (or position) objects along grid lines when you create them. Snapping objects to the grid is often faster and more accurate than positioning them manually with the on-screen pointer. • . , I It .
Press X or period (.) to turngrid snapping on or off onlyfor the next create, move, or resize operation. l_ To snap objects to the grid: 1. Select Grids from the Options menu. A dialog box appears. 2. Select Snap to Grids. 3. Click on Apply. While Snap to Gn'ds is selected, Drawing to grids when you draw, move, or resize an o_'ect. 4. Click on Close. will snap corners I Using Text in Drawings In Drawing, create as little or as much text objects text as you for entering like. text.
• To enter and edit text in a text object: Use the basic text editing techniques available in all programs, including BACKSPACE and DELETE keys, and Undo, Cut, Copy, and Paste from the Edit menu. • To create text in different sizes: 1. Select the Text tool. 2. Place the crossed I-beam pointer where you want to begin typing. 3. Hold down CTRL; then hold the Select button and drag the on-screen pointer diagonally to create your text object.
Changin_ Text Style, Size Text sty/e • ,• You can combinestyles to create Undedined. Bold Underlined./taiic Underlined.Bold Italic, and Bold Italic Underlined. and you can apply Strike Thru, Superscriptor Subscript to any of thosestyles. The default styleis Plain Text. refers to the way the type in each font appears: Plain Text Bold • Italic • Underlined Subscript (e.g. H20_ Superscript (e.g.
Aligning 2. • Click on the Text Shading tool. A hcrdzontalpop-up menu appears. The option farthest to the lej_ is 100% soading, while the option farthest to the right is 0%. 3. Select the shading text or text objects. you want. Drawing applies the shading to the selected Text \ Text alignment refers to how the text lines up With the left and right edges of a text object. You can align text at the left, center, or right of a text object. You can also justify text (aligned left and right).
Working with Bitmap Objects ,, , In Drawing, you can use three types of objects objects, graphic objects, and bitmap objects. Because bitmap drawings use a lot of memory: *Limit the size ofyour bitmap drawing to an area smaller than the size of the window, scaled at 100% normal size. .Save your document frequen@ .Limit the number of bitrnap drawings per document you create to compose using a drawing: text • A text objea is an object Attributes tool bar.
Creating a Bitmap Frame A bitmapframe defines the outer bounds of a bitmap. Create a bitmap frame using the Frame tool or by drawing a bitmap shape using other bitmap tools. Use the Bitmap tools to change pixels in the object and manipulate the bitmap by moving, resizing, or transforming it as desired. If you know the size of the bitmap you want to create, or if you just want to block out an area of the drawing for the bitmap, use the Frame tool to create a rectangular bitmap frame.
You can also create a bitmap frame by using the Bitmap tools to draw a bitmap shape (straight line, freehand symbol, rectangle, or ellipse) in a blank part of the drawing area. When you do this, Drawing creates a rectangular bitmap frame around the object along its outermost points; the boundaries of the frame become the boundaries of the bitmap. -.o_.-..
• To draw a straight Hold down SHIFT while drawing a line tomake it exactly hoHzontal, vertical,or 45 degrees. 1. Select Line Attributes 2. Select the line tone, 3. Select the Bitmap Line tool from the tool bar. Thepointer crosshairs when you move it over the drawing area. 4. Move the on-screen pointer to where you want to anchor the first point of the line; then hold the Select button and drag the line to where you want it to end. .
Editing Bitmap Objects Once you create a bitmap, you can use the Bitmap tools to change pixels in the object, erase portions of it, and select all or part of the object to cut, copy, and paste. Whenever you use a bitmap tool in a bitmap object, the bitmap object becomes the selected object.
Using Tone or Fill Pattern in a Selected Area It is a good idea to save your drawings after every fill operaOon. You can change the tone of a contiguous group of pixels using the Bitmap Fill tool. Unlike the Fill tool for graphic objects, which fills the entire interior of a graphic object, the Bitmap Fill tool fills an enclosed area with the current area fill tone. The enclosed area is bounded by pixels of a different tone. l_ To change the pixels in an enclosed area: 1.
• To display --_ the Pixel View: 1. aSelect the Pixelglass Viewwhen tool you frommove the it Bitmap tooldrawing bar. Thepointer magnifying over the area. 2. Move the on-screen pointer to where you want click the Select button. The Pixel View appeam. 3. Select 4. In the Pixel View window, individually or in groups. the bitmap • To change tool you want to change to use to change use any of the Bitmap pixels; changes then pixels.
Changing the Bitmap Color and Resolution You can change the color format (monochrome or color) (the number of dots, or pixels, per inch) of a bitmap. and resolution For example, if you want to reduce the storage and memory size of the object, change a 16-color object.to a monochrome object. Similarly, to add color, change a monochrome object to a 16-color object. CAUTION: Increasing the resolution of the bitmap or the You can also change storage and memory 72 dpi.
• To print a document: 1. Save your document; 2. Select Print. 3. Select your The Print then press d_/og print options; PRINT. A submenu appears. box appears. then click on Print. • To fax: 1. Save your document; Drawing 164 2. Select Fax. 3. Select your fax options; then press PRINT. A submenu appears. The Fax dialog box appeam. then click on fax.
Importing and Exporting Graphics When you import a biffnap graphic, Drawing places it in the center of the window. The object will not respond like a graphic bbject,but rather like a bitmap objecL Withbitrnap objects, the pixels enlarge and shank as you resize, and you must editthem with the Bitmap tools (see page 156). You can import graphics into Drawing that were created with other drawing programs or are stored in other file formats. You can also export drawings you have created in Drawing.
Select 0S/2 Device Independent Bitmap if you plan to use the exported file in an OS/2 program. Select Windows 2.x Device Dependent Bitmap if you plan to use the exported file in a Windows program with a version of Microsoft Windows earlier than 3.0. Select Windows 3.x'D1B if you plan to use the exported file in a program running with Microsoft Windows 3.0 or higher. Select Windows 3.x DIB R/_ Compressed if you plan to use the exported file with Microsoft Windows 3.
4 Scrapbook Before starting, review Scrapbook is a place to store graphic objects and bits of text so that they are these basic procedures available for pasting into documents. It also allows you to place the clip art from the Getting Started that is supplied on diskette in a" Scrapbook document to place in other chapter in Book 1: documents.
Using Scrapbook Documents Scrapbook is a place to store graphic objects and bits of text so that they available for pasting into documents. You can also delete graphic objects text from your default scrapbook or any other scrapbook document. You can also navigate scraps, through a scrapbook so you can find items document and name a page are and of easily. Placing and Deleting Clip Art and Other Scraps You can place dip art, scraps of text, or other graphics into a Scrapbook document.
II_ To copy from Scrapbook 1. Go to the scrapbook to other programs: page that has the scrap you want to cut or copy. 2. Press CUT or COPY from the function keys. 3. Exit Scrapbook by pressing EXIT. 4. Open the document in the program to which you are copying the scrap. 5. Place the insertion point where you want to paste the scrap on the page. 6. Press PASTE. The scrap is pasted Nawgating into the document. Through Scraps You can flip through the pages go directly to a specific page.
!_ To retrieve Retrieving a deleted page restores the document to the a deleted page: 1. Select Other from the File menu. way it was when 2. Select Discard you last saved it. All changes made 3. Click on Yes. The scrapbook Changes A submenu from the submenu. is restored appears. appe_zrs. A _ to tbe pretdouMy saved version. during the current work session are deleted. For this reason, you should onty do this ifitis very importantto retrievethe deleted page.
Creating a New Scrapbook Before you create a new scrapbook documen_ you must firstsave and close the current one. Document l_ To create a new scrapbook 1. If you have a Scrapbook document: document open, select Close from the File menu. If you have unsaved changes in the current scrapbook document, you are asked if you wish to save or discard them. TheNew/Open dialog box appears. 2. Click on New. A new scrapbook 3. Add a scrap scraps name. to the new scrapbook 4. Press SAVE. A dialog 5.
• To import graphics or text from another program: 1. Open the scrapbook in which you want to place the image. 2. Insert the diskette import. containing the scrap (graphic or text) that you want to 3. Go to the page that you want to follow the imported page. If you do not know the format of the file you are impo_'ng, select No Idea, and Scrapbook will analyze it to see if it can be imported. Scrapbook 172 4. Select Import Scrap from the'File menu, The Import Scrap dialog box appears. 5.
5 Addressbook Bo[om startir_, rmaew these bask: pmcE_uros from the Getting Started chapter in Book 1: • Working with Documents Addressbook is your electronic address and telephone directory. Use it to store addresses and telephone numbers, as well as notes and email addresses. You can also create multiple Ad_-essbook documents, for example, one for business and one for personal.
Working with Cards Addressbook documents are referred to as Addr_ssbooks, which contain a series of cards, or records, much like the cards in a real card file. Each card contains the name, address, phone numbers, and notes you enter for each person. Once you fill in the blanks, the program stores the card as a record in your Addressbook file.
I_ To add cards to your Addressbook: CTRL + TAB moves the cursor from field to field. 1. Click on New. Addressbook the index field. shows a blank card with the insertion point in" 2. If you are adding a card for a person, type the person's name in the index field in last name, first name order. Addressbook uses the index field to sort cards in alphabetical order. Be sure to type a comma after the last name. OR Ignoreany highlighted letter tabs while you are entering a new card.
Adding and Changing Phone Types Each address card can have up to seven phone numbers in six standard categories: HOME, OFFICE, CAR, FAX, EMAIL, and ALIAS. Each card also contains a blank field so you can add one phone type. )_To add a phone type in the empty I. Click on the up and see an empty field. 2. Click in this empty 3. Type a name down phone for the phone arrows type next field. type.
Editing Cards • To make changes 1. To make changes on the appropriate want Copying in cards: in cards, locate the card you want to change by clicking index tab; then clicking on Next until the card you appears. 2. Select the text and replace it with new change text in any program. 3. Undo a change other task. Addressbook by choosing Undo undoes text, the same way you would on the Edit menu the last change before you do any entered.
Deleting Cards From time to time, you may want to clean up your Addressbooks by deleting cards you no longer need. • To delete a card from your Addressbook: 1. Flip through your cards until you find the card you want to delete. 2. Select Delete Record from the Edit menu./'be card is removed from your Addressbook. 3. Undo a delete delete. by selecting Undo from the Edit menu right after you Adding Notes to Cards Notes can be useful other information. • To add notes 1.
Searching through Cards Addressbook allows you to search all the cards. For example, the cards to fred those containing a spedfic address. l_ To search for information you can search on the cards: 1. Select Find from the Utilities menu. A dia/og box appez_: Selector deselectthese optionsto specifyfieldsin whichthe searchwill occur. _ [ ] I[ind: [Search Find [e(Jmin Index Field And: I"11kldresses 0 Ilotes n Phone Humbers Remove allthree check [ marksto searchonlythe indexfield.
Making New Addressbooks You may want to create other Addressbooks. For instance, you may find it easier to keep business contacts in one Addressbook and keep friends and family in another. Beforeyou create a new Addressbook, press SAVE to save and close the currentone. II_To create a new Addressbook document: 1. If you have an Addressbook menu. If you make changes you want to saoe or discard 2. When the New/Open Addressbook appears. 3. You must add one or more save it and give it a name. 4.
Curreat record - Address only. This option prints the address currently on screen for labels and envelopes. All records - Addresses and phone numbers. This option prints a list of the index fields, addresses, and phone numbers from all cards in your Addressbook. All records - Address_ only. This option prints the addresses from all cards in your Addressbook for labels and envelopes. All records - Phone numbers only.
4. Select fax options and click on Fax. Importing a Document You can import documents, such as mailing lists, from some database and Spreadsheet programs and turn them into Addressbooks. You can import the following: If you are importing a document and do not 1. No idea, and Addressbook will 2. • Lotus 1-2-3 • dBase Separated Values) IV Insert the diskette Save and close file: containing the current the file to import. Addressbook.
In the SourceList,clickon a fieldnameto mapfrom a file. In the DestinationList,clickon the Addressbook Thislist showsthepairsof fieldsyou havemapped. nameto whichyouwantto map. _ce List= I IC,ckhere iryoumake an stake. Clickhere for eachfieldsyou haveselectedto map. 5. Select one field in the Source List and one corresponding field in the Destination List and click on Map. The corre/at_n is added to the Map List.
i_ To export an Addressbook: 1. With the Addressbook submenu 2. Select Export 3. Select the format box, and selector. change the order of information as you export. For example, if you want the Address field to be the Document 4. Select 5. Click on Export. a folder Other 2. Export 3. Select 4. first field in the exported documen_ select Other from the File menu. A dialog The file _xtension with that extension to save the document from the File menu. Comma Document.
6 Planner Before starting, review Planner is an automated appointment book that combines a yearly calendar and scheduler in one program. You can create multiple Planner documents, these basic procedures from the Getting Started chapter in Book 1: • Working with Documents for example, one to keep track of business track of personal appointments.
Viewing the Calendar The Calendar window always contains a whole year, January through December. Normally you see only one month at a time, which is the single month view. You can scroll the window to see the other months in the year, and you can change the year over which you are scrolling, but you never see more than one month at a time, The current day of the month is highlighted. )_ To switch to the full year view: 1. Select Full Year from the View menu.
Selecting and Viewing Events Like an appointment book, Planner keeps track of weekly meetings, importam appointments, and special dates. All of these are called events. Use events in Planner to track important dates in your daily schedule and to schedule dates far in advance, like birthdays and vacations. You can also schedule repeating events. Tosee differentyears,clickon the up and down arrows.Or double-clicktheyear and editiL. Clickon a dayin the calendarwindowto selectit and viewitsevents.
Switching between On the View menu, when both windows are showing, the Both choice is on (darkened). When only one window is showing. Both is off. the Calendar You can view one one Window and the Events Window the Calendar window and the Events at a time. Showing only one window without taking up space for both. window at a time lets you side-by-side work or with either • To show only one window: Select Both from the View menu. The Both button changes to off and one of the windows disappears.
Selecting a Range of Days and Viewing Their Events You can view a summary of events over a range of days. The following illustration shows an example: These arethedatesoverwhich. events are beingsummadzed. ,.,.., [r_-l rt'z _b41 E 3 M 4 T bl & 5 F T 7 Oec Hon. Oec_m_,_r 1996 | 12dglo IPlq _ Ttm, Dec 12, S J 18 19 ZO/ Z2 Z3 Z9 50 - Oe¢ 5cl_ PM 1996 eneetlin O - Dr, Planning meeting Cd I_'. gumn8 PH Dec IS.
• This Quarter. Selects all days in this calendar quarter. The quaffers run January through March, April through June, July through September, and October through December. • This Year. Selects all days in this year. The selected range is bighh'gbted appear in the Events window. Scheduling in the Calendar window, and its events Events To schedule events, select the day, select a time in the Events window, and then type a description of the event.
Changing a Scheduled Event You can change description. When you change the time of a scheduled the scheduled time for an event I_ To change a scheduled event: event, it does oot 1. In the Events change its place among the other times in the Event 2. If you want to change the time, click in the time area. Delete the existing time and type a new time in HH:MM formal Use AM or PM to specify AM or PM,For example, you can type 8:15 AM for a new time. 3.
3. Edit the time if the one shown is not correct. Be sure the time you type is in the HH:MM format. For example, type 8:15 _a_ for a new time. 4. Press TAB or click in the description Adding an Event at a Particular area, and then type a description. Time You may want to schedule an event at a time that template, such as an early morning or late evening schedule an event with no specific time.
Scheduling Repeating Events You might have events that happen regularly, such as a meeting every Thursday at 4:00. In Planner, you can schedule the event once. Planner then remembers to schedule these meetings for you every Thursday at 4:00. You can schedule an event that repeats in one of the following ways: Weekly. A week/y event occurs on the same day every week, such as every Wednesday. Monthly by date.
2. Click on New. Another dialog box appears: Chun_ aepeeU. 0 Ewt [requenctj, • Neekkj s_pec_ry t_, @nero Type of [_ent@ HunUdy O Veeritj @omj of _ek Event 141flOccur Select _Detj(s)_ n Sun _ LaSt DOLlof [_onth: Day of I_k: • Plon n Tuns • Date: I First [] J_'-_ _ General _l_Foreuer OFrolrnt • Ned [] Thu _ Month: _ Time=. I 0 Frl 17Set _ ] Information. I TmL I J m 3. Select Weekly. •....... 4. Select the check 5. If you want to give the .
6. If you are scheduling a yearly the month your event occurs. monthly event.) 7. If you know the time of the event, format and type AM or PM. 8. Type 9. Select a brief description Forever if your event, use the up or down arrows (Skip this step if you are scheduling type of the event event'should it in the Time in the Event repeat box. to select a Use the HH:MM box. indefinitely. OR Select From ff your event is of limited duration and should only repeat a specific time period.
Changing a Repeating Event If your scheduled repeating event changes at any time, you can modify the event to reflect the new changes. • To change a scheduled Select Repeating . repeating event: Events from the Utilities menu. A dialog box appears. 2. Select the event you want to change from the list, and then click on Change. Another dialog box appears. Only unaltered occurrences of the repeating event are changed in the schedule.
2. 3. Type the text for which Click on Find Next. If no matches you are searching. The search are found, you starts on the current are asked if you want day and goes forward. to search past events. 4. Click on OK. The first event that matcbes the search text appears highlighted in the Events window. If there is no match for the specified text, then Planner informs you that ray match was found. 5. Click on Find Next if you text.
• To change Page Size options: 1. Select Page Size from the File menu. A dialog box appears: 2. Fill in the dialog box: • Type. Select paper, envelope, 3. • Size. Select the page size from the lisL • Page Layout. Select portrait or landscape. • Width. Select the width of the paper. You can also enter a custom page width here. • Height. Select the height. You can also enter a custom page height here. Click on Apply. box remains 4. or label.
. From the drop-down to select a month. OR list, select Month; then click on the up or down arrow Select Year;, then click on the up or down arrow to select a year. You can also edit the number in the Year box. OR Select Events window. . When the Content is set to Month, select Include the first few lines of events for each day. OR Events ff you want to fax If you want to fax a blank calendar, make sure the Include Events option is off. 7. Click on Fax when you are f'mished.
Creating New Calendars Planner provides a standard document called My Schedule. Whenever you start Planner, this document opens, making it easy to keep all of your appointments in one place. If you keep just one calendar, you should use this document. You can create other calendars. For example, you may f'md it easier to keep business contacts in one calendar and friends and family in another. Before you create a new calendar, press SAVE to save the current one. II_ To create a new Calendar document: 1.
7 Book Reader Before starting, review these basic procedures from the Getting Started chapter in Book 1: • Working with Menus ° Working with Dialog Boxes' With Book Reader, you can open books supplied on diskette, such as directories of zip codes and area codes. When you open a book on diskette, you can scroll through it and move from topic to topic using a byper/im_, a highlighted word that takes you to a new topic. Starting Book Reader • To open a book: 1.
Send. This tool opens a dialog box allowing you to send selected text to the clipboard or to the printer. lF'mdLThis tool OlXmSa dialog box with options about the information you want to find and how you want to find it. I_ To close a book: Select Using Information You can also choose book-reading options from the Nmn'gate menu. ff a book has a Table of Contents page, Book Reader shows it to you when you start. If it does not, Exit from the Book menu. Book Reader closes.
• To find information 1. Click on the Find in a book: icon at the bottom of the screen. The Find dfi2/og box appears: r- lrl I I I 2. Enter the search 3. Click on Find term. Next, Find Previous, • To find information 1. I Move the cursor until Close, with hyperlinks a text hyperlink Click on the spot. The area flashes; information on that topic. .. • To copytext You can paste the text in Word Processing or rDrawing. - or other content 1. Place the insertion your finger across 2.
Printing from Book Reader The Print option is in the Send dialog box. You can send selected text to the clipboard or printer. Selecting the print option prints the selected text or the current page if no text is selected. Be sure you have set up your printer (see Setting Printer Options in the Getting Started chapter of Book 1). • To print selected 1. Select the content 2. Click on the Send opens. 3. Click on Printer; text from a book: to print. icon at the bottom then of the screen.
8 Text File Editor Text File Editor is a simple editing program that allows you to create, read, write, and edit DOS text files, also called ASCII text fries. Text File Editor is supplied on diskette. DOS is Disk Operating System.
What Text File Editor Can and Cannot Do Word Processing can perfom all of the tasks listed in this table, even those that Text File Editor cannot do. For more l information, see the chapter on Word Processing The following table lists the tasks that Text File Editor can and cannot perform. Text File Editor shares basic capabilities with Word Processing, such as spell check.
Printing or Faxing a DOS Text File Before printing a Drawing Options in Getting Started actual size, layout, and _ document for the first time, review Setting Printer (Book 1). Also select page size options to reflect the that you want to prinL Before faxing for the first time, set up your fax information sheet; see the Fax and Data Modem chapter in Book 1. To print or fax in Text File Editor, Note the following two differences and create a cover select Print or Fax from the Send menu.
Naming a DOS Text File, DOS File Names. All documents created in Text File Editor are DOS text files. Give them names that follow the DOS rules for naming files: up to eight characters long, no spaces, followed by a period and three more characters. Use TXT following the period to indicate your file is a text file. For more information, Text File Editor 208 see Naming a DOS File in Getting Started (Book 1).
9 Games Before starting, review Two games are available: Turnabout, a game of strategy, and Solitaire, a these basic procedures popular international card game for one player. Games are supplied on from the Ge_ng Started diskette. chapter in Book 1: • Working with Menus • Workingwith Dialog Boxes Turnabout Turnabout is a strategy game where you try to gain control of the board by capturing pieces from your opponent. The game ends when no one can make any more moves.
6. The system then places its next piece. Watch the board carefully because the action moves very quickly. 7. It is your turn again to place your next piece. Play continues until no more of the pieces can be capture_ The system keeps a running score of how many pieces each player has during the game. The player that has the most pieces on the board at the end of the game wins. Setting User Options The commands from the Options menu help you tailor Turnabout personal tastes.
Starting Solitaire 1. Insert the diskette labelled 2. Click on File Manager 3. Click on the drive A icon diskette 4. Solitaire in the disk drive. from the Main Menu. File Manager at the bottom of the screen. and double-click on it./'he appears. The contents of the appear Locate the Solitaire icon Solitaire window appears: r_mm llmms Clickhereto see thenextcard (Thisalsostartsthe game.) I L I= ,,_: Youcanalsostart lhe gamebydraggingany card to a newlocation.
_ To undo a mistake: Select Undo from the Game menu. The card returns to its original iocmion. Finishing a Game You win Solitaire when you have flipped over all of the face-down cards, and played all of the cards in the deck. When this happens, the Auto Finish button changes from gray to black. At this point, manually move all the cards into the upper four piles or click on the Auto Finish button.
Changing the Scoring Solitaire has the following scoring options: Standard ('rimed) and Standard (LMtimed). In Standard (Timed), you lose points for the time you spend deciding where to move a card. In Standard (Untimed), you are not penalized for taking time to make decisions. Standard (Timed) and Standard (Untimed) games are scored as shown in the following table: IF YOU ... YOU GET... Let 10 seconds pass. -1 point Move a card to one of the +10 points four upper stacks.
I_ To change Changing the scoring: 1. Select Scoring 2. an option Select from the Options from menu. the Scoring A submenu appears. submenu. the Number of Cards Drawn You can draw either one, two, Or three dards at.a time from the deck. choice you make affects your scoring if you affects how many times you can go through scoring. For more information, see Changing W To change 1.
. Appendix: , ' • Spreadsheet Spreadsheet uses floating point math, which has benefits such as speed Built-in Functions Bui/t-kzfunaions are prewritten formulas that take a value, perform a mathematical operation, and _turn a result. For example, you can use a built-in function to total a grotlp of fiumbers. But floating point math produces errors in the 17th or 18th You can also use built-in functions to insert information in Spreadsheet; for significant o_git.
Financial Functions The arguments for financial functions are either numbers or addresses of cells that contain numbers. When the argument is the interest rate, enter its actual value (for example, enter .07 or 7% rather than 7). Be sure to specify the same units for the term and the interest. If the interest is monthly, the term is also monthly. Enter all values without spaces.
Function Description SIN (cost;salvage,h'fe) Straight-line depreciation. Cost is the initial cost of the asset. Sa/vaooe is the value of the asset at the end of the time period. Life is the useful life of the asset, the number of time periods the asset is being depreciated. SYD Accelerated depredation of an asset, using the sum of yem"s digits method. Cost is the initial cost of the asset. Salt_oe is the value of the asset at the end of the time period.
Function Description HLOOKI_ (value, range, offset) Returns a value from a horizontal lookup table, allowing you to use a spreadsheet table like a database. HLOOKUPextracts from the horizontal rows, and VLOOKUP extracts information from vertical columns. HI.OOKUPassumes the entries in the Fast row are sorted in ascending order. This function returns the entry corresponding to the nearest ascending value that is not greater than va/ue.
Information Function example: HLOOKUP HLOOKUP and VLOOKUP allow you to search for a value that is within a range of values. The table below is an example of a simple lookup table. This table discount rate, which is based on the number of units sold. look up a discount rate for 1257 units sold, use HLOOKUP horizontally.
Logical Functions, The logical functions evaluate relationships and return true or false results. True= 1 (or nonzero values) and false = 0. A logical function uses a conditional statement; for example, if this is true then do that. An example of a lo[_ical function would be this conditional statement: if the value in B12 is larger than 10,000, then display 50 in this cell. Function Description AND Logical AND. Returns 1 if all arguments are true or 0 if any is false. Useful with IF statements.
BONUS= IF(SALES
Mathematical Functions The arguments for mathematical functions are either numbers or addresses cells that contain numbers. The results of these calculations are always numbers. Function Description ABS (value) Absolute £XP (mluO Value of e (the positive integer. integer FACT INT LN (value) can mathematical constant) If va/ue has a fractional of value. of a number Base 10 logarithm LOG(100) returns (value, -_ divisor) .... - PRODUCT (valuel, value2,...) .
Print Functions The print functions return the name of the file, the current page, and the number of pages with headers and footers when printing documents. Function Description FII.ENAME ( ) ' Returns the mename of the current file for inclusion in a Spreadsheet header or footer. You must include the empty parentheses. PAGE ( ) Returns the current page number for use in a header or footer. Must include the empty parentheses.
Function Description STDP (valuel, value2,..) Standard deviation VAR (valuel, Simple variance want. value2, ..) VARP (valuel, value'2.-) Population want. String Functions of a population. of a sample variance You can use as many t_dues as you want. population. You can use as many arguments as you of the values in a list. You can use as many arguments , , as you , A string is a series of characters. The string functions numbers) or return numbers based on text.
Function Description LEFT (string, hum) Returns the characters in the leftmost position in a string. Num is the number of characters to return. The first character in the string is in position O. A reference to cells containing values produces an error. The RIGHT function extracts characters beginning with the rightmost character, while LEFT extracts beginning with the leftmost character, and MID extracts from an internal position. See the descriptions of the RIGHT and MID functions.
Time and Date Functions Spreadsheet uses serial numbers to represent times and dates. The serial numbers begin with 1 = January 1, 1900. The DATE and DATEVALUE functions return the serial number for a given date. Function Description DATE (year, month, Converts a numeric date (day, month, year) to the serial number format. Year can be from 1900 to 2078. For the years 1900 to 1999, you can enter just the last two digits, for example 96 rather than 1996. Month can be 1-12.
Function Description TODAYO Returns the current WEEKDAY (date value) • YEAR (date value) Trigonometric date (month, day, and year) in the serial number format Returns the number for the day from the serial number format for date va/ue. The WEEKDAY returns a number representing the day of the week: 1 for Sunday, 2 for Monday, etc. Date value must be a serial number. Use DATEVALUE to convert dates entered as labels. Returns the current year from the serial number format for the date value.
Function Description COS (angle) Returns degrees, the cosine of an angle, expressed in radians. If you know an angle you can use the RADIANS function to convert it to radians. COSH (value) Returns the hyperix_lic DEGREES Converts PI() Value : radials cosine in of a value. to degrees. of Tt (3.141592653589795). You must include the empty parentheses. RADIANS Converts SIN (any/e) Returns the sine of an angle expressed in radians.
Glossary absolute reference number argument - in Spreadsheet, - in Spreadsheet, a reference a piece to a cen address of information you enter ASCH - American Standard Code for Information between computer applications auto_matic bar pagination - a method chart - a horizontal widths (as opposed base style - a text style from baud rate - the speed bibliography binary at which - number of bits (pieces (BMP)- border - a line or box a group - a unit of information card view cell - th
continuous printing - a Spreadsheet one continuous page control keys - the keyboard SHIFT are control keys. - Comma Separated printing option that allows you to print a spreadsheet keys that modify the effect of the other keys.
file selector - the New Disk button and the scrolling list in dialog boxes for selecting folder, or diskette fixed notation you want - a format to appear, option such for numbers as two decimal in which places: you set the number a file, of decimal places that 10.99 floating point math - a quick method for calculating numbers with a mantissa, which is the nurnbers the follow a decimal point. For example, in 3.256789888, the mantissa is 0.256789888.
header - a page element that appears at the top of each page. See footer. highlight - to select text or graphics to be able to work with that chosen item. Highlighted text has a black background, and highlighted graphics have square handles around them.
legend- the part of a graph that uses text for explanation llne chart - a chart that represents values with points on an x-y axis, connecting the values with • straight lines line status - in Communication, linear progression value the quality of the phone - a progression of numbers connection that is increased by a certain amount, the step logical function - a mathematical formula that includes an If statement logical operator - a mathematical symbol used in logical functions (> < _>< ;_
pica - 1/6 of an inch or 12 points pie chart pinning - a round a menu - the smallest pixd view place that represents - keeping pixd tool chart a pull-down menu dot on the monitor - a bitmap holder text your doctunent values of a pie on the screen screen tool that allows - text that appeam as pieces you to see and change in templates showing individual pixels you what kind of information to put into t pointer - the arrow point appearing - a measurement polygon on the scree
scrolling list - a box listing various items used in conjunction with a scroll bar such that you are able to see all the selections from which to choose select - to highlight an item using the on-screen pointer or keyboard. Selected items will darken Select button - the top button on a glidepad or left button on a mouse used to select an item on the screen. For example, to draw a box in Drawing, select the Box tool, hold the Select butt6n, and drag the on-screen pointer.
transform - a submenu tmformatted diskette uniform resource Wide Web user dictiottary valu_ item that contains - a diskette locator - numbers entered that has not been (url) - a special the options - the address dictionary that flip, rotate, prepared of a document you create skew, and scale for saving (web with terms documents.
Index A abbreviatiotis for long phrases, 59 ABS(value) mathematical function, 222 absolute references, Spreadsheet, 87 ACOS(value) trigonometric function, 227 ACOSH(value) trigonometric function, 227 address records, 174 Addressbook email address, 175 exporting, 183 importing, 182 merging with Word Processing, 55 phone numbers, type, 176 printing, 180 _ aligning text Drawing, 155 Spreadsheet, 83 --tips, Word Processing, 1 Word Processing, 15 AND function logicall, logical2 .....
Word Processing, 15 text appearance, 12 text size, 13 user dictionary, 51 CHAR(value) 224 string function, CODE, function (string), 224 color background of text, 16 bitmap, 161 Drawing, 136, 138 spreadsheet, 80 text character spacing, 12 weight,, 12 width, 12 COLS(range) Charts, legend, changing, 112 column Drawing, 155 Word Processing, 15 charts area, 105 axis markings, changing, 112 bar, 104 chart titles, 111 column, 103 copying, another program, 110 creating, 102 deleting, 110 description, 102 e
text files, 205 inserting, 61 longhand format, 60 numeric format, 60 drag and drop, 11 Drag button, 1, 69, 125 DATEVALUE(string) function, 226 DAY(date-value) 226 definition, 230 dragging, definition, 230 function, Drawing arcs, 134 arrange objects, 146 front to back, 146 moving, 146 arrowhead, 131 attributes, 136 bitmap, 156 shapes, 158 circle, 129 converting text to graphic, 145 DDB(cost,salvage,life,period) function, 216 default document Addressbook, 173, 185 Planner, 185 Scrapbook, 167 delete,
ERR() function, 217 error, Spreadsheet, 124 EXACT(stringl,string2) function, 224 EXP(value) f_ction, 222 exporting Addressbook, 183 graphics bitcoimt option, 165 BMP format, 165 compression options, 166 from Drawing documents, 165 selected object, 166 whole document, 166 Lotus format, 121 Spreadsheet, 121 changing column order, 122 F FACr(value) function, 222 FALSE() functio_ 220 field, definition, 230 file, definition, 230 FILENAME 0 function, 223 fill, tool, drawing, 127 financial, functions, lis
printing Spreadsheet, 120 HLOOKUP(value,range,offset ) function, 218 HOUR(time_value) 226 function, hyphenatioia maximumlines, 26 prefix, shortest, 26 shortest word, 26 suffix, shortest, 26 insert, row/column, spreadsheet, 96 locking rows/columns, Spreadsheet, 118 inserting, graphic layout, 45 logical functions, list, 220 operators, spreadsheet, 221 insertion point, Word Processing, 7 INT(value) function, 222 invisible characters, displaying, Word Processing, 58 IRR(guess,range) 216 ISERR(value) t
MOD(value,divisor) 222 function, move, objects, 146 front to back, 146 page numbers automatic, 27 inserting Spreadsheet, 79 Word Processing, 27, 61 viewing current, 61 viewing total number, 61 moving, text, 10, 11 PAGE() function, 223 MONTH(date_.
S R RANDOM() scale to fit, Spreadsheet, function, 223 RANDOMN(value) 223 spaces, displaying marks, 58 function, scheduling, repeating events, Planner, 193 RATE(futfirevalue,present_v flue,term) function, 216 scheduling 190 read, book reader, 202 scientific notation, Spreadsheet, 73 recalc_ation, 100 Spreadsheet, references absolute, Spreadsheet, 86 formulas, 85 relative, Spreadsheet, 86 Spreadsheet, 86 scrolling, Spreadsheet, SECOND(time_value) function, 226 replace, all option, 18 z.
formulas, 72 grid description, 65 show/hide, 78 header, 65 headers and footers, 79 incremental'values, 97 inserting row or column, 96 labels, 72 locking rows/columns, 118 moving, cell contents, 94, 95 moving around, 72 open existing, 66 operators, 88 page numbering, 79 print options, 119 printing, 119 quotation marks, 73 row height, 82 setting a value, 83 scientific notation, 73 scrolling, 69 selecting cell with keyboar d , 71 cells, 69 entire row/column, 70 multiple rows/columns, 70 - range of cells, 70 ra
basic functions, Spreadsheet, 67 Bitmap, 156 Graphics, Word Processing, 4 transforming objects, Drawing, 141 trigonometric functions listing, 227 Spreadsheet, 92 TRIM(string) TRUE() function, 225 turn tool, drawing, 126 Turnabout, Games, 209 TXT extension, text file editor, 208 U underlined text changing to, 14 spreadsheet, 84--_ tool bar button, 3 undo, 12 objects, Drawing:-143 Scrapbook, retrieving a deleted page, 170 tool, drawing, 126 ungroup graphic, Drawing, 148 untransforming objects, Drawing, 143
___he_® Printed in USA Part Number US3475001