
Installation Instructions


3
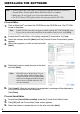
7.
Check on/off which shortcuts you wish to add, and then click [Next].
8.
Review the settings, and then click [Next]. (To change the settings, click [Back] to go
back to the appropriate windows and correct.)
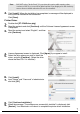
9.
Select the Microsoft
®
Office application(s) you
would like to use the Add-In functions with, and
click [Next].
(The Add-In function will let you create labels
directly from your Microsoft
®
Office applications.)
10.
The selected features (P-touch Editor and P-touch Quick Editor for Standard setup) will
be installed automatically.
11.
When prompted, connect your P-touch to the personal computer by using the USB
cable, and then turn on the P-touch.
12.
The Printer Driver will be installed automatically.
13.
Select "Yes" (default) to register your P-touch online, and then click [Next]. If you have
selected to register, the default Internet browser will be launched.
14.
Click [Finish] to complete the installation. (Restart your personal computer if you are
instructed to do so.)
Note : If you wish to modify or change the
destination, click [Browse] to choose the
installation path.
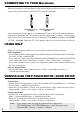
Desktop Quick Launch Bar
Connect to P-touch
USB port.
Connect to personal
computer USB port.