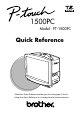
500PC Model : PT-1500PC Quick Reference • Read this Quick Reference before you start using your P-touch. • Keep this Quick Reference in a handy place for future reference.
Thank you for purchasing the P-touch 1500PC! With your new Brother label printer, you can print personalized labels for any purpose. Simply insert a label cassette into the PT-1500PC, design your label with the enclosed P-touch label-designing software, and then print it out. Your customized label prints out in seconds. Label tape cassettes are available in various sizes and colors—ideal for color-coded labeling or any other special labeling needs.
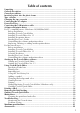
Table of contents Unpacking ................................................................................................................... 2 General description ..................................................................................................... 2 General precautions .................................................................................................... 2 Inserting a photo into the photo frame ........................................................................
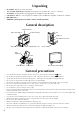
Unpacking • • • • • • PT-1500PC (with photo frame attached) 1/2” (12 mm) wide TZ tape cassette (black characters on white tape; 16’ 3/8” (5 meters)) AC adapter (model AD-60; for plugging the PT-1500PC into the AC outlet) USB Interface cable (for connecting the PT-1500PC to either an IBM PC-compatible or Macintosh computer) Quick Reference CD-ROM containing the PC and Mac software and their manuals General description Status indicator Tape cutter button Power/Feed key USB port DC IN Tape exit slot Tape
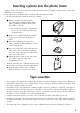
Inserting a photo into the photo frame A photo can be inserted into the photo frame attached to the PT-1500PC, turning it into a decorative addition to your workspace. Insert a photo into the photo frame in either of the following two ways: • By removing the photo frame from the PT-1500PC 1 Remove the photo frame from the PT-1500PC by carefully pulling off the frame, grabbing it from the back of the PT-1500PC as shown.
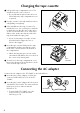
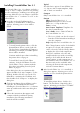
Changing the tape cassette 1 Lift open the tape compartment cover. The installed cassette is also released. Be careful that the photo frame does not fall off when the tape compartment cover is opened. 2 If a tape cassette is already installed, remove it by pulling it straight up. 3 If the ink ribbon in the tape cassette to be installed is loose, use your finger to wind the toothed wheel in the direction of the arrow on the cassette until there is no slack in the ribbon.
Power/Feed key The power/feed key ( ) can be used both for turning on and off the PT-1500PC and for feeding out tape. • To turn the PT-1500PC on or off: Press once. • To feed out some tape: Hold down for at least two seconds. Connecting the USB interface cable Connect the PT-1500PC to the computer as described below.
For Windows® For PC-compatible users (Windows® 98/98SE/Me/2000) Before labels can be printed on the PT-1500PC, label-designing software and the PT-1500PC printer driver must be installed. In order to design labels that can be printed on the PT-1500PC, two applications are available on the enclosed CD-ROM: P-touch Quick Editor and P-touch Editor Ver. 3.1 Before installation Check that your system configuration meets the following requirements.
8 Select the desired location for the shortcut, and then click the Next button. A dialog box appears, allowing you to select whether or not to install the printer driver. For Windows® 3 Carefully read the contents of the dialog box, and then click the Next button to continue. The User Information dialog box appears. To install the printer driver, click the Yes button. The first Driver Setup dialog box appears, informing you that the PT-1500PC printer driver will be installed.
For Windows® Installing P-touch Editor Ver. 3.1 The P-touch Editor Ver. 3.1 software includes a variety of more complex functions for printing barcodes and images, enabling you to design just about any label that you can imagine. Install the P-touch Editor Ver. 3.1 software on a PC as described below. 1 Insert the enclosed CD-ROM into the computer’s CD-ROM drive. A dialog box appears, allowing you to select what to install. Typical All of the basic options (P-touch Editor Ver. 3.
Continue with the procedure in Installing the printer driver below. For Windows® If the printer driver is already installed, click the No button. A dialog box appears, showing that installation is finished. 3 Click the Finish button. A dialog box appears, showing that installation is finished. Select “Yes, I want to restart may computer now.”, click the Finish button to restart the computer, and then remove the CD-ROM from the CD-ROM drive.
For Windows® Uninstalling the software and printer driver Replacing, deleting or adding another printer driver Uninstall the P-touch Editor Ver. 3.1/P-touch Quick Editor software from a PC as described below. 1 Start up Windows® 98/98SE/Me/2000. 1 Turn off the PT-1500PC, and then disconnect it from the computer. 2 Click the Start button in the taskbar, select “Settings”, and then click “Control Panel”. 3 In the Control Panel window, double-click “Add/Remove Programs”.
If “Delete Brother PT-1500PC” was selected: A dialog box appears, asking for confirmation to delete all PT-1500 printer drivers. For Macintosh 5 If “Replace with new Brother PT-1500PC” or “Add Brother PT-1500PC” was selected: A dialog box appears, instructing you to connect the PT-1500PC to the computer. Click the Yes button. A dialog box appears, showing that the printer drivers have been deleted.
For Macintosh Installing P-touch Quick Editor The P-touch Quick Editor software provides quick access to the more simple label-designing features for easy text input and instant printing of labels. Install the P-touch Quick Editor software on a Mac as described below. 1 With the PT-1500PC and computer turned off, connect the PT-1500PC to the Macintosh using the enclosed USB interface cable. Be sure to leave the PT-1500PC off. 2 Turn on the Macintosh.
8 When the dialog box appears asking if you wish to restart the computer, click the Restart button to restart the computer. For Macintosh 5 Double-click the P-touch Editor 3.1 Installer icon in the folder. The installer starts up. Selecting the printer 1 Pull down the Apple menu and select “Chooser” to display the Chooser window. 6 Select the installation method. 2 In the list on the left, click the PT-1500PC icon. Clicking the Install button immediately starts installing the most basic options.
For Macintosh Uninstalling the software and printer driver Uninstall P-touch Quick Editor, P-touch Editor Ver3.1 and the printer driver as described below. When deleting the printer driver, be sure that the P-touch is turned off and unplugged. 1 Drag the following folder to the Trash icon: • P-touch Quick Editor folder (for the Ptouch Quick Editor software) • P-touch Editor Ver3.1 folder (for the Ptouch Editor Ver. 3.1 software) 2 In the System Folder, open the Extensions folder.
Starting up the P-touch Editor software Starting up P-touch Quick Editor Starting up P-touch Editor Ver. 3.1 When P-touch Quick Editor is installed on a PC, you can choose to add shortcuts to the desktop, the StartUp menu, and to the Quick Launch toolbar. The P-touch Editor Ver. 3.1 application makes it easy for anyone to design more complex labels and print them for almost any need imaginable.
Rulers Layout area Print area On a Macintosh computer: • Double-click the P-touch Editor Ver3.1.6 icon in the P-touch Editor Ver3.1 folder installed on the computer. After P-touch Editor Ver. 3.1 is started, the following window is displayed. For more details on the functions of P-touch Editor Ver. 3.1, refer to its User’s Guide, which can either be installed on the computer or viewed from the CD-ROM .
3 In the Symbol List view, select the desired symbol. Importing text Text that has already been typed in another application can easily be imported into the label. 1 Select the desired text in the other application. 2 Import the text into the label layout either by pressing the designated shortcut keys (Windows only) or by dragging it from the other application.
3 Select the desired print settings. Cut Marks: This option allows you to select whether or not to print cut marks (:), which indicate where to cut the label so that the left and right margins are equal. Mirror Printing: This option allows you to print the text in reverse so it can be attached to a window. Copies: This option allows enter the number of copies to be printed. 4 (Windows) Click the OK button. (Macintosh) Click [Print]. The layout is printed.
Removing the label backing The enclosed tape separator enables you to easily remove the backing from labels printed on laminated tape. 1 Hold the tape in your left hand, with the printed surface facing up, and hold the stick in your right hand. AB CD EF GH 2 Pass the tape halfway through the long narrow hole in the stick. 3 Turn the stick three-quarters of a turn towards you, and then pull the stick away from you as shown in the illustration. EF CD AB 4 Peel off the label backing.
4 Use a dry cotton swab to gently wipe up and down along the print head and roller. Caution: Be careful not to touch the cutter near the print head and roller while cleaning them. In addition, do not try to clean the print head immediately after printing, otherwise you may be burned. 5 Insert the tape cassette, and then close the tape compartment cover. Cotton swab Roller (area to be cleaned) Cotton swab * Cleaning can easily be done using the optional print head cleaning cassette (TZ-CL4).
Problem-solving If you think the P-touch is not printing correctly, but you cannot determine the problem with the status indicator, refer to the following list of possible problems, and then perform the necessary operations. Cause Solution The P-touch does not print. A printing error is indicated. • The interface cable is not correctly connected. • The tape cassette is not inserted correctly. • The tape compartment cover is open.
Accessories • Supplies Obtain tape cassettes from your nearest authorized dealer. Brother cannot be held responsible for trouble caused by the use of unauthorized supplies. mark. Use only Brother TZ tapes with this machine. Do not use tapes that do not have the Stock No.
Stock No. Description 1/4” (6 mm) laminated tapes TZ-111 Black Characters on Clear Adhesive TZ-211 Black Characters on White Adhesive TZ-315 White Characters on Black Adhesive TZ-S111 Industrial (Strong Adhesive) Black Characters on Clear Adhesive TZ-S211 Industrial (Strong Adhesive) Black Characters on White Adhesive QTY/PACKAGE PRICE 1 1 1 1 1 $12.99 $14.99 $17.99 $15.99 $15.
BROTHER CONTACT INFORMATION Service Center Locations If you need a local service center, please call 1-800-284-HELP (4357) to locate the authorized service center closest to you. Note: Be sure to call the Service Center before your visit. Service centers do not provide operational assistance. See “Operational Assistance”.
P-TOUCH ACCESSORY ORDER FORM Dear Customer: This order form is provided for your convenience should your retailer not stock the item(s) needed. To order by mail, send this completed form along with proper payment to the address below OR credit card holders: Call toll-free 1-888-879-3232, fax completed order form to 1-800-947-1445, or visit our web site at http://www.brothermall.com. Please refer to the Accessories listing in your User’s Guide for stock no. and price. Stock No.
P-TOUCH ACCESSORY ORDER FORM Dear Customer: This order form is provided for your convenience should your retailer not stock the item(s) needed. To order by mail, send this completed form along with proper payment to the address below OR credit card holders: Call toll-free 1-888-879-3232, fax completed order form to 1-800-947-1445, or visit our web site at http://www.brothermall.com. Please refer to the Accessories listing in your User’s Guide for stock no. and price. Stock No.
Referencia rápida
¡Gracias por adquirir la impresora P-touch 1500PC! Con su nueva impresora de etiquetas Brother, podrá imprimir etiquetas personalizadas para cualquier propósito. Simplemente tiene que introducir un casete de cinta para etiquetas en la PT-1500PC, diseñar su etiqueta con el software de diseño de etiquetas P-touch incluido y finalmente imprimirla. Su etiqueta personalizada se imprimirá en cuestión de segundos.
Índice Desembalaje ................................................................................................................ 2 Descripción general .................................................................................................... 2 Precauciones generales ............................................................................................... 2 Inserción de una foto en el portafotos ......................................................................... 3 Casetes de cinta ..
Desembalaje • • • • • • PT-1500PC (con portafotos colocado) Casete de cinta TZ de 12 mm (1/2”) de ancho (caracteres negros sobre cinta blanca; 5 metros (16’ 3/8’’)) Adaptador de CA (modelo AD-60; para enchufar la PT-1500PC en la toma de corriente de CA) Cable de interfaz USB (para conectar la PT-1500PC a un ordenador compatible con PC IBM u ordenador Macintosh) Referencia rápida CD-ROM que contiene el software para PC y Mac y sus manuales Descripción general Indicador de estado Botón de corte de la cinta
Inserción de una foto en el portafotos En el portafotos colocado en la PT-1500PC se puede insertar una foto, para convertirla en uno más de los objetos decorativos de su lugar de trabajo. Inserte una foto en el portafotos en una de las dos formas siguientes: • Quitando el portafotos de la PT-1500PC 1 Quite el portafotos de la PT-1500PC agarrándolo por la parte trasera de la PT1500PC, y tirando de él con cuidado como se muestra.
Cambio del casete de cinta 1 Abra la tapa del compartimiento de la cinta levantándola. El casete instalado se soltará a la vez. Tenga cuidado de que el portafotos no se caiga cuando abra la tapa del compartimiento de la cinta. 2 Si ya hay una cinta de casete instalada, extráigala tirando de ella hacia arriba en línea recta.
Tecla de encendido y apagado/avance La tecla de encendido y apagado/avance ( ) puede utilizarse para encender y apagar la PT-1500PC y para avanzar la cinta. • Para encender o apagar la PT-1500PC: Presione una vez. • Para avanzar algo de cinta: Mantenga presionado durante dos segundos por lo menos. Conexión del cable de interfaz USB Conecte la PT-1500PC al ordenador como se describe a continuación.
Para Windows® Para usuarios con PC compatible (Windows® 98/98SE/Me/2000) Antes de poder imprimir etiquetas con la PT-1500PC, deberá instalarse el software de diseño de etiquetas y el controlador de impresora PT-1500PC. Para diseñar etiquetas que se puedan imprimir con la PT-1500PC, en el CDROM incluido hay disponibles dos aplicaciones: P-touch Quick Editor y P-touch Editor Ver. 3.1. Antes de la instalación Compruebe que la configuración de su sistema satisface los siguientes requisitos.
8 Seleccione la ubicación deseada para el acceso directo y a continuación haga clic sobre el botón “Next”. Aparecerá un cuadro de diálogo que le permitirá seleccionar si quiere o no instalar el controlador de impresora. para Windows® 3 Lea atentamente el contenido del cuadro de diálogo y a continuación haga clic sobre el botón “Next” para continuar. Aparecerá un cuadro de diálogo “User Information”. Para instalar el controlador de impresora, haga clic sobre el botón “Yes”.
Para Windows® Instalación del P-touch Editor Ver. 3.1 El software P-touch Editor Ver. 3.1 incluye una variedad de funciones más complejas para imprimir códigos de barras e imágenes, que le permitirán diseñar prácticamente cualquier etiqueta que usted pueda imaginar. Instale el P-touch Editor Ver. 3.1 en un PC como se describe a continuación. 1 Introduzca el CD-ROM incluido en la unidad de CDROM del ordenador. Aparecerá un cuadro de diálogo que le permitirá seleccionar lo que quiera instalar.
Continúe con el procedimiento de “Instalación del controlador de impresora” abajo. 3 Haga clic sobre el botón “Finish”. Aparecerá un cuadro de diálogo mostrándole que la instalación ha terminado. Seleccione “Yes, I want to restart my computer now”, haga clic sobre el botón “Finish” para reiniciar el ordenador y a continuación extraiga el CD-ROM del ordenador.
Para Windows® Desinstalación del software y controlador de impresora Sustitución, eliminación o adición de otro controlador de impresora Desinstale el software P-touch Editor Ver. 3.1/P-touch Quick Editor del PC como se describe a continuación. 1 Inicie Windows® 98/98SE/Me/2000. 1 Apague la PT-1500PC y a continuación desconéctela de la impresora. 2 Haga clic sobre el botón “Start” en la barra de tareas, seleccione “Settings” y a continuación haga clic sobre “Control Panel”.
5 Si se seleccionó “Replace with new Brother PT1500PC” o “Add Brother PT-1500PC”: Aparecerá un cuadro de diálogo indicándole que conecte la PT1500PC al ordenador. Haga clic sobre el botón “Yes”. Aparecerá un cuadro de diálogo mostrándole que los controladores de impresora han sido eliminados. Conecte la PT-1500PC al ordenador utilizando el cable de interfaz USB incluido como se describe en la página 5 y a continuación encienda la PT-1500PC.
Para Macintosh Instalación del P-touch Quick Editor El software P-touch Quick Editor ofrece un acceso rápido a las funciones más sencillas de diseño de etiquetas y permite una fácil introducción de texto y una impresión de etiquetas instantánea. Instale el software P-touch Quick Editor en un Mac como se describe a continuación. 1 Con la PT-1500PC y el ordenador apagados, conecte la PT1500PC al Macintosh utilizando el cable de interfaz USB incluido. Asegúrese de dejar la PT-1500PC apagada.
8 Cuando aparezca el cuadro de diálogo, preguntándole si quiere reiniciar el ordenador, haga clic sobre el botón “Restart” para reiniciar el ordenador. Selección de la impresora 1 Despliegue el menú Apple y seleccione “Chooser” para visualizar la ventana “Chooser”. 6 Seleccione el método de instalación. Al hacer clic sobre el botón “Install” comenzará inmediatamente la instalación de las opciones más básicas. (Algunas ilustraciones de los clips de arte no se instalarán.
Para Macintosh Desinstalación del software y controlador de impresora Desinstale el software P-touch Quick Editor, Ptouch Editor Ver3.1 y el controlador de impresora como de describe a continuación. Cuando vaya a borrar el controlador de impresora, asegúrese de que la P-touch está apagada y desenchufada. 1 Arrastre la siguiente carpeta hasta el icono “Trash”: • Carpeta P-touch Quick Editor (para el software P-touch Quick Editor) • Carpeta P-touch Editor Ver3.1 (para el software P-touch Editor Ver. 3.
Inicio del software P-touch Editor Inicio del P-touch Quick Editor Inicio del P-touch Editor Ver. 3.1 Cuando instale el P-touch Quick Editor en un PC, podrá elegir si quiere añadir accesos directos al escritorio, al menú de inicio “StartUp” y a la barra de herramientas “Quick Launch”. La aplicación P-touch Editor Ver. 3.1 hace que a cualquiera le resulte fácil diseñar etiquetas complicadas e imprimirlas para casi cualquier necesidad imaginable.
Área de Área de Reglas composición impresión En un ordenador Macintosh: • Haga doble clic sobre el icono “P-touch Editor Ver3.1.6” en la carpeta P-touch Editor Ver.3.1 instalada en el ordenador. Una vez iniciado el P-touch Editor Ver. 3.1, se visualizará la siguiente ventana. Barra de título Barra de menús Barra de herramientas de dibujo Para más detalles sobre las funciones del P- Barra de herramientas de impresión touch Editor Ver. 3.
Importación de texto 3 En la vista de la lista de símbolos, seleccione el símbolo deseado. El texto que ya haya sido ingresado en otra aplicación puede ser importado fácilmente a la etiqueta. 1 Seleccione el texto deseado en la otra aplicación. 4 Haga clic sobre el botón “OK”. El símbolo seleccionado se añadirá a la izquierda del texto. 2 Importe el texto al diseño de etiqueta presionando las teclas de acceso directo designadas (Windows solamente) o bien arrastrándolo desde la otra aplicación.
En el Macintosh, este cuadro de diálogo también puede visualizarse haciendo clic solamente sobre el botón “Print”. 3 Seleccione los ajustes de impresión deseados. Cut Marks: Esta opción le permite seleccionar si quiere o no imprimir marcas de corte (:), que indican por dónde cortar la etiqueta para que los márgenes derecho e izquierdo sean iguales. Mirror Printing: Esta opción le permite imprimir texto en reverso para poder colocarlo en una ventana.
Para quitar el respaldo de la etiqueta El separador de cinta suministrado le permite quitar fácilmente el respaldo de las etiquetas impresas en cinta laminada. 1 Sujete la cinta con la mano izquierda, con la superficie impresa hacia arriba, y sujete GH EF la barra con la mano derecha. CD AB 2 Pase la cinta hasta la mitad a través del agujero estrecho y largo de la barra. 3 Gire la barra tres cuartos de vuelta hacia usted, y después aleje la barra de usted como de muestra en la ilustración.
4 Utilice un bastoncillo de algodón para frotar suavemente de arriba a abajo a lo largo del cabezal de impresión y rodillo. Precaución: Tenga cuidado de no tocar la cuchilla que hay junto al cabezal de impresión y del rodillo cuando los limpie. Además, no intente limpiar el cabezal de impresión inmediatamente después de imprimir porque podrá quemarse. 5 Introduzca el casete de cinta y a continuación cierre la tapa del compartimiento de la cinta.
Solución de problemas Si piensa que la P-touch no está imprimiendo correctamente, pero no puede determinar el problema con el indicador de estado, refiérase a la siguiente lista de posibles problemas y realice las operaciones Causa Solución La P-touch no imprime. Se indica un error de impresión. • El cable de interfaz no está conectado correctamente. • El casete de cinta no está insertado correctamente. • La tapa del compartimiento de la cinta está abierta.
Accesorios • Accesorios de consumo Adquiera los casetes de cinta en el distribuidor autorizado que le quede más cerca. Brother no puede hacerse responsable de los problemas causados por el empleo de accesorios de consumo no autorizados. Emplee sólo cintas Brother TZ con esta máquina. No emplee cintas que no tengan la marca . N.
Cintas laminadas de 6 mm (1/4”) TZ-111 Caracteres negros sobre cinta transparente TZ-211 Caracteres negros sobre cinta blanca TZ-315 Caracteres blancos sobre cinta negra TZ-S111 Caracteres negros industriales (adhesivo fuerte) sobre adhesivo transparente TZ-S211 Caracteres negros industriales (adhesivo fuerte) sobre adhesivo blanco 1 1 1 1 1 $12.99 $14.99 $17.99 $15.99 $15.99 CANT./PAQUETE 1 1 PRECIO $29.99 $24.
INFORMACIÓN PARA CONTACTAR CON BROTHER Lugares de los centros de reparación Si necesita recurrir a un centro de reparación, le rogamos que llame al 1-800-284-HELP (4357) para localizar el centro de reparación autorizado más cercano a usted. Nota: Asegúrese de llamar al centro de reparación antes de visitarlo. Los centros de reparación no ofrecen asistencia sobre el funcionamiento. Consulte “Asistencia sobre el funcionamiento”.
Printed in China LA6423001