www.brother.
Contents.............................................................................................................................................. i z CONTENTS Contents INTRODUCTION................................................................................................ 1 General Precautions .......................................................................................................................... 1 QL-500/550.......................................................................
CONTENTS Creating Bar Code Labels ......................................................................................................... 34 Creating Other Types of Labels ................................................................................................. 36 Using Help ................................................................................................................................. 37 The Label List...............................................................................
INTRODUCTION We strongly recommend that you read this User’s Guide carefully before using your QL-500/550, and then keep it nearby for future reference. 9 z INTRODUCTION Congratulations on purchasing the QL-500/550. Your new QL-500/550 is a label printer that connects to your personal computer, enabling you to quickly and easily print professional custom labels that you have created on your personal computer using the label editing software provided.
INTRODUCTION • Use only genuine Brother accessories and supplies. Do not use any unauthorized accessories or supplies. • When using the QL-500/550, place it on a stationary, level location. • Use only the authorized power source for the QL-500/550. • When not in use for an extended period, remove the DK Roll from the QL-500/550. • Never disassemble the QL-500/550 or get it wet with water to avoid possible fire or electrical shock.
• • • • Do not scratch the CD-ROM. Do not subject the CD-ROM to extremely high or extremely low temperatures. Do not put heavy objects on the CD-ROM or apply force to the CD-ROM. The software contained on the CD-ROM is meant for use with the QL-500/550 only. See License on CD for further details. This software may be installed on multiple personal computers for use at an office, etc. z INTRODUCTION CD-ROM & Software AC power cord • Use only the AC power cord included with the QL-500/550.
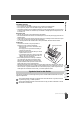
GETTING STARTED Unpacking Your QL-500/550 Check that the package contains the following before using your QL-500/550. If any item is missing or damaged, please contact the retail outlet where the QL-500/550 was purchased. P-touch QL-500/550 QL-500 4 QL-550 USB cable Quick Start Guide CD-ROM DK Label & Tape Guide Starter roll Warranty Card The QL-500/550 includes one starter roll of DK Diecut Standard Address Labels (100 labels), and one starter roll of DK Continuous Durable Paper Tape 62 mm (8 m).
z GETTING STARTED QL-500/550 Components QL-500/550 Label Printer Front QL-500 DK Roll compartment cover QL-550 DK Roll compartment cover FEED button FEED button LED lamp CUT button ON/OFF button LED lamp CUT lever ON/OFF button If the DK Roll compartment cover is left open, dust will collect on the print head. Always close the cover. Back QL-500/QL-550 AC power cord inlet USB port Do not connect the QL-500/550 to the USB port of your personal computer yet.
GETTING STARTED Button descriptions The functions of the buttons on the QL-500/550 are described below. Button ON/OFF button CUT button (QL-550 only) FEED button Condition Turns power to the QL-500/550 on and off. Cuts the label from the DK Roll. Use this button to cut labels when the "Auto Cut" option in the Print dialog box is unchecked. • When using DK Die-cut Labels, feeds the DK Label Roll to the beginning of the first label on the roll.
z GETTING STARTED Connecting to the Power Supply 1 Connect the AC power cord to the QL-500/550. 2 Plug the AC power cord into a standard electrical outlet. • Check that the electrical outlet is 220 - 240 V before inserting the plug. • Remove the AC power cord from the electrical outlet after you have finished using the QL-500/550. • Do not pull the cord when removing it from the electrical outlet. The wire in the cord may become damaged.
GETTING STARTED Installing the DK Roll There is a wide range of DK Rolls available for use with your QL-500/550, allowing you to create almost any type of label you need. Available supplies The types of DK Rolls that may be used with the QL-500/550 are listed below. DK Die-cut Paper Labels A roll of pre-cut paper labels. DK Die-cut Film Labels A roll of pre-cut film labels that are durable in water. A roll of continuous paper tape for printing labels of varied length.
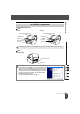
z GETTING STARTED 3 Lift the label lever and then thread the end of the DK Roll into the slot immediately before the cutter. When unable to thread the end of the DK Roll to the slot, thread it as far as possible, lower the label lever and close the cover, then press the FEED button to set the roll. 4 Lower the label lever and then close the DK Roll compartment cover.
INSTALLING SOFTWARE Software Overview To design and print professional labels with your QL-500/550 install the following print driver and label editor software on your personal computer. P-touch Editor Version 4.1 Use this powerful label design software to create a wide variety of custom labels such as address labels, file folder labels, CD/DVD labels, etc. P-touch Editor Version 4.
The installation procedure differs depending on the operating system running on your personal computer. Refer to the installation procedure for the appropriate operating system to install the software. Refer to “When using Microsoft Windows 98 SE” on page 16 for the installation procedure for that operating system.
INSTALLING SOFTWARE 3 Carefully read the license agreement. If you agree to the terms and conditions of the license agreement, click [Yes] to continue installation. The Customer Information dialog box appears. 4 Enter your “User Name” and the “Company Name”, and then click [Next]. The Setup Type dialog box appears.
z INSTALLING SOFTWARE 5 Select the type of setup you prefer. Change the default destination folder if you wish to place the program files elsewhere, and then click [Next]. • Click [Browse] to select an alternate destination folder. • Select “Custom” to install a particular feature. For example, to install the printer driver only. The following items will be installed.
INSTALLING SOFTWARE 7 Review the settings to ensure all are correct, and then click [Next]. If the settings are incorrect, click [Back] to go back and correct. • The InstallShield Wizard completes preparations for installing the software, and then the Setup Status dialog box appears. • After all files necessary to install the Ptouch Editor have been copied and registered, the Driver Setup dialog box appears. The Driver Setup dialog box does not appear if “Driver” is not selected in Custom installation.
z INSTALLING SOFTWARE 9 Check that the QL-500/550 is turned on, and then plug the connector on the USB cable into the USB port on your personal computer. When the QL-500/550 is recognized, the installer proceeds with the driver software installation. When connecting the QL-500/550 to a personal computer via a USB hub, a proper connection may not be possible due to the type of hub used. If this occurs, connect the QL-500/ 550 directly to the personal computer.
INSTALLING SOFTWARE When using Microsoft Windows 98 SE 1 Start your personal computer and insert the CD-ROM into the CD-ROM drive. A dialog box automatically appears, allowing you to select the language of the Installer. Select the desired language, and then click “OK”. A dialog box appears briefly while the InstallShield Wizard prepares for installation. When the preparation is complete, the InstallShield Wizard welcome dialog box appears. • It may take a short time for the dialog box to appear.
Enter your “User Name” and the “Company Name”, and then click [Next]. The Setup Type dialog box appears. 5 Select the type of setup you prefer. Change the default destination folder if you wish to place the program files elsewhere, and then click [Next]. z INSTALLING SOFTWARE 4 • Click [Browse] to select an alternate destination folder. • Select “Custom” to install a particular feature. For example, to install the printer driver only. The following items will be installed.
INSTALLING SOFTWARE 6 Specify where to add shortcuts (for easy, one click access) for Brother Software, and then click [Next]. If you do not want a shortcut created for an area, clear the check box for that area. Clear all check boxes to add no shortcuts. The Start Copying Files dialog box appears. 7 Review the settings to ensure all are correct, and then click [Next]. If the settings are incorrect, click [Back] to go back and correct.
When the Driver Setup dialog box instructs you to connect the QL-500/ 550, plug the connector on the USB cable into the USB port on the back of the QL-500/550. 9 Check that the QL-500/550 is turned on, and then plug the connector on the USB cable into the USB port on your personal computer. The Add New Hardware Wizard dialog box appears. z INSTALLING SOFTWARE 8 When connecting the QL-500/550 to a personal computer via a USB hub, a proper connection may not be possible due to the type of hub used.
INSTALLING SOFTWARE 12 Click [Next]. The next Add New Hardware Wizard dialog box appears. The settings displayed on the screen may vary depending on the operating environment the software is being installed on. The software will automatically make the appropriate settings, so it is not necessary to change these settings. 13 Click [Next]. The next dialog box appears. The remainder of this procedure varies depending on the dialog box that appears next.
z INSTALLING SOFTWARE 14 Proceed with one of the following. When the Add New Hardware Wizard dialog box appears. Click [Finish]. The new hardware has been detected. Return to step 10. If an error dialog box appears, refer to Error Recovery on page 23 to correct the error. When the Add Printer Wizard dialog box appears. Click [Finish]. The new hardware has been detected. Go to step 15. 15 Click [Finish]. The User Registration dialog box appears.
INSTALLING SOFTWARE 16 Select on option and then click [Next]. When “Yes, display the page.” is selected, the online user registration web page is opened in your web browser. When “No, do not display the page.” is selected, installation continues. The InstallShield Wizard Complete dialog box appears. 17 Click [Finish]. Installation of the P-touch Editor software is now completed. You may be required to restart your personal computer after installation.
1 Click [OK]. The Driver Setup dialog box appears. 2 Click [Cancel]. The Confirmation dialog box appears. 3 Turn the QL-500/550 off, and the click [Yes]. The dialog box displayed before beginning to install the printer driver appears. 4 Turn the QL-500/550 on. The Add New Hardware Wizard dialog box appears and you can resume installation from step 10.
INSTALLING SOFTWARE Uninstalling Software If for any reason you need to remove the software from your personal computer, follow these steps to uninstall the software. Uninstalling P-touch Editor Version 4.1 This procedure removes the P-touch Editor software and associated software files. The printer driver is not removed by this procedure. 1 Start (→ Settings) → Control Panel → Add or Remove Programs → Brother P-touch Editor Version 4.1 (/Brother P-touch Quick Editor) → Change/Remove (Add/Remove...
z INSTALLING SOFTWARE 4 Click [Finish] to complete the uninstall. The uninstall process is now completed. Uninstalling the Printer Driver This procedure removes the printer driver from the personal computer. 1 2 Turn off the P-touch and remove the USB cable from your personal computer. Open the Printer control panel (Printers and Faxes for Windows® XP (Home/ Professional)). For details, refer to Windows Help.
INSTALLING SOFTWARE Connecting the QL-500/550 to Multiple Computers Using the QL-500/550 as a Shared Printer The QL-500/550 can be shared by multiple personal computers connected by a network. To share the QL-500/550, connect the QL-500/550 to a computer and set it to be a shared device. The QL-500/550 can now used as a network label printer.
CREATING LABELS This section describes the general procedure for creating labels using your QL-500/550. Refer to the sections indicated for details and additional information related to each operation. 1 Choose the label you want to create shown below are a few label samples. Your QL-500/ 550 includes a standard address label. z CREATING LABELS Overview Picture the type of label you want to create. 2 Insert the appropriate DK Roll. Select the appropriate DK Roll for the label you are creating.
CREATING LABELS 3 4 Enter the text. There are two main methods of entering text on the label. Enter text with P-touch Editor our easy to use label creation software. Enter text into a Microsoft Office software application and use our Add-In feature. p. 29 or P-touch Editor Help p. 46 or P-touch Editor Help Edit the label. P-touch Editor provides a variety of editing functions. Use the tools in the Draw toolbar and Object dock to edit the label.
z CREATING LABELS Starting P-touch Editor 1 To start P-touch Editor, click the Start button on the task bar, point to All Programs (or Programs), point to Ptouch Editor 4.1, and then click P-touch Editor. You can also start P-touch Editor by double-clicking the short-cut icon on the desktop or clicking the short-cut icon in the Quick Launch Tray if these were created during installation. When P-touch Editor starts, the layout selection dialog box appears.
CREATING LABELS Using P-touch Editor After installing and starting the software, you are now ready to create your own labels. While you can create a wide range of labels using P-touch Editor, there is generally a common work flow for creating any label. Select the type and size of label ¾ Enter text ¾ Apply formatting to text ¾ Add decorative objects to the label ¾ Print the completed label Each process in this work flow is described in the following sections.
This section describes the process of creating an address label as an example. In this example we will create a standard sized address label with the addressee’s name in bold and a slightly larger font size, and with a simple single-line frame with rounded corners. 1 In the Page properties box, select Standard Address from the pull-down list of label types. The tape length and width settings are automatically set to the size of a standard address label.
CREATING LABELS Printing the Label We will now print the label created in the earlier example. 1 In the Print properties box, select the number of copies to be printed (1) and then click . The label is printed. If the Print property box is not displayed in the Property dock click to open it. 2 Cut off the printed label using the CUT button (QL-550) or the CUT lever (QL-500).
You can save the label you have created in a file for later use. 1 Click in the Standard toolbar. The Save As dialog box appears. When the current label layout has already been saved, changes are saved to the existing file name. 2 z CREATING LABELS Saving the Label Navigate to the folder where you want to save the file, enter the file name, and then click . The label layout is saved in the location specified.
CREATING LABELS Creating Bar Code Labels You can create labels with bar codes for use with cash registers, stock control systems or other bar code reader systems. 1 In the Page properties box, select Normal Format from the pull-down list of label types. The tape length and width settings are automatically set to the size of a standard address label. If the Page property box is not displayed in the Property dock click 2 Click the in the Object dock. The Bar Code Properties dialog box appears.
z CREATING LABELS • Brother shall not assume any responsibility for any loss or damage caused by bar code labels being misread. • If the bar code reader is not able to read bar code labels printed using the "Give priority to print speed" option, try using the "Give priority to print quality" option. • The bar code reader may not be able to read bar code labels with narrow bar codes. • The QL-500/550 is not designed exclusively for creating bar code labels.
CREATING LABELS Creating Other Types of Labels The following are examples of the variety of labels that can be created using P-touch Editor and some optional features. Refer to How To in the online P-touch Editor Help for further details.
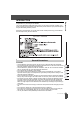
P-touch Editor has its own Help application that offers further detailed information on the features available with P-touch Editor and how to use these features. Opening Help 1 Start P-touch Editor. Refer to “Starting P-touch Editor” on page 29. The layout window appears. 2 Select “P-touch Editor Help” from the Help menu or use F1. The P-touch Editor Help window appears. z CREATING LABELS Using Help 1 2 3 4 1. Toolbar Contains quick and easy access icons used in Help. 2.
CREATING LABELS Printing Help The contents of the Help topics can be printed to a standard printer (not the QL-500/550). 1 Select a topic in the Contents tab. 2 Click on the toolbar. The Print Topics dialog box appears. 3 Select the range of topics to be printed, and then click . The Print dialog box appears. 4 38 Select any options for your standard printer, and then click The specified Help topics will be printed. Using P-touch Editor .
The Label List is a built-in database for storing information from previously created labels or for potentially new labels. How the Label List works The Label List is displayed in the Label List window, and works similarly to a Database connection. Refer to “Using a Database” on page 53 for a details about conecting to a database.
CREATING LABELS Form view Displays the selected record data in a form rather than as a list. Field name Field data Using the Label List As an example we will create a set of address labels using the Label List. Before beginning, create a new layout and select the label size. Refer to “Creating an Address Label” on page 31. The label list would be used when a user wishes to print (reprint) a label containing the stored information.
To add the next record, right click in the Label List window, and select “Create New Record” from the pull down menu. z CREATING LABELS 4 A new record appears in the list. 5 Enter the name and address, etc., in the new record. 6 Repeat steps 4 and 5 to add more records.
CREATING LABELS Creating Labels Using a Layout Style and Data from the Label List The label layout can now be created using the fields in the Label List as a guide. What is a Layout Style? • A Layout Style lets you easily use a variety of previously registered label layouts. • You can also register new layouts you have created and quickly and easily recall these for use again later.
z CREATING LABELS 2 Select the appropriate layout for the label you want to create, and then click . The Merge Fields dialog box appears. Each label size has default Layout Style. For each, the layout style used the last time for that specific label size will be automatically saved and used the next time. 3 On the new layout, each field has a name, indicated in the Merge Fields dialog box as Layout Object. For each field, assign an object from the Label List.
CREATING LABELS 2 To add the field from the Label List to the label layout, click on the field selector of the field you want to add to the label, and then drag and drop it on the layout. A pop-up menu appears. 3 Select “Text” from the pop-up menu. The field is added to the layout and displayed as text. If “Bar Code” is selected, the field is added and displayed as a bar code. 4 Repeat steps 1 and 2 to add more fields to the layout.
z CREATING LABELS Printing labels from the Label List 1 Click in the Print properties box to open the Print dialog box and select the print options. Refer to “Print Options” on page 32 for details. The “Auto Cut” option is not available when using the QL-500. 2 Select a Print Range option to select which records are printed. Refer to the Print Range Options table for details. 3 Click The specified labels are printed.
CREATING LABELS Using P-touch Editor with Other Applications If during software installation the Add-In feature was selected, an Add-In function is also installed for Microsoft Word, Microsoft Excel and Microsoft Outlook (provided these applications are installed on your personal computer). Using these Add-In functions, you can quickly and easily create a label by highlighting the information and clicking the P-touch icon.
You can start the P-touch Add-In and copy the highlighted data directly onto a label from Microsoft Word. The highlighted data is copied as text and automatically added to a new record created in the Label List. The Title and Body fields of the new record are then merged into a new label layout, which is displayed in the Add-In Preview window. Creating a label using data from Microsoft Word 1 Open a Microsoft Word document and select the data you wish to place on a label.
CREATING LABELS 2 Click in Microsoft Word’s standard toolbar. P-touch Editor starts and the Add-In Preview window appears showing the newly created label. Toolbar Preview window Displays a preview of the label with the copied data Add-In Preview window toolbar Print button Prints the current label. Print Settings button Opens the Print dialog box. Check Media button Checks the size of the DK Roll currently inserted in the QL-500/550. Change Paper Setting Opens the Paper Settings dialog box.
Click to print the label. To edit or customize the text or label layout, click . The full P-touch Editor screen appears and you can edit the label. How Microsoft Word data is added to the Label List A new record is automatically created and the text in the selected data is added to the following fields. • The current date is added to the Date field. • The first line is added to the Title field. • All remaining lines are added to the Body field.
CREATING LABELS 2 Click in Microsoft Excel’s standard toolbar. P-touch Editor starts and the Add-In Preview window appears showing the newly created label. • Refer to P-touch Editor Help for other methods of starting P-touch Editor from within Microsoft Excel. • An error message appears if there is no data highlighted, or if the data highlighted contains an object not supported by P-touch Editor.
Microsoft Outlook z CREATING LABELS • Uncheck the "Label List" checkbox in the Add-In Preview window when you do not want to register the data in the Label List. • The data is copied onto a label formatted with the default Layout Style. To change the Layout Style, click to open the full P-touch Editor screen and edit the layout or apply a different Layout Style. Refer to “Creating Labels Using a Layout Style and Data from the Label List” on page 42 for details.
CREATING LABELS • Refer to P-touch Editor Help for other methods of starting P-touch Editor from within Microsoft Outlook. • An error message appears if there is no data highlighted, or if the data highlighted contains an object not supported by P-touch Editor. • Refer to “How Microsoft Outlook data is added to the Label List” on page 52 for details of how the selected data is automatically added to the Label List. 3 Click to print the label. To edit or customize the text or label layout, click .
What is the database function? The database function allows you to use existing data from another source to quickly create custom labels containing database content - for example name/address labels or inventory labels with codes. The supported formats are mdb (MS Access), csv (generic format) and xls (MS Excel). Creating a name badge label using a database This procedure describes how to retrieve the database information and associate it to the layout.
CREATING LABELS 4 Navigate to the file containing the data to be used for the labels and open the file. We will be using MS Excel data for this example. After opening the database file, the Database window appears below the Layout work area. 5 Click on the field selector of the field you want to add to the label, for this example we will use the Name field, and then drag and drop it on the layout. The field is added to the layout.
Use the Text Properties dialog box to update the font, position and size of the new field. 7 Repeat steps 4 and 5 to add more fields to the layout. Once you have competed editing the layout, the label is ready to be printed. You can check the layout and content of each label by selecting the corresponding record in the Database window. z CREATING LABELS 6 You can also move from record to record by using the "Next Record" and "Previous Record" buttons in the "Database Properties" box.
CREATING LABELS 8 Print the label(s) using one of the methods below • To print the label currently displayed in the Layout work area by itself, click in the Print Properties box. • To print several labels, hold down the [Ctrl] key and select the records in the Database window for the labels you want to print, and then click in the Print Properties box. • To print labels for all records, click the Print Setup button. Select “All Records” for “Print Range” and click to print the labels.
APPENDIX Your QL-500/550 may need cleaning from time to time, particularly if you are using it in a dusty environment. z APPENDIX Maintenance Cleaning the Print Head The DK Paper Roll used in the QL-500/550 is designed to automatically clean the print head. As the DK Paper Roll passes over the head during printing or label feeding, the print head is cleaned. If necessary, simply feed the DK Paper Roll using the FEED button to clean the print head.
APPENDIX 4 Thread the end ( 1 ) of the Cleaning Sheet into the slot immediately before the cutter. • Do not peel off section ( 1 ) of the sheet. • Make sure that the printed surface of the Cleaning Sheet is facing up. 5 After the Cleaning Sheet is inserted in the slot, peel off section ( 2 ) of the sheet. 6 7 Turn on the QL-500/550. Press and hold the FEED button for at least one second. The roller rotates for 10 cm. • The length of the Cleaning Sheet is 8.5 cm.
Repeated use of the cutter unit will eventually reduce the sharpness of the blade. When this occurs, purchase a replacement cutter and then follow this procedure to replace the cutter. 1 Turn off the QL-500/550 and unplug the power code from the electrical outlet. 2 Open the DK Roll compartment cover, lift up the label lever, and remove the DK Roll from the compartment. 3 Using a screw driver, loosen the screw securing the cutter unit.
APPENDIX Troubleshooting What to do when... Problem The QL-500/550 does not print, or a printing error is received. The power button does not light up or flash. The printed label contains streaks or poor quality characters, or the label is not fed correctly. A data transmission error appears on the personal computer. Labels are jammed in the cutter or are not ejected correctly after printing. 60 Troubleshooting Solution Is the USB cable loose? Check that the USB cable is connected correctly.
z APPENDIX Specifications QL-500 / QL-550 Item Display Specification LED lamp (green) Printing method Printing speed Printing Buttons Interface Power source Dimensions Weight Cutter Direct thermal printing via thermal head Max.90 mm/sec, Max.50labels/min. (Standard Adress Labels) 300 dpi/720 dot 59 mm 25 mm Print head Maximum Printing Width Minimum printing length ON/OFF button FEED button CUT button (QL-550 only) USB (USB Spec. 1.1 protocol) 220 - 240 VAC 50/60 Hz (0.
APPENDIX APPENDIX Index A D AC power cord ......................................... 3 Add-In function ....................................... 46 Add-In Preview window ...................... 48 Add-In software ...................................... 10 Add-Ins ...................................................... 17 Administrator ........................................... 10 Auto Cut .................................................... 32 Auto Format Templates ................ 13, 17 Database ..........
M Maintenance ........................................... 57 Manuals .............................................. 13, 17 Merge Fields ........................................... 43 Merge Fields function .......................... 42 Microsoft Excel ....................................... 49 Microsoft Outlook .................................. 51 Microsoft Word ....................................... 47 N Name badge ........................................... 53 Network printer ...........................
APPENDIX T Text icon ................................................... 31 Text properties ....................................... 30 Title field ....................................... 49, 50, 52 Troubleshooting ..................................... 60 Typical setup ..................................... 13, 17 U USB cable .................................................. 4 USB port ..................................................... 5 © 1993-2004 Brother Industries, Ltd.