RL-700S RFID Label Printer User's Manual ● Please read this manual before using the printer. ● Keep this manual in a convenient place for future reference.
Introduction Thank you for purchasing the RL-700S. The RL-700S (hereafter, referred to as "this machine") is an RFID label printer that enables you to easily create custom labels and read/write Brother SZ tapes (RFID labels) when the printer is connected to a computer. The machine can also use readily available TZ tapes, HG tapes, and AL tapes.
Note: Marking is in compliance with EU Directive 2002/96/EC and EN50419. This equipment is marked with the above recycling symbol. It means that at the end of the life of the equipment you must dispose of it separately at an appropriate collection point and not place it in the normal domestic unsorted waste stream. This will benefit the environment for all.
Contents Introduction . . . . . . . . . . . . . . . . . . . . . . . . . . . . . . . . . . . . . . . . . . . . . 2 About the machine .............................................................................................. 2 About the manual................................................................................................ 2 About the trademarks.......................................................................................... 2 Contents . . . . . . . . . . . . . . . . . . . . . . .
Using RFID Labels 29 Reading and writing data on RFID labels . . . . . . . . . . . . . . . . . . . . . 29 Experience RFID label applications (Sample Applications) . . . . . . . 30 Overview of sample applications....................................................................... 30 Support for application development. . . . . . . . . . . . . . . . . . . . . . . . . 32 SOFTWARE UPDATE ......................................................................................
Before using your machine Before using your machine Safety precautions To prevent injury or damage, follow all warnings and caution informations with following symbols. Warning Tell you what to do to avoid the risk of injury. Caution Tells you about procedures you must follow to prevent damage to the machine or its surroundings. Warning AC Adapter • Do not use voltages or adapters other than the specified voltage (220-240 V) and the included AC adapter (AD9100).
Before using your machine Warning Tape Cutter • To avoid injury, do not touch the tape cutter. Labels • Depending on the location, material, and environmental conditions, the label may be difficult to remove, the colour of the label may change or may be transferred to other objects. Test the suitability of the surface first by affixing a small piece of the label to an inconspicuous area of the intended surface.
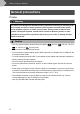
Before using your machine General precautions Printer Warning The printer is not designed or manufactured for applications requiring an extremely high level of safety, such as in nuclear reaction control systems of nuclear power plants, aircraft autopilot systems, air traffic control towers, driving control of mass transit systems, life-support systems, missile launch control of defense systems, or other applications posing a direct, significant risk of injury, loss of life, or damage if safety cannot be e
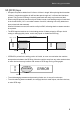
Before using your machine SZ (RFID) tape • SZ tapes can produce labels from 53.5mm to 100mm in length. When printing labels less than 100mm in length the machine will still feed the tape through as if a 100mm label had been printed. This is so the RFID tag is correctly positioned and ready to print the next label.
Before using your machine • Data reading may be significantly impaired if labels are applied directly to moist surfaces or near them. Test operation before applying labels to surfaces. • Do not bring SZ tape cassettes or RFID tags within 50 mm in front of, above, or on the right side of the printer when it is in use. This may interfere data writing during printing. • Do not bring SZ tape cassettes within the read range of other RFID reader/writers. This may interfere data writing during printing.
Before using your machine Box contents Make sure that all the following items are included in the package before using the product. If any items are missing or damaged, please contact the dealer you purchased the product from. CD-ROM RL-700S RFID label printer SZ tape cassette (RFID tape) 24mm black on white (RFID tape). Makes up to 30 labels. AC Adapter TZ tape cassette 24mm black on white (non-RFID tape). 8 Power cord The design of adapter and plug may differ metres in length.
Before using your machine Description of parts Front Cover Tape ejection slot Open Cover button Error lamp ON/OFF button RFID reader/writer Feed and Cut button Back AC adapter jack 12 USB port
Before using your machine Description of buttons Button Function ON/OFF button ( Turns the printer on and off. ) Feed and Cut button ( ) Open Cover button Feeds and cuts the printed labels. Use this button when the auto cut option in the printing dialog box is not checked. * Feed and cut does not function when SZ tapes are loaded. Opens the cover. Lamp display The ON/OFF button lamp (blue) and Error lamp (red) indicate the current operating status.
Before printing labels Before printing labels Connect the machine to a power point 1 2 3 Connect the AC adapter to the power cord. Plug the connector of the AC adapter into the AC adapter jack on the rear of the printer. Connect the plug of the AC adapter to a household power point. for UK Memo The design of adapter and plug may differ depending on which country the machine was purchased in.
Before printing labels Prepare a tape cassette List of cassette types suitable for this machine: SZ Tape (24 mm) 24 mm width tape cassettes with the SZ logo ( You can use this tape to create RFID labels. ). TZ Tape (3.5-36 mm) 3.5 mm, 6 mm, 9 mm, 12 mm, 18 mm, 24 mm or 36 mm width tape cassettes with the TZ logo ( ). Enables printing at up to 20 mm/sec.
Before printing labels 2 Check the tape cassette. Make sure that the end of the tape is not bent and the tape is through the tape guide. To pull in the slack of the tape, wind the takeup spool with your finger in the direction of the arrow for one or two turns. The end of the tape 3 4 Press the Open Cover button to open the cover of the printer. Put the tape cassette in the printer. Memo Make sure you position the tape cassette in the right direction.
Before printing labels 5 Close the cover. 6 Press the ON/OFF button. The ON/OFF button lights up in blue. Memo ON/OFF button If the cover is not properly closed or the tape cassette is not properly set, the ERROR lamp lights up. Repeat from Step 3 onwards. Feed and Cut button 7 Press the Feed and Cut button. This procedure removes any slack in the tape cassette. Memo This step is not necessary for SZ tapes.
Before printing labels Install the software Software overview Before connecting the printer to your computer, you must install the software on your computer, including software applications and the printer driver. The following applications are included on the CD-ROM. P-touch Editor 4.2 Advanced editing software to create label designs for a variety of purposes. P-touch Editor is a standalone application for easy label design.
Before printing labels Preparing for installation System requirements Before installation, make sure your computer meets these requirements and that other required software is already installed. Item Details ® ® Operating System Microsoft Windows 2000 Professional (SP4 or later), Windows® XP, or Windows Vista® * The computer should meet the recommendations provided by Microsoft® for the OS installed. * Internet Explorer® 5.01 or later is required to use the sample applications.
Before printing labels Software installation procedure Install screens are from Windows® XP. Some screens may be different with other versions of Windows®. 1 Start your computer and insert the CD-ROM in the CD-ROM drive. Select the language you want to install. The RL-700S Installer starts up and the P-touch R Setup screen is displayed. Memo • It may take few moments before this screen is displayed. • If it does not start up automatically, double-click the "Setup.exe" icon on the CD-ROM.
Before printing labels 3 Read the license agreement very carefully. If you agree with the terms and conditions of the license agreement, click Yes to continue the installation. The Customer Information screen is displayed. 4 Fill in the information requested by the installer, and then click Next. Several screens may follow. You will need to provide the following information: • Customer Information • Choose Destination Location • Add Shortcut 5 Check the settings are correct, then click Next.
Before printing labels 6 Select the programs you would like to install the Add-Ins to, and then click Next. Memo • Make sure that you closed all Microsoft® Office® applications before proceeding. • For details on configuring Add-Ins, see the help file for P-touch Editor 4.2. • Follow the instructions on the screen to complete installation. The software is now installed. When installation is finished, the Driver Setup screen is displayed. 7 When the message "Connect Brother RL-700S, and then turn it on.
Before printing labels 8 Connect the USB cable to the computer's USB port and turn on the printer. When the computer detects the printer, the printer driver installs automatically. Memo If your machine is not detected, make sure that the USB cable is connected directly to your computer and not through a USB hub. After the driver is installed, the Online User Registration screen is displayed. 9 Click Finish. Software installation is now complete.
Creating labels Creating labels This section explains how to create simple labels using P-touch Editor 4.2. You can find more detailed information in P-touch Editor Help (see "View Help" on page 26). Memo • To create RFID labels, install the RFID sample applications provided on the CD-ROM. • P-touch Editor cannot write data to SZ tapes (RFID capable). To use the RFID capability of SZ tapes, install and run the RFID sample applications provided on the CD-ROM.
Creating labels P-touch Editor Edit window 1Menu Commands are categorized in menus such as File, Edit, View, and Insert according to the functions. 2Standard Tool Bar This tool bar includes the Menu commands that are most frequently used such as New layout, Open, Save and Auto-format. 3Properties Dock The print properties, page properties, text properties, layout properties, and database properties appear in this part.
Creating labels View Help Find detailed information and instructions on how to use P-touch Editor. 1 In the P-touch Editor edit window, Click Help in the menu bar and then P-touch Editor Help. Memo You can also launch Help by the following steps. • Click Start, All Programs, Brother P-touch and then P-touch Editor 4.2 Help. • While the P-touch Editor edit window is on the screen, press the F1 key on the keyboard. 2 View P-touch Editor Help.
Creating labels 3 Print P-touch Editor Help. You can print out the contents of Help. 1 Select topics to print out on the "Contents" tab. 2 Click on the tool bar. The "Print Topics" dialog box appears. 3 Specify the range of topics to print out and click "OK". The "Print" dialog box appears. 4 Select the desired printer and then "Print". The selected content of Help will be printed. Memo Select a standard printer that supports conventional paper sizes such as A4.
Creating labels Create different types of labels The steps to create the following types of labels are explained in the "How To" section (PT series) of the P-touch Editor Help.
Using RFID Labels Using RFID Labels Reading and writing data on RFID labels The printer has a built-in reader/writer for reading and writing RFID label data. To use the reader/writer of the printer, you need to install a supporting application first. Install one of the included sample applications before use. See p. 30 "Experience RFID label applications (Sample Applications)".
Using RFID Labels Experience RFID label applications (Sample Applications) For an introduction to use RFID labels, try installing and using one of the sample applications from the CD-ROM. Memo These programs are sample applications to introduce printer RFID functions. They are provided as a way to try common functions, but no guarantee is implied regarding actual use.
Using RFID Labels FileOpen An application for opening multiple files (registered in advance) at once when you hold the RFID label near the reader/writer of the printer. For example, this function is useful when several people give presentations on a single computer. Issue the RFID Labels Read the RFID Labels Since this application is a resident Register multiple files that you want to application, you can open the registered open, and then print the labels.
Using RFID Labels Support for application development The SDK (Software Development Kit) is provided so that you can develop applications that take full advantage of the RFID label creating capability of your RL-700S. RL-700S SDK is provided as a library for use on Microsoft Windows® operating systems. This SDK can be used with development languages such as Visual Studio .
Cleaning and maintenance Cleaning and maintenance Maintenance Follow the instructions in this section to keep your machine operating at optimum efficiency. Dusty environments may require shorter intervals between cleaning and maintenance procedures. Cleaning the outside of the machine Wipe off dirt and dust on the surface (outside) of the printer with a dry soft cloth. Use a moistened cloth to clean persistent dirt and stains.
Cleaning and maintenance Cleaning the print head and head roller If horizontal lines are printed on the labels or the prints are not very clear, the print head or head roller may need to be cleaned. Follow the steps below to clean the print head and head roller. 1 Clean the print head with the self cleaning function. 1 Press the Open Cover button to open the cover of the printer. 2 Remove the tape cassette. 3 Close the cover. 4 Press the Feed and Cut button. Self-cleaning will be performed.
Cleaning and maintenance Accessories Brother recommends the use of genuine Brother accessories (tape cassettes, AC adaptor, etc.) with your P-touch. The use of other products may effect the print quality or may damage your Ptouch. Availability of accessories subject to change without notice. Tape cassettes Not all tape cassettes are available in all countries. Memo Do not use tapes that do not have the , , or mark. SZ Tapes You can create RFID labels using this tape.
Cleaning and maintenance Stock No.
Cleaning and maintenance Stock No.
Cleaning and maintenance Stock No.
Cleaning and maintenance Stock No. Description TZ-N531 Black characters on blue tape TZ-N631 Black characters on yellow tape 9 mm TZ-N221 Black characters on white tape 6 mm TZ-N211 Black characters on white tape 3.5 mm TZ-N201 Black characters on white tape Strong adhesive tapes (length: 8 m) Laminated tapes with stronger adhesive, ideal for rough surfaces or harsh environments. Stock No.
Cleaning and maintenance Stock No. TZ-S611 Description Black characters on yellow tape Flexible ID tapes (length: 8 m) Flexible laminated tapes ideal for labelling network cables, electrical wires, etc. Stock No.
Cleaning and maintenance Fabric tape (length: 3 m) These fabric labels can be affixed to other fabric using an iron. Stock No. Description 18 mm TZ-FA4B Blue characters on white tape 12 mm TZ-FA3 Blue characters on white tape Thermal Paper tape (length: 7 m) Stock No. AL-K251 Description 24 mm thermal paper tape (black characters on white tape) Print head cleaning cassette Cassette tape for cleaning the print head of your P-touch. Stock No.
Cleaning and maintenance Troubleshooting Refer to the following if you have trouble using your machine. Trouble Causes Solutions The cables are not properly The printer does not print. A writing error occurs. plugged in. The tape cassette is not properly placed in the printer. Check the cables, tape cassette, cover or other parts of the printer. The cover is open. Stripes appear on TZ, HG or AL tapes. The ON/OFF button of the printer does not light up. The tape has run out. the Feed and Cut button.
Cleaning and maintenance Storing your machine Make sure you disconnect the machine from the power for your safety if you are not going to use it for an extended period of time. Uninstalling software Steps to uninstall software vary depending on the operating system. Refer to the documentation for your operating system for further details. P-touch Editor 4.
Specifications Specifications Item Display Print Details LED lamps (blue and red) Printing Method Thermal transfer lamination/thermal printing Print Head 360 dpi, 384 dots Resolution TZ, SZ or AL tape: 360 dpi HG tape, high resolution mode: 360 x 720 dpi (in feed direction) Speed TZ, SZ or AL tape: up to 20 mm/sec HG tape, high-speed mode: up to 40 mm/sec Maximum Width 27.1 mm Interface USB (Ver. 2.
Specifications Computer system requirements Item Details Microsoft® ® Windows® Operating System 2000 Professional(SP4 or later)/ Windows XP / Windows Vista® * Refer to Microsoft® guidelines for minimum hardware requirements for each operating system. * Internet Explorer® 5.01 is required to use the RFID sample applications. Interface USB port (USB 1.
RL-700S Imprimante d'étiquettes RFID RFID Label Printer User's Manual Manuel d'utilisation Please read this manual before using the printer. •● Veuillez lire ce manuel avant d'utiliser l'imprimante. ● Keep this manual in a convenient place for future en reference. • Conservez ce manuel dans un endroit commode vue de le consulter ultérieurement.
Introduction Merci d'avoir choisi la RL-700S. La RL-700S (ci-après dénommée « cette machine ») est une imprimante d'étiquettes RFID (identification par radiofréquence) qui vous permet de créer facilement des étiquettes personnalisées et de lire/écrire les rubans SZ Brother (étiquettes RFID) lorsque l'imprimante est branchée à un ordinateur. La machine peut également utiliser des rubans TZ, des rubans HG et des rubans AL qui sont facilement disponibles.
Déclaration de conformité de la CE Fabricant Brother Industries Ltd., 15-1, Naeshiro-cho, Mizuho-ku, Nagoya 467-8561, Japon Usine Zhuhai Brother Industries Co., Ltd. 254 Gangchang Road, Gongbei, Zhuhai City S.E.Z.
Table des matières Introduction . . . . . . . . . . . . . . . . . . . . . . . . . . . . . . . . . . . . . . . . . . . . . 2 À propos de la machine ...................................................................................... 2 À propos du manuel ............................................................................................ 2 À propos des marques déposées ....................................................................... 2 Table des matières . . . . . . . . . . . . . . . . . . .
Utilisation des étiquettes RFID 29 Lecture et écriture de données sur des étiquettes RFID. . . . . . . . . . 29 Découverte des applications d'étiquettes RFID (applications échantillons) . . . . . . . . . . . . . . . . . . . . . . . . . . . . . . . . . . . . . . . . . . . 30 Vue d'ensemble des applications échantillons.................................................. 30 Assistance au développement d'applications . . . . . . . . . . . . . . . . . . 32 MISE À JOUR DU LOGICIEL ..............................
Avant d'utiliser la machine Avant d'utiliser la machine Précautions de sécurité Afin d'éviter toute blessure ou dommage, respectez tous les avertissements et informations de précautions portant les symboles suivants. Alerte Vous indique comment agir afin d'éviter le risque de blessures. Attention Vous indique les procédures à respecter pour éviter les dommages à la machine ou à ce qui l'entoure.
Avant d'utiliser la machine Avertissement Massicot de ruban • Pour éviter toute blessure, ne touchez pas le massicot de ruban. Étiquettes • En fonction du lieu, du matériau et des conditions ambiantes, l'étiquette peut être difficile à décoller, la couleur de l'étiquette peut varier ou peut être transférée sur d'autres objets. Testez tout d'abord l'adéquation de la surface en collant une petite partie de l'étiquette sur une zone discrète de la surface souhaitée.
Avant d'utiliser la machine Précautions générales Imprimante Avertissement L'imprimante n'est pas conçue ou fabriquée pour des applications qui requièrent un très haut niveau de sécurité telles que dans les systèmes de contrôle de réaction nucléaire des centrales nucléaires, les pilotes automatiques des avions, les tours de contrôle de trafic aérien, les commandes de conduite des systèmes de transport en commun, les systèmes d'assistance vitale, les commandes de lancement de missiles des systèmes de défens
Avant d'utiliser la machine Ruban (RFID) SZ • Les rubans SZ peuvent produire des étiquettes de 53,5 mm à 100 mm de long. Lors de l'impression d'étiquettes de moins de 100 mm de long, la machine continue à alimenter le ruban comme si une étiquette de 100 mm avait été imprimée. Ainsi l'étiquette RFID est correctement positionnée et prêt à imprimer l'étiquette suivante.
Avant d'utiliser la machine • La lecture de données peut être détériorée de façon significative si les étiquettes sont appliquées directement sur des surfaces humides ou à proximité. Testez le fonctionnement avant d'appliquer des étiquettes sur les surfaces. • N'approchez pas les cassettes de ruban SZ ou les étiquettes RFID à moins de 50 mm devant, audessus ou sur le côté droit de l'imprimante lorsqu'elle fonctionne. Cela peut interférer avec l'écriture de données pendant l'impression.
Avant d'utiliser la machine Contenu de la boîte Assurez-vous que le paquet contient tous les articles suivants avant d'utiliser le produit. S'il manque des articles ou s'ils sont détériorés, contactez le vendeur auquel vous avez acheté le produit. CD-ROM RL-700S Imprimante d'étiquette RFID Cassette de ruban SZ (ruban RFID) 24 mm noir sur blanc (ruban RFID). Fabrique jusqu'à 30 étiquettes. Adaptateur secteur Cassette de ruban TZ 24 mm noir sur blanc (ruban non RFID).
Avant d'utiliser la machine Description des pièces Vue avant Couvercle Fenêtre de sortie de ruban Bouton d'ouverture du couvercle Voyant d'erreur Bouton d'alimentation (allumé) Lecteur/scripteur RFID Bouton de chargement et de coupe Vue arrière Connecteur femelle pour adaptateur secteur 12 Port USB
Avant d'utiliser la machine Description des boutons Bouton Fonction Bouton de marche/arrêt ( ) Allume et éteint l'imprimante. Bouton de chargement et de coupe ( ) Charge et coupe les étiquettes imprimées. Utilisez ce bouton lorsque l'option de coupe automatique n'est pas cochée dans la boîte de dialogue d'impression. * La fonction « chargement et coupe » ne fonctionne pas lorsque des rubans SZ sont chargés. Bouton d'ouverture du couvercle Ouvre le couvercle.
Avant d'imprimer les étiquettes Avant d'imprimer les étiquettes Raccordement de la machine à une alimentation électrique 1 2 3 Raccordez l'adaptateur secteur au cordon d'alimentation. Branchez le connecteur de l'adaptateur secteur dans le connecteur femelle de l'adaptateur secteur à l'arrière de l'imprimante. Raccordez la prise de l'adaptateur secteur à une prise secteur domestique.
Avant d'imprimer les étiquettes Préparation d'une cassette de ruban Liste des types de cassettes compatibles avec cette machine : Ruban SZ (24 mm) Cassettes de ruban de 24 mm de largeur avec le logo SZ ( ). Vous pouvez utiliser ce ruban pour créer des étiquettes RFID. Ruban TZ (3,5-36 mm) Cassettes de ruban de 3,5 mm, 6 mm, 9 mm, 12 mm, 18 mm, 24 mm ou 36 mm de largeur avec le logo TZ ( ). Permet d'imprimer jusqu'à 20 mm/sec.
Avant d'imprimer les étiquettes 2 Contrôlez la cassette de ruban. Assurez-vous que la fin du ruban n'est pas pliée et que le ruban passe à travers le guide du ruban. Pour retendre le ruban, tournez la bobine réceptrice avec votre doigt d'un ou deux tours dans le sens de la flèche. 3 4 Appuyez sur le bouton d'ouverture du couvercle pour ouvrir le couvercle de l'imprimante. Placez la cassette du ruban dans l'imprimante. Note Assurez-vous de placer la cassette du ruban dans le bon sens.
Avant d'imprimer les étiquettes 5 Fermez le couvercle. 6 Appuyez sur le bouton de marche/arrêt. Le bouton de marche/arrêt s'allume en bleu. Note Bouton de Power button marche/arrêt Si le couvercle n'est pas bien fermé ou si la cassette du ruban n'est pas correctement placée, le voyant d’erreur s'allume. Recommencez à partir de l'Étape 3. Bouton de Cut chargement Feed and button et de coupe 7 Appuyez sur le bouton de chargement et de coupe.
Avant d'imprimer les étiquettes Installation du logiciel Vue d'ensemble du logiciel Avant de brancher l'imprimante sur votre ordinateur, vous devez installer le logiciel sur votre ordinateur, notamment les applications logicielles et le pilote d'imprimante. Les applications suivantes sont incluses dans le CD-ROM. P-touch Editor 4.2 Logiciel d'édition avancé permettant de créer des étiquettes pour différents usages. P-touch Editor est une application autonome pour la création facile d'étiquettes.
Avant d'imprimer les étiquettes Préparation à l'installation Configuration du système requise Avant l'installation, assurez-vous que votre ordinateur remplit ces critères et que les autres logiciels requis sont déjà installés. Élément Précisions Système d'exploitation Microsoft® Windows® 2000 Professional (SP4 ou ultérieur), Windows® XP ou Windows Vista® * L'ordinateur doit respecter les recommandations fournies par Microsoft® pour le système d'exploitation installé. * Internet Explorer® 5.
Avant d'imprimer les étiquettes Procédure d'installation du logiciel Les écrans d'installation viennent de Windows® XP. Certains écrans peuvent être différents avec d'autres versions de Windows®. 1 Démarrez votre ordinateur et insérez le CD-ROM dans le lecteur de CD-ROM. Sélectionnez la langue à installer. Le programme d'installation de RL-700S démarre et l'écran Configuration de P-touch R s'affiche. Note • Un certain temps peut s'écouler avant que l'écran ne s'affiche.
Avant d'imprimer les étiquettes 3 Lisez attentivement le contrat de licence. Si vous acceptez les conditions du contrat de licence, cliquez sur Oui pour continuer l'installation. L'écran Informations client s'affiche. 4 Remplissez les informations demandées par le programme d'installation puis cliquez sur Suivant. Plusieurs écrans vont peut-être suivre.
Avant d'imprimer les étiquettes 6 Sélectionnez les programmes pour lesquels vous souhaitez installer des macros complémentaires puis cliquez sur Suivant. Note • Assurez-vous que vous avez fermé toutes les applications Microsoft® Office® avant de commencer. • Pour des informations sur la configuration des macros complémentaires, consultez le fichier d'aide pour P-touch Editor 4.2. • Suivez les instructions à l'écran pour achever l'installation. Le logiciel est maintenant installé.
Avant d'imprimer les étiquettes 8 Branchez le câble USB au port USB de l'ordinateur et mettez l'imprimante sous tension. Lorsque l'ordinateur détecte l'imprimante, le pilote de l'imprimante s'installe automatiquement. Note Si votre machine n'est pas détectée, vérifiez que le câble USB est connecté directement à votre ordinateur et ne passe pas par un concentrateur USB. Après avoir installé le pilote, l'écran Enregistrement utilisateur s'affiche. 9 Cliquez sur Terminer.
Création d'étiquettes Création d'étiquettes Cette partie explique comment créer des étiquettes simples à l'aide de P-touch Editor 4.2. Vous pouvez trouver de plus amples informations dans l'aide de P-touch Editor (consultez « Affichage de l'aide » page 26). Note • Pour créer des étiquettes RFID, installez les applications échantillons RFID fournies sur le CD-ROM. • P-touch Editor ne peut pas écrire des données sur des rubans SZ (RFID capables).
Création d'étiquettes Fenêtre Edition de P-touch Editor 1 2 3 4 5 6 1Menu Les commandes sont classées dans des menus tels que Fichier, Edition, Affichage et Insérer selon les fonctions. 2Barre d'outils Standard Cette barre d'outils inclut les commandes de menu qui sont le plus souvent utilisées telles que Nouvelle mise en page, Ouvrir, Enregistrer et Format automatique.
Création d'étiquettes Affichage de l'aide Trouvez des informations précises et des instructions sur la façon d'utiliser P-touch Editor. 1 Dans la fenêtre Edition de P-touch Editor, Cliquez sur Aide dans la barre de menus puis sur P-touch Editor Aide. Note Vous pouvez également lancer l'Aide en suivant les étapes ci-dessous. • Cliquez sur Démarrer, Tous les programmes, Brother P-touch puis sur Aide de P-touch Editor 4.2.
Création d'étiquettes 3 Imprimer l'aide de P-touch Editor. Vous pouvez imprimer le contenu de l'aide. 1 Sélectionnez les rubriques à imprimer dans l'onglet « Sommaire ». 2 Cliquez sur Imprimer dans la barre d'outils. La boîte de dialogue « Impression des rubriques » apparaît. 3 Indiquez le groupe de rubriques à imprimer et cliquez sur « OK ». La boîte de dialogue « Imprimer » s'affiche. 4 Sélectionnez l’imprimante à utiliser puis « Imprimer ». Le contenu sélectionné de l'aide est imprimé.
Création d'étiquettes Création de différents types d'étiquettes Les étapes pour créer les types d'étiquettes suivants sont expliquées dans la partie « Comment » (gamme PT) de l'aide de P-touch Editor.
Utilisation des étiquettes RFID Utilisation des étiquettes RFID Lecture et écriture de données sur des étiquettes RFID L'imprimante est dotée d'un lecteur/scripteur intégré pour la lecture et l'écriture de données d'étiquettes RFID. Pour utiliser le lecteur/scripteur de l'imprimante, vous devez installer d'abord une application qui le prend en charge. Installez une des applications échantillons incluses avant utilisation. Consultez la page 30, Découverte des applications d'étiquettes RFID.
Utilisation des étiquettes RFID Découverte des applications d'étiquettes RFID (applications échantillons) Pour une présentation de l'utilisation des étiquettes RFID, installez et utilisez une des applications échantillons à partir du CD-ROM. Note Ces programmes sont des applications échantillons qui servent à présenter les fonctions RFID de l'imprimante. Ils sont fournis afin de tester les fonctions usuelles mais aucune garantie n'est donnée par rapport à une utilisation réelle.
Utilisation des étiquettes RFID Ouvrir fichier Une application permettant d'ouvrir plusieurs fichiers (enregistrés au préalable) en même temps lorsque vous tenez l'étiquette RFID près du lecteur/scripteur de l'imprimante. Par exemple, cette fonction est utile lorsque plusieurs personnes font des présentations sur un seul ordinateur.
Utilisation des étiquettes RFID Assistance au développement d'applications Le SDK (kit de développement logiciel) est fourni pour vous permettre de développer des applications qui utilisent pleinement la capacité de création d'étiquettes RFID de votre RL-700S. Le SDK RL-700S est fourni sous forme d'une bibliothèque à utiliser sur les systèmes d'exploitation de Microsoft Windows®. Ce SDK peut être utilisé avec des langages de développement tels que Visual Studio .
Nettoyage et maintenance Nettoyage et maintenance Maintenance Pour garantir un focntionnement optimal de votre machine, suivez les instructions de cette partie. Dans le cas d'environnements poussiéreux, il peut être nécessaire d'effectuer plus souvent les procédures de nettoyage et de maintenance. Nettoyage de l'extérieur de la machine Essuyez la saleté et la poussière sur la surface (extérieure) de l'imprimante avec un chiffon sec et doux.
Nettoyage et maintenance Nettoyage de la tête d'impression et du rouleau principal Si des lignes horizontales s'impriment sur les étiquettes ou si les impressions ne sont pas très nettes, il peut être nécessaire de nettoyer la tête d'impression ou le rouleau principal. Suivez les étapes ci-dessous pour nettoyer la tête d'impression et le rouleau principal. 1 Nettoyage de la tête d'impression à l'aide de la fonction d'auto-nettoyage.
Nettoyage et maintenance Accessoires Brother recommande d'utiliser des accessoires Brother d'origine (cassettes de ruban, adaptateur secteur, etc.) avec votre P-touch. L'utilisation d'autres produits peut dégrader la qualité de l'impression ou détériorer votre P-touch. Disponibilité des accessoires susceptible d'être modifiée sans préavis. Cassettes de ruban Toutes les cassettes de ruban ne sont pas disponibles dans tous les pays. Note N'utilisez pas de rubans qui ne portent pas la marque , , ou .
Nettoyage et maintenance Référence TZ-262 Description Caractères rouges sur ruban blanc TZ-263 Caractères bleus sur ruban blanc TZ-364 Caractères dorés sur ruban noir TZ-365 Caractères blancs sur ruban noir TZ-461 Caractères noirs sur ruban rouge TZ-561 Caractères noirs sur ruban bleu TZ-661 Caractères noirs sur ruban jaune TZ-M961 Caractères noirs sur ruban (mat) argenté 24 mm TZ-151 Caractères noirs sur ruban transparent TZ-M51 Caractères noirs sur ruban (mat) transparent TZ-152 Cara
Nettoyage et maintenance Référence Description 18 mm TZ-141 Caractères noirs sur ruban transparent TZ-241 Caractères noirs sur ruban blanc TZ-242 Caractères rouges sur ruban blanc TZ-243 Caractères bleus sur ruban blanc TZ-344 Caractères dorés sur ruban noir TZ-145 Caractères blancs sur ruban transparent TZ-345 Caractères blancs sur ruban noir TZ-441 Caractères noirs sur ruban rouge TZ-541 Caractères noirs sur ruban bleu TZ-641 Caractères noirs sur ruban jaune TZ-741 Caractères noirs
Nettoyage et maintenance Référence TZ-M31 Description Caractères noirs sur ruban (mat) transparent 9 mm TZ-121 Caractères noirs sur ruban transparent TZ-122 Caractères rouges sur ruban transparent TZ-123 Caractères bleus sur ruban transparent TZ-221 Caractères noirs sur ruban blanc TZ-222 Caractères rouges sur ruban blanc TZ-223 Caractères bleus sur ruban blanc TZ-324 Caractères dorés sur ruban noir TZ-325 Caractères blancs sur ruban noir TZ-421 Caractères noirs sur ruban rouge TZ-521
Nettoyage et maintenance Référence Description TZ-N531 Caractères noirs sur ruban bleu TZ-N631 Caractères noirs sur ruban jaune 9 mm TZ-N221 Caractères noirs sur ruban blanc 6 mm TZ-N211 Caractères noirs sur ruban blanc 3,5 mm TZ-N201 Caractères noirs sur ruban blanc Rubans adhésifs puissants (longueur : 8 m) Rubans laminés avec des adhésifs plus puissants, idéaux pour les surfaces rugueuses ou les environnements difficiles.
Nettoyage et maintenance Référence TZ-S611 Description Caractères noirs sur ruban jaune Rubans ID flexibles (longueur : 8 m) Rubans laminés flexibles, idéaux pour étiqueter les câbles d'un réseau, les fils électriques, etc.
Nettoyage et maintenance Ruban en tissu (longueur : 3 m) Ces étiquettes en tissu peuvent être apposées sur d'autres tissus en utilisant un fer à repasser.
Nettoyage et maintenance Dépannage Consultez le tableau suivant si vous rencontrez des problèmes lors de l'utilisation de votre machine. Problème Causes Solutions Les câbles ne sont pas L'imprimante correctement branchés. n'imprime pas. La cassette de ruban n'est Vérifiez les câbles, la cassette de ruban, le Une erreur d'écriture pas bien placée dans couvercle ou d'autres parties de l'imprimante. se produit. l'imprimante. Le couvercle est ouvert.
Nettoyage et maintenance Stockage de votre machine Pour votre sécurité, si vous n'allez pas utiliser votre machine pendant une période prolongée, assurez-vous de la débrancher de l'alimentation électrique. Désinstallation du logiciel Les étapes pour désinstaller le logiciel varient selon le système d'exploitation. Consultez la documentation sur votre système d'exploitation pour obtenir de plus amples informations. P-touch Editor 4.
Caractéristiques techniques Caractéristiques techniques Élément Affichage Impression Précisions Voyants à DEL (bleu et rouge) Méthode d'impression Lamination par transfert thermique/impression thermique Tête d'impression 360 dpi, 384 points Résolution Ruban TZ, SZ ou AL : 360 dpi Ruban HG, mode haute définition : 360 x 720 dpi (en direction d'avance) Vitesse Ruban TZ, SZ ou AL : jusqu'à 20 mm/sec Ruban HG, mode haute vitesse : jusqu'à 40 mm/sec Largeur maximale 27,1 mm Interface USB (Ver. 2.
Caractéristiques techniques Configuration du système requise Élément Précisions ® Windows® ® Système d'exploitation 2000 Professional(SP4 ou version Microsoft ultérieure)/Windows XP / Windows Vista® * Consultez les recommandations de Microsoft® pour le matériel minimum requis pour chaque système d'exploitation. * Internet Explorer® 5.01 est nécessaire pour utiliser les applications échantillons RFID. Interface Port USB (USB 1.
RL-700S RFID Label Labelprinter RFID Printer Gebruikershandleiding User's Manual Please read this manual before using printer. •● Lees deze handleiding vooraleer u de the printer gebruikt. Keep this manual in a convenient place forplaats futurevoor reference. •● Bewaar deze handleiding op een handige toekomstige referentie.
Introductie Dank u voor de aankoop van de RL-700S. De RL-700S (waarnaar hierna verwezen wordt als "deze machine") is een RFID-labelprinter waarmee u eenvoudig aangepaste labels en lezen/schrijven Brother SZ-tapes (RFID-labels) kunt maken wanneer de printer is aangesloten op een computer. De machine kan ook vlot beschikbare TZ-tapes, HG-tapes en AL-tapes gebruiken.
EG-verklaring van conformiteit Fabrikant Brother Industries Ltd., 15-1, Naeshiro-cho, Mizuho-ku, Nagoya 467-8561, Japan Fabriek Zhuhai Brother Industries Co., Ltd. 254 Gangchang Road, Gongbei, Zhuhai City S.E.Z.
Inhoud Introductie . . . . . . . . . . . . . . . . . . . . . . . . . . . . . . . . . . . . . . . . . . . . . . 2 Over de machine................................................................................................. 2 Over de handleiding............................................................................................ 2 Over de handelsmerken...................................................................................... 2 Inhoud . . . . . . . . . . . . . . . . . . . . . . . . . .
RFID-labels gebruiken 29 Gegevens lezen en schrijven op RFID-labels . . . . . . . . . . . . . . . . . . 29 RFID-labelapplicaties gebruiken (voorbeeldapplicaties) . . . . . . . . . . 30 Overzicht van voorbeeldapplicaties .................................................................. 30 Ondersteuning voor applicatieontwikkeling. . . . . . . . . . . . . . . . . . . . 32 SOFTWARE UPDATE ......................................................................................
Voor u de machine gebruikt Voor u de machine gebruikt Veiligheidsvoorzorgen Om letsel of schade te voorkomen, volg alle waarschuwingen en voorzichtigheidsinformatie met de volgende symbolen. Waarschuwing Zegt u wat te doen om het risico op letsel te vermijden. Let op Zegt u welke procedures u moet volgen om schade aan de machine of zijn omgeving te voorkomen.
Voor u de machine gebruikt Waarschuwing Tapesnijeenheid • Om letsels te vermijden, raak de tapesnijeenheid niet aan. Labels • Afhankelijk van de locatie, het materiaal en de omgevingsvoorwaarden, kan het label moeilijk te verwijderen zijn, kan de kleur van het label wijzigen of overgebracht worden op andere objecten. Test eerst de geschiktheid van het oppervlak door een klein stukje van het label te bevestigen aan een onopvallend gebied van het bedoelde oppervlak.
Voor u de machine gebruikt Algemene voorzorgsmaatregelen Printer Waarschuwing De printer is niet ontworpen of gefabriceerd voor toepassingen die een zeer hoog niveau van beveiliging vereisen, zoals in controlesystemen voor kernreacties of kerncentrales, autopilootsystemen in vliegtuigen, luchtverkeertorens, besturingscontrole van massatransitsystemen, levensinstandhoudingssystemen, raketlanceercontrole van defensiesystemen of andere toepassingen die een direct, aanzienlijk risico op letsels, de dood of sch
Voor u de machine gebruikt SZ (RFID)-tape • SZ-tapes kunnen labels produceren van 53,5 mm of 100 mm in lengte. Wanneer labels van minder dan 100 mm in lengte worden afgedrukt, zal de machine de tape doorvoeren alsof een label van 100 mm werd afgedrukt. Dit is zodat de RFID-tag correct gepositioneerd is en klaar is om het volgende label af te drukken.
Voor u de machine gebruikt • Het lezen van gegevens kan aanzienlijk verstoord worden indien de labels rechtstreeks op vochtige oppervlakken of nabij deze toegepast worden. Test de werking voor u de labels op oppervlakken plaatst. • Breng geen SZ-tape cassettes of RFID-tags binnen de 50 mm voor of boven of aan de rechterkant van de printer wanneer de printer in gebruik is. Dit kan het gegevensschrijven tijdens het afdrukken verstoren.
Voor u de machine gebruikt Inhoud doos Zorg ervoor dat alle volgende items in de verpakking zitten voor u het product gebruikt. Indien er items ontbreken of beschadigd zijn, neem contact op met de dealer bij wie u het product kocht. CD-ROM RL-700S RFID labelprinter SZ-tapecassette (RFID-tape) 24mm zwart op wit (RFID-tape). Maakt tot 30 labels. AC Adapter TZ-tapecassette 24mm zwart op wit (non-RFID-tape). Netsnoer Het ontwerp van de adapter en de stekker 8 meter in lengte.
Voor u de machine gebruikt Beschrijving van de onderdelen Voorkant Deksel Label uitgang Ontgrendelknop deksel Foutlamp Aan/uit-knop (brandt) RFID-lezer/schrijver Doorvoer en Snijden knop Achterkant AC adapteraansluiting 12 USB-poort
Voor u de machine gebruikt Beschrijving van de knoppen Knop AAN/UIT-knop ( Functie Schakelt de printer aan en uit. ) Doorvoer en Snijden knop ( Ontgrendelknop deksel Voert door en snijdt de gedrukte labels. Gebruik deze knop wanneer de optie automatisch snijden ) in het dialoogvenster Afdrukken niet ingeschakeld is. * Doorvoeren en snijden werkt niet wanneer SZ-tapes geladen zijn. Opent het deksel.
Voor het afdrukken van labels Voor het afdrukken van labels Sluit de machine aan op een stopcontact 1 2 3 Sluit de AC adapter aan op het netsnoer. Plug de connector van de AC adapter in de AC adapteraansluiting aan de achterkant van de printer. Sluit de plug van de AC adapter aan op een huishoudstopcontact. voor UK Memo Het ontwerp van de adapter en de stekker kan verschillen afhankelijk van het land waarin het toestel werd aangekocht.
Voor het afdrukken van labels Een tapecassette voorbereiden Lijst van cassettetypes die geschikt zijn voor dit toestel: SZ-tape (24 mm) 24 mm brede tapecassettes met het SZ-logo ( ). U kunt deze tape gebruiken om RFID-labels te maken. TZ-tape (3,5-36 mm) 3,5 mm, 6 mm, 9 mm, 12 mm, 18 mm, 24 mm of 36 mm brede tapecassettes met het TZ-logo ( ). Maakt afdrukken tot 20mm/sec mogelijk.
Voor het afdrukken van labels 2 Controleer de tapecassette. Zorg ervoor dat het uiteinde van de tape niet gebogen is en de tape doorheen de tapegeleider gaat. Om de loshangende tape strak te krijgen, draai het opwindspoel één of twee draaien met uw vinger in de richting van de pijl. 3 4 Druk op de ontgrendelknop deksel om het deksel van de printer te openen. Plaats de tapecassette in de printer. Memo Zorg ervoor dat u de tapecassette in de juiste richting plaatst.
Voor het afdrukken van labels 5 Sluit het deksel. 6 Druk op de AAN/UIT-knop. Het blauwe aan/uit-lampje in de knop begint te branden. Aan/uit-knop Power button Memo Indien het deksel niet goed gesloten is of de tapecassette niet juist geplaatst is, begint het foutlampje te branden. Herhaal vanaf stap 3. Doorvoer Snijden Feed anden Cut button knop 7 Druk op de Doorvoer en Snijden knop. Deze procedure verwijdert alle verslappingen in de tapecassette. Memo Deze stap is niet nodig voor SZ-tapes.
Voor het afdrukken van labels De software installeren Software overzicht Voor u de printer aansluit op de computer, moet u de software installeren op uw computer, inbegrepen softwaretoepassingen en het printerstuurprogramma. De volgende toepassingen staan op de CD-ROM. P-touch Editor 4.2 Geavanceerde bewerkingssoftware om labelontwerpen te creëren voor verschillende doeleinden. P-touch Editor is een standalone toepassing voor eenvoudig labelontwerp.
Voor het afdrukken van labels Installatie voorbereiden Systeemvereisten Voor de installatie moet u ervoor zorgen dat uw computer voldoet aan deze vereisten en dat de andere vereiste software al geïnstalleerd is. Item Details ® ® Besturingssysteem Microsoft Windows 2000 Professional (SP4 of later), Windows® XP, of Windows Vista® * De computer moet voldoen aan de aanbevelingen geleverd door Microsoft® voor het geïnstalleerde besturingssysteem. * Internet Explorer® 5.
Voor het afdrukken van labels Software-installatieprocedure De installatieschermen zijn van Windows® XP Sommige schermen kunnen verschillen van andere versies van Windows®. 1 Start uw computer en plaats de CD-ROM in het CD-ROM-station. Selecteer de taal die u wilt installeren. De RL-700S Installer start en het scherm P-touch Setup wordt weergegeven. Memo • Het kan enkele momenten duren voor dit scherm wordt weergegeven. • Indien het niet automatisch opstart, dubbelklik op het pictogram "Setup.
Voor het afdrukken van labels 3 Lees de licentieovereenkomst zeer zorgvuldig. Indien u het eens bent met de voorwaarden en bepalingen van de licentieovereenkomst, klik op Ja om verder te gaan met de installatie. Het scherm met de klantgegevens wordt weergegeven. 4 Vul de informatie in die vereist is door de installer en klik vervolgens op Volgende. Er kunnen verschillende schermen volgen.
Voor het afdrukken van labels 6 Selecteer de programma's waarnaar u de invoegtoepassingen wilt installeren en klik op Volgende. Memo • Zorg ervoor dat u alle Microsoft® Office® toepassingen gesloten hebt voor u verdergaat. • Voor details betreffende het configureren van invoegtoepassingen, zie het helpbestand voor P-touch Editor 4.2. • Volg de instructies op het scherm om de installatie te voltooien. De software is nu geïnstalleerd.
Voor het afdrukken van labels 8 Sluit de USB-kabel aan op de USBpoort van de computer en schakel de printer in. Wanneer de computer de printer detecteert, wordt het stuurprogramma van de printer automatisch geïnstalleerd. Memo Indien uw toestel niet gedetecteerd is, zorg er dan voor dat de USB-kabel rechtstreeks op uw computer is aangesloten en niet via een USB hub. Nadat het stuurprogramma geïnstalleerd is, wordt het scherm Online gebruikersregistratie weergegeven. 9 Klik op Voltooien.
Labels creëren Labels creëren Dit deel verklaart hoe eenvoudige labels te creëren met behulp van P-touch Editor 4.2 U kunt meer gedetailleerde informatie vinden in P-touch Editor Help (zie "Help weergeven" op pagina 26). Memo • Om RFID-labels te maken, installeer de RFID-voorbeeldtoepassingen geleverd op de CD-ROM. • P-touch Editor kan geen gegevens schrijven naar SZ-tapes (RFID-capable).
Labels creëren Venster P-touch Editor Bewerken 1 2 3 4 5 6 1Menu De opdrachten worden gecategoriseerd in menu's zoals Bestand, Bewerken, Beeld en Invoegen afhankelijk van hun functies. 2Standaard Werkbalk Deze werkbalk omvat de menu-opdrachten die het vaakst gebruik worden zoals Nieuwe layout, Openen, Opslaan en Automatische opmaak. 3Werkbalk Eigenschappen De afdrukeigenschappen, paginaeigenschappen, tekstseigenschappen, lay-outeigenschappen en gegevensbankeigenschappen verschijnen in dit deel.
Labels creëren Help weergeven Zoek gedetailleerde informatie en instructies over hoe P-touch Editor te gebruiken. 1 In het venster P-touch Editor Bewerken klik op Help in de menubalk en vervolgens op P-touch Editor Help. Memo U kunt Help starten via de volgende stappen. • Klik op Start, Alle programma's, Brother P-touch en vervolgens P-touch Editor 4.2 Help. • Terwijl het venster P-touch Editor Bewerken op het scherm staat, druk op F1 op het toetsenbord. 2 P-touch Editor Help weergeven.
Labels creëren 3 P-touch Editor Help afdrukken. U kunt de inhoud van de Help afdrukken. 1 Selecteer onderwerpen op het tabblad "Inhoud" om af te drukken. 2 Klik op de werkbalk. Het dialoogvenster "Onderwerpen afdrukken" verschijnt. 3 Specificeer het bereik van af te drukken onderwerpen en klik op "OK". Het dialoogvenster "Afdrukken" verschijnt. 4 De gewenste printer selecteren en vervolgens "Afdrukken". De geselecteerde inhoud van Help wordt afgedrukt.
Labels creëren Verschillende types labels maken De stappen om de volgende types labels te maken worden uitgelegd in het deel "Hoe" (PT series) van de P-touch Editor Help.
RFID-labels gebruiken RFID-labels gebruiken Gegevens lezen en schrijven op RFID-labels De printer heeft een ingebouwde lezer/schrijver voor het lezen en schrijven van RFIDlabelgegevens. Om de lezer/schrijver van de printer te gebruiken, moet u eerst een ondersteuningstoepassing installeren. Installeer één van de inbegrepen voorbeeldtoepassingen voor gebruik. Zie pagina 30, RFID-labelapplicaties gebruiken.
RFID-labels gebruiken RFID-labelapplicaties gebruiken (voorbeeldapplicaties) Voor een introductie van het gebruik van RFID-labels, probeer één van de voorbeeldapplicaties van de CD-ROM te installeren en te gebruiken. Memo Deze programma's zijn voorbeeldapplicaties om printer RFID-functies te introduceren. Ze worden geleverd als een manier om veel gebruikte functies te proberen, maar het werkelijke gebruik wordt niet gegarandeerd.
RFID-labels gebruiken Bestand openen Een applicatie voor het tegelijk openen van meerdere bestanden (op voorhand geregistreerd) wanneer u het RFID-label nabij de lezer/schrijver van de printer houdt. Bijvoorbeeld, deze functie is nuttig wanneer verschillende mensen presentaties op één enkele computer geven.
RFID-labels gebruiken Ondersteuning voor applicatieontwikkeling De SDK (softwareontwikkelingskit) wordt geleverd zodat u applicaties kunt ontwikkelen die volledig voordeel halen uit de RFID-labelmakende capaciteit van uw RL-700S. RL-700S SDK wordt geleverd als een bibliotheek voor gebruik op Microsoft Windows® besturingssystemen. Deze SDK kan worden gebruikt met ontwikkelingstalen zoals Visual Studio .
Reinigen en onderhoud Reinigen en onderhoud Onderhoud Volg de instructies in dit deel om uw toestel werkende te houden met optimale doeltreffendheid. Stoffige omgevingen kunnen kortere tussenpozen tussen de reinigings- en onderhoudsprocedure vereisen. De buitenkant van het toestel reinigen Wrijf vuil en stof van het oppervlak (buitenkant) van de printer met een droge zachte doek. Gebruik een bevochtigde doek om hardnekkig vuil en vlekken te verwijderen.
Reinigen en onderhoud De printkop en koproller reinigen. Indien horizontale lijnen op de labels afgedrukt zijn of de afdrukken niet zeer duidelijk zijn, moeten mogelijk de printkop of de koproller worden gereinigd. Volg onderstaande stappen om de printkop en koproller te reinigen. 1 De printkop reinigen met de zelfreinigende functie. 1 2 3 4 Druk op de ontgrendelknop deksel om het deksel van de printer te openen. Verwijder de tapecassette. Sluit het deksel. Druk op de Doorvoer en Snijden knop.
Reinigen en onderhoud Accessoires Brother beveelt het gebruik aan van authentieke Brother accessoires (tapecassettes, AC adapter, enz.) met uw P-touch. Het gebruik van producten kan een invloed hebben op de afdrukkwaliteit of kan uw P-touch beschadigen. De beschikbaarheid van accessoires kan zonder kennisgeving worden gewijzigd. Tapecassettes Niet alle tapecassettes zijn beschikbaar in alle landen. Memo Gebruik geen tapes zonder het , , of merkteken.
Reinigen en onderhoud Stock nr.
Reinigen en onderhoud Stock nr.
Reinigen en onderhoud Stock nr.
Reinigen en onderhoud Stock nr. Beschrijving TZ-N531 Zwarte tekens op blauwe tape TZ-N631 Zwarte tekens op gele tape 9 mm TZ-N221 Zwarte tekens op witte tape 6 mm TZ-N211 Zwarte tekens op witte tape 3,5 mm TZ-N201 Zwarte tekens op witte tape Sterk klevende tapes (lengte: 8 m) Gelamineerde tapes die sterker kleven, ideaal voor ruwe oppervlakken of ruwe omgevingen. Stock nr.
Reinigen en onderhoud Stock nr. TZ-S611 Beschrijving Zwarte tekens op gele tape Flexibele ID-tapes (lengte: 8 m) Flexibele gelamineerde tapes ideaal voor het labelen van netwerkkabels, elektrische draden, enz. Stock nr.
Reinigen en onderhoud Weefseltape (lengte: 3 m) Deze weefsellabels kunnen op een ander weefsel worden bevestigd met behulp van een strijkijzer. Stock nr. Beschrijving 18 mm TZ-FA4B Blauwe tekens op witte tape 12 mm TZ-FA3 Blauwe tekens op witte tape Thermokopieerpapier-tape (lengte: 7 m) Stock nr. Beschrijving AL-K251 24 mm thermokopieerpapier-tape (zwarte tekens op witte tape) Reinigingscassette voor printkop Cassettetape voor het reinigen van de printkop van uw P-touch. Stock nr.
Reinigen en onderhoud Problemen oplossen Raadpleeg het onderstaande indien u problemen hebt om uw toestel te gebruiken. Probleem Oorzaken Oplossingen De kabels zijn niet goed De printer drukt niet af. Er treedt een schrijffout op. ingestoken. Controleer de kabels, tapecassette, De tapecassette is niet correct deksel of andere onderdelen van de in de printer geplaatst. printer. Het deksel is open. Er verschijnen strepen op de TZ, De tape is op. HG of AL-tapes.
Reinigen en onderhoud Uw toestel opslaan Zorg ervoor dat u de stekker van het toestel uit het stopcontact trekt als u het toestel gedurende een langere periode niet gaat gebruiken. Software verwijderen De stappen om de software te verwijderen hangen af van het besturingssysteem. Zie de documentatie voor uw besturingssysteem voor meer details. P-touch Editor 4.
Specificaties Specificaties Item Display Details LED-lampjes (blauw en rood) Afdrukmethode Thermische transfer laminering/thermisch afdrukken Printkop 360 dpi, 384 dots Resolutie TZ-, SZ- of AL-tape: 360 dpi HG-tape, hoge resolutiemodus: 360 x 720 dpi (in doorvoerrichting) Snelheid TZ-, SZ- of AL-tape: tot 20 mm/sec HG-tape, hoge snelheidsmodus: tot 40 mm/sec Maximum breedte 27,1 mm Afdrukken Interface USB (Ver. 2.
Specificaties Computersysteemvereisten Item Details Microsoft® ® Windows® Besturingssysteem 2000 Professional(SP4 of later)/ Windows XP / Windows Vista® * Zie de Microsoft® richtlijnen voor minimum hardwarevereisten voor elk besturingssysteem. * Internet Explorer® 5.01 is vereist om de RFIDvoorbeeldapplicaties te gebruiken. Interface USB poort (USB 1.
RL-700S RFID-Etikettendrucker Benutzerhandbuch ● Lesen Sie dieses Handbuch, bevor Sie den Drucker verwenden. ● Bewahren Sie dieses Handbuch zum späteren Nachschlagen griffbereit auf.
Einführung Schön, dass Sie den RL-700S gekauft haben. Der RL-700S (im Folgenden als "dieses Gerät" bezeichnet) ist ein RFID-Etikettendrucker, mit dem Sie leicht RFID-Etiketten erstellen und auf Brother SZ-Bänder gedruckte RFID-Etiketten lesen und beschreiben können. Dazu muss das Gerät an einen Computer angeschlossen sein. Es können mit dem Gerät auch TZ-, HG und AL-Bänder verwendet werden.
Bescheinigung des Herstellers/Importeurs Hersteller Brother Industries Ltd. 15-1, Naeshiro-cho, Mizuho-ku, Nagoya 467-8561, Japan Werk Zhuhai Brother Industries Co., Ltd. 254 Gangchang Road, Gongbei, Zhuhai City S.E.Z.
Inhaltsverzeichnis Einführung. . . . . . . . . . . . . . . . . . . . . . . . . . . . . . . . . . . . . . . . . . . . . . 2 Zu diesem Gerät ................................................................................................. 2 Zu diesem Handbuch.......................................................................................... 2 Warenzeichen ..................................................................................................... 2 Inhaltsverzeichnis . . . . . . . . . . . . .
RFID-Etiketten verwenden 29 Daten auf RFID-Etiketten lesen und schreiben. . . . . . . . . . . . . . . . . 29 RFID-Etikettenanwendungen verwenden (Beispielanwendungen). . 30 Überblick über die Beispielanwendungen ......................................................... 30 Unterstützung der Anwendungsentwicklung . . . . . . . . . . . . . . . . . . . 32 SOFTWARE-UPDATE ...................................................................................... 32 Wartung und Reinigung 33 Wartung. . . . . . .
Vor der Verwendung des Gerätes Vor der Verwendung des Gerätes Sicherheitsmaßnahmen Um Verletzungen oder Schäden zu vermeiden, sollten Sie die mit den folgenden Symbolen gekennzeichneten Warnungen und Sicherheitshinweise beachten. Warnung Beachten Sie diese Hinweise, um Verletzungsgefahr zu vermeiden. Vorsicht Beachten Sie diese Hinweise, um Schäden am Gerät oder seiner Umgebung zu vermeiden.
Vor der Verwendung des Gerätes Warnung Bandabschneider • Berühren Sie nicht die Klinge der Schneideeinheit, um Verletzungen zu vermeiden. Etiketten • Je nach Ort, Material oder den Umgebungsbedingungen, unter denen Sie das Etikett verwenden, kann das Etikett eventuell nur schwer entfernt werden. Auch kann sich die Farbe des Etiketts verändern oder auf andere Gegenstände abfärben.
Vor der Verwendung des Gerätes Allgemeine Vorsichtmaßnahmen Drucker Warnung Der Drucker wurde nicht für Anwendungen entwickelt oder hergestellt, die eine hohe Sicherheitsstufe erfordern, wie die Steuerungs- und Regelungstechnik für Kernreaktionen in Atomkraftwerken, Flugregler in Flugzeugen, die Flugsicherung, die Steuerung von Massentransportsystemen, Überlebenssysteme, die Raketenstartkontrolle von Verteidigungssystemen, oder andere Anwendungen, die eine direkte, signifikante Gefahr von Verletzungen, Tod
Vor der Verwendung des Gerätes SZ-Band (RFID-Band) • Mit SZ-Bändern können Etiketten von 53,5 mm bis 100 mm Länge hergestellt werden. Wenn Etiketten mit einer geringeren Länge als 100 mm gedruckt werden, transportiert das Gerät das Band dennoch genauso weit vor, wie für ein 100 mm langes Etikett. Dadurch wird das RFID-Tag richtig positioniert, so dass das nächste Etikett gedruckt werden kann.
Vor der Verwendung des Gerätes • Stellen Sie den Drucker nicht in den Lesebereich eines anderen RFID-Lese-/Schreibgerätes. Dadurch kann das Schreiben von Daten während des Druckens gestört werden. • Um eine Beschädigung der Etiketten zu vermeiden, sollten Sie die Bänder nicht zusammenpacken, keine Gegenstände darauf legen und sie nicht mit harten Gegenständen zerkratzen. Befestigen Sie die Etiketten nicht an Gegenständen, an denen sie starken Erschütterungen oder Stößen ausgesetzt sind.
Vor der Verwendung des Gerätes Verpackungsinhalt Vergewissern Sie sich, dass die Packung das unten gezeigten Zubehör enthält, bevor Sie das Gerät verwenden. Falls Teile fehlen oder beschädigt sein sollten, wenden Sie sich an Ihren Brother-Vertriebspartner, bei dem Sie das Gerät gekauft haben. RL-700S CD-ROM RFID-Etikettendrucker SZ-Bandkassette (RFID-Band) 24 mm schwarz auf weiß (RFID-Band) für bis zu 30 Etiketten.
Vor der Verwendung des Gerätes Beschreibung der Geräteteile Vorderseite Gehäusedeckel Taste zum Öffnen des Gehäusedeckels Fehlerlampe Bandausgabeschlitz EIN/AUS-Taste (leuchtend) RFID-Lese-/Schreibgerät Bandvorlauf- und Abschneidetaste Rückseite NetzadapterAnschluss USBAnschluss Beschreibung der Tasten Taste EIN/AUS-Taste ( Funktion Schaltet den Drucker ein oder aus.
Vor der Verwendung des Gerätes Lampenanzeigen Die EIN/AUS-Taste (blau) und die Fehlerlampe (rot) zeigen den aktuellen Betriebsstatus an. Lampenstatus EIN/AUSTaste (blau) Fehlerlampe ERROR (rot) Aus Aus • Das Gerät ist ausgeschaltet. Leuchtet Aus • Der Drucker arbeitet normal. Blinkt Aus • Der Drucker empfängt Daten vom Computer. Druckerstatus Leuchtet • Der Drucker empfängt Daten vom Computer, kann aber nicht drucken. Legen Sie eine Bandkassette ein und schließen Sie den Gehäusedeckel.
Vor dem Drucken von Etiketten Vor dem Drucken von Etiketten Gerät an die Stromversorgung anschließen 1 2 3 Schließen Sie das Netzkabel am Netzadapter an. Schließen Sie den Stecker des Netzadapters an die Netzanschlussbuchse an der Rückseite des Druckers an. Stecken Sie den Netzstecker des Netzadapters in die Netzsteckdose. Für Großbritannien Anmerkung Das Aussehen des Netzadapters und des Netzsteckers kann je nach Land, in dem das Gerät gekauft wurde, unterschiedlich sein.
Vor dem Drucken von Etiketten Bandkassette einlegen Verwendbare Bandkassetten SZ-Band (24 mm) Kassetten mit 24 mm breiten Bändern und dem SZ-Logo ( ). Sie können diese Bänder zum Erstellen von RFID-Etiketten verwenden. TZ-Band (3,5 - 36 mm) Kassetten mit 3,5 mm, 6 mm, 9 mm, 12 mm, 18 mm, 24 mm oder 36 mm breiten Bändern und dem TZ-Logo ( ). Ermöglichen das Drucken mit 20 mm/Sek. HG-Band (6 - 36 mm) Kassetten mit 6 mm, 9 mm, 12 mm, 18 mm, 24 mm oder 36 mm breiten Bändern und dem HG-Logo ( ).
Vor dem Drucken von Etiketten 2 Prüfen Sie die Bandkassette. Vergewissern Sie sich, dass das Bandende nicht gebogen ist und dass sich das Band in der Führung befindet. Um das Band zu straffen, drehen Sie das Transportrad mit dem Finger ein bis zwei Umdrehungen in Pfeilrichtung. 3 4 Drücken Sie am Drucker die Taste zum Öffnen des Gehäusedeckels. Legen Sie die Bandkassette in den Drucker ein. Anmerkung Achten Sie darauf, dass Sie die Bandkassette richtig herum einlegen.
Vor dem Drucken von Etiketten 5 Schließen Sie den Gehäusedeckel. 6 Drücken Sie die EIN/AUS-Taste. Die EIN/AUS-Taste leuchtet nun blau. Anmerkung EIN/AUSPower button Taste Wenn der Gehäusedeckel nicht richtig geschlossen ist oder die Bandkassette nicht richtig eingelegt ist, leuchtet die ERROR-Lampe auf. Legen Sie die Kassette richtig ein, wie ab Schritt 3 beschrieben. 7 BandvorlaufAbschneidetaste Feed and Cutund button Drücken Sie die Bandvorlauf- und Abschneidetaste.
Vor dem Drucken von Etiketten Software installieren Software-Übersicht Bevor Sie den Drucker an Ihren Computer anschließen, müssen Sie die Software (Anwendungssoftware und Druckertreiber) auf Ihrem Computer installieren. Die folgenden Anwendungen sind auf der CD-ROM enthalten. P-touch Editor 4.2 Komfortable Etikettendesign-Software zum Erstellen von Etiketten für eine Vielzahl von Anwendungen. Der P-touch Editor ist eine eigenständige Anwendung zum einfachen Gestalten von Etikettendesigns.
Vor dem Drucken von Etiketten Vorbereitungen für die Installation Systemanforderungen Vor der Installation sollten Sie sich vergewissern, dass Ihr Computer den folgenden Anforderungen entspricht und dass die erforderliche Software installiert ist. Funktion Beschreibung Microsoft® ® ® Betriebssystem Windows 2000 Professional (SP4 oder neuer), Windows XP oder Windows Vista® * Der Computer sollte den von Microsoft® für das jeweilige Betriebssystem empfohlenen Voraussetzungen entsprechen.
Vor dem Drucken von Etiketten Software installieren Die Installationsbildschirme wurden unter Windows® XP erstellt. Sie können von denen Ihrer Windows®-Version abweichen. 1 Starten Sie den Computer und legen Sie die CD-ROM in das CD-ROMLaufwerk ein. Wählen Sie die Sprache, die Sie installieren möchten, aus. Das Installationsprogramm des RL-700S wird gestartet und der Bildschirm "P-touch R Setup" erscheint. Anmerkung • Es kann einen kurzen Moment dauern, bis dieser Bildschirm angezeigt wird.
Vor dem Drucken von Etiketten 3 Lesen Sie die Lizenzvereinbarung sorgfältig durch. Wenn Sie mit den Vertragsbedingungen einverstanden sind, klicken Sie auf Ja, um die Installation fortzusetzen. Es erscheint nun das Dialogfeld zur Eingabe der Benutzerinformationen. 4 Tragen Sie die erforderlichen Informationen ein und klicken Sie auf Weiter. Es können nun weitere Bildschirme folgen.
Vor dem Drucken von Etiketten 6 Wählen Sie die Programme, für die Sie die Add-Ins installieren möchten, und klicken Sie auf Weiter. Anmerkung • Vergewissern Sie sich, dass alle Microsoft® Office®-Anwendungen geschlossen sind, bevor Sie fortfahren. • Weitere Informationen zur Konfiguration der Add-Ins finden Sie in der Hilfe des P-touch Editor 4.2. • Folgen Sie den Anweisungen auf dem Bildschirm, um die Installation abzuschließen. Die Software ist nun installiert.
Vor dem Drucken von Etiketten 8 Schließen Sie das USB-Kabel am USB-Anschluss des Computers an und schalten Sie den Drucker ein. Wenn der Computer den Drucker erkennt, wird der Druckertreiber automatisch installiert. Anmerkung Wenn Ihr Gerät nicht erkannt wird, vergewissern Sie sich, dass das USB-Kabel direkt am Computer und nicht an einem USB-Hub angeschlossen ist. Nachdem der Treiber installiert ist, wird der Bildschirm zur Anwender-Registrierung angezeigt. 9 Klicken Sie auf Fertig stellen.
Etiketten erstellen Etiketten erstellen In diesem Abschnitt wird beschrieben, wie Sie Etiketten mit dem P-touch Editor 4.2 erstellen können. Ausführlichere Informationen finden Sie in der P-touch Editor-Hilfe. (Siehe S. 26 "Hilfe aufrufen".) Anmerkung • Um RFID-Etiketten zu erstellen, installieren Sie die Beispielanwendungen von der mitgelieferten CD-ROM. • Mit dem P-touch Editor können keine Daten auf SZ-Bänder (RFID-Etiketten) gedruckt werden.
Etiketten erstellen P-touch Editor-Bearbeitungsfenster 1Menüleiste Enthält verschiedene Menüs, wie Datei, Bearbeiten, Ansicht, Einfügen usw., in denen Befehle thematisch zusammengefasst sind. 2Standard-Symbolleiste Enthält Symbole zur Verwendung häufig benutzter Befehle, wie Neues Layout, Öffnen, Speichern und AutoFormat. 3Eigenschaftenpalette Hier werden die Druckeigenschaften-, Seiteneigenschaften-, Texteigenschaften-, Layouteigenschaften- und Datenbankeigenschaften-Schaltflächen angezeigt.
Etiketten erstellen Hilfe aufrufen In der Hilfe finden Sie ausführliche Informationen zur Verwendung des P-touch Editors. 1 Klicken Sie im P-touch EditorBearbeitungsfenster auf Hilfe in der Menüleiste und dann auf P-touch Editor Hilfe. Anmerkung Sie können die Hilfe auch wie folgt aufrufen: • Klicken Sie auf Start, Alle Programme, Brother P-touch, P-touch Editor 4.2 Hilfe. • Wenn das P-touch Editor-Bearbeitungsfenster angezeigt wird, können Sie auch F1 auf Ihrer Tastatur drücken.
Etiketten erstellen 3 P-touch Editor Hilfe drucken Sie können die Hilfe auch ausdrucken. 1 Wählen Sie die zu druckenden Themen in der Registerkarte "Inhalt" aus. 2 Klicken Sie auf in der Symbolleiste. Das Dialogfeld [Themen drucken] wird nun angezeigt. 3 Wählen Sie den Themenbereich, der gedruckt werden soll, und klicken Sie dann auf "OK". Das Dialogfeld "Drucken" wird angezeigt. 4 Wählen Sie einen Drucker aus und klicken Sie auf "Drucken". Die ausgewählten Hilfethemen werden nun gedruckt.
Etiketten erstellen Verschiedene Etikettenarten erstellen Die Schritte zum Erstellen der folgenden Etiketten sind im Abschnitt "So geht´s" (PT-Serie) der P-touch Editor-Hilfe erklärt. Etikettenarten Beispiel Verwendete Funktionen Namenschild erstellen • Etikettengröße festlegen • Text im Etikett zentrieren • Text umrahmen Etiketten für CD-Hülle erstellen • Hintergrund-Design verwenden.
RFID-Etiketten verwenden RFID-Etiketten verwenden Daten auf RFID-Etiketten lesen und schreiben Der Drucker ist mit einem Lese-/Schreibgerät zum Lesen und Schreiben von RFID-Etikettendaten ausgestattet. Um das Lese-/Schreibgerät des Druckers zu verwenden, müssen Sie zuerst eine entsprechende Anwendung installieren. Installieren Sie eine der mitgelieferten Beispielanwendungen, bevor Sie die Lese-/Schreibfunktionen benutzen. Siehe S. 30 "RFIDEtikettenanwendungen verwenden (Beispielanwendungen)".
RFID-Etiketten verwenden RFID-Etikettenanwendungen verwenden (Beispielanwendungen) Zur Einführung in die Verwendung von RFID-Etiketten installieren und benutzen Sie am besten eine der Beispielanwendungen mit den dazugehörigen Anleitungen, die Sie auf der CD-ROM finden. Anmerkung Diese Anwendungen führen Sie anhand von Beispielen in die Verwendung der RFID-Funktionen des Druckers ein.
RFID-Etiketten verwenden Datei öffnen Eine Anwendung zum Öffnen mehrerer, zuvor registrierter Dateien auf einmal, wenn das RFID-Etikett in die Nähe des Lese-/Schreibgerätes Ihres Druckers gehalten wird. Dies ist zum Beispiel hilfreich, wenn verschiedene Personen Präsentationen auf einem Computer durchführen möchten.
RFID-Etiketten verwenden Unterstützung der Anwendungsentwicklung Das SDK (Software Development Kit) hilft Ihnen, Anwendungen zu entwickeln, die alle Vorteile der RFID-Funktionen Ihres RL-700R nutzen. RL-700S SDK ist als Library zur Verwendung unter Microsoft Windows® vorgesehen. Das SDK kann mit Entwicklersprachen wie Visual Studio .
Wartung und Reinigung Wartung und Reinigung Wartung Folgen Sie den Anweisungen in diesem Abschnitt, um den optimalen Betriebszustand des Gerätes zu erhalten. Wenn Sie das Gerät in staubiger Umgebung verwenden, kann dies eine häufigere Reinigung und Wartung notwendig machen. Gehäuse des Gerätes reinigen Wischen Sie Schmutz und Staub mit einem weichen trockenen Tuch vom Gehäuse des Gerätes (Außenseite) ab. Verwenden Sie ein angefeuchtetes Tuch, um hartnäckigen Schmutz und Flecken auf dem Gerät zu entfernen.
Wartung und Reinigung Druckkopf und die Druckkopfrollen reinigen Wenn horizontale Linien auf den gedruckten Etiketten erscheinen oder die Ausdrucke nicht klar und deutlich sind, müssen eventuell der Druckkopf und die Druckkopfrollen gereinigt werden. 1 Reinigen Sie den Druckkopf mit der Selbstreinigungsfunktion. 1 Drücken Sie am Drucker die Taste zum Öffnen des Gehäusedeckels. 2 Entfernen Sie die Bandkassette. 3 Schließen Sie den Gehäusedeckel. 4 Drücken Sie die Bandvorlauf- und Abschneidetaste.
Wartung und Reinigung Zubehör Verwenden Sie nur original Brother-Zubehör und Verbrauchsmaterialien (Bandkassetten, Netzadapter etc.). Die Verwendung von Zubehör und Verbrauchsmaterial, das nicht den Spezifikationen von Brother entspricht und/oder nicht von gleicher Qualität und Eignung wie das von Brother gelieferte oder freigegebene ist, kann zu Schäden am Gerät und zum Verlust von Garantie- und Gewährleistungsansprüchen führen.
Wartung und Reinigung Bestellnummer Beschreibung TZ-262 Rote Schrift auf weißem Band TZ-263 Blaue Schrift auf weißem Band TZ-364 Goldene Schrift auf schwarzem Band TZ-365 Weiße Schrift auf schwarzem Band TZ-461 Schwarze Schrift auf rotem Band TZ-561 Schwarze Schrift auf blauem Band TZ-661 Schwarze Schrift auf gelbem Band TZ-M961 Schwarze Schrift auf silbernem Band (matt) 24 mm TZ-151 Schwarze Schrift auf farblosem Band TZ-M51 Schwarze Schrift auf farblosem Band (matt) TZ-152 Rote Sch
Wartung und Reinigung Bestellnummer Beschreibung 18 mm TZ-141 Schwarze Schrift auf farblosem Band TZ-241 Schwarze Schrift auf weißem Band TZ-242 Rote Schrift auf weißem Band TZ-243 Blaue Schrift auf weißem Band TZ-344 Goldene Schrift auf schwarzem Band TZ-145 Weiße Schrift auf farblosem Band TZ-345 Weiße Schrift auf schwarzem Band TZ-441 Schwarze Schrift auf rotem Band TZ-541 Schwarze Schrift auf blauem Band TZ-641 Schwarze Schrift auf gelbem Band TZ-741 Schwarze Schrift auf grünem B
Wartung und Reinigung Bestellnummer Beschreibung 9 mm TZ-121 Schwarze Schrift auf farblosem Band TZ-122 Rote Schrift auf farblosem Band TZ-123 Blaue Schrift auf farblosem Band TZ-221 Schwarze Schrift auf weißem Band TZ-222 Rote Schrift auf weißem Band TZ-223 Blaue Schrift auf weißem Band TZ-324 Goldene Schrift auf schwarzem Band TZ-325 Weiße Schrift auf schwarzem Band TZ-421 Schwarze Schrift auf rotem Band TZ-521 Schwarze Schrift auf blauem Band TZ-621 Schwarze Schrift auf gelbem Ban
Wartung und Reinigung Bestellnummer Beschreibung 9 mm TZ-N221 Schwarze Schrift auf weißem Band 6 mm TZ-N211 Schwarze Schrift auf weißem Band 3,5 mm TZ-N201 Schwarze Schrift auf weißem Band Laminierte extra stark klebende Bänder (Länge: 8 m) Laminierte extra stark klebende Bänder, speziell geeignet für raue Oberflächen oder schlechte Witterungsbedingungen.
Wartung und Reinigung Laminierte Flexi-Tapes (Länge: 8 m) Laminierte Beschriftungen mit Brother P-touch sehen nicht nur gut aus, sondern sind auch geschützt für lange Haltbarkeit. Für die Flexi-Tape-Schriftbänder kommt speziell entwickeltes Material zum Einsatz, das sich unter anderem zum Umkleben/Umwickeln von dünnen Radien oder auch scharfen Kanten eignet. Flexi-Tape-Beschriftungen lassen sich aufgrund ihrer Bandeigenschaften vielseitig nutzen.
Wartung und Reinigung Aufbügelband (Länge: 3 m) Diese Gewebeetiketten können auf andere Textilien aufgebügelt werden. Bestellnummer Beschreibung 18 mm TZ-FA4B Blaue Schrift auf weißem Band 12 mm TZ-FA3 Blaue Schrift auf weißem Band Papierschriftband (Länge: 7 m) Bestellnummer AL-K251 Beschreibung 24 mm Papierschriftband (schwarze Schrift auf weißem Band) Druckkopf-Reinigungskassette Kassette zur Reinigung des P-touch-Druckkopfes.
Wartung und Reinigung Problemlösung Lesen Sie die folgenden Hinweise, falls einmal ein Problem bei der Verwendung des Gerätes auftreten sollte. Problem Mögliche Ursachen Lösungen Die Kabel sind nicht richtig angeschlossen. Das Gerät druckt nicht. Beim Schreiben tritt ein Fehler auf. Die Bandkassette ist nicht richtig in den Drucker eingelegt. Überprüfen Sie den Anschluss der Kabel, die Bandkassette, den Gehäusedeckel und andere Teile des Druckers. Der Gehäusedeckel ist geöffnet.
Wartung und Reinigung Lagern des Gerätes Falls Sie das Gerät für längere Zeit nicht benutzen möchten, sollten Sie das Gerät zu Ihrer Sicherheit vom Stromnetz trennen. Software entfernen Die Schritte zum Entfernen der Software sind je nach Betriebssystem unterschiedlich. Lesen Sie die Dokumentation zu Ihrem Betriebssystem, um ausführliche Anweisungen zu erhalten. P-touch Editor 4.
Technische Daten Technische Daten Funktion Anzeige Beschreibung LED-Anzeigen (blau und rot) Druckmethode Thermotransfer-Laminierung/Thermodruck Druckkopf 360 dpi / 384 Druckpunkte Auflösung TZ-, SZ- oder AL-Bänder: 360 dpi HG-Bänder, Modus für höhe Auflösung: 360 x 720 dpi (in Einzugsrichtung) Druckgeschwindigkeit TZ-, SZ- oder AL-Bänder: 20 mm/Sekunde HG-Band, Modus für hohe Geschwindgkeit: bis zu 40 mm/Sekunde Drucken Maximale Brei27,1 mm te Schnittstelle USB (Ver. 2.
Technische Daten Systemvoraussetzungen Funktion Beschreibung Microsoft® ® Windows® Betriebssystem 2000 Professional (SP4 oder neuer) / Windows XP / Windows Vista® * Siehe auch die Microsoft®-Richtlinien in Bezug auf die minimalen Hardware-Anforderungen für jedes Betriebssystem. * Zur Verwendung der Beispielanwendungen benötigen Sie den Internet Explorer® 5.01 oder höher. Schnittstelle USB-Anschluss (USB 1.
Printed in China LW2385001