
Use and Care Manual


LCD Operation
10
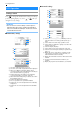
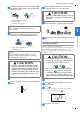
Settings screen
Press to change the default machine settings (needle stop
position, opening display, etc.). Press or , after you
changed necessary settings.
■ Embroidery settings
1 Select the embroidery frame to be used.
2 Select the center mark and grid lines that are displayed.
3 When set to [ON], the embroidery pattern can be
selected according to the embroidery frame size that you
have selected in number
1. (page 25)
4 Change the thread color display on the embroidery
screen; thread number, color name. (page 27)
5 When the thread number [#123] is selected, select from
thread brands. (page 27)
6 Change the display units (mm/inch).
7 Press to specify the size of pattern thumbnails.
8 Change the color of the background for the embroidery
display area.
9 Change the color of the background for the thumbnail
area.
■ General settings
0 Select the needle stop position (the needle position for
when the machine is not being operated) to be up or
down.
A Select whether to hear the beep operation sound.
B Select whether to display the opening screen when the
machine is turned on.
C Select the display language.
D Select whether to turn on the light for the work area.
E Select the level of the input sensitivity for operation keys.
(page 11)
F Display the service count which is a reminder to take
your machine in for regular servicing. (Contact your
authorized Brother dealer for details.)
G Display the total number of stitches embroidered on this
machine.
H The [No.] is the internal machine number for your
machine.
I Display the program version installed on your machine.
LCD Operation
Memo
• You can save the current settings screen image in a
USB flash drive by pressing when the USB flash
drive is inserted into the USB port. The files are saved in
a folder labeled “bPocket”.
3
1
2
4
5
6
7
8
9
0
A
B
C
D
E
F
G
I
H