
User's Manual
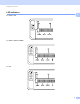
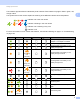


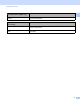
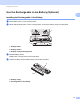
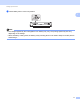
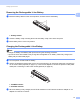
Table Of Contents
- Online User’s Guide PJ-722 PJ-723 PJ-762 PJ-763 PJ-763MFi PJ-773
- Introduction
- IMPORTANT NOTE
- Table of Contents
- Basic Operations
- 1 Setting Up the Printer
- 2 Using the Printer
- Printing from a Windows® PC or Mac
- Printing with the Printer Driver
- Setting Printer Driver Options
- Settings That Can Be Changed Using the Windows® Printer Driver (Examples)
- Settings That Can Be Changed Using the Mac Printer Driver (Examples)
- Printing with Google Cloud Print™ (PJ-773 Only)
- Printing with AirPrint (Only When Using PJ-773 with a Mac)
- Printing from an iOS Device
- Printing from an Android™ Device
- Printing from a Windows® PC or Mac
- 3 Changing the Printer Settings
- Printer Setting Tool (for Windows® PCs)
- Using the Printer Setting Tool (for Windows® PCs)
- Communication Settings (PJ-762/PJ-763/PJ-763MFi/PJ-773 Only)
- Device Settings
- P-touch Template Settings
- Printer Setting Tool (for Mac Computers)
- Using the Printer Setting Tool (for Mac Computers)
- Changing Settings When Printing from a Mobile Device
- Confirm the Printer Settings
- 4 Other Functions
- 5 Printer Maintenance
- Application
- 6 How to Use P-touch Editor (Windows® Only)
- 7 How to Use P-touch Transfer Manager & P-touch Library (Windows® Only)
- 8 Transferring Templates with P-touch Transfer Express (Windows® Only)
- 9 How to Update Printer Software Using Windows® and Mac Computers
- Wireless Network (PJ-773 Only)
- Appendix
- brother US ENG

Setting Up the Printer
8
1
Button Functions 1
(Power) button function
Operation
Turn the printer on Press and hold the button for about one second until the POWER indicator
turns on.
Turn the printer off Press and hold the button for about one second or press it quickly two times
depending on the setting specified in the Printer Setting Tool (see Changing the
Printer Settings on page 45). (If the [Auto Power Off] feature is enabled in the
Printer Setting Tool, the printer will turn itself off automatically after the selected
period of inactivity.)
Start up the printer in Mass Storage
Mode
If you press and hold the button while also pressing the (Feed) button, the
printer starts up in mass storage mode (see Mass Storage Mode on page 92).
(Feed) button function Operation
Feed paper Load the paper and press the button to feed the paper.
If you continue to hold down the button after about 1/2 inch (12.7 mm) of paper
has been fed, about one page length of paper is fed at high speed. The amount
of paper fed is determined by the [Form Feed Mode] setting in the Printer
Setting Tool (see Changing the Printer Settings on page 45).
To ensure that printing is complete, wait five seconds after the printer has
received the data before using a form feed.
Print the printer settings (see Confirm
the Printer Settings on page 91)
To print the printer settings without connecting the printer to a computer or
mobile device:
1 Turn the printer on and make sure no paper is loaded.
2 Press and hold the button until the DATA indicator lights in red.
3 Load paper.