
User's Manual
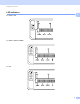


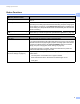
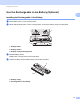
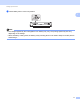
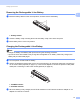
Table Of Contents
- Online User’s Guide PJ-722 PJ-723 PJ-762 PJ-763 PJ-763MFi PJ-773
- Introduction
- IMPORTANT NOTE
- Table of Contents
- Basic Operations
- 1 Setting Up the Printer
- 2 Using the Printer
- Printing from a Windows® PC or Mac
- Printing with the Printer Driver
- Setting Printer Driver Options
- Settings That Can Be Changed Using the Windows® Printer Driver (Examples)
- Settings That Can Be Changed Using the Mac Printer Driver (Examples)
- Printing with Google Cloud Print™ (PJ-773 Only)
- Printing with AirPrint (Only When Using PJ-773 with a Mac)
- Printing from an iOS Device
- Printing from an Android™ Device
- Printing from a Windows® PC or Mac
- 3 Changing the Printer Settings
- Printer Setting Tool (for Windows® PCs)
- Using the Printer Setting Tool (for Windows® PCs)
- Communication Settings (PJ-762/PJ-763/PJ-763MFi/PJ-773 Only)
- Device Settings
- P-touch Template Settings
- Printer Setting Tool (for Mac Computers)
- Using the Printer Setting Tool (for Mac Computers)
- Changing Settings When Printing from a Mobile Device
- Confirm the Printer Settings
- 4 Other Functions
- 5 Printer Maintenance
- Application
- 6 How to Use P-touch Editor (Windows® Only)
- 7 How to Use P-touch Transfer Manager & P-touch Library (Windows® Only)
- 8 Transferring Templates with P-touch Transfer Express (Windows® Only)
- 9 How to Update Printer Software Using Windows® and Mac Computers
- Wireless Network (PJ-773 Only)
- Appendix
- brother US ENG

Setting Up the Printer
12
1
Removing the Rechargeable Li-ion Battery 1
a Move the battery latches to the unlock position, and then remove the battery.
1 Battery latches
b Insert the battery cavity mounting block into the battery cavity until it locks into place.
c Move battery latch 1 to the lock position.
Charging the Rechargeable Li-ion Battery 1
Note
• Charge the battery immediately after purchase using the following procedure.
• Up to three hours are needed to fully charge the rechargeable Li-ion battery. When fully charged, the
battery will print about 600 pages.
a Turn the printer off and install the battery.
b Use the AC adapter and AC power cord to connect the printer to an AC power outlet (see Connecting to
an AC Power Outlet (Optional) on page 14), or use the car adapter to connect the printer to a DC power
outlet (see Connecting to a DC Power Outlet (Optional) on page 15).
1 POWER indicator
2 STATUS indicator
c When the battery is fully charged, the STATUS indicator turns off. Disconnect the AC adapter or car
adapter from the DC connector.
1
1
2