
Quick Setup Guide


3
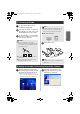
3
Read the Software License Agreement,
and then click [Yes] if you agree.
4
Select “Installs this unit and the utility.”,
and then click [Next].
• When setting up the second or more
computer (client computers), select
“Installs the utility.”, click [Next], and
then continue with step 8.
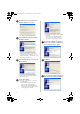
5
Select PS-9000, which is to be set up, and
then click [Next].
• If the product is not displayed in the
list, click [Search].
6
Specify the IP address.
• If “Assign an IP address” is selected
(recommended)
→In the following dialog box that
appears, type in the IP address,
subnet mask and default gateway.
Consult your network administrator
for the appropriate settings.
• If “Obtain an IP address automatically”
is selected
→In an environment with a DHCP/
BOOTP server, the IP address of
PS-9000 is automatically assigned.
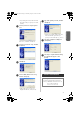
7
The selected configuration is displayed
for you to check it. If the configuration is
correct, click [Execute] to apply it.
8
Click [Next].
9
Specify the group name that will appear
in the Start menu, and then click [Next].
PS9000_setup.book Page 3 Thursday, August 17, 2006 12:56 PM