
Owner's Manual


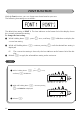


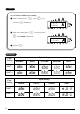
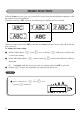
Table Of Contents
- PT_1900_US_.pdf
- CONTENTS
- Getting Started
- For Your Information
- POWER KEY
- CURSOR KEYS
- CODE, ALT & SHIFT KEYS
- SPACE KEY
- RETURN KEY
- TAB FUNCTION
- DELETE KEY
- LINE OUT FUNCTION
- CLEAR FUNCTION
- ACCENT FUNCTION
- SYMBOL FUNCTION
- AUTO FORMAT FUNCTION
- STAMP FUNCTION
- FONT FUNCTION
- SIZE & WIDTH FUNCTIONS
- STYLE FUNCTION
- UNDERLINE FUNCTION
- FRAME FUNCTION
- TAPE MARGIN FUNCTION
- HORIZONTAL ALIGNMENT FUNCTION
- MIRROR PRINTING FUNCTION
- LENGTH FUNCTION
- AUTO CUT FUNCTION
- PRINT KEY
- FEED & CUT FUNCTION
- NUMBERING FUNCTION
- REPEAT PRINTING FUNCTION
- MEMORY FUNCTIONS
- TROUBLESHOOTING
- ERROR MESSAGE LIST
- SPECIFICATIONS
- ACCESSORIES
- INDEX
- BROTHER CONTACT INFORMATION
- PT_1900_ES_.pdf
- INTRODUCCIÓN
- ÍNDICE
- CUIDADOS Y PRECAUCIONES GENERALES
- PILAS
- ADAPTADOR DE CA OPCIONAL
- CASETES DE CINTA
- COLOCACIÓN DE ETIQUETAS
- CABEZA DE IMPRESIÓN Y RODILLOS
- TECLA DEL CURSOR
- TECLAS CODE, ALT Y SHIFT
- TECLA DE RETORNO
- TABULACIÓN
- TECLA DE BORRADO (DEL)
- FUNCIÓN DE BORRADO DE LÍNEA (LINE OUT)
- FUNCIÓN DE REPOSICIÓN (CLEAR)
- FUNCIÓN DE ACENTOS
- FUNCIÓN DE SÍMBOLOS
- FUNCIÓN DE FORMATO AUTOMÁTICO
- FUNCIÓN DE SELLOS
- FUNCIÓN DEL TIPO DE CARACTERES
- FUNCIONES DE TAMAÑO Y DE ANCHURA
- FUNCIÓN DE ESTILO
- FUNCIÓN DE SUBRAYADO
- FUNCIÓN DE MARCOS
- FUNCIÓN DE CINTA
- FUNCIÓN DE LA ALINEACIÓN HORIZONTAL
- FUNCIÓN DE IMPRESIÓN EN MODO ESPEJO
- FUNCIÓN DE LONGITUD
- FUNCIÓN DE CORTE AUTOMÁTICO
- TECLA DE IMPRESIÓN
- FUNCIÓN DE AVANCE Y CORTE
- FUNCIÓN DE NUMERACIÓN
- FUNCIÓN DE IMPRESIÓN REPETIDA
- FUNCIONES DE LA MEMORIA
- SOLUCIÓN DE PROBLEMAS
- LISTA DE MENSAJES DE ERROR
- ESPECIFICACIONES
- ACCESORIOS
- ÍNDICE ALFABÉTICO
- INFORMACIÓN PARA CONTACTAR CON BROTHER

24
3 Press r. The text is automatically formatted for the installed stamp: centered within
the preset message area with the tape length and margins automatically adjusted.
4 Press p to cut the text out of the stamp stencil film.
5 After the stamp stencil film is cut off, remove the backing paper from the stamp stencil
film and affix it to the ink pad of a stamp film holder.
EXAMPLE
To cut a stamp:
1
Enter the text and insert a stamp film cassette in the tape compartment.
2 Hold down c and press U.
3 Press r.
4 Press p to engrave the stamp stencil film, and
then automatically cut it off.
To affix a stamp:
5
Remove the stamp frame from around the stamp
film holder ink pad, one side at a time, and then
remove the protective seal covering the ink pad
and the backing paper from the stamp stencil film.
6 With the glossy side of the stamp stencil film
upward, align one of its ends with the slit on the
side of the stamp film holder.
FORMAT?
STAMP
2:
1234 Main
1:
J Smith
1/ 1
COPIES
Tape end
Glossy side
Slit