
Owner's manual
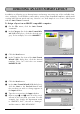
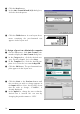

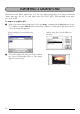

Table Of Contents
- INTRODUCTION
- CONTENTS
- Getting Started
- Learning the Ropes
- For Your Information
- POWER KEY
- CURSOR KEYS
- CODE, ALT & SHIFT KEYS
- SPACE KEY
- RETURN KEY
- NEW BLOCK FUNCTION
- TAB FUNCTION
- DELETE KEY
- LINE OUT FUNCTION
- CLEAR FUNCTION
- ACCENT FUNCTION
- SYMBOL FUNCTION
- AUTO FORMAT FUNCTION
- STAMP FUNCTION
- LOCAL FORMAT FUNCTION
- FONT FUNCTION
- SIZE & WIDTH FUNCTIONS
- STYLE FUNCTION
- UNDERLINE FUNCTION
- FRAME FUNCTION
- TAPE MARGIN FUNCTION
- HORIZONTAL ALIGNMENT FUNCTION
- MIRROR PRINTING FUNCTION
- LENGTH FUNCTION
- BARCODE FUNCTION
- AUTO CUT FUNCTION
- PRINT KEY AND FEED & CUT FUNCTION
- NUMBERING FUNCTION
- REPEAT PRINTING FUNCTION
- MEMORY FUNCTIONS
- TROUBLESHOOTING
- ERROR MESSAGE LIST
- SPECIFICATIONS
- ACCESSORIES
- Spanish
- INTRODUCCIÓN
- ÍNDICES
- PRECAUCIONES GENERALES
- PILAS
- ADAPTADOR DE CA OPCIONAL
- CONEXIÓN DE LA P-TOUCH A UNA PC
- INSTALACIÓN DEL P-TOUCH EDITOR
- UTILIZACIÓN DEL-P-TOUCH EDITOR
- DISEÑO DE UNA COMPOSICIÓN DE FORMATO AUTOMÁTICO
- IMPORTACIÓN DE UN ARCHIVO DE GRÁFICOS
- LECTURA DE LA GUÍA DE USUARIO
- CASETES DE CINTA
- COLOCACIÓN DE ETIQUETAS
- CABEZAL DE IMPRESIÓN Y RODILLOS
- TECLA DEL CURSOR
- TECLAS CODE, ALT Y SHIFT
- TECLA DE RETORNO
- FUNCIÓN DE NUEVO BLOQUE
- TABULACIÓN
- TECLA DE BORRADO (DEL)
- FUNCIÓN DE BORRADO DE LÍNEA (LINE OUT)
- FUNCIÓN DE REPOSICIÓN (CLEAR)
- FUNCIÓN DE ACENTOS
- FUNCIÓN DE SÍMBOLOS
- FUNCIÓN DE FORMATO AUTOMÁTICO
- FUNCIÓN DE CREACION DE SELLOS
- FUNCIÓN DE FORMATO LOCAL
- FUNCIÓN DEL TIPO DE CARACTERES
- FUNCIONES DE TAMAÑO Y DE ANCHURA
- FUNCIÓN DE ESTILO
- FUNCIÓN DE SUBRAYADO
- FUNCIÓN DE MARCOS
- FUNCIÓN DE MARGENES
- FUNCIÓN DE LA ALINEACIÓN HORIZONTAL
- FUNCIÓN DE IMPRESIÓN EN MODO ESPEJO
- FUNCIÓN DE LONGITUD
- FUNCIÓN DE CÓDIGO DE BARRAS
- FUNCIÓN DE CORTE AUTOMÁTICO
- TECLA DE IMPRESIÓN & FUNCIÓN DE AVANCE Y CORTE
- FUNCIÓN DE NUMERACIÓN
- FUNCIÓN DE IMPRESIÓN REPETIDA
- FUNCIONES DE LA MEMORIA
- SOLUCIÓN DE PROBLEMAS
- LISTA DE MENSAJES DE ERROR
- ESPECIFICACIONES
- ACCESORIOS

18
9 Click the Next button.
0 In the Auto Format Wizard (4/4) dialog box,
click the desired options.
A Click the Finish button. A new layout docu-
ment containing the pre-formatted text
appears in the layout area.
To design a layout on a Macintosh computer:
1 On the File menu, click Auto Format com-
mand to display the Auto Format dialog box.
2 In the Category box, click the desired cate-
gory. For this example, let’s select shop.
3 In the Template box, click the desired tem-
plate. Let’s select the one named shop3.lbl.
4 Click the OK button. The pre-formatted tem-
plate appears in the layout area.
5 Click the Next or the Previous button until
the text that you wish to change appears in
the Input edit box. Here, the first line of text
that we wish to change, “CAMERA”, is
already displayed.
6 In the Input box, change the text so that the
desired text is entered. We can start by
changing the product name to “VCR”.