
Owner's manual

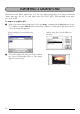

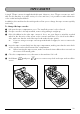
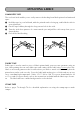
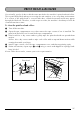

Table Of Contents
- INTRODUCTION
- CONTENTS
- Getting Started
- Learning the Ropes
- For Your Information
- POWER KEY
- CURSOR KEYS
- CODE, ALT & SHIFT KEYS
- SPACE KEY
- RETURN KEY
- NEW BLOCK FUNCTION
- TAB FUNCTION
- DELETE KEY
- LINE OUT FUNCTION
- CLEAR FUNCTION
- ACCENT FUNCTION
- SYMBOL FUNCTION
- AUTO FORMAT FUNCTION
- STAMP FUNCTION
- LOCAL FORMAT FUNCTION
- FONT FUNCTION
- SIZE & WIDTH FUNCTIONS
- STYLE FUNCTION
- UNDERLINE FUNCTION
- FRAME FUNCTION
- TAPE MARGIN FUNCTION
- HORIZONTAL ALIGNMENT FUNCTION
- MIRROR PRINTING FUNCTION
- LENGTH FUNCTION
- BARCODE FUNCTION
- AUTO CUT FUNCTION
- PRINT KEY AND FEED & CUT FUNCTION
- NUMBERING FUNCTION
- REPEAT PRINTING FUNCTION
- MEMORY FUNCTIONS
- TROUBLESHOOTING
- ERROR MESSAGE LIST
- SPECIFICATIONS
- ACCESSORIES
- Spanish
- INTRODUCCIÓN
- ÍNDICES
- PRECAUCIONES GENERALES
- PILAS
- ADAPTADOR DE CA OPCIONAL
- CONEXIÓN DE LA P-TOUCH A UNA PC
- INSTALACIÓN DEL P-TOUCH EDITOR
- UTILIZACIÓN DEL-P-TOUCH EDITOR
- DISEÑO DE UNA COMPOSICIÓN DE FORMATO AUTOMÁTICO
- IMPORTACIÓN DE UN ARCHIVO DE GRÁFICOS
- LECTURA DE LA GUÍA DE USUARIO
- CASETES DE CINTA
- COLOCACIÓN DE ETIQUETAS
- CABEZAL DE IMPRESIÓN Y RODILLOS
- TECLA DEL CURSOR
- TECLAS CODE, ALT Y SHIFT
- TECLA DE RETORNO
- FUNCIÓN DE NUEVO BLOQUE
- TABULACIÓN
- TECLA DE BORRADO (DEL)
- FUNCIÓN DE BORRADO DE LÍNEA (LINE OUT)
- FUNCIÓN DE REPOSICIÓN (CLEAR)
- FUNCIÓN DE ACENTOS
- FUNCIÓN DE SÍMBOLOS
- FUNCIÓN DE FORMATO AUTOMÁTICO
- FUNCIÓN DE CREACION DE SELLOS
- FUNCIÓN DE FORMATO LOCAL
- FUNCIÓN DEL TIPO DE CARACTERES
- FUNCIONES DE TAMAÑO Y DE ANCHURA
- FUNCIÓN DE ESTILO
- FUNCIÓN DE SUBRAYADO
- FUNCIÓN DE MARCOS
- FUNCIÓN DE MARGENES
- FUNCIÓN DE LA ALINEACIÓN HORIZONTAL
- FUNCIÓN DE IMPRESIÓN EN MODO ESPEJO
- FUNCIÓN DE LONGITUD
- FUNCIÓN DE CÓDIGO DE BARRAS
- FUNCIÓN DE CORTE AUTOMÁTICO
- TECLA DE IMPRESIÓN & FUNCIÓN DE AVANCE Y CORTE
- FUNCIÓN DE NUMERACIÓN
- FUNCIÓN DE IMPRESIÓN REPETIDA
- FUNCIONES DE LA MEMORIA
- SOLUCIÓN DE PROBLEMAS
- LISTA DE MENSAJES DE ERROR
- ESPECIFICACIONES
- ACCESORIOS

23
TAPE CASSETTE
A single TZ tape cassette is supplied with this unit. However, since TZ tape cassettes are avail-
able for this machine in a wide variety of colors and sizes, it is possible to make distinctive
color-coded and stylized labels.
In addition, this machine has been designed to allow you to change the tape cassettes quickly
and easily.
To change the tape cassette:
1 Lift open the tape compartment cover. The installed cassette is also released.
2 If a tape cassette is already installed, remove it by pulling it straight up.
3 If the ink ribbon in the other tape cassette is loose, use your finger to wind the toothed
wheel in the direction of the arrow on the cassette until there is no slack in the ribbon.
Also, make sure that the end of the tape feeds under the tape guides.
☞
If you are using a new tape cassette provided with a stopper, be sure to remove the
stopper.
4 Insert the tape cassette firmly into the tape compartment, making sure that the entire back
of the cassette touches the bottom of the compartment.
☞
When inserting the tape cassette, make sure that the inner ribbon does not catch on
the corner of the metal guide.
5 Close the compartment cover, then turn on the machine if it is off.
6 Hold down and press once to remove any slack in the tape and cut off the
excess.
CodeCode
Space
Feed&Cut
Space