
Software User's Guide

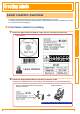
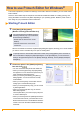
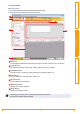
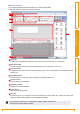
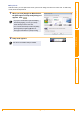
Table Of Contents
- Contents
- Introduction
- Creating Labels
- Label creation overview
- How to use P-touch Editor for Windows®
- How to use the P-touch Address Book (Windows® only)
- How to use P-touch Transfer Manager (QL-650TD / 580N / 1050 / 1060N / 720NW only) (Windows® only)
- How to use the P-touch Library (Windows® only)
- Transferring label templates with P-touch Transfer Express (QL-720NW only) (Windows® only)
- How to use P-touch Editor Lite (QL-700 only) (Windows® only)
- How to use P-touch Editor Lite LAN (QL-710W / 720NW only) (Windows® only)
- Using the P-touch Update Software
- Printing labels using P-touch templates (QL-580N / 720NW / 1050 / 1060N only)
- Printing labels distributed to multiple printers (QL-710W / 720NW only) (Windows® only)
- How to use P-touch Editor for Macintosh
- Appendix

Starting P-touch Editor
9
IntroductionCreating LabelsAppendix
Snap Mode
With this mode, you can capture the screen, print it as an image, and save it for future use. To start Snap
mode, follow the steps below.
1 When you click [Snap] from Mode Switch,
the [Description of Snap mode] dialog box
appears. Click .
2 Snap mode appears.
• If you put a checkmark in [Do Not Display
This Dialog Again], you can go to Snap
mode directly from the next time.
• You can also start Snap mode from [Start]-
[All Programs (Programs)]-[Brother P-
touch]-[P-touch Editor 5.0 (Snap mode)].
See the P-touch Editor Help for details.