
Software User's Guide
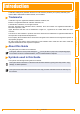
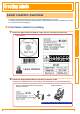
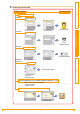
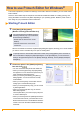
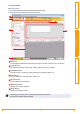
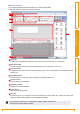
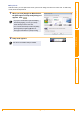
Table Of Contents
- Contents
- Introduction
- Creating Labels
- Label creation overview
- How to use P-touch Editor for Windows®
- How to use the P-touch Address Book (Windows® only)
- How to use P-touch Transfer Manager (QL-650TD / 580N / 1050 / 1060N / 720NW only) (Windows® only)
- How to use the P-touch Library (Windows® only)
- Transferring label templates with P-touch Transfer Express (QL-720NW only) (Windows® only)
- How to use P-touch Editor Lite (QL-700 only) (Windows® only)
- How to use P-touch Editor Lite LAN (QL-710W / 720NW only) (Windows® only)
- Using the P-touch Update Software
- Printing labels using P-touch templates (QL-580N / 720NW / 1050 / 1060N only)
- Printing labels distributed to multiple printers (QL-710W / 720NW only) (Windows® only)
- How to use P-touch Editor for Macintosh
- Appendix

Starting P-touch Editor
7
IntroductionCreating LabelsAppendix
Layout window
Express Mode
This mode provides easy label creation with texts and images.
The layout window consists of the following sections:
Menu bar
Commands are categorized under each menu (File, Edit, View, and Insert, etc.) by function.
Command bar
Contains the New/Open, Paper, Text, Frame, Image, and other commands.
Draw/Edit toolbar
Provides tools for choosing an object, entering text, drawing graphics, etc.
Property bar
You can easily insert and format text, images, etc.
Layout window
Used to display and edit objects.
Database window
Displays a connected database.
Mode Switch
Switches the Editor's modes.
• The [View] menu allows you to show/hide the toolbars and windows.
• See the P-touch Editor Help for details.
5
2
1
4
3
6
7
1
2
3
4
5
6
7